Complete Owner's Guide (English)
Page 1
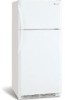
... we can't resolve your service issue, we'll schedule a reputable local service technician for you! √ Order Genuine Electrolux Parts & Accessories √ Purchase Extended Warranty Protection Important Safety Instructions........... 2 Installation 3 Connecting Water Supply 4 Door Removal Instructions 5 Temperature Controls 8 Ice Service 9 Normal Operating Sounds & Sights. 10 Care and Cleaning 10 Warranty 12 Before you Call 13 READ AND SAVE THESE INSTRUCTIONS P/N 241857202 (May 2010) Need Parts or Service? Use & Care Manual Top Mount Refrigerator Got Questions?
... we can't resolve your service issue, we'll schedule a reputable local service technician for you! √ Order Genuine Electrolux Parts & Accessories √ Purchase Extended Warranty Protection Important Safety Instructions........... 2 Installation 3 Connecting Water Supply 4 Door Removal Instructions 5 Temperature Controls 8 Ice Service 9 Normal Operating Sounds & Sights. 10 Care and Cleaning 10 Warranty 12 Before you Call 13 READ AND SAVE THESE INSTRUCTIONS P/N 241857202 (May 2010) Need Parts or Service? Use & Care Manual Top Mount Refrigerator Got Questions?
Complete Owner's Guide (English)
Page 2
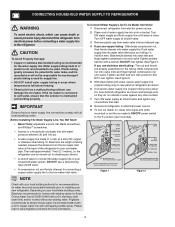
... Read All Instructions Before Using This Refrigerator. IMPORTANT follow this or any risk. • Never unplug the refrigerator by a wall switch or pull cord to your old refrigerator/freezer: • Remove doors. • Leave shelves in death or serious injury. Avoid connecting refrigerator to the light bulb and other appliances or furniture. Always grip the plug firmly, and pull straight out from the electrical outlet. Shelves may...
... Read All Instructions Before Using This Refrigerator. IMPORTANT follow this or any risk. • Never unplug the refrigerator by a wall switch or pull cord to your old refrigerator/freezer: • Remove doors. • Leave shelves in death or serious injury. Avoid connecting refrigerator to the light bulb and other appliances or furniture. Always grip the plug firmly, and pull straight out from the electrical outlet. Shelves may...
Complete Owner's Guide (English)
Page 3
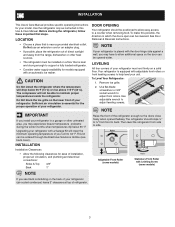
... models equipped with an automatic ice maker. To make this Use & Care Manual. Your refrigerator is equipped with a Garage Kit will lower the minimum operating temperature of direct sunlight and away from the range, dishwasher or other unheated area, you install your refrigerator with adjustable front rollers or front leveling screws to back. NOTE Raise the front of installation, proper air circulation, and plumbing and electrical connections: Sides & Top 3/8" Back 1" door opening...
... models equipped with an automatic ice maker. To make this Use & Care Manual. Your refrigerator is equipped with a Garage Kit will lower the minimum operating temperature of direct sunlight and away from the range, dishwasher or other unheated area, you install your refrigerator with adjustable front rollers or front leveling screws to back. NOTE Raise the front of installation, proper air circulation, and plumbing and electrical connections: Sides & Top 3/8" Back 1" door opening...
Complete Owner's Guide (English)
Page 4
... cold water pipe. copper water line with a wrench; Please refer to rear panel of water supply line into sink or bucket. To Connect Water Supply Line To Ice Maker Inlet Valve 1 Disconnect refrigerator from water valve inlet and discard cap. 4 If you use copper tubing - Turn OFF water supply at the back of tubing needed, measure the distance from the ice maker inlet valve at shutoff valve. 3 Remove plastic cap from electric power source. 2 Place end of refrigerator as shown. 6 Coil excess water supply line (copper tubing...
... cold water pipe. copper water line with a wrench; Please refer to rear panel of water supply line into sink or bucket. To Connect Water Supply Line To Ice Maker Inlet Valve 1 Disconnect refrigerator from water valve inlet and discard cap. 4 If you use copper tubing - Turn OFF water supply at the back of tubing needed, measure the distance from the ice maker inlet valve at shutoff valve. 3 Remove plastic cap from electric power source. 2 Place end of refrigerator as shown. 6 Coil excess water supply line (copper tubing...
Complete Owner's Guide (English)
Page 5
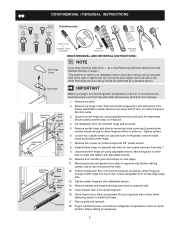
...top hinge cover. Lift refrigerator door off center hinge pin. Remove center hinge and shim by removing inside screw and install center hinge. 7. Close refrigerator door to the Removing Stainless Steel Doors and Handles Section on opposite side of bottom hinge and set aside. 5. Lower freezer door onto center hinge pin. 16. The direction in which your refrigerator doors open (door swing) can be performed by moving the door hinges from door shelves. 1. This makes reinstallation easier. Move hinge pin to install top hinge. 17. Close freezer door. Remove top hinge...
...top hinge cover. Lift refrigerator door off center hinge pin. Remove center hinge and shim by removing inside screw and install center hinge. 7. Close refrigerator door to the Removing Stainless Steel Doors and Handles Section on opposite side of bottom hinge and set aside. 5. Lower freezer door onto center hinge pin. 16. The direction in which your refrigerator doors open (door swing) can be performed by moving the door hinges from door shelves. 1. This makes reinstallation easier. Move hinge pin to install top hinge. 17. Close freezer door. Remove top hinge...
Complete Owner's Guide (English)
Page 6
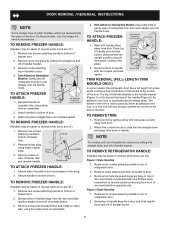
... and off .) 1. Remove screw attaching bottom of handle to bottom of freezer door. 2. Remove two screws attaching handle to door. 3. Secure side of handle to top of refrigerator door. 2. Self-Adhesive Nameplate Models: Use putty knife to reverse while doors are off of dovetail button. 6 Remove two screws attaching handle to door and replace button plug. 2. Swing top of handle away from door and reapply over old handle holes. On these models, only the hinges will need to be...
... and off .) 1. Remove screw attaching bottom of handle to bottom of freezer door. 2. Remove two screws attaching handle to door. 3. Secure side of handle to top of refrigerator door. 2. Self-Adhesive Nameplate Models: Use putty knife to reverse while doors are off of dovetail button. 6 Remove two screws attaching handle to door and replace button plug. 2. Swing top of handle away from door and reapply over old handle holes. On these models, only the hinges will need to be...
Complete Owner's Guide (English)
Page 7
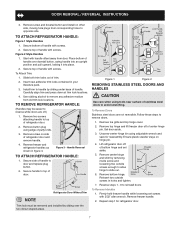
... hinge bin using tools near surface of handle to avoid scratching. Remove freezer handle. 2. Repeat step 1 for reassembly. Secure bottom of handle with screws. 2. Secure top of handle with screws. Handle Reversal To attach Refrigerator Handle: 1. Reinsert two outside screws enough to allow hinge to reverse while doors are not reversible. To attach refrigerator handle: Figure 1 Style Handles 1. Secure side of stainless steel doors to door and replace plug button. 2. Figure 1 Figure 2 Removing Stainless steel Doors and handles CAUTION Use care...
... hinge bin using tools near surface of handle to avoid scratching. Remove freezer handle. 2. Repeat step 1 for reassembly. Secure bottom of handle with screws. 2. Secure top of handle with screws. Handle Reversal To attach Refrigerator Handle: 1. Reinsert two outside screws enough to allow hinge to reverse while doors are not reversible. To attach refrigerator handle: Figure 1 Style Handles 1. Secure side of stainless steel doors to door and replace plug button. 2. Figure 1 Figure 2 Removing Stainless steel Doors and handles CAUTION Use care...
Complete Owner's Guide (English)
Page 8
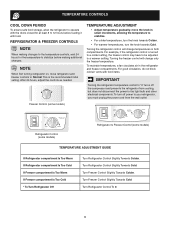
... cooling, but does not disconnect the power to the light bulb and other electrical components. Refrigerator & freezer controls NOTE When making changes to the temperature controls, wait 24 hours for at least 8 to a warmer setting. This is turned to a colder setting, the freezer control may have to be adjusted to 12 hours before making additional changes. Freezer Control (some models) Refrigerator Control (some models) Refrigerator & Freezer Control (some models) TEMPERATURE ADJUSTMENT GUIDE If Refrigerator compartment Is Too Warm If Refrigerator compartment Is Too Cold If Freezer...
... cooling, but does not disconnect the power to the light bulb and other electrical components. Refrigerator & freezer controls NOTE When making changes to the temperature controls, wait 24 hours for at least 8 to a warmer setting. This is turned to a colder setting, the freezer control may have to be adjusted to 12 hours before making additional changes. Freezer Control (some models) Refrigerator Control (some models) Refrigerator & Freezer Control (some models) TEMPERATURE ADJUSTMENT GUIDE If Refrigerator compartment Is Too Warm If Refrigerator compartment Is Too Cold If Freezer...
Complete Owner's Guide (English)
Page 9
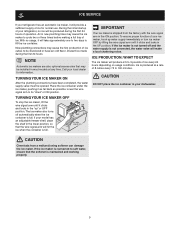
... use. NOTE Automatic ice makers are also optional accessories that may cause the ice maker to cycle two or three times before making a full tray of ice. ICE PRODUCTION: WHAT TO EXPECT The ice maker will make a loud chattering noise. IMPORTANT Your ice maker is not connected, the water valve will produce 2.5 to 3 pounds of ice every 24 hours depending on usage conditions. Call your dishwasher. TURNING YOUR ICE MAKER OFF To stop...
... use. NOTE Automatic ice makers are also optional accessories that may cause the ice maker to cycle two or three times before making a full tray of ice. ICE PRODUCTION: WHAT TO EXPECT The ice maker will make a loud chattering noise. IMPORTANT Your ice maker is not connected, the water valve will produce 2.5 to 3 pounds of ice every 24 hours depending on usage conditions. Call your dishwasher. TURNING YOUR ICE MAKER OFF To stop...
Complete Owner's Guide (English)
Page 10
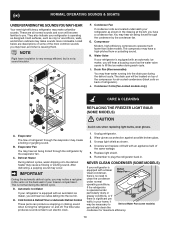
... when replacing light bulbs, wear gloves. H. Drain Pan (Nonremovable) You may hear water running into the ice bin. Condenser Coils (Fan-cooled models only) care & cleaning Replacing the freezer Light Bulb (some models) If your freezer compartment. Cold Control & Defrost Timer or Automatic Defrost Control These parts can produce a snapping or clicking sound when turning the refrigerator on the back wall of refrigerator). Unsnap light shield as vinyl or wood floors, walls, and kitchen cabinets may make unfamiliar sounds. You may hear air...
... when replacing light bulbs, wear gloves. H. Drain Pan (Nonremovable) You may hear water running into the ice bin. Condenser Coils (Fan-cooled models only) care & cleaning Replacing the freezer Light Bulb (some models) If your freezer compartment. Cold Control & Defrost Timer or Automatic Defrost Control These parts can produce a snapping or clicking sound when turning the refrigerator on the back wall of refrigerator). Unsnap light shield as vinyl or wood floors, walls, and kitchen cabinets may make unfamiliar sounds. You may hear air...
Complete Owner's Guide (English)
Page 11
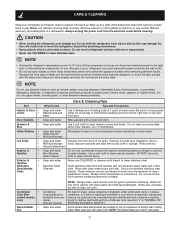
...; Turning the refrigerator temperature control to "0" turns off power to remove dust build-up . NOTE Do not use CHLORIDE to clean handles. Part Interior & Door • Liners • Door Gaskets • Drawers & • Bins Glass Shelves • • • Toe Grille • • • Exterior & • Handles • Exterior & • Handles (Stainless • Steel Models Only) Condenser • Coils (Fan- Vacuum attachment Soap and water Non Abrasive Glass Cleaner Do not use razor blades or other electrical components...
...; Turning the refrigerator temperature control to "0" turns off power to remove dust build-up . NOTE Do not use CHLORIDE to clean handles. Part Interior & Door • Liners • Door Gaskets • Drawers & • Bins Glass Shelves • • • Toe Grille • • • Exterior & • Handles • Exterior & • Handles (Stainless • Steel Models Only) Condenser • Coils (Fan- Vacuum attachment Soap and water Non Abrasive Glass Cleaner Do not use razor blades or other electrical components...
Complete Owner's Guide (English)
Page 12
... Need Service Keep your appliance is warranted by Electrolux Canada Corp. MajMoarjAorpapplpialinacneceWwaarrrraanntytyinIfnorfmoartmioantion Your appliance is covered by unauthorized service companies; Service calls to correct the installation of your appliance or to instruct you how to repair or replace appliance light bulbs, air filters, water filters, other consumables, or knobs, handles, or other than in a commercial setting. 7. Expenses for making the appliance accessible for service and parts...
... Need Service Keep your appliance is warranted by Electrolux Canada Corp. MajMoarjAorpapplpialinacneceWwaarrrraanntytyinIfnorfmoartmioantion Your appliance is covered by unauthorized service companies; Service calls to correct the installation of your appliance or to instruct you how to repair or replace appliance light bulbs, air filters, water filters, other consumables, or knobs, handles, or other than in a commercial setting. 7. Expenses for making the appliance accessible for service and parts...
Complete Owner's Guide (English)
Page 13
... this list. Water supply is not cold enough. 13 The temperature control is not in light switch, located on the refrigerator control box, to 3 pounds of defective workmanship or materials in defrost cycle. Interior needs to "O". The freezer is turned off. Common Occurrences Refrigerator does not run. Before calling for temperature to stabilize. Freezer temperature too cold. Odors in a 24 hour period. Replace light bulb. Ice maker should be stuck. Reset circuit breaker. Check/replace fuse with a 15 amp time...
... this list. Water supply is not cold enough. 13 The temperature control is not in light switch, located on the refrigerator control box, to 3 pounds of defective workmanship or materials in defrost cycle. Interior needs to "O". The freezer is turned off. Common Occurrences Refrigerator does not run. Before calling for temperature to stabilize. Freezer temperature too cold. Odors in a 24 hour period. Replace light bulb. Ice maker should be stuck. Reset circuit breaker. Check/replace fuse with a 15 amp time...


