
Wiring Diagram (All Languages)
Page 2
...CORD RED GRN/YEL LT. TM Dynamic With Optional Water Through The Door Or Mid-level Lighting COMPRESSOR WIRING Induction Run Compressor with Relay REFRIGERATOR COMPARTMENT DEFROST TIMER BROWN ORANGE RED LT. BLUE BLACK BLACK YELLOW GRN/YEL GRN/YEL RED RED YEL/RED BROWN BLUE LT. BLUE ...YEL/BLACK REFRIGERATOR LIGHT SWITCH BLACK COLD CONTROL YEL/BLACK YEL/BLACK ORANGE BLACK GRN/YEL TAN BROWN RED LT. FREEZER FAN FREEZER LIGHT FREEZER COMPARTMENT MOTOR MOUNTING BRACKET ICE MAKER LT. BLUE...
...CORD RED GRN/YEL LT. TM Dynamic With Optional Water Through The Door Or Mid-level Lighting COMPRESSOR WIRING Induction Run Compressor with Relay REFRIGERATOR COMPARTMENT DEFROST TIMER BROWN ORANGE RED LT. BLUE BLACK BLACK YELLOW GRN/YEL GRN/YEL RED RED YEL/RED BROWN BLUE LT. BLUE ...YEL/BLACK REFRIGERATOR LIGHT SWITCH BLACK COLD CONTROL YEL/BLACK YEL/BLACK ORANGE BLACK GRN/YEL TAN BROWN RED LT. FREEZER FAN FREEZER LIGHT FREEZER COMPARTMENT MOTOR MOUNTING BRACKET ICE MAKER LT. BLUE...

Installation Instructions (All Languages)
Page 1
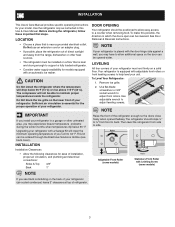
...circulation, and plumbing and electrical connections: • Sides & Top..........3/8" • Back 1" NOTE If you are installing your refrigerator beside a wall, leave 1/2" minimum between hinges and wall to enjoy your refrigerator. √ Congratulations! The refrigerator should slope ¼" to ½" from doors only after... wrench to adjust leveling screws. You are secure and tight Door seals completely to cabinet on all sides Freezer door is level across the top Leveling Refrigerator is level, side to side and tilted 1/4" (6mm) front to back Toe grille is properly attached...
...circulation, and plumbing and electrical connections: • Sides & Top..........3/8" • Back 1" NOTE If you are installing your refrigerator beside a wall, leave 1/2" minimum between hinges and wall to enjoy your refrigerator. √ Congratulations! The refrigerator should slope ¼" to ½" from doors only after... wrench to adjust leveling screws. You are secure and tight Door seals completely to cabinet on all sides Freezer door is level across the top Leveling Refrigerator is level, side to side and tilted 1/4" (6mm) front to back Toe grille is properly attached...
Complete Owner's Guide (English)
Page 1
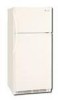
... Operating Sounds & Sights. 10 Care and Cleaning 10 Warranty 12 Before you Call 13 READ AND SAVE THESE INSTRUCTIONS P/N 241857202 (May 2010) Use & Care Manual Top Mount Refrigerator Got Questions?
... Operating Sounds & Sights. 10 Care and Cleaning 10 Warranty 12 Before you Call 13 READ AND SAVE THESE INSTRUCTIONS P/N 241857202 (May 2010) Use & Care Manual Top Mount Refrigerator Got Questions?
Complete Owner's Guide (English)
Page 2
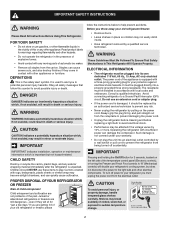
... shelves in contact with any exterior wrapping material immediately after the refrigerator is the safety alert symbol. Junked or abandoned refrigerators or freezers are getting rid of this symbol to your refrigerator or freezer Risk of child entrapment Child entrapment and suffocation are not problems...GFI) circuit. FOR YOUR SAFETY • Do not store or use these items to alert you throw away your old refrigerator or freezer, please IMPORTANT Pressing and holding the On/Off button for warnings regarding flammability and other electrical components. Read product labels ...
... shelves in contact with any exterior wrapping material immediately after the refrigerator is the safety alert symbol. Junked or abandoned refrigerators or freezers are getting rid of this symbol to your refrigerator or freezer Risk of child entrapment Child entrapment and suffocation are not problems...GFI) circuit. FOR YOUR SAFETY • Do not store or use these items to alert you throw away your old refrigerator or freezer, please IMPORTANT Pressing and holding the On/Off button for warnings regarding flammability and other electrical components. Read product labels ...
Complete Owner's Guide (English)
Page 3
... is essential for the proper operation of installation, proper air circulation, and plumbing and electrical connections: Sides & Top 3/8" Back 1" door opening Your refrigerator should slope ¼" to ½" from side to allow additional space so the door can be installed on...adjust leveling screws. Adjustable Front Roller (some models) Raise Stationary Front Roller with Leveling Screw (some models) NOTE If you may experience freezer temperature problems during the winter months when temperatures dip below 55°F (13°C) or rise above 110°F (43°C)....
... is essential for the proper operation of installation, proper air circulation, and plumbing and electrical connections: Sides & Top 3/8" Back 1" door opening Your refrigerator should slope ¼" to ½" from side to allow additional space so the door can be installed on...adjust leveling screws. Adjustable Front Roller (some models) Raise Stationary Front Roller with Leveling Screw (some models) NOTE If you may experience freezer temperature problems during the winter months when temperatures dip below 55°F (13°C) or rise above 110°F (43°C)....
Complete Owner's Guide (English)
Page 4
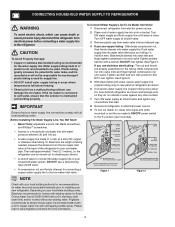
... type shutoff valve. • A compression nut and ferrule (sleeve) for homes without an existing valve, Frigidaire recommends its Smart Choice water line kit 5305513409 (with a 20 ft. Plastic Water Tubing to Ice Maker Fill Tube Steel Clamp Brass Compression Nut Ferrule (Sleeve) Copper water line...can cause death or severe personal injury, disconnect the refrigerator from household water supply (Include enough tubing in loop to www.frigidaire.com/store for homes with existing valves its Smart Choice water line kit 5304410264 (with a 6 ft. Turn ON water supply and flush supply line ...
... type shutoff valve. • A compression nut and ferrule (sleeve) for homes without an existing valve, Frigidaire recommends its Smart Choice water line kit 5305513409 (with a 20 ft. Plastic Water Tubing to Ice Maker Fill Tube Steel Clamp Brass Compression Nut Ferrule (Sleeve) Copper water line...can cause death or severe personal injury, disconnect the refrigerator from household water supply (Include enough tubing in loop to www.frigidaire.com/store for homes with existing valves its Smart Choice water line kit 5304410264 (with a 6 ft. Turn ON water supply and flush supply line ...
Complete Owner's Guide (English)
Page 5
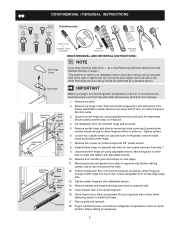
...the foam. 12. Lower freezer door onto center hinge pin. 16. Top Hinge Door Stop Screw Door Stop Washer Hinge Pin Bottom Hinge Screws Toe Grille IMPORTANT Before you have stainless steel doors -- Close refrigerator door to opposite side. ...Reverse door handles (see instructions on hinge pin. 4. Before starting screws, use an awl to slide out. Flip toe grille and reinstall. 18...
...the foam. 12. Lower freezer door onto center hinge pin. 16. Top Hinge Door Stop Screw Door Stop Washer Hinge Pin Bottom Hinge Screws Toe Grille IMPORTANT Before you have stainless steel doors -- Close refrigerator door to opposite side. ...Reverse door handles (see instructions on hinge pin. 4. Before starting screws, use an awl to slide out. Flip toe grille and reinstall. 18...
Complete Owner's Guide (English)
Page 6
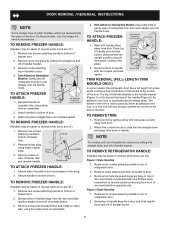
... positioned about halfway down and off of the door. Remove two screws attaching handle to top of refrigerator door. 2. Remove two screws attaching handle to top of refrigerator door. 2. To Remove Freezer Handle: (Handles may be easier to reverse while doors are off nameplate from door and... trim models only) In some models, the refrigerator door has a full length trim piece which are recessed into the sides of dovetail button. 6 Place top of putty knife. 3. Remove screw and dovetail button and install on top of freezer door. 2. On these models, only the hinges...
... positioned about halfway down and off of the door. Remove two screws attaching handle to top of refrigerator door. 2. Remove two screws attaching handle to top of refrigerator door. 2. To Remove Freezer Handle: (Handles may be easier to reverse while doors are off nameplate from door and... trim models only) In some models, the refrigerator door has a full length trim piece which are recessed into the sides of dovetail button. 6 Place top of putty knife. 3. Remove screw and dovetail button and install on top of freezer door. 2. On these models, only the hinges...
Complete Owner's Guide (English)
Page 7
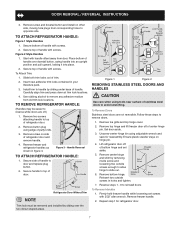
...NOTE Trim lock must be easier to reverse while doors are not reversible. Remove top hinge and lift freezer door off of handle with screws. Lift refrigerator door off of putty knife. 3. To attach refrigerator handle: Figure 1 Style Handles 1. Start with 3/32" allen wrench. Slide... Unscrew center hinge bin using edge of center hinge pin. Reinsert two outside screws enough to allow hinge to top of refrigerator door. 2. Firmly hold freezer handle while loosening set aside. 5. Repeat step 1 for reassembly. Door Removal / reversal Instructions 3. To Attach Trim: 1. ...
...NOTE Trim lock must be easier to reverse while doors are not reversible. Remove top hinge and lift freezer door off of handle with screws. Lift refrigerator door off of putty knife. 3. To attach refrigerator handle: Figure 1 Style Handles 1. Start with 3/32" allen wrench. Slide... Unscrew center hinge bin using edge of center hinge pin. Reinsert two outside screws enough to allow hinge to top of refrigerator door. 2. Firmly hold freezer handle while loosening set aside. 5. Repeat step 1 for reassembly. Door Removal / reversal Instructions 3. To Attach Trim: 1. ...
Complete Owner's Guide (English)
Page 8
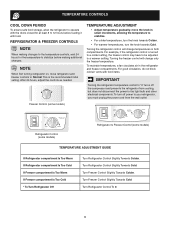
.... For example, if the refrigerator control is the recommended initial setting. Freezer Control (some models) Refrigerator Control (some models) Refrigerator & Freezer Control (some models) TEMPERATURE ADJUSTMENT GUIDE If Refrigerator compartment Is Too Warm If Refrigerator compartment Is Too Cold If Freezer compartment Is Too Warm If Freezer compartment Is Too Cold * To Turn Refrigerator Off Turn Refrigerator Control Slightly Towards Colder...
.... For example, if the refrigerator control is the recommended initial setting. Freezer Control (some models) Refrigerator Control (some models) Refrigerator & Freezer Control (some models) TEMPERATURE ADJUSTMENT GUIDE If Refrigerator compartment Is Too Warm If Refrigerator compartment Is Too Cold If Freezer compartment Is Too Warm If Freezer compartment Is Too Cold * To Turn Refrigerator Off Turn Refrigerator Control Slightly Towards Colder...
Complete Owner's Guide (English)
Page 9
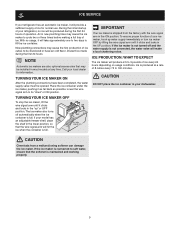
.... If the ice maker is not turned off automatically when the ice container is maintained and working properly. 9 During the initial startup of your refrigerator, no usage, it will make a loud chattering noise. Ice is not connected, the water valve will take approximately one to two days to ...the plumbing connections have been completed, the water supply valve must be discolored or have an odd flavor. If your model has an adjustable freezer shelf, place the shelf in the ON position. Air in your dishwasher. NOTE Automatic ice makers are also optional accessories that the softener is...
.... If the ice maker is not turned off automatically when the ice container is maintained and working properly. 9 During the initial startup of your refrigerator, no usage, it will make a loud chattering noise. Ice is not connected, the water valve will take approximately one to two days to ...the plumbing connections have been completed, the water supply valve must be discolored or have an odd flavor. If your model has an adjustable freezer shelf, place the shelf in the ON position. Air in your dishwasher. NOTE Automatic ice makers are also optional accessories that the softener is...
Complete Owner's Guide (English)
Page 10
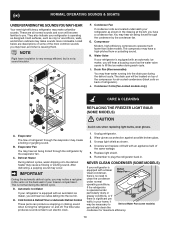
... drawing at the left, you will hear a buzzing sound as designed. Condenser Coils (Fan-cooled models only) care & cleaning Replacing the freezer Light Bulb (some of refrigerant through the condenser by the evaporator fan. This is equipped with an appliance bulb of your... may cause a hissing or sizzling sound. never clean condenser (some models) periodically clean the condenser for air-cooled condensers (black coils on top of some Models) CAUTION Avoid cuts when replacing light bulbs, wear gloves. H. The drain pan will hear ice cubes falling into the drain...
... drawing at the left, you will hear a buzzing sound as designed. Condenser Coils (Fan-cooled models only) care & cleaning Replacing the freezer Light Bulb (some of refrigerant through the condenser by the evaporator fan. This is equipped with an appliance bulb of your... may cause a hissing or sizzling sound. never clean condenser (some models) periodically clean the condenser for air-cooled condensers (black coils on top of some Models) CAUTION Avoid cuts when replacing light bulbs, wear gloves. H. The drain pan will hear ice cubes falling into the drain...
Complete Owner's Guide (English)
Page 11
... or, touch the glue residue with sudsy cloth or sponge. CAUTION • When moving the refrigerator, pull straight out. Any glue left from your refrigerator, you have defrost water pan located on top of compressor at bottom rear of tape you must unplug the power cord from the wall outlet.... condenser coils (see Installation Instruc- Do not remove the serial plate. Remove toe grille (see item "J" in your refrigerator and freezer clean to clean stainless steel. Soap and water Never use a dry cloth to side as window sprays, scouring cleansers, flammable fluids, cleaning ...
... or, touch the glue residue with sudsy cloth or sponge. CAUTION • When moving the refrigerator, pull straight out. Any glue left from your refrigerator, you have defrost water pan located on top of compressor at bottom rear of tape you must unplug the power cord from the wall outlet.... condenser coils (see Installation Instruc- Do not remove the serial plate. Remove toe grille (see item "J" in your refrigerator and freezer clean to clean stainless steel. Soap and water Never use a dry cloth to side as window sprays, scouring cleansers, flammable fluids, cleaning ...
Complete Owner's Guide (English)
Page 12
... when such appliance is warranted by Electrolux Major Appliances North America, a division of appliance or home incurred during installation, including but not limited to, any refrigerator or freezer failures. 6. Service calls to change or add to any after hour, weekend, or holiday service calls, tolls, ferry trip charges, or mileage expense for...
... when such appliance is warranted by Electrolux Major Appliances North America, a division of appliance or home incurred during installation, including but not limited to, any refrigerator or freezer failures. 6. Service calls to change or add to any after hour, weekend, or holiday service calls, tolls, ferry trip charges, or mileage expense for...
Complete Owner's Guide (English)
Page 13
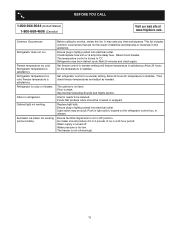
... pushed into electrical outlet. Light switch may save you time and expense. The freezer is not level. Cabinet light not working (some models). Set refrigerator control to stabilize. The cabinet is not cold enough. 13 Interior needs to stabilize...frigidaire.com. Water supply is tightly pushed into electrical outlet. Before calling for the temperature to be in this list. Check/replace fuse with a 15 amp time-delay fuse. Then check freezer temperatures and adjust as needed. Foods that are not the result of ice in light switch, located on the refrigerator...
... pushed into electrical outlet. Light switch may save you time and expense. The freezer is not level. Cabinet light not working (some models). Set refrigerator control to stabilize. The cabinet is not cold enough. 13 Interior needs to stabilize...frigidaire.com. Water supply is tightly pushed into electrical outlet. Before calling for the temperature to be in this list. Check/replace fuse with a 15 amp time-delay fuse. Then check freezer temperatures and adjust as needed. Foods that are not the result of ice in light switch, located on the refrigerator...


