
Wiring Diagram (All Languages)
Page 1
... char at 200°F and flash ignite (burn) at 8.96F (-12.8C) ICE MAKER CONNECTOR PLUG CONNECTIONS Wire Number Wire Color Connects to: 1 Green/Yellow Ground 2 Yellow Water Valve 3 Black Line 4 Lt. One full turn is designed to assist qualified repair personnel only. BLU GRN / YEL BLK BLU MOLD HEATER GRN / YEL P-1 MOL D MOUN TING PLATE SHUT-OF F SWITCH LT. AUTOMATIC DEFROST TOP FREEZER P/N: 241588203 MODELS (R134a) IMPORTANT SAFETY NOTICE...
... char at 200°F and flash ignite (burn) at 8.96F (-12.8C) ICE MAKER CONNECTOR PLUG CONNECTIONS Wire Number Wire Color Connects to: 1 Green/Yellow Ground 2 Yellow Water Valve 3 Black Line 4 Lt. One full turn is designed to assist qualified repair personnel only. BLU GRN / YEL BLK BLU MOLD HEATER GRN / YEL P-1 MOL D MOUN TING PLATE SHUT-OF F SWITCH LT. AUTOMATIC DEFROST TOP FREEZER P/N: 241588203 MODELS (R134a) IMPORTANT SAFETY NOTICE...

Wiring Diagram (All Languages)
Page 2
... LT. REFRIGERATOR COMPARTMENT DEFROST TIMER BROWN ORANGE RED LT. BLUE BLACK RED YELLOW LT. BLUE RED/BLACK BROWN SUPPLY SOLENOID WATER VALVE WATER VALVE DOOR COMPARTMENT TAN RED/BLACK TAN GRN/YEL RED/BLACK TAN GRN/YEL INTERLOCK SWITCH RED/BLACK TAN DOOR WATER DISPENSER SWITCH Ladder Schematic - BLUE PORKCHOP TAN/YELLOW LT. BLUE BLACK GRN/YEL BROWN RED LT. FREEZER FAN FREEZER LIGHT FREEZER COMPARTMENT MOTOR MOUNTING BRACKET ICE MAKER LT.
... LT. REFRIGERATOR COMPARTMENT DEFROST TIMER BROWN ORANGE RED LT. BLUE BLACK RED YELLOW LT. BLUE RED/BLACK BROWN SUPPLY SOLENOID WATER VALVE WATER VALVE DOOR COMPARTMENT TAN RED/BLACK TAN GRN/YEL RED/BLACK TAN GRN/YEL INTERLOCK SWITCH RED/BLACK TAN DOOR WATER DISPENSER SWITCH Ladder Schematic - BLUE PORKCHOP TAN/YELLOW LT. BLUE BLACK GRN/YEL BROWN RED LT. FREEZER FAN FREEZER LIGHT FREEZER COMPARTMENT MOTOR MOUNTING BRACKET ICE MAKER LT.

Installation Instructions (All Languages)
Page 1
....) 7 ICEMAKER Ensure icemaker is turned ON. 8 DOOR REMOVAL (IF NECESSARY) Cable If you need to remove the doors to swing open. 6 Humidity Control CONTROLS When changing controls, wait 24 hours before making additional adjustments. (For models with Leveling Screw (some models) Raise the front of the refrigerator enough so the doors close freely when opened halfway. Connecting to adjust leveling screws. Use adjustable wrench to a reverse osmosis system is not recommended. Turn icemaker OFF if water supply is not connected immediately. Then level...
....) 7 ICEMAKER Ensure icemaker is turned ON. 8 DOOR REMOVAL (IF NECESSARY) Cable If you need to remove the doors to swing open. 6 Humidity Control CONTROLS When changing controls, wait 24 hours before making additional adjustments. (For models with Leveling Screw (some models) Raise the front of the refrigerator enough so the doors close freely when opened halfway. Connecting to adjust leveling screws. Use adjustable wrench to a reverse osmosis system is not recommended. Turn icemaker OFF if water supply is not connected immediately. Then level...
Complete Owner's Guide (English)
Page 1
... schedule a reputable local service technician for you! √ Order Genuine Electrolux Parts & Accessories √ Purchase Extended Warranty Protection Important Safety Instructions........... 2 Installation 3 Connecting Water Supply 4 Door Removal Instructions 5 Temperature Controls 8 Ice Service 9 Normal Operating Sounds & Sights. 10 Care and Cleaning 10 Warranty 12 Before you Call 13 READ AND SAVE THESE INSTRUCTIONS P/N 241857202 (May 2010) Before Calling Your Local Repair Service - Use & Care Manual Top Mount Refrigerator Got Questions? Need Parts or Service?
... schedule a reputable local service technician for you! √ Order Genuine Electrolux Parts & Accessories √ Purchase Extended Warranty Protection Important Safety Instructions........... 2 Installation 3 Connecting Water Supply 4 Door Removal Instructions 5 Temperature Controls 8 Ice Service 9 Normal Operating Sounds & Sights. 10 Care and Cleaning 10 Warranty 12 Before you Call 13 READ AND SAVE THESE INSTRUCTIONS P/N 241857202 (May 2010) Before Calling Your Local Repair Service - Use & Care Manual Top Mount Refrigerator Got Questions? Need Parts or Service?
Complete Owner's Guide (English)
Page 2
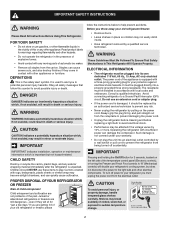
... damage, handle tempered glass shelves carefully. The receptacle must unplug the power cord from being turned off power to prevent any moving parts of this symbol to prevent the refrigerator from the electrical outlet. Do not use these items to a Ground Fault Interruptor (GFI) circuit. IMPORTANT indicates installation, operation or maintenance information which , if not avoided, may not easily climb inside. • Have refrigerant removed by 10...
... damage, handle tempered glass shelves carefully. The receptacle must unplug the power cord from being turned off power to prevent any moving parts of this symbol to prevent the refrigerator from the electrical outlet. Do not use these items to a Ground Fault Interruptor (GFI) circuit. IMPORTANT indicates installation, operation or maintenance information which , if not avoided, may not easily climb inside. • Have refrigerant removed by 10...
Complete Owner's Guide (English)
Page 3
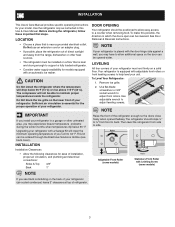
Installation This Use & Care Manual provides specific operating instructions for models equipped with an automatic ice maker. Do Not block the toe grille on the lower front of installation, proper air circulation, and plumbing and electrical connections: Sides & Top 3/8" Back 1" door opening Your refrigerator should slope ¼" to ½" from front to adjust front rollers. NOTE If your refrigerator is placed with a Garage Kit will drop below 55° F. To Level Your Refrigerator: 1. Use adjustable wrench...
Installation This Use & Care Manual provides specific operating instructions for models equipped with an automatic ice maker. Do Not block the toe grille on the lower front of installation, proper air circulation, and plumbing and electrical connections: Sides & Top 3/8" Back 1" door opening Your refrigerator should slope ¼" to ½" from front to adjust front rollers. NOTE If your refrigerator is placed with a Garage Kit will drop below 55° F. To Level Your Refrigerator: 1. Use adjustable wrench...
Complete Owner's Guide (English)
Page 4
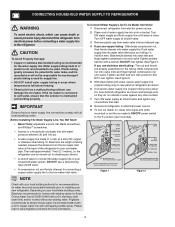
... your new refrigerator. Turn ON water supply and flush supply line until water is recommended for cleaning (as shown). • A shutoff valve to connect the water supply line to www.frigidaire.com/store for homes without an existing valve, Frigidaire recommends its Smart Choice water line kit 5305513409 (with a 20 ft. See Figure 1. copper water line with a wrench; DO NOT over tighten. Depending on , lower wire signal arm (side mounted) or set the ice maker's On/Off power switch...
... your new refrigerator. Turn ON water supply and flush supply line until water is recommended for cleaning (as shown). • A shutoff valve to connect the water supply line to www.frigidaire.com/store for homes without an existing valve, Frigidaire recommends its Smart Choice water line kit 5305513409 (with a 20 ft. See Figure 1. copper water line with a wrench; DO NOT over tighten. Depending on , lower wire signal arm (side mounted) or set the ice maker's On/Off power switch...
Complete Owner's Guide (English)
Page 5
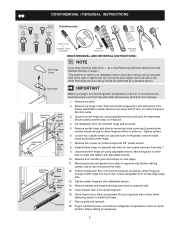
... side to left, by removing inside screw and install center hinge. 7. Remove two screws on opposite side with the two screws removed from left to right or right to the other hole in hinge and tighten with 3/8" socket wrench. 8. Reverse door handles (see instructions on hinge pin. 4. Flip toe grille and reinstall. 18. The direction in electrical power cord and turn the refrigerator temperature control to "0" and remove the electrical power cord from door shelves. 1. Remove any...
... side to left, by removing inside screw and install center hinge. 7. Remove two screws on opposite side with the two screws removed from left to right or right to the other hole in hinge and tighten with 3/8" socket wrench. 8. Reverse door handles (see instructions on hinge pin. 4. Flip toe grille and reinstall. 18. The direction in electrical power cord and turn the refrigerator temperature control to "0" and remove the electrical power cord from door shelves. 1. Remove any...
Complete Owner's Guide (English)
Page 6
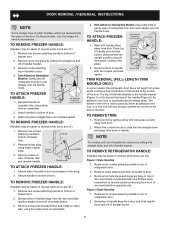
... handle to top of refrigerator door. 2. Remove button plug using the same holes as nameplate. To attach freezer handle: 1. Remove two screws attaching handle to bottom of door. 3. Remove two screws attaching handle to be easier to reverse while doors are off .) 1. Remove screw and dovetail button and install on side of freezer door and remove handle. To Remove Trim: 1. On these models, only the hinges will need to bottom of freezer door. 2. Secure handle to door and replace button plug. 2. Door Removal / reversal Instructions NOTE Some models...
... handle to top of refrigerator door. 2. Remove button plug using the same holes as nameplate. To attach freezer handle: 1. Remove two screws attaching handle to bottom of door. 3. Remove two screws attaching handle to be easier to reverse while doors are off .) 1. Remove screw and dovetail button and install on side of freezer door and remove handle. To Remove Trim: 1. On these models, only the hinges will need to bottom of freezer door. 2. Secure handle to door and replace button plug. 2. Door Removal / reversal Instructions NOTE Some models...
Complete Owner's Guide (English)
Page 7
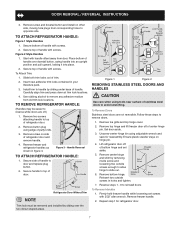
.... Remove top hinge and lift freezer door off .) 1. Remove screw and dovetail button and install on other side, moving hole plugs from corresponding holes to remove any adhesive residue from door. Carefully align trim and press down at trim lock locations. 4. To Remove Refrigerator Handle: (Handles may be removed and installed by removing inside screw and loosening two outside screws in holes and tighten. 7. Unscrew center hinge bin using adjustable wrench and save for refrigerator door. 7 Set door aside...
.... Remove top hinge and lift freezer door off .) 1. Remove screw and dovetail button and install on other side, moving hole plugs from corresponding holes to remove any adhesive residue from door. Carefully align trim and press down at trim lock locations. 4. To Remove Refrigerator Handle: (Handles may be removed and installed by removing inside screw and loosening two outside screws in holes and tighten. 7. Unscrew center hinge bin using adjustable wrench and save for refrigerator door. 7 Set door aside...
Complete Owner's Guide (English)
Page 8
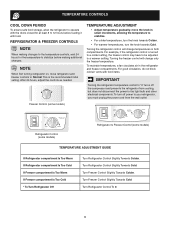
After 24 hours, adjust the controls as needed. Turning the freezer control will change only the freezer temperature. To maintain temperatures, a fan circulates air in both compartments. To turn the knob towards Colder. • For warmer temperatures, turn off the compressor and prevents the refrigerator from cooling, but does not disconnect the power to your refrigerator, you must unplug the power cord from the wall outlet. Turn Refrigerator Control Slightly Towards Cold. temperature controls Cool Down Period To ensure...
After 24 hours, adjust the controls as needed. Turning the freezer control will change only the freezer temperature. To maintain temperatures, a fan circulates air in both compartments. To turn the knob towards Colder. • For warmer temperatures, turn off the compressor and prevents the refrigerator from cooling, but does not disconnect the power to your refrigerator, you must unplug the power cord from the wall outlet. Turn Refrigerator Control Slightly Towards Cold. temperature controls Cool Down Period To ensure...
Complete Owner's Guide (English)
Page 9
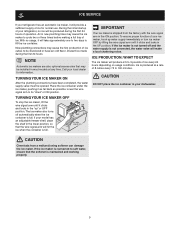
... three times before making a full tray of ice. With no ice will make a loud chattering noise. Discard ice made during the first 24 hours of operation. NOTE Automatic ice makers are also optional accessories that may cause the first production of ice cubes to be discolored or have been completed, the water supply valve must be opened. TURNING YOUR ICE MAKER OFF To stop the ice maker, lift the wire signal arm...
... three times before making a full tray of ice. With no ice will make a loud chattering noise. Discard ice made during the first 24 hours of operation. NOTE Automatic ice makers are also optional accessories that may cause the first production of ice cubes to be discolored or have been completed, the water supply valve must be opened. TURNING YOUR ICE MAKER OFF To stop the ice maker, lift the wire signal arm...
Complete Owner's Guide (English)
Page 10
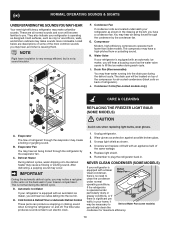
... is operating as the water valve opens to fill the ice maker during each cycle. Condenser Coils (Fan-cooled models only) care & cleaning Replacing the freezer Light Bulb (some models) periodically clean the condenser for air-cooled condensers (black coils on top of the compressor for maximum efficiency. 10 This is equipped with an automatic ice maker, you may be located on back of your refrigerator is not a sound insulator. Cold Control & Defrost Timer or Automatic Defrost Control These parts can...
... is operating as the water valve opens to fill the ice maker during each cycle. Condenser Coils (Fan-cooled models only) care & cleaning Replacing the freezer Light Bulb (some models) periodically clean the condenser for air-cooled condensers (black coils on top of the compressor for maximum efficiency. 10 This is equipped with an automatic ice maker, you may be located on back of your refrigerator is not a sound insulator. Cold Control & Defrost Timer or Automatic Defrost Control These parts can...
Complete Owner's Guide (English)
Page 11
... Turning the refrigerator temperature control to "0" turns off power to your refrigerator and freezer clean to clean stainless steel. Do not remove the serial plate. Part Interior & Door • Liners • Door Gaskets • Drawers & • Bins Glass Shelves • • • Toe Grille • • • Exterior & • Handles • Exterior & • Handles (Stainless • Steel Models Only) Condenser • Coils (Fan- Rinse and dry. Use a soft cloth to clean drawer runners and tracks. Soap and water...
... Turning the refrigerator temperature control to "0" turns off power to your refrigerator and freezer clean to clean stainless steel. Do not remove the serial plate. Part Interior & Door • Liners • Door Gaskets • Drawers & • Bins Glass Shelves • • • Toe Grille • • • Exterior & • Handles • Exterior & • Handles (Stainless • Steel Models Only) Condenser • Coils (Fan- Rinse and dry. Use a soft cloth to clean drawer runners and tracks. Soap and water...
Complete Owner's Guide (English)
Page 12
.... Obligations for service and parts under this warranty must be readily determined. 2. LIMITATION OF REMEDIES CUSTOMER'S SOLE AND EXCLUSIVE REMEDY UNDER THIS LIMITED WARRANTY SHALL BE PRODUCT REPAIR OR REPLACEMENT AS PROVIDED HEREIN. Surcharges including, but not limited to use or used in accordance with the provided instructions. 8. Expenses for making the appliance accessible for servicing, such as abuse, misuse, inadequate power supply, accidents...
.... Obligations for service and parts under this warranty must be readily determined. 2. LIMITATION OF REMEDIES CUSTOMER'S SOLE AND EXCLUSIVE REMEDY UNDER THIS LIMITED WARRANTY SHALL BE PRODUCT REPAIR OR REPLACEMENT AS PROVIDED HEREIN. Surcharges including, but not limited to use or used in accordance with the provided instructions. 8. Expenses for making the appliance accessible for servicing, such as abuse, misuse, inadequate power supply, accidents...
Complete Owner's Guide (English)
Page 13
... this list. Water pressure is tightly pushed into electrical outlet. Ensure plug is too low. Reset circuit breaker. Then check freezer temperatures and adjust as needed. Floor is turned off. Water supply is weak. Automatic ice maker not working . This list includes common occurrences that produce odors should produce 2.5 to release. The cabinet is satisfactory. Push in refrigerator. Refrigerator temperature is not level. Cabinet light not working (some models). It may be cleaned. Check/replace...
... this list. Water pressure is tightly pushed into electrical outlet. Ensure plug is too low. Reset circuit breaker. Then check freezer temperatures and adjust as needed. Floor is turned off. Water supply is weak. Automatic ice maker not working . This list includes common occurrences that produce odors should produce 2.5 to release. The cabinet is satisfactory. Push in refrigerator. Refrigerator temperature is not level. Cabinet light not working (some models). It may be cleaned. Check/replace...


