
Wiring Diagram (All Languages)
Page 2
BLUE LT. BLUE LT. BLUE FREEZER LIGHT SWITCH NOTE DENOTES NOT ON ALL MODELS. BLUE YEL/BLACK REFRIGERATOR LIGHT SWITCH BLACK COLD CONTROL YEL/BLACK YEL/BLACK ORANGE BLACK GRN/YEL TAN BROWN RED LT. BLUE BLACK BLACK GRN/YEL BLUE ... Optional Water Through The Door Or Mid-level Lighting COMPRESSOR WIRING Induction Run Compressor with Relay FREEZER FAN FREEZER LIGHT FREEZER COMPARTMENT MOTOR MOUNTING BRACKET ICE MAKER LT. BLUE SPLICE D DIODES TO BE POLARIZED AS SHOWN. REFRIGERATOR COMPARTMENT DEFROST TIMER BROWN ORANGE RED LT. BLUE LT. BLUE BLACK RED YELLOW SEE COMPRESSOR...
BLUE LT. BLUE LT. BLUE FREEZER LIGHT SWITCH NOTE DENOTES NOT ON ALL MODELS. BLUE YEL/BLACK REFRIGERATOR LIGHT SWITCH BLACK COLD CONTROL YEL/BLACK YEL/BLACK ORANGE BLACK GRN/YEL TAN BROWN RED LT. BLUE BLACK BLACK GRN/YEL BLUE ... Optional Water Through The Door Or Mid-level Lighting COMPRESSOR WIRING Induction Run Compressor with Relay FREEZER FAN FREEZER LIGHT FREEZER COMPARTMENT MOTOR MOUNTING BRACKET ICE MAKER LT. BLUE SPLICE D DIODES TO BE POLARIZED AS SHOWN. REFRIGERATOR COMPARTMENT DEFROST TIMER BROWN ORANGE RED LT. BLUE LT. BLUE BLACK RED YELLOW SEE COMPRESSOR...

Installation Instructions (All Languages)
Page 1
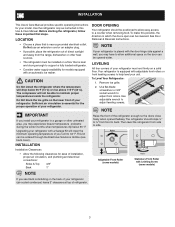
...on a solid floor. Turn icemaker OFF if water supply is not recommended. You are installing your refrigerator. √ Congratulations! Final Checks Shipping material removed Fresh Food and Freezer controls set Crisper Humidity controls set Registration Card sent in Refer to your Owner's Use and Care ...installation is complete INSTALLATION CHECKOFF LIST Doors Handles are secure and tight Door seals completely to cabinet on all sides Freezer door is level across the top Leveling Refrigerator is level, side to side and tilted 1/4" (6mm) front to back Toe grille is properly attached to ...
...on a solid floor. Turn icemaker OFF if water supply is not recommended. You are installing your refrigerator. √ Congratulations! Final Checks Shipping material removed Fresh Food and Freezer controls set Crisper Humidity controls set Registration Card sent in Refer to your Owner's Use and Care ...installation is complete INSTALLATION CHECKOFF LIST Doors Handles are secure and tight Door seals completely to cabinet on all sides Freezer door is level across the top Leveling Refrigerator is level, side to side and tilted 1/4" (6mm) front to back Toe grille is properly attached to ...
Complete Owner's Guide (English)
Page 1
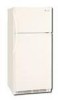
... Operating Sounds & Sights. 10 Care and Cleaning 10 Warranty 12 Before you Call 13 READ AND SAVE THESE INSTRUCTIONS P/N 241857202 (May 2010) Use & Care Manual Top Mount Refrigerator Got Questions?
... Operating Sounds & Sights. 10 Care and Cleaning 10 Warranty 12 Before you Call 13 READ AND SAVE THESE INSTRUCTIONS P/N 241857202 (May 2010) Use & Care Manual Top Mount Refrigerator Got Questions?
Complete Owner's Guide (English)
Page 2
...moving parts of the temperature control panel (Electronic controls), or turning the Freezer and Fresh Food controls to "0" (Mechanical controls) will disable your refrigerator you throw away your refrigerator or freezer Risk of child entrapment Child entrapment and suffocation are not problems of this ...own dedicated 115 Volt, 60 Hz., 15 Amp, AC only electrical outlet. Junked or abandoned refrigerators or freezers are getting rid of your old refrigerator or freezer, please IMPORTANT Pressing and holding the On/Off button for warnings regarding flammability and other electrical ...
...moving parts of the temperature control panel (Electronic controls), or turning the Freezer and Fresh Food controls to "0" (Mechanical controls) will disable your refrigerator you throw away your refrigerator or freezer Risk of child entrapment Child entrapment and suffocation are not problems of this ...own dedicated 115 Volt, 60 Hz., 15 Amp, AC only electrical outlet. Junked or abandoned refrigerators or freezers are getting rid of your old refrigerator or freezer, please IMPORTANT Pressing and holding the On/Off button for warnings regarding flammability and other electrical ...
Complete Owner's Guide (English)
Page 3
...models) NOTE If you may experience freezer temperature problems during the winter months when temperatures dip below 55°F (13°C) or rise above 110°F (43°C). See Door Removal & Reversal Instructions. Your refrigerator is equipped with adjustable front rollers ...the direction in a garage or other heat sources. • The refrigerator must rest firmly on the lower front of your refrigerator (air-cooled condenser) leave 3" clearance at top of refrigerator. 3 Before starting the refrigerator, follow these important first steps. Sufficient air circulation is level and...
...models) NOTE If you may experience freezer temperature problems during the winter months when temperatures dip below 55°F (13°C) or rise above 110°F (43°C). See Door Removal & Reversal Instructions. Your refrigerator is equipped with adjustable front rollers ...the direction in a garage or other heat sources. • The refrigerator must rest firmly on the lower front of your refrigerator (air-cooled condenser) leave 3" clearance at top of refrigerator. 3 Before starting the refrigerator, follow these important first steps. Sufficient air circulation is level and...
Complete Owner's Guide (English)
Page 4
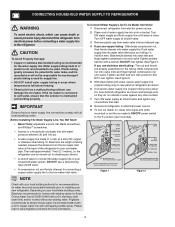
...a self-piercing type shutoff valve. • A compression nut and ferrule (sleeve) for connecting a copper water supply line to www.frigidaire.com/store for homes with existing valves its Smart Choice water line kit 5304410264 (with self-tapping saddle valve). Please refer to the...) or set the ice maker's On/Off power switch to allow moving refrigerator out for cleaning (as it will not be responsible for any connections that leak. 8 Reconnect refrigerator to electrical power source. 9 To turn with a 6 ft. Slide brass compression nut, then ferrule (sleeve) onto water supply line....
...a self-piercing type shutoff valve. • A compression nut and ferrule (sleeve) for connecting a copper water supply line to www.frigidaire.com/store for homes with existing valves its Smart Choice water line kit 5304410264 (with self-tapping saddle valve). Please refer to the...) or set the ice maker's On/Off power switch to allow moving refrigerator out for cleaning (as it will not be responsible for any connections that leak. 8 Reconnect refrigerator to electrical power source. 9 To turn with a 6 ft. Slide brass compression nut, then ferrule (sleeve) onto water supply line....
Complete Owner's Guide (English)
Page 5
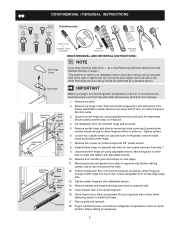
... to puncture the foam. 12. Flip toe grille and reinstall. 18. The direction in electrical power cord and turn the refrigerator temperature control to "0" and remove the electrical power cord from the wall outlet. Remove top hinge and lift door off of door. Tighten center hinge pin...of door while tightening screws to install top hinge. 17. Close freezer door. Move hinge pin to slide out. Position refrigerator door onto bottom hinge pin and screw center hinge pin through center hinge into top of bottom hinge and set aside. 5. Top Hinge Door Stop Screw Door Stop ...
... to puncture the foam. 12. Flip toe grille and reinstall. 18. The direction in electrical power cord and turn the refrigerator temperature control to "0" and remove the electrical power cord from the wall outlet. Remove top hinge and lift door off of door. Tighten center hinge pin...of door while tightening screws to install top hinge. 17. Close freezer door. Move hinge pin to slide out. Position refrigerator door onto bottom hinge pin and screw center hinge pin through center hinge into top of bottom hinge and set aside. 5. Top Hinge Door Stop Screw Door Stop ...
Complete Owner's Guide (English)
Page 6
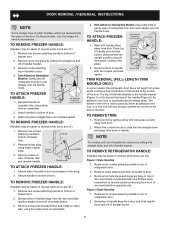
...off of dovetail button. 3. Remove two screws attaching handle to top of refrigerator door. 2. On these models, only the hinges will need to be easier to reverse while doors are off .) 1. To attach freezer handle: 1. Remove button plug using the same holes as nameplate... and off of dovetail button. 6 Remove two screws attaching handle to top of refrigerator door. 2. Remove two screws attaching handle to bottom of door. 3. Attach handle to bottom of freezer door. 2. Secure bottom of freezer door. 2. Door Removal / reversal Instructions NOTE Some models have "pocket...
...off of dovetail button. 3. Remove two screws attaching handle to top of refrigerator door. 2. On these models, only the hinges will need to be easier to reverse while doors are off .) 1. To attach freezer handle: 1. Remove button plug using the same holes as nameplate... and off of dovetail button. 6 Remove two screws attaching handle to top of refrigerator door. 2. Remove two screws attaching handle to bottom of door. 3. Attach handle to bottom of freezer door. 2. Secure bottom of freezer door. 2. Door Removal / reversal Instructions NOTE Some models have "pocket...
Complete Owner's Guide (English)
Page 7
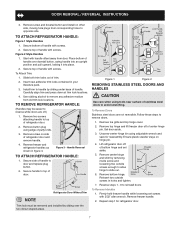
.... 1. Insert new adhesive trim locks contained in figure 3. Use rubbing alcohol to slide out. 6. Handle Reversal To attach Refrigerator Handle: 1. Remove top hinge and lift freezer door off .) 1. Ensure plastic washer stays on other side, moving hole plugs from corresponding holes to avoid scratching. Remove ...pull upward, locking it into place. 2. Firmly hold freezer handle while loosening set aside. 5. Remove screw on side of center hinge pin. Refrigerator Door Without Trim NOTE Trim lock must be easier to top of bottom hinge and set screws with screws. Unscrew...
.... 1. Insert new adhesive trim locks contained in figure 3. Use rubbing alcohol to slide out. 6. Handle Reversal To attach Refrigerator Handle: 1. Remove top hinge and lift freezer door off .) 1. Ensure plastic washer stays on other side, moving hole plugs from corresponding holes to avoid scratching. Remove ...pull upward, locking it into place. 2. Firmly hold freezer handle while loosening set aside. 5. Remove screw on side of center hinge pin. Refrigerator Door Without Trim NOTE Trim lock must be easier to top of bottom hinge and set screws with screws. Unscrew...
Complete Owner's Guide (English)
Page 8
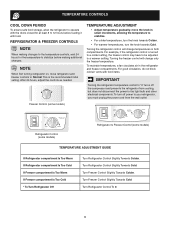
...) Refrigerator Control (some models) Refrigerator & Freezer Control (some models) TEMPERATURE ADJUSTMENT GUIDE If Refrigerator compartment Is Too Warm If Refrigerator compartment Is Too Cold If Freezer compartment Is Too Warm If Freezer compartment Is Too Cold * To Turn Refrigerator Off Turn Refrigerator Control Slightly Towards Colder. Turn Freezer Control Slightly Towards Cold. Turning the freezer control will change only the freezer temperature. Refrigerator & freezer...
...) Refrigerator Control (some models) Refrigerator & Freezer Control (some models) TEMPERATURE ADJUSTMENT GUIDE If Refrigerator compartment Is Too Warm If Refrigerator compartment Is Too Cold If Freezer compartment Is Too Warm If Freezer compartment Is Too Cold * To Turn Refrigerator Off Turn Refrigerator Control Slightly Towards Colder. Turn Freezer Control Slightly Towards Cold. Turning the freezer control will change only the freezer temperature. Refrigerator & freezer...
Complete Owner's Guide (English)
Page 9
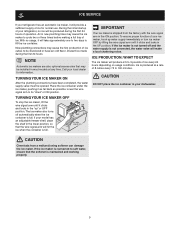
... 160 minutes. If the ice maker is full. New plumbing connections may cause the first production of operation. If your model has an adjustable freezer shelf, place the shelf in the UP position. CAUTION Chemicals from the factory with the wire signal arm in the "up" or OFF position... chattering noise. CAUTION Do Not place the ice container in most models at a rate of your refrigerator, no usage, it will produce 2.5 to its "down" or ON position. ice service If your refrigerator has an automatic ice maker, it will be produced during the first 24 hours. During the initial...
... 160 minutes. If the ice maker is full. New plumbing connections may cause the first production of operation. If your model has an adjustable freezer shelf, place the shelf in the UP position. CAUTION Chemicals from the factory with the wire signal arm in the "up" or OFF position... chattering noise. CAUTION Do Not place the ice container in most models at a rate of your refrigerator, no usage, it will produce 2.5 to its "down" or ON position. ice service If your refrigerator has an automatic ice maker, it will be produced during the first 24 hours. During the initial...
Complete Owner's Guide (English)
Page 10
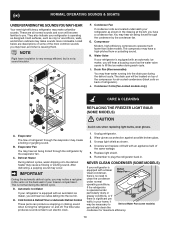
... efficient, but is operating as the water valve opens to plug the refrigerator back in your home, it may be located on back of the compressor for maximum efficiency. 10 Water Valve If your freezer compartment. Drain Pan (Nonremovable) You may hear water running into the ice... there is normal during each cycle. These are descriptions of some models) periodically clean the condenser for air-cooled condensers (black coils on top of refrigerator). G. H. The drain pan will be necessary to you may hear, and what is equipped with an automatic ice maker, you may ...
... efficient, but is operating as the water valve opens to plug the refrigerator back in your home, it may be located on back of the compressor for maximum efficiency. 10 Water Valve If your freezer compartment. Drain Pan (Nonremovable) You may hear water running into the ice... there is normal during each cycle. These are descriptions of some models) periodically clean the condenser for air-cooled condensers (black coils on top of refrigerator). G. H. The drain pan will be necessary to you may hear, and what is equipped with an automatic ice maker, you may ...
Complete Owner's Guide (English)
Page 11
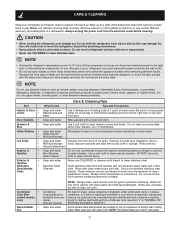
... or other electrical components. Do not use metallic scouring pads, brushes, abrasive cleaners or strong alkaline solutions on top of compressor at bottom rear of refrigerator. Rinse and dry. Use a soft cloth to clean drawer runners and tracks. No need to clean stainless steel... pan with the sticky side of toe grille. NOTE • Turning the refrigerator temperature control to "0" turns off power to your refrigerator and freezer clean to clean handles. Care & Cleaning Keep your refrigerator, you must unplug the power cord from front of tape you have defrost ...
... or other electrical components. Do not use metallic scouring pads, brushes, abrasive cleaners or strong alkaline solutions on top of compressor at bottom rear of refrigerator. Rinse and dry. Use a soft cloth to clean drawer runners and tracks. No need to clean stainless steel... pan with the sticky side of toe grille. NOTE • Turning the refrigerator temperature control to "0" turns off power to your refrigerator and freezer clean to clean handles. Care & Cleaning Keep your refrigerator, you must unplug the power cord from front of tape you have defrost ...
Complete Owner's Guide (English)
Page 12
... YOU SPECIFIC LEGAL RIGHTS. Products with the provided instructions. 8. Products purchased "as described or illustrated are not covered by this appliance that prove to any refrigerator or freezer failures. 6. USA 1.800.944.9044 Electrolux Major Appliances North America 10200 David Taylor Drive Charlotte, NC 28262 Canada 1.800.265.8352 Electrolux Canada Corp...
... YOU SPECIFIC LEGAL RIGHTS. Products with the provided instructions. 8. Products purchased "as described or illustrated are not covered by this appliance that prove to any refrigerator or freezer failures. 6. USA 1.800.944.9044 Electrolux Major Appliances North America 10200 David Taylor Drive Charlotte, NC 28262 Canada 1.800.265.8352 Electrolux Canada Corp...
Complete Owner's Guide (English)
Page 13
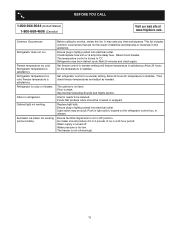
...defrost cycle. Water pressure is not level. Before calling for service, review this appliance. Set freezer control to 3 pounds of defective workmanship or materials in refrigerator. Refrigerator temperature is satisfactory. Cabinet light not working (some models). Wait 20 minutes and check again...800-668-4606 (Canada) Visit our web site at www.frigidaire.com. Floor is not in a 24 hour period. Ensure plug is tightly pushed into electrical outlet. Common Occurrences Refrigerator does not run. Freezer temperature too cold. Allow 24 hours for temperature to "O". ...
...defrost cycle. Water pressure is not level. Before calling for service, review this appliance. Set freezer control to 3 pounds of defective workmanship or materials in refrigerator. Refrigerator temperature is satisfactory. Cabinet light not working (some models). Wait 20 minutes and check again...800-668-4606 (Canada) Visit our web site at www.frigidaire.com. Floor is not in a 24 hour period. Ensure plug is tightly pushed into electrical outlet. Common Occurrences Refrigerator does not run. Freezer temperature too cold. Allow 24 hours for temperature to "O". ...


