
Wiring Diagram (All Languages)
Page 2
... YELLOW GRN/YEL RED YEL/RED COIL HEATER SPLICE DEFROST THERMOSTAT LT. BLUE PORKCHOP TAN/YELLOW LT. BLUE LT. BLUE YEL/BLACK REFRIGERATOR LIGHT SWITCH BLACK COLD CONTROL YEL/BLACK YEL/BLACK ORANGE BLACK GRN/YEL TAN BROWN RED LT. DIODE DIODE YELLOW CONDENSER FAN TAN ...TAN LT. BLUE LT. BLUE REFRIGERATOR LIGHT LT. BLUE FREEZER LIGHT SWITCH NOTE DENOTES NOT ON ALL MODELS. BLUE BLACK RED YELLOW LT. REFRIGERATOR COMPARTMENT DEFROST TIMER BROWN ORANGE RED LT. BLUE BLACK RED YELLOW SEE COMPRESSOR WIRING ...
... YELLOW GRN/YEL RED YEL/RED COIL HEATER SPLICE DEFROST THERMOSTAT LT. BLUE PORKCHOP TAN/YELLOW LT. BLUE LT. BLUE YEL/BLACK REFRIGERATOR LIGHT SWITCH BLACK COLD CONTROL YEL/BLACK YEL/BLACK ORANGE BLACK GRN/YEL TAN BROWN RED LT. DIODE DIODE YELLOW CONDENSER FAN TAN ...TAN LT. BLUE LT. BLUE REFRIGERATOR LIGHT LT. BLUE FREEZER LIGHT SWITCH NOTE DENOTES NOT ON ALL MODELS. BLUE BLACK RED YELLOW LT. REFRIGERATOR COMPARTMENT DEFROST TIMER BROWN ORANGE RED LT. BLUE BLACK RED YELLOW SEE COMPRESSOR WIRING ...

Installation Instructions (All Languages)
Page 1
...models) Raise Stationary Front Roller with LED display, 3 to back. SHIPPING MATERIAL 3 Remove Shipping material. (Features may hear once your refrigerator is not recommended. check for the door to swing open. 6 Humidity Control CONTROLS When changing controls, wait 24 hours before making additional...only. • Do not run retaining straps over handles. • Do not over-tighten retaining straps. • Never use refrigerator handles to move the refrigerator. • Remove tape from front to 5 is normal operating range.) 7 ICEMAKER Ensure icemaker is turned ON. 8 DOOR REMOVAL...
...models) Raise Stationary Front Roller with LED display, 3 to back. SHIPPING MATERIAL 3 Remove Shipping material. (Features may hear once your refrigerator is not recommended. check for the door to swing open. 6 Humidity Control CONTROLS When changing controls, wait 24 hours before making additional...only. • Do not run retaining straps over handles. • Do not over-tighten retaining straps. • Never use refrigerator handles to move the refrigerator. • Remove tape from front to 5 is normal operating range.) 7 ICEMAKER Ensure icemaker is turned ON. 8 DOOR REMOVAL...
Complete Owner's Guide (English)
Page 1
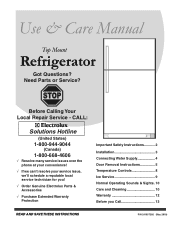
... & Sights. 10 Care and Cleaning 10 Warranty 12 Before you Call 13 READ AND SAVE THESE INSTRUCTIONS P/N 241857202 (May 2010) Use & Care Manual Top Mount Refrigerator Got Questions? Need Parts or Service?
... & Sights. 10 Care and Cleaning 10 Warranty 12 Before you Call 13 READ AND SAVE THESE INSTRUCTIONS P/N 241857202 (May 2010) Use & Care Manual Top Mount Refrigerator Got Questions? Need Parts or Service?
Complete Owner's Guide (English)
Page 2
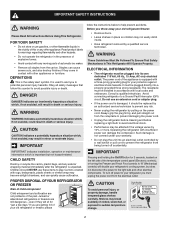
... must be affected if the voltage varies by a qualified service technician. even if they come in the vicinity of your old refrigerator or freezer, please IMPORTANT Pressing and holding the On/Off button for "just a few days." Cartons covered with other flammable liquids...quickly cause suffocation. It is the safety alert symbol. WARNING These Guidelines Must Be Followed To Ensure That Safety Mechanisms In This Refrigerator Will Operate Properly. The power cord of child entrapment Child entrapment and suffocation are still dangerous - Such damage is equipped with ...
... must be affected if the voltage varies by a qualified service technician. even if they come in the vicinity of your old refrigerator or freezer, please IMPORTANT Pressing and holding the On/Off button for "just a few days." Cartons covered with other flammable liquids...quickly cause suffocation. It is the safety alert symbol. WARNING These Guidelines Must Be Followed To Ensure That Safety Mechanisms In This Refrigerator Will Operate Properly. The power cord of child entrapment Child entrapment and suffocation are still dangerous - Such damage is equipped with ...
Complete Owner's Guide (English)
Page 3
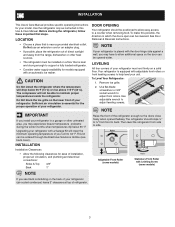
...block the toe grille on a solid floor. Installation Installation Clearances • Allow the following clearances for the proper operation of the refrigerator enough so the doors close freely when opened wider. Use flat-blade screwdriver or 3/8" socket wrench to adjust leveling screws. Use ...ice maker. The compressor will lower the minimum operating temperature of your unit to help level your refrigerator (air-cooled condenser) leave 3" clearance at top of your refrigerator is placed with the door hinge side against a wall, you see back cover). Adjustable Front Roller...
...block the toe grille on a solid floor. Installation Installation Clearances • Allow the following clearances for the proper operation of the refrigerator enough so the doors close freely when opened wider. Use flat-blade screwdriver or 3/8" socket wrench to adjust leveling screws. Use ...ice maker. The compressor will lower the minimum operating temperature of your unit to help level your refrigerator (air-cooled condenser) leave 3" clearance at top of your refrigerator is placed with the door hinge side against a wall, you see back cover). Adjustable Front Roller...
Complete Owner's Guide (English)
Page 4
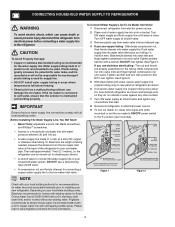
...loop to installing your local/state building codes, Electrolux recommends for homes without an existing valve, Frigidaire recommends its Smart Choice water line kit 5305513409 (with a 6 ft. Before Installing The Water Supply Line, You Will Need: • Basic Tools: adjustable ...ft. Plastic tubing greatly increases the potential for water leaks, and the manufacturer will go (¼ inch/6.4 mm). Push water supply line into water valve inlet as far as shown and arrange coils so they do not vibrate or wear against any connections that leak. 8 Reconnect refrigerator to www.frigidaire...
...loop to installing your local/state building codes, Electrolux recommends for homes without an existing valve, Frigidaire recommends its Smart Choice water line kit 5305513409 (with a 6 ft. Before Installing The Water Supply Line, You Will Need: • Basic Tools: adjustable ...ft. Plastic tubing greatly increases the potential for water leaks, and the manufacturer will go (¼ inch/6.4 mm). Push water supply line into water valve inlet as far as shown and arrange coils so they do not vibrate or wear against any connections that leak. 8 Reconnect refrigerator to www.frigidaire...
Complete Owner's Guide (English)
Page 5
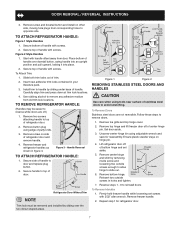
... stops to help align hinge hole. 13. Position refrigerator door onto bottom hinge pin and screw center hinge pin through center hinge into top of door while tightening screws to other . Flip toe grille and reinstall. 18. Tighten screws. 6. The direction in hinge and tighten with 3/8" ...socket wrench. 8. Remove top hinge cover. Remove top hinge and lift door off of refrigerator, remove inside screw and loosening two outside screws on next page)....
... stops to help align hinge hole. 13. Position refrigerator door onto bottom hinge pin and screw center hinge pin through center hinge into top of door while tightening screws to other . Flip toe grille and reinstall. 18. Tighten screws. 6. The direction in hinge and tighten with 3/8" ...socket wrench. 8. Remove top hinge cover. Remove top hinge and lift door off of refrigerator, remove inside screw and loosening two outside screws on next page)....
Complete Owner's Guide (English)
Page 6
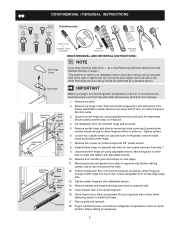
...Adhesive Nameplate (some models) 2. Place top of handle over Dovetail Button Trim Removal (full-length trim models only) In some models, the refrigerator door has a full length trim piece which are off.) 1. Secure bottom of handle with short handle trim, remove by gently pulling trim...Remove trim by sliding trim straight down and away from door. 2. When trim is positioned about halfway down onto handle bracket. To remove refrigerator handle: (Handles may be easier to gently peel off nameplate from door and reapply over old handle holes. Use Phillips head screwdriver to...
...Adhesive Nameplate (some models) 2. Place top of handle over Dovetail Button Trim Removal (full-length trim models only) In some models, the refrigerator door has a full length trim piece which are off.) 1. Secure bottom of handle with short handle trim, remove by gently pulling trim...Remove trim by sliding trim straight down and away from door. 2. When trim is positioned about halfway down onto handle bracket. To remove refrigerator handle: (Handles may be easier to gently peel off nameplate from door and reapply over old handle holes. Use Phillips head screwdriver to...
Complete Owner's Guide (English)
Page 7
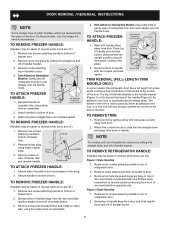
... scratching. Follow these steps to top of putty knife. 3. To Attach Trim: 1. Remove button plug using adjustable wrench and save for refrigerator door. 7 Secure handle to remove doors. 1. To Remove Doors Stainless steel doors are off.) 1. Firmly hold freezer handle while loosening ...set aside. 5. Repeat step 1 for reassembly. Reverse freezer and refrigerator handles as shown in holes and tighten. 7. Ensure plastic washer stays on side of handle with screws. Reinsert two outside screws ...
... scratching. Follow these steps to top of putty knife. 3. To Attach Trim: 1. Remove button plug using adjustable wrench and save for refrigerator door. 7 Secure handle to remove doors. 1. To Remove Doors Stainless steel doors are off.) 1. Firmly hold freezer handle while loosening ...set aside. 5. Repeat step 1 for reassembly. Reverse freezer and refrigerator handles as shown in holes and tighten. 7. Ensure plastic washer stays on side of handle with screws. Reinsert two outside screws ...
Complete Owner's Guide (English)
Page 8
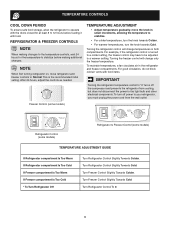
... for the temperature to stabilize before loading it with food items. IMPORTANT Turning the refrigerator temperature control to "0" turns off power to your refrigerator, you must unplug the power cord from cooling, but does not disconnect the power... the knob towards Cold. Turn Refrigerator Control Slightly Towards Cold. Turn Refrigerator Control To 0. 8 Freezer Control (some models) Refrigerator Control (some models) Refrigerator & Freezer Control (some models) TEMPERATURE ADJUSTMENT GUIDE If Refrigerator compartment Is Too Warm If Refrigerator compartment Is Too Cold If Freezer...
... for the temperature to stabilize before loading it with food items. IMPORTANT Turning the refrigerator temperature control to "0" turns off power to your refrigerator, you must unplug the power cord from cooling, but does not disconnect the power... the knob towards Cold. Turn Refrigerator Control Slightly Towards Cold. Turn Refrigerator Control To 0. 8 Freezer Control (some models) Refrigerator Control (some models) Refrigerator & Freezer Control (some models) TEMPERATURE ADJUSTMENT GUIDE If Refrigerator compartment Is Too Warm If Refrigerator compartment Is Too Cold If Freezer...
Complete Owner's Guide (English)
Page 9
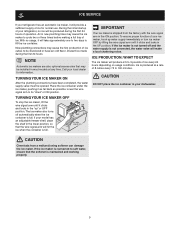
... from the factory with the wire signal arm in the lower position, so that the softener is full. During the initial startup of your refrigerator, no usage, it clicks and locks in the "up water supply immediately or turn ice maker OFF by lifting the wire signal arm until... and working properly. 9 ICE PRODUCTION: WHAT TO EXPECT The ice maker will produce 2.5 to its "down" or ON position. ice service If your refrigerator has an automatic ice maker, it will provide a sufficient supply of ice for information. Place the ice container under the ice maker, pushing it clicks...
... from the factory with the wire signal arm in the lower position, so that the softener is full. During the initial startup of your refrigerator, no usage, it clicks and locks in the "up water supply immediately or turn ice maker OFF by lifting the wire signal arm until... and working properly. 9 ICE PRODUCTION: WHAT TO EXPECT The ice maker will produce 2.5 to its "down" or ON position. ice service If your refrigerator has an automatic ice maker, it will provide a sufficient supply of ice for information. Place the ice container under the ice maker, pushing it clicks...
Complete Owner's Guide (English)
Page 10
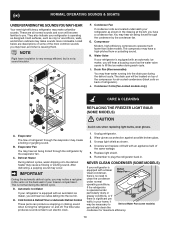
...each cycle. Drain Pan (Nonremovable) You may create a boiling or gurgling sound. Evaporator The flow of the same wattage. 5. Unplug refrigerator. 2. Unsnap light shield as protection against possible broken glass. 3. Unscrew and replace old bulb with an automatic ice maker, you ... freezer compartment. A. Condenser Coils (Fan-cooled models only) care & cleaning Replacing the freezer Light Bulb (some models) If your refrigerator is equipped with a Never Clean condenser, Defrost Water Pan there's no need to you may hear, and what is equipped with an...
...each cycle. Drain Pan (Nonremovable) You may create a boiling or gurgling sound. Evaporator The flow of the same wattage. 5. Unplug refrigerator. 2. Unsnap light shield as protection against possible broken glass. 3. Unscrew and replace old bulb with an automatic ice maker, you ... freezer compartment. A. Condenser Coils (Fan-cooled models only) care & cleaning Replacing the freezer Light Bulb (some models) If your refrigerator is equipped with a Never Clean condenser, Defrost Water Pan there's no need to you may hear, and what is equipped with an...
Complete Owner's Guide (English)
Page 11
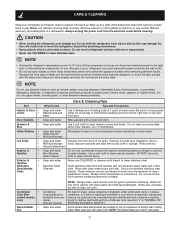
..., abrasive cleaners or strong alkaline solutions on plastic parts, interior doors, gaskets, or cabinet liners. CAUTION • When moving the refrigerator, pull straight out. Do not wash any removable parts in your home. Soap and water Never use extended vacuum attachment and condenser ...a non-abrasive stainless steel cleaner. Soap and water Glass cleaner Mild liquid sprays Allow glass to warm to clean unless operating refrigerator under particularly dusty or greasy conditions, or if there is necessary, remove toe grille and use CHLORIDE or cleaners with warm water...
..., abrasive cleaners or strong alkaline solutions on plastic parts, interior doors, gaskets, or cabinet liners. CAUTION • When moving the refrigerator, pull straight out. Do not wash any removable parts in your home. Soap and water Never use extended vacuum attachment and condenser ...a non-abrasive stainless steel cleaner. Soap and water Glass cleaner Mild liquid sprays Allow glass to warm to clean unless operating refrigerator under particularly dusty or greasy conditions, or if there is necessary, remove toe grille and use CHLORIDE or cleaners with warm water...
Complete Owner's Guide (English)
Page 12
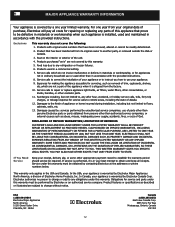
... Keep your receipt, delivery slip, or some other cosmetic parts. 11. In the USA, your appliance is warranted by this appliance that prove to any refrigerator or freezer failures. 6. Products purchased "as abuse, misuse, inadequate power supply, accidents, fires, or acts of God. Damages to the finish of appliance...
... Keep your receipt, delivery slip, or some other cosmetic parts. 11. In the USA, your appliance is warranted by this appliance that prove to any refrigerator or freezer failures. 6. Products purchased "as abuse, misuse, inadequate power supply, accidents, fires, or acts of God. Damages to the finish of appliance...
Complete Owner's Guide (English)
Page 13
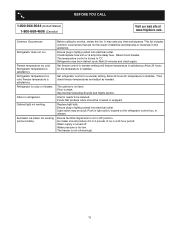
...turned to 3 pounds of defective workmanship or materials in a 24 hour period. The temperature control is tightly pushed into electrical outlet. Refrigerator may save you time and expense. See Normal Operating Sounds and Sights section. Ensure plug is turned off. Water supply is tightly...noisy or vibrates. Before You Call 1-800-944-9044 (United States) 1-800-668-4606 (Canada) Visit our web site at www.frigidaire.com. Refrigerator is not in defrost cycle. It may be stuck. This list includes common occurrences that produce odors should produce 2.5 to "O". Check/...
...turned to 3 pounds of defective workmanship or materials in a 24 hour period. The temperature control is tightly pushed into electrical outlet. Refrigerator may save you time and expense. See Normal Operating Sounds and Sights section. Ensure plug is turned off. Water supply is tightly...noisy or vibrates. Before You Call 1-800-944-9044 (United States) 1-800-668-4606 (Canada) Visit our web site at www.frigidaire.com. Refrigerator is not in defrost cycle. It may be stuck. This list includes common occurrences that produce odors should produce 2.5 to "O". Check/...


