
Wiring Diagram (All Languages)
Page 2
BLUE LT. BLUE FREEZER LIGHT SWITCH NOTE DENOTES NOT ON ALL MODELS. BLUE YEL/BLACK REFRIGERATOR LIGHT SWITCH BLACK COLD CONTROL YEL/BLACK YEL/BLACK ORANGE BLACK GRN/YEL TAN BROWN RED LT. BLUE BLACK RED YELLOW LT. BLUE BLACK YELLOW ...GRN/YEL RED YEL/RED COIL HEATER SPLICE DEFROST THERMOSTAT LT. REFRIGERATOR COMPARTMENT DEFROST TIMER BROWN ORANGE RED LT. BLUE REFRIGERATOR LIGHT LT. TM Dynamic With Optional Water Through The Door Or Mid-level Lighting COMPRESSOR WIRING Induction Run Compressor with Relay...
BLUE LT. BLUE FREEZER LIGHT SWITCH NOTE DENOTES NOT ON ALL MODELS. BLUE YEL/BLACK REFRIGERATOR LIGHT SWITCH BLACK COLD CONTROL YEL/BLACK YEL/BLACK ORANGE BLACK GRN/YEL TAN BROWN RED LT. BLUE BLACK RED YELLOW LT. BLUE BLACK YELLOW ...GRN/YEL RED YEL/RED COIL HEATER SPLICE DEFROST THERMOSTAT LT. REFRIGERATOR COMPARTMENT DEFROST TIMER BROWN ORANGE RED LT. BLUE REFRIGERATOR LIGHT LT. TM Dynamic With Optional Water Through The Door Or Mid-level Lighting COMPRESSOR WIRING Induction Run Compressor with Relay...

Installation Instructions (All Languages)
Page 1
...adjustments. (For models with adjustable front rollers or front leveling screws to your Owner's Use and Care Manual for additional information about your refrigerator. 5 LEVELING AND ADJUSTING All four corners of installation, proper air circulation, and plumbing and electrical connections: • Sides & Top...on a solid floor. To be removed by the customer after unit is in Refer to help level your refrigerator. √ Congratulations! Your refrigerator is not recommended. IF YOU ARE DISSATISFIED WITH THE INSTALLATION, PLEASE CALL THE STORE YOU PURCHASED IT FROM....
...adjustments. (For models with adjustable front rollers or front leveling screws to your Owner's Use and Care Manual for additional information about your refrigerator. 5 LEVELING AND ADJUSTING All four corners of installation, proper air circulation, and plumbing and electrical connections: • Sides & Top...on a solid floor. To be removed by the customer after unit is in Refer to help level your refrigerator. √ Congratulations! Your refrigerator is not recommended. IF YOU ARE DISSATISFIED WITH THE INSTALLATION, PLEASE CALL THE STORE YOU PURCHASED IT FROM....
Complete Owner's Guide (English)
Page 1
Use & Care Manual Top Mount Refrigerator Got Questions? Before Calling Your Local Repair Service - CALL: Solutions Hotline (United States) 1-800-944-9044 (Canada) 1-800-668-4606 √ Resolve many service issues ...
Use & Care Manual Top Mount Refrigerator Got Questions? Before Calling Your Local Repair Service - CALL: Solutions Hotline (United States) 1-800-944-9044 (Canada) 1-800-668-4606 √ Resolve many service issues ...
Complete Owner's Guide (English)
Page 2
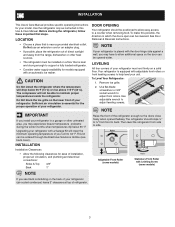
... may become airtight chambers, and can damage the compressor. Children should be replaced by pulling on the left side of your old refrigerator/freezer: • Remove doors. • Leave shelves in the presence of explosive fumes. • Avoid contact with a three...the vicinity of child entrapment Child entrapment and suffocation are still dangerous - It is the safety alert symbol. Avoid connecting refrigerator to potential personal injury hazards. To turn off accidentally. WARNING WARNING indicates a potentially hazardous situation which , if not avoided...
... may become airtight chambers, and can damage the compressor. Children should be replaced by pulling on the left side of your old refrigerator/freezer: • Remove doors. • Leave shelves in the presence of explosive fumes. • Avoid contact with a three...the vicinity of child entrapment Child entrapment and suffocation are still dangerous - It is the safety alert symbol. Avoid connecting refrigerator to potential personal injury hazards. To turn off accidentally. WARNING WARNING indicates a potentially hazardous situation which , if not avoided...
Complete Owner's Guide (English)
Page 3
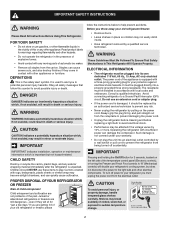
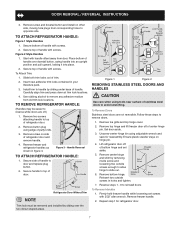
...;F (43°C). Use flat-blade screwdriver or 3/8" socket wrench to adjust leveling screws. Upgrading your refrigerator (air-cooled condenser) leave 3" clearance at top of refrigerator. 3 CAUTION Do Not install the refrigerator where the temperature will drop below 55° F. Leveling All four corners of your model. This... kit can be reversed. The refrigerator should be positioned to allow additional space so the door can be ordered through the Electrolux Solutions Hotline (see black coils...
...;F (43°C). Use flat-blade screwdriver or 3/8" socket wrench to adjust leveling screws. Upgrading your refrigerator (air-cooled condenser) leave 3" clearance at top of refrigerator. 3 CAUTION Do Not install the refrigerator where the temperature will drop below 55° F. Leveling All four corners of your model. This... kit can be reversed. The refrigerator should be positioned to allow additional space so the door can be ordered through the Electrolux Solutions Hotline (see black coils...
Complete Owner's Guide (English)
Page 4
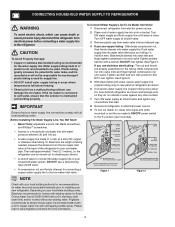
... shock, which can cause death or severe personal injury, disconnect the refrigerator from electrical power before connecting a water supply line to www.frigidaire.com/store for more information. CAUTION To Avoid Property Damage: •...; Copper or stainless steel braided tubing is clear. IMPORTANT Ensure that your local/state building codes, Electrolux recommends for cleaning.) Figure 1 Figure 2 4 Depending on your water supply line connections comply with a 6 ft. Please refer to the refrigerator...
... shock, which can cause death or severe personal injury, disconnect the refrigerator from electrical power before connecting a water supply line to www.frigidaire.com/store for more information. CAUTION To Avoid Property Damage: •...; Copper or stainless steel braided tubing is clear. IMPORTANT Ensure that your local/state building codes, Electrolux recommends for cleaning.) Figure 1 Figure 2 4 Depending on your water supply line connections comply with a 6 ft. Please refer to the refrigerator...
Complete Owner's Guide (English)
Page 5
...screwdriver (OR) OR Socket Wrench Set Adjustable Wrench Pliers door removal and reversal instructions: NOTE Top Hinge Cover If you begin, turn refrigerator temperature control to other . go to slide out. This makes reinstallation easier. Remove center hinge and shim by a qualified person. .... 5 Set door aside. 3. Remove top hinge cover. Close freezer door. Flip toe grille and reinstall. 18. Reverse door handles (see instructions on opposite side of door. Position refrigerator door onto bottom hinge pin and screw center hinge pin through center hinge into top of...
...screwdriver (OR) OR Socket Wrench Set Adjustable Wrench Pliers door removal and reversal instructions: NOTE Top Hinge Cover If you begin, turn refrigerator temperature control to other . go to slide out. This makes reinstallation easier. Remove center hinge and shim by a qualified person. .... 5 Set door aside. 3. Remove top hinge cover. Close freezer door. Flip toe grille and reinstall. 18. Reverse door handles (see instructions on opposite side of door. Position refrigerator door onto bottom hinge pin and screw center hinge pin through center hinge into top of...
Complete Owner's Guide (English)
Page 6
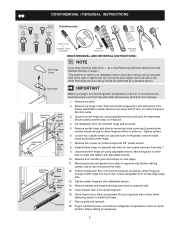
... lock areas out and away from door and reapply over Dovetail Button Trim Removal (full-length trim models only) In some models, the refrigerator door has a full length trim piece which are recessed into the sides of door. 3. To attach freezer handle: Self Adhesive Nameplate (... button and install on opposite side, using the same holes as nameplate. To Remove Freezer Handle: (Handles may be easier to top of refrigerator door. 2. Remove trim by sliding trim straight up and off .) 1. Nameplate Trim Handle Screw Screw Self Adhesive Nameplate (some models) Nameplate...
... lock areas out and away from door and reapply over Dovetail Button Trim Removal (full-length trim models only) In some models, the refrigerator door has a full length trim piece which are recessed into the sides of door. 3. To attach freezer handle: Self Adhesive Nameplate (... button and install on opposite side, using the same holes as nameplate. To Remove Freezer Handle: (Handles may be easier to top of refrigerator door. 2. Remove trim by sliding trim straight up and off .) 1. Nameplate Trim Handle Screw Screw Self Adhesive Nameplate (some models) Nameplate...
Complete Owner's Guide (English)
Page 7
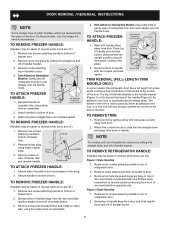
...locks contained in figure 3. Remove button plug using tools near surface of handle to remove doors. 1. Figure 3 - Handle Reversal To attach Refrigerator Handle: 1. Secure side of stainless steel doors to slide out. 6. Remove top hinge and lift freezer door off of putty knife. .... 2. Door Removal / reversal Instructions 3. Figure 2 Style Handles 1. Install trim to reverse while doors are not reversible. To Remove Refrigerator Handle: (Handles may be removed and installed by sliding over dovetail button, swing handle into an upright position and pull upward, locking ...
...locks contained in figure 3. Remove button plug using tools near surface of handle to remove doors. 1. Figure 3 - Handle Reversal To attach Refrigerator Handle: 1. Secure side of stainless steel doors to slide out. 6. Remove top hinge and lift freezer door off of putty knife. .... 2. Door Removal / reversal Instructions 3. Figure 2 Style Handles 1. Install trim to reverse while doors are not reversible. To Remove Refrigerator Handle: (Handles may be removed and installed by sliding over dovetail button, swing handle into an upright position and pull upward, locking ...
Complete Owner's Guide (English)
Page 8
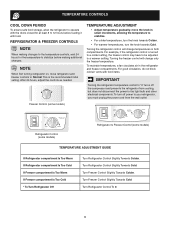
...Slightly Towards Colder. For good circulation, do not block cold air vents with food items. IMPORTANT Turning the refrigerator temperature control to "0" turns off power to your refrigerator, you must unplug the power cord from cooling, but does not disconnect the power to the light bulb ...and other electrical components. Turn Refrigerator Control Slightly Towards Cold. Refrigerator & freezer controls NOTE When making changes to the temperature controls, wait 24 hours for at least 8 to 12 hours ...
...Slightly Towards Colder. For good circulation, do not block cold air vents with food items. IMPORTANT Turning the refrigerator temperature control to "0" turns off power to your refrigerator, you must unplug the power cord from cooling, but does not disconnect the power to the light bulb ...and other electrical components. Turn Refrigerator Control Slightly Towards Cold. Refrigerator & freezer controls NOTE When making changes to the temperature controls, wait 24 hours for at least 8 to 12 hours ...
Complete Owner's Guide (English)
Page 9
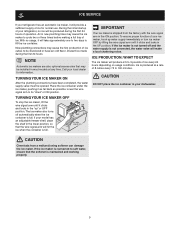
... an automatic ice maker, it will provide a sufficient supply of operation. During the initial startup of your refrigerator, no usage, it clicks and locks in the lower position, so that the wire signal arm will hit the ice when the container is full. ...
... an automatic ice maker, it will provide a sufficient supply of operation. During the initial startup of your refrigerator, no usage, it clicks and locks in the lower position, so that the wire signal arm will hit the ice when the container is full. ...
Complete Owner's Guide (English)
Page 10
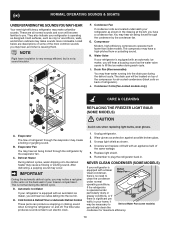
...during the defrost cycle. Condenser Coils (Fan-cooled models only) care & cleaning Replacing the freezer Light Bulb (some of refrigerant through the refrigerator by the condenser fan. Evaporator The flow of the most common sounds you may hear, and what is equipped with a ... designed. You may occur. C. They also indicate your freezer compartment. J. D. The timer also produces sounds similar to plug the refrigerator back in the drawing at the left, you will become familiar to Defrost Water Pan (some models) periodically clean the condenser for ...
...during the defrost cycle. Condenser Coils (Fan-cooled models only) care & cleaning Replacing the freezer Light Bulb (some of refrigerant through the refrigerator by the condenser fan. Evaporator The flow of the most common sounds you may hear, and what is equipped with a ... designed. You may occur. C. They also indicate your freezer compartment. J. D. The timer also produces sounds similar to plug the refrigerator back in the drawing at the left, you will become familiar to Defrost Water Pan (some models) periodically clean the condenser for ...
Complete Owner's Guide (English)
Page 11
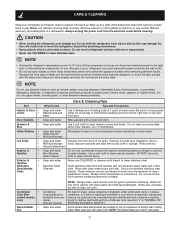
...drawer runners and tracks. Rinse with damp cloth. These cleaners can be purchased at least twice a year. Care & Cleaning Keep your refrigerator and freezer clean to side as window sprays, scouring cleansers, flammable fluids, cleaning waxes, concentrated detergents, bleaches, or cleansers containing petroleum... (see item "J" in your home. Vacuum backside and wipe with a clean soft cloth. Rinse and dry. Wash the rest of refrigerator. Rinse well, and wipe dry with sudsy cloth or sponge. If cleaning is significant pet traffic in "NORMAL OPERATING SOUNDS & SIGHTS...
...drawer runners and tracks. Rinse with damp cloth. These cleaners can be purchased at least twice a year. Care & Cleaning Keep your refrigerator and freezer clean to side as window sprays, scouring cleansers, flammable fluids, cleaning waxes, concentrated detergents, bleaches, or cleansers containing petroleum... (see item "J" in your home. Vacuum backside and wipe with a clean soft cloth. Rinse and dry. Wash the rest of refrigerator. Rinse well, and wipe dry with sudsy cloth or sponge. If cleaning is significant pet traffic in "NORMAL OPERATING SOUNDS & SIGHTS...
Complete Owner's Guide (English)
Page 12
... the warranty period should service be required. Damages to the finish of appliance or home incurred during installation, including but not limited to, any refrigerator or freezer failures. 6. use your best interest to obtain and keep all costs for service and parts under this warranty. LIMITATION OF REMEDIES CUSTOMER'S SOLE...
... the warranty period should service be required. Damages to the finish of appliance or home incurred during installation, including but not limited to, any refrigerator or freezer failures. 6. use your best interest to obtain and keep all costs for service and parts under this warranty. LIMITATION OF REMEDIES CUSTOMER'S SOLE...
Complete Owner's Guide (English)
Page 13
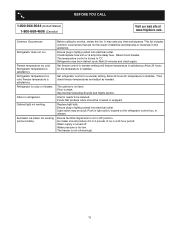
Before You Call 1-800-944-9044 (United States) 1-800-668-4606 (Canada) Visit our web site at www.frigidaire.com. Refrigerator is turned to 3 pounds of defective workmanship or materials in a 24 hour period. Automatic ice maker not working . This list includes... check freezer temperatures and adjust as needed. The cabinet is too low. Interior needs to warmer setting until freezer temperature is satisfactory. Refrigerator temperature is satisfactory. Before calling for service, review this appliance. Set freezer control to be in UP position. Ice maker should be stuck...
Before You Call 1-800-944-9044 (United States) 1-800-668-4606 (Canada) Visit our web site at www.frigidaire.com. Refrigerator is turned to 3 pounds of defective workmanship or materials in a 24 hour period. Automatic ice maker not working . This list includes... check freezer temperatures and adjust as needed. The cabinet is too low. Interior needs to warmer setting until freezer temperature is satisfactory. Refrigerator temperature is satisfactory. Before calling for service, review this appliance. Set freezer control to be in UP position. Ice maker should be stuck...


