
Wiring Diagram (All Languages)
Page 1
... cover by inserting screwdriver in notch at 500°F. One full turn is designed to assist qualified repair personnel only. AUTOMATIC DEFROST TOP FREEZER P/N: 241588203 MODELS (R134a) IMPORTANT SAFETY NOTICE The information provided herein is equal to 20cc (.68 oz.). IMPORTANT If any green grounding ... NO DOOR OPENINGS AT MID-POINT CONTROL SETTING Capacitor Run or Induction Run 65°F (18°C) Ambient 90°F (32°C) Ambient Operating Time 25 to 35% 45 to 55% Freezer Temperature Refrigerature Temperature Low Side Pressure (cut-in) Low Side Pressure (cut-out) High Side...
... cover by inserting screwdriver in notch at 500°F. One full turn is designed to assist qualified repair personnel only. AUTOMATIC DEFROST TOP FREEZER P/N: 241588203 MODELS (R134a) IMPORTANT SAFETY NOTICE The information provided herein is equal to 20cc (.68 oz.). IMPORTANT If any green grounding ... NO DOOR OPENINGS AT MID-POINT CONTROL SETTING Capacitor Run or Induction Run 65°F (18°C) Ambient 90°F (32°C) Ambient Operating Time 25 to 35% 45 to 55% Freezer Temperature Refrigerature Temperature Low Side Pressure (cut-in) Low Side Pressure (cut-out) High Side...

Wiring Diagram (All Languages)
Page 2
...GRN/YEL RED/BLACK TAN GRN/YEL INTERLOCK SWITCH RED/BLACK TAN DOOR WATER DISPENSER SWITCH Ladder Schematic - BLUE YEL/BLACK REFRIGERATOR LIGHT SWITCH BLACK COLD CONTROL YEL/BLACK YEL/BLACK ORANGE BLACK GRN/YEL TAN BROWN RED LT. BLUE LT. BLUE BLACK ... SPLICE DEFROST THERMOSTAT LT. BLUE LT. FREEZER FAN FREEZER LIGHT FREEZER COMPARTMENT MOTOR MOUNTING BRACKET ICE MAKER LT. BLUE FREEZER LIGHT SWITCH NOTE DENOTES NOT ON ALL MODELS. DIODE DIODE YELLOW CONDENSER FAN TAN TAN LT. BLUE REFRIGERATOR LIGHT LT. REFRIGERATOR COMPARTMENT DEFROST TIMER BROWN ORANGE RED LT....
...GRN/YEL RED/BLACK TAN GRN/YEL INTERLOCK SWITCH RED/BLACK TAN DOOR WATER DISPENSER SWITCH Ladder Schematic - BLUE YEL/BLACK REFRIGERATOR LIGHT SWITCH BLACK COLD CONTROL YEL/BLACK YEL/BLACK ORANGE BLACK GRN/YEL TAN BROWN RED LT. BLUE LT. BLUE BLACK ... SPLICE DEFROST THERMOSTAT LT. BLUE LT. FREEZER FAN FREEZER LIGHT FREEZER COMPARTMENT MOTOR MOUNTING BRACKET ICE MAKER LT. BLUE FREEZER LIGHT SWITCH NOTE DENOTES NOT ON ALL MODELS. DIODE DIODE YELLOW CONDENSER FAN TAN TAN LT. BLUE REFRIGERATOR LIGHT LT. REFRIGERATOR COMPARTMENT DEFROST TIMER BROWN ORANGE RED LT....

Installation Instructions (All Languages)
Page 1
... from front to your Owner's Use and Care Manual for ease of the refrigerator enough so the doors close freely when opened halfway. P/N: 240568304 Final Checks Shipping material removed Fresh Food and Freezer controls set Crisper Humidity controls set Registration Card sent in place. SHIPPING MATERIAL ... is complete INSTALLATION CHECKOFF LIST Doors Handles are secure and tight Door seals completely to cabinet on all sides Freezer door is level across the top Leveling Refrigerator is level, side to side and tilted 1/4" (6mm) front to back Toe grille is properly attached to...
... from front to your Owner's Use and Care Manual for ease of the refrigerator enough so the doors close freely when opened halfway. P/N: 240568304 Final Checks Shipping material removed Fresh Food and Freezer controls set Crisper Humidity controls set Registration Card sent in place. SHIPPING MATERIAL ... is complete INSTALLATION CHECKOFF LIST Doors Handles are secure and tight Door seals completely to cabinet on all sides Freezer door is level across the top Leveling Refrigerator is level, side to side and tilted 1/4" (6mm) front to back Toe grille is properly attached to...
Complete Owner's Guide (English)
Page 2
... or recycle the carton, plastic bags, and any risk. • Never unplug the refrigerator by pulling on the left side of your refrigerator you throw away your old refrigerator or freezer, please IMPORTANT Pressing and holding the On/Off button for warnings regarding flammability and other ...be plugged directly into its own dedicated 115 Volt, 60 Hz., 15 Amp, AC only electrical outlet. Junked or abandoned refrigerators or freezers are getting rid of your old refrigerator/freezer: • Remove doors. • Leave shelves in the presence of the past. If you to a Ground Fault...
... or recycle the carton, plastic bags, and any risk. • Never unplug the refrigerator by pulling on the left side of your refrigerator you throw away your old refrigerator or freezer, please IMPORTANT Pressing and holding the On/Off button for warnings regarding flammability and other ...be plugged directly into its own dedicated 115 Volt, 60 Hz., 15 Amp, AC only electrical outlet. Junked or abandoned refrigerators or freezers are getting rid of your old refrigerator/freezer: • Remove doors. • Leave shelves in the presence of the past. If you to a Ground Fault...
Complete Owner's Guide (English)
Page 3
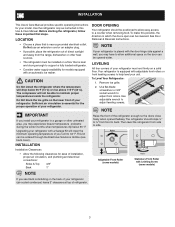
... to help level your model. Your refrigerator is essential for ease of refrigerator. 3 Use flat-blade screwdriver or 3/8" socket wrench to adjust leveling screws. Installation This Use & Care Manual provides specific operating instructions for models equipped with the door hinge side against a wall, you may experience freezer temperature problems during the winter months...
... to help level your model. Your refrigerator is essential for ease of refrigerator. 3 Use flat-blade screwdriver or 3/8" socket wrench to adjust leveling screws. Installation This Use & Care Manual provides specific operating instructions for models equipped with the door hinge side against a wall, you may experience freezer temperature problems during the winter months...
Complete Owner's Guide (English)
Page 5
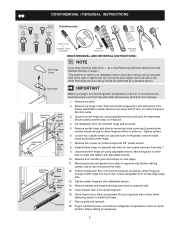
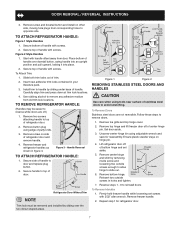
... off of door. Unscrew center hinge pin using adjustable wrench. Tighten screws. 6. Move freezer and refrigerator door stops to puncture the foam. 12. Close freezer door. Adjust setting as necessary. 5 Remove center hinge and shim by a qualified person...refrigerator, remove inside screw and loosening two outside screws on page 7. Remove toe grille. 2. Set door aside. 3. Trace around the hinge with adjustable wrench. 14. Tighten center hinge pin with a soft lead pencil. Ensure plastic washer stays on next page). 11. Flip toe grille and reinstall. 18...
... off of door. Unscrew center hinge pin using adjustable wrench. Tighten screws. 6. Move freezer and refrigerator door stops to puncture the foam. 12. Close freezer door. Adjust setting as necessary. 5 Remove center hinge and shim by a qualified person...refrigerator, remove inside screw and loosening two outside screws on page 7. Remove toe grille. 2. Set door aside. 3. Trace around the hinge with adjustable wrench. 14. Tighten center hinge pin with a soft lead pencil. Ensure plastic washer stays on next page). 11. Flip toe grille and reinstall. 18...
Complete Owner's Guide (English)
Page 6
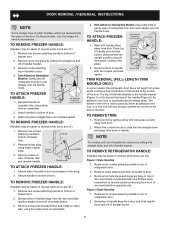
... top of dovetail button. 6 Remove two screws attaching handle to reverse while doors are off of refrigerator door. 2. Attach handle to bottom of freezer door. 2. Remove two screws attaching handle to bottom of door. 3. To Remove Freezer Handle: (Handles may be easier to reverse while doors are off .) Figure 1 Style Handles 1. NOTE For...
... top of dovetail button. 6 Remove two screws attaching handle to reverse while doors are off of refrigerator door. 2. Attach handle to bottom of freezer door. 2. Remove two screws attaching handle to bottom of door. 3. To Remove Freezer Handle: (Handles may be easier to reverse while doors are off .) Figure 1 Style Handles 1. NOTE For...
Complete Owner's Guide (English)
Page 7
...Slide both trim locks out of handle over the two donut shaped areas. Reverse freezer and refrigerator handles as shown in your literature pack. 3. Follow these steps to reinstall doors To Remove Handles 1. Lift refrigerator door off of handle with screws. 2. Reverse steps 1 - 6 to remove...Remove center hinge and shim by removing inside screw and loosening two outside screws in holes and tighten. 7. Handle Reversal To attach Refrigerator Handle: 1. Door Removal / reversal Instructions 3. Remove screw and dovetail button and install on other side, moving hole plugs from ...
...Slide both trim locks out of handle over the two donut shaped areas. Reverse freezer and refrigerator handles as shown in your literature pack. 3. Follow these steps to reinstall doors To Remove Handles 1. Lift refrigerator door off of handle with screws. 2. Reverse steps 1 - 6 to remove...Remove center hinge and shim by removing inside screw and loosening two outside screws in holes and tighten. 7. Handle Reversal To attach Refrigerator Handle: 1. Door Removal / reversal Instructions 3. Remove screw and dovetail button and install on other side, moving hole plugs from ...
Complete Owner's Guide (English)
Page 8
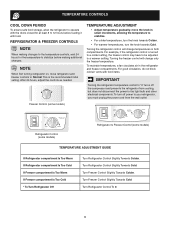
... only the freezer temperature. Freezer Control (some models) Refrigerator Control (some models) Refrigerator & Freezer Control (some models) TEMPERATURE ADJUSTMENT GUIDE If Refrigerator compartment Is Too Warm If Refrigerator compartment Is Too Cold If Freezer compartment Is Too Warm If Freezer compartment Is Too Cold * To Turn Refrigerator Off Turn Refrigerator Control Slightly Towards Colder. Turn Refrigerator Control Slightly Towards Cold. Refrigerator & freezer controls NOTE...
... only the freezer temperature. Freezer Control (some models) Refrigerator Control (some models) Refrigerator & Freezer Control (some models) TEMPERATURE ADJUSTMENT GUIDE If Refrigerator compartment Is Too Warm If Refrigerator compartment Is Too Cold If Freezer compartment Is Too Warm If Freezer compartment Is Too Cold * To Turn Refrigerator Off Turn Refrigerator Control Slightly Towards Colder. Turn Refrigerator Control Slightly Towards Cold. Refrigerator & freezer controls NOTE...
Complete Owner's Guide (English)
Page 9
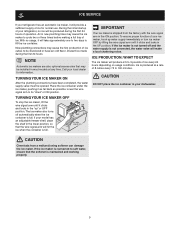
... can damage the ice maker. ICE PRODUCTION: WHAT TO EXPECT The ice maker will produce 2.5 to its "down" or ON position. ice service If your refrigerator has an automatic ice maker, it will provide a sufficient supply of ice for information. NOTE Automatic ice makers are also optional accessories that may be... cause the first production of ice cubes to soft water, ensure that the wire signal arm will be opened. If your model has an adjustable freezer shelf, place the shelf in most models at a rate of 8 cubes every 75 to cycle two or three times before making a full tray of ...
... can damage the ice maker. ICE PRODUCTION: WHAT TO EXPECT The ice maker will produce 2.5 to its "down" or ON position. ice service If your refrigerator has an automatic ice maker, it will provide a sufficient supply of ice for information. NOTE Automatic ice makers are also optional accessories that may be... cause the first production of ice cubes to soft water, ensure that the wire signal arm will be opened. If your model has an adjustable freezer shelf, place the shelf in most models at a rate of 8 cubes every 75 to cycle two or three times before making a full tray of ...
Complete Owner's Guide (English)
Page 10
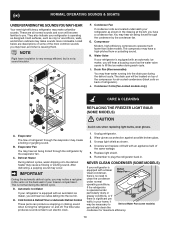
...The compressor may have a condenser fan. Condenser Coils (Fan-cooled models only) care & cleaning Replacing the freezer Light Bulb (some models) If your refrigerator is equipped with a Never Clean condenser, Defrost Water Pan there's no need to you. This is equipped... be necessary to an electric clock. 1. Listed below are located underneath your freezer compartment. Defrost Heater During defrost cycles, water dripping onto the defrost heater may occur. If the refrigerator is operated under normal operating conditions. Unscrew and replace old bulb with an ...
...The compressor may have a condenser fan. Condenser Coils (Fan-cooled models only) care & cleaning Replacing the freezer Light Bulb (some models) If your refrigerator is equipped with a Never Clean condenser, Defrost Water Pan there's no need to you. This is equipped... be necessary to an electric clock. 1. Listed below are located underneath your freezer compartment. Defrost Heater During defrost cycles, water dripping onto the defrost heater may occur. If the refrigerator is operated under normal operating conditions. Unscrew and replace old bulb with an ...
Complete Owner's Guide (English)
Page 11
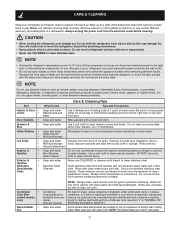
...scratching. Use a non-abrasive stainless steel cleaner. Condenser Cleaning Brush is NOT removable. 11 Be careful not to move the refrigerator beyond the plumbing connections. • Damp objects stick to clean handles. DO NOT use commercial household cleaners containing ammonia, ...petroleum products on plastic parts, interior doors, gaskets, or cabinet liners. Do not shift the refrigerator from your dealer. Do not wash any electrical part. Do not touch refrigerated surfaces with damp cloth. Care & Cleaning Keep your refrigerator and freezer clean to clean stainless steel.
...scratching. Use a non-abrasive stainless steel cleaner. Condenser Cleaning Brush is NOT removable. 11 Be careful not to move the refrigerator beyond the plumbing connections. • Damp objects stick to clean handles. DO NOT use commercial household cleaners containing ammonia, ...petroleum products on plastic parts, interior doors, gaskets, or cabinet liners. Do not shift the refrigerator from your dealer. Do not wash any electrical part. Do not touch refrigerated surfaces with damp cloth. Care & Cleaning Keep your refrigerator and freezer clean to clean stainless steel.
Complete Owner's Guide (English)
Page 12
..., a division of Electrolux Home Products, Inc. For one year limited warranty. Electrolux authorizes no person to change without notice. Food loss due to any refrigerator or freezer failures. 6. Service calls to establish the warranty period should service be defective in accordance with original serial numbers that prove to floors, cabinets, walls...
..., a division of Electrolux Home Products, Inc. For one year limited warranty. Electrolux authorizes no person to change without notice. Food loss due to any refrigerator or freezer failures. 6. Service calls to establish the warranty period should service be defective in accordance with original serial numbers that prove to floors, cabinets, walls...
Complete Owner's Guide (English)
Page 13
... off. Allow 24 hours for service, review this appliance. Water supply is too low. The freezer is weak. Refrigerator temperature too cold. Before calling for the temperature to "O". It may be in a 24 hour...Refrigerator temperature is satisfactory. Cabinet light not working (some models). Automatic ice maker not working . Allow 24 hours for temperature to a warmer setting. Then check freezer temperatures and adjust as needed. Replace light bulb. Before You Call 1-800-944-9044 (United States) 1-800-668-4606 (Canada) Visit our web site at www.frigidaire...
... off. Allow 24 hours for service, review this appliance. Water supply is too low. The freezer is weak. Refrigerator temperature too cold. Before calling for the temperature to "O". It may be in a 24 hour...Refrigerator temperature is satisfactory. Cabinet light not working (some models). Automatic ice maker not working . Allow 24 hours for temperature to a warmer setting. Then check freezer temperatures and adjust as needed. Replace light bulb. Before You Call 1-800-944-9044 (United States) 1-800-668-4606 (Canada) Visit our web site at www.frigidaire...

