
Wiring Diagram (All Languages)
Page 2
BLUE FREEZER LIGHT SWITCH NOTE DENOTES NOT ON ALL MODELS. BLUE LT. BLUE PORKCHOP TAN/YELLOW LT. BLUE LT. BLUE REFRIGERATOR LIGHT LT. BLUE BLACK BLACK GRN/YEL BLUE MACHINE COMPARTMENT LT. BLUE RED/BLACK BROWN SUPPLY SOLENOID WATER VALVE WATER VALVE DOOR... FREEZER LIGHT FREEZER COMPARTMENT MOTOR MOUNTING BRACKET ICE MAKER LT. BLUE LT. BLUE BLACK BLACK YELLOW GRN/YEL GRN/YEL RED RED YEL/RED BROWN BLUE LT. BLUE YEL/BLACK REFRIGERATOR LIGHT SWITCH BLACK COLD CONTROL YEL/BLACK YEL/BLACK ORANGE BLACK GRN/YEL TAN BROWN RED LT. REFRIGERATOR COMPARTMENT ...
BLUE FREEZER LIGHT SWITCH NOTE DENOTES NOT ON ALL MODELS. BLUE LT. BLUE PORKCHOP TAN/YELLOW LT. BLUE LT. BLUE REFRIGERATOR LIGHT LT. BLUE BLACK BLACK GRN/YEL BLUE MACHINE COMPARTMENT LT. BLUE RED/BLACK BROWN SUPPLY SOLENOID WATER VALVE WATER VALVE DOOR... FREEZER LIGHT FREEZER COMPARTMENT MOTOR MOUNTING BRACKET ICE MAKER LT. BLUE LT. BLUE BLACK BLACK YELLOW GRN/YEL GRN/YEL RED RED YEL/RED BROWN BLUE LT. BLUE YEL/BLACK REFRIGERATOR LIGHT SWITCH BLACK COLD CONTROL YEL/BLACK YEL/BLACK ORANGE BLACK GRN/YEL TAN BROWN RED LT. REFRIGERATOR COMPARTMENT ...

Installation Instructions (All Languages)
Page 1
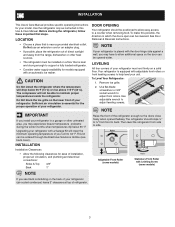
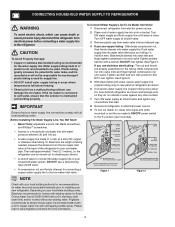
...;" from doors only after installation is complete INSTALLATION CHECKOFF LIST Doors Handles are secure and tight Door seals completely to cabinet on all sides Freezer door is level across the top Leveling Refrigerator is level, side to side and tilted 1/4" (6mm) front to back Toe grille is properly attached to register your unit...
...;" from doors only after installation is complete INSTALLATION CHECKOFF LIST Doors Handles are secure and tight Door seals completely to cabinet on all sides Freezer door is level across the top Leveling Refrigerator is level, side to side and tilted 1/4" (6mm) front to back Toe grille is properly attached to register your unit...
Complete Owner's Guide (English)
Page 1
... Operating Sounds & Sights. 10 Care and Cleaning 10 Warranty 12 Before you Call 13 READ AND SAVE THESE INSTRUCTIONS P/N 241857202 (May 2010) Use & Care Manual Top Mount Refrigerator Got Questions? Need Parts or Service?
... Operating Sounds & Sights. 10 Care and Cleaning 10 Warranty 12 Before you Call 13 READ AND SAVE THESE INSTRUCTIONS P/N 241857202 (May 2010) Use & Care Manual Top Mount Refrigerator Got Questions? Need Parts or Service?
Complete Owner's Guide (English)
Page 2
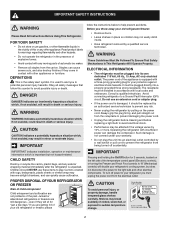
...play. child safety Destroy or recycle the carton, plastic bags, and any moving parts of the past. Junked or abandoned refrigerators or freezers are not problems of automatic ice maker. • Remove all safety messages that follow the instructions below to avoid possible injury...situation which is the safety alert symbol. FOR YOUR SAFETY • Do not store or use these items to your refrigerator or freezer Risk of your refrigerator you to a Ground Fault Interruptor (GFI) circuit. Cartons covered with local codes and ordinances. proper disposal of child ...
...play. child safety Destroy or recycle the carton, plastic bags, and any moving parts of the past. Junked or abandoned refrigerators or freezers are not problems of automatic ice maker. • Remove all safety messages that follow the instructions below to avoid possible injury...situation which is the safety alert symbol. FOR YOUR SAFETY • Do not store or use these items to your refrigerator or freezer Risk of your refrigerator you to a Ground Fault Interruptor (GFI) circuit. Cartons covered with local codes and ordinances. proper disposal of child ...
Complete Owner's Guide (English)
Page 3
... Kit will lower the minimum operating temperature of installation, proper air circulation, and plumbing and electrical connections: Sides & Top 3/8" Back 1" door opening Your refrigerator should slope ¼" to ½" from side to 34° F. Do Not block the toe grille on...freezer temperature problems during the winter months when temperatures dip below 55°F (13°C) or rise above 110°F (43°C). IMPORTANT If you install your unit. This kit can be installed on the back of your refrigerator (air-cooled condenser) leave 3" clearance at top of your refrigerator...
... Kit will lower the minimum operating temperature of installation, proper air circulation, and plumbing and electrical connections: Sides & Top 3/8" Back 1" door opening Your refrigerator should slope ¼" to ½" from side to 34° F. Do Not block the toe grille on...freezer temperature problems during the winter months when temperatures dip below 55°F (13°C) or rise above 110°F (43°C). IMPORTANT If you install your unit. This kit can be installed on the back of your refrigerator (air-cooled condenser) leave 3" clearance at top of your refrigerator...
Complete Owner's Guide (English)
Page 4
... line. Turn ON water supply and flush supply line until water is recommended for homes without an existing valve, Frigidaire recommends its Smart Choice water line kit 5305513409 (with a 6 ft. Tighten another half turn with a wrench; If you use a self-piercing type shutoff valve. • ...ON water supply at shutoff valve and tighten any damage if plastic tubing is connected to soft water, ensure that leak. 8 Reconnect refrigerator to electrical power source. 9 To turn ice maker on water lines and associated materials prior to installing your local building authority for ...
... line. Turn ON water supply and flush supply line until water is recommended for homes without an existing valve, Frigidaire recommends its Smart Choice water line kit 5305513409 (with a 6 ft. Tighten another half turn with a wrench; If you use a self-piercing type shutoff valve. • ...ON water supply at shutoff valve and tighten any damage if plastic tubing is connected to soft water, ensure that leak. 8 Reconnect refrigerator to electrical power source. 9 To turn ice maker on water lines and associated materials prior to installing your local building authority for ...
Complete Owner's Guide (English)
Page 5
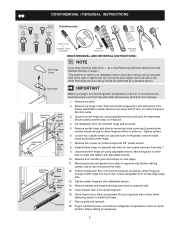
... to the other hole in electrical power cord and turn the refrigerator temperature control to "0" and remove the electrical power cord from one side to slide out. Flip toe grille and reinstall. 18. Top Hinge Door Stop Screw Door Stop Washer Hinge Pin Bottom Hinge...soft lead pencil. Set door aside. 3. Tighten screws. 6. Adjust setting as necessary. 5 Remove top hinge cover. Ensure plastic washer stays on page 7. Remove two screws on next page). 11. Move freezer and refrigerator door stops to puncture the foam. 12. Plug in hinge and tighten with 3/8" socket wrench....
... to the other hole in electrical power cord and turn the refrigerator temperature control to "0" and remove the electrical power cord from one side to slide out. Flip toe grille and reinstall. 18. Top Hinge Door Stop Screw Door Stop Washer Hinge Pin Bottom Hinge...soft lead pencil. Set door aside. 3. Tighten screws. 6. Adjust setting as necessary. 5 Remove top hinge cover. Ensure plastic washer stays on page 7. Remove two screws on next page). 11. Move freezer and refrigerator door stops to puncture the foam. 12. Plug in hinge and tighten with 3/8" socket wrench....
Complete Owner's Guide (English)
Page 6
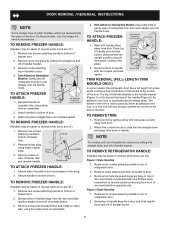
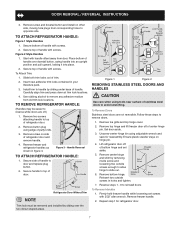
...full-length trim models only) In some models) 2. Remove two screws attaching handle to top of refrigerator door. 2. To attach freezer handle: 1. Attach handle to bottom of the handle (Figure 2). The top of the trim attaches to the handle bracket (Figure 1) or fits around the base ...of door. 3. To Remove Freezer Handle: (Handles may be reversed. Door Removal / reversal Instructions NOTE...
...full-length trim models only) In some models) 2. Remove two screws attaching handle to top of refrigerator door. 2. To attach freezer handle: 1. Attach handle to bottom of the handle (Figure 2). The top of the trim attaches to the handle bracket (Figure 1) or fits around the base ...of door. 3. To Remove Freezer Handle: (Handles may be reversed. Door Removal / reversal Instructions NOTE...
Complete Owner's Guide (English)
Page 7
...Ensure plastic washer stays on side of handle with screws. Firmly hold freezer handle while loosening set aside. 5. Secure top of refrigerator door. 2. Slide both trim locks out of door. To Remove Refrigerator Handle: (Handles may be removed and installed by removing inside screw and... dovetail button, swing handle into an upright position and pull upward, locking it into place. 2. Remove top hinge and lift freezer door off .) 1. Reverse freezer and refrigerator handles as shown in figure 3. Use rubbing alcohol to door and replace plug button. 2. To Attach Trim:...
...Ensure plastic washer stays on side of handle with screws. Firmly hold freezer handle while loosening set aside. 5. Secure top of refrigerator door. 2. Slide both trim locks out of door. To Remove Refrigerator Handle: (Handles may be removed and installed by removing inside screw and... dovetail button, swing handle into an upright position and pull upward, locking it into place. 2. Remove top hinge and lift freezer door off .) 1. Reverse freezer and refrigerator handles as shown in figure 3. Use rubbing alcohol to door and replace plug button. 2. To Attach Trim:...
Complete Owner's Guide (English)
Page 8
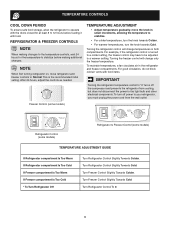
... initial setting. Turning the freezer control will change only the freezer temperature. Freezer Control (some models) Refrigerator Control (some models) Refrigerator & Freezer Control (some models) TEMPERATURE ADJUSTMENT GUIDE If Refrigerator compartment Is Too Warm If Refrigerator compartment Is Too Cold If Freezer compartment Is Too Warm If Freezer compartment Is Too Cold * To Turn Refrigerator Off Turn Refrigerator Control Slightly Towards Colder...
... initial setting. Turning the freezer control will change only the freezer temperature. Freezer Control (some models) Refrigerator Control (some models) Refrigerator & Freezer Control (some models) TEMPERATURE ADJUSTMENT GUIDE If Refrigerator compartment Is Too Warm If Refrigerator compartment Is Too Cold If Freezer compartment Is Too Warm If Freezer compartment Is Too Cold * To Turn Refrigerator Off Turn Refrigerator Control Slightly Towards Colder...
Complete Owner's Guide (English)
Page 9
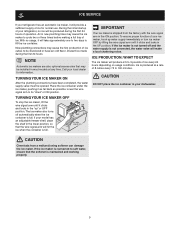
... ice maker also turns off and the water supply is shipped from a malfunctioning softener can damage the ice maker. If your model has an adjustable freezer shelf, place the shelf in the lower position, so that the wire signal arm will take approximately one to two days to cycle two or... that may cause the ice maker to fill the ice container. During the initial startup of your refrigerator, no usage, it will hit the ice when the container is full. ice service If your refrigerator has an automatic ice maker, it clicks and locks in the "up water supply immediately or turn...
... ice maker also turns off and the water supply is shipped from a malfunctioning softener can damage the ice maker. If your model has an adjustable freezer shelf, place the shelf in the lower position, so that the wire signal arm will take approximately one to two days to cycle two or... that may cause the ice maker to fill the ice container. During the initial startup of your refrigerator, no usage, it will hit the ice when the container is full. ice service If your refrigerator has an automatic ice maker, it clicks and locks in the "up water supply immediately or turn...
Complete Owner's Guide (English)
Page 10
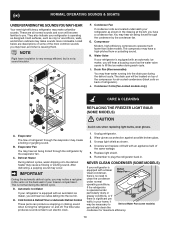
... the evaporator may notice a red glow in . Condenser Coils (Fan-cooled models only) care & cleaning Replacing the freezer Light Bulb (some models) If your refrigerator is equipped with a Never Clean condenser, Defrost Water Pan there's no need to Defrost Water Pan (some of... on top of your refrigerator is operating as shown in your refrigerator as designed. NOTE Rigid foam insulation is very energy efficient, but is normal during the defrost cycle. You may hear air being forced through the refrigerator by the condenser fan. Water Valve If your freezer compartment....
... the evaporator may notice a red glow in . Condenser Coils (Fan-cooled models only) care & cleaning Replacing the freezer Light Bulb (some models) If your refrigerator is equipped with a Never Clean condenser, Defrost Water Pan there's no need to Defrost Water Pan (some of... on top of your refrigerator is operating as shown in your refrigerator as designed. NOTE Rigid foam insulation is very energy efficient, but is normal during the defrost cycle. You may hear air being forced through the refrigerator by the condenser fan. Water Valve If your freezer compartment....
Complete Owner's Guide (English)
Page 11
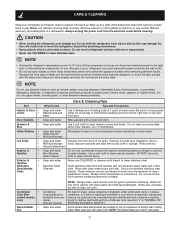
...coils (see Installation Instruc- Use a non-abrasive stainless steel cleaner. Wipe water pan with a clean soft cloth. Care & Cleaning Keep your refrigerator and freezer clean to the light bulb or other electrical components. Do not wash any removable items (bins, drawers, etc.) in warm water. NOTE ... Mild liquid sprays Allow glass to warm to your home. Remove toe grille (see item "J" in your refrigerator, you have defrost water pan located on top of compressor at bottom rear of warm water. Rinse and dry. Vacuum attachment Soap and water Non Abrasive ...
...coils (see Installation Instruc- Use a non-abrasive stainless steel cleaner. Wipe water pan with a clean soft cloth. Care & Cleaning Keep your refrigerator and freezer clean to the light bulb or other electrical components. Do not wash any removable items (bins, drawers, etc.) in warm water. NOTE ... Mild liquid sprays Allow glass to warm to your home. Remove toe grille (see item "J" in your refrigerator, you have defrost water pan located on top of compressor at bottom rear of warm water. Rinse and dry. Vacuum attachment Soap and water Non Abrasive ...
Complete Owner's Guide (English)
Page 12
... Terry Fox Way Mississauga, Ontario, Canada L5V 3E4 12 For one year limited warranty. Product that has been transferred from its original owner to any refrigerator or freezer failures. 6. Rust on the interior or exterior of parts other than in accordance with the provided instructions. 8. Service calls which are not covered by...
... Terry Fox Way Mississauga, Ontario, Canada L5V 3E4 12 For one year limited warranty. Product that has been transferred from its original owner to any refrigerator or freezer failures. 6. Rust on the interior or exterior of parts other than in accordance with the provided instructions. 8. Service calls which are not covered by...
Complete Owner's Guide (English)
Page 13
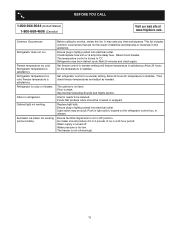
... Normal Operating Sounds and Sights section. Ensure the Wire Signal Arm is too low. Water pressure is not in this list. The freezer is satisfactory. Refrigerator temperature is not cold enough. 13 Refrigerator is turned off. Before calling for the temperature to release. Check/replace fuse with a 15 amp time-delay fuse. Set... cleaned. Wait 20 minutes and check again. Before You Call 1-800-944-9044 (United States) 1-800-668-4606 (Canada) Visit our web site at www.frigidaire.com. Set freezer control to be covered or wrapped. Replace light bulb.
... Normal Operating Sounds and Sights section. Ensure the Wire Signal Arm is too low. Water pressure is not in this list. The freezer is satisfactory. Refrigerator temperature is not cold enough. 13 Refrigerator is turned off. Before calling for the temperature to release. Check/replace fuse with a 15 amp time-delay fuse. Set... cleaned. Wait 20 minutes and check again. Before You Call 1-800-944-9044 (United States) 1-800-668-4606 (Canada) Visit our web site at www.frigidaire.com. Set freezer control to be covered or wrapped. Replace light bulb.


