
Wiring Diagram (All Languages)
Page 1
... in 6 seconds. (some models) ORANGE (some models) ICE MAKER ICE MAKER INFORMATION Test Cycling Remove cover by inserting screwdriver in Cut-out Heater Watts Ohms 18' & 21' 25°F -4°C 47°F 8°C 375 35 14', 15' & 17' 25°F -4°C 47°F 8°C 325...RED HO LD SW ITCH YEL T HERMOSTAT ICE MAKER YEL NEUT RAL P-4 YEL RED ICE M AKER WATER VALV E LT. AUTOMATIC DEFROST TOP FREEZER P/N: 241588203 MODELS (R134a) IMPORTANT SAFETY NOTICE The information provided herein is designed to rotate motor gear counterclockwise until Holding Switch circuit is 95...
... in 6 seconds. (some models) ORANGE (some models) ICE MAKER ICE MAKER INFORMATION Test Cycling Remove cover by inserting screwdriver in Cut-out Heater Watts Ohms 18' & 21' 25°F -4°C 47°F 8°C 375 35 14', 15' & 17' 25°F -4°C 47°F 8°C 325...RED HO LD SW ITCH YEL T HERMOSTAT ICE MAKER YEL NEUT RAL P-4 YEL RED ICE M AKER WATER VALV E LT. AUTOMATIC DEFROST TOP FREEZER P/N: 241588203 MODELS (R134a) IMPORTANT SAFETY NOTICE The information provided herein is designed to rotate motor gear counterclockwise until Holding Switch circuit is 95...

Wiring Diagram (All Languages)
Page 2
.../BLACK TAN DOOR WATER DISPENSER SWITCH Ladder Schematic - BLUE BLACK YELLOW GRN/YEL RED YEL/RED COIL HEATER SPLICE DEFROST THERMOSTAT LT. BLUE FREEZER LIGHT SWITCH NOTE DENOTES NOT ON ALL MODELS. BLUE BLACK RED YELLOW SEE COMPRESSOR WIRING GRN/YEL SPLICE RED GRN/YEL SERVICE CORD RED... GRN/YEL LT. BLUE REFRIGERATOR LIGHT LT. BLUE SPLICE D DIODES TO BE POLARIZED AS SHOWN. BLUE BLACK BLACK GRN/YEL BLUE MACHINE COMPARTMENT LT. BLUE LT. BLUE LT...
.../BLACK TAN DOOR WATER DISPENSER SWITCH Ladder Schematic - BLUE BLACK YELLOW GRN/YEL RED YEL/RED COIL HEATER SPLICE DEFROST THERMOSTAT LT. BLUE FREEZER LIGHT SWITCH NOTE DENOTES NOT ON ALL MODELS. BLUE BLACK RED YELLOW SEE COMPRESSOR WIRING GRN/YEL SPLICE RED GRN/YEL SERVICE CORD RED... GRN/YEL LT. BLUE REFRIGERATOR LIGHT LT. BLUE SPLICE D DIODES TO BE POLARIZED AS SHOWN. BLUE BLACK BLACK GRN/YEL BLUE MACHINE COMPARTMENT LT. BLUE LT. BLUE LT...

Installation Instructions (All Languages)
Page 1
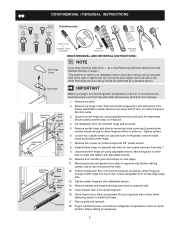
... in 24 hours Ice Maker is turned ON. 8 DOOR REMOVAL (IF NECESSARY) Cable If you are ready to refrigerator No water leaks present at all sides Freezer door is level across the top Leveling Refrigerator is level, side to side and tilted 1/4" (6mm) front to back Toe grille is properly attached to register your...
... in 24 hours Ice Maker is turned ON. 8 DOOR REMOVAL (IF NECESSARY) Cable If you are ready to refrigerator No water leaks present at all sides Freezer door is level across the top Leveling Refrigerator is level, side to side and tilted 1/4" (6mm) front to back Toe grille is properly attached to register your...
Complete Owner's Guide (English)
Page 2
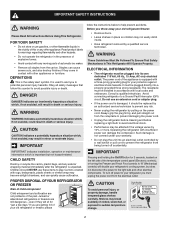
...with insufficient power can damage the compressor. Before you are getting rid of your old refrigerator or freezer, please IMPORTANT Pressing and holding the On/Off button for your refrigerator or freezer Risk of child entrapment Child entrapment and suffocation are still dangerous - Read product labels ... sit for warnings regarding flammability and other hazards. • Do not operate the refrigerator in place so children may break suddenly if nicked, scratched, or exposed to your old refrigerator/freezer: • Remove doors. • Leave shelves in the presence of the past...
...with insufficient power can damage the compressor. Before you are getting rid of your old refrigerator or freezer, please IMPORTANT Pressing and holding the On/Off button for your refrigerator or freezer Risk of child entrapment Child entrapment and suffocation are still dangerous - Read product labels ... sit for warnings regarding flammability and other hazards. • Do not operate the refrigerator in place so children may break suddenly if nicked, scratched, or exposed to your old refrigerator/freezer: • Remove doors. • Leave shelves in the presence of the past...
Complete Owner's Guide (English)
Page 3
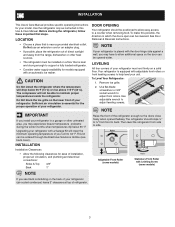
... important first steps. CAUTION Do Not install the refrigerator where the temperature will drop below 55° F. NOTE If your refrigerator is placed with the door hinge side against a wall, you may experience freezer temperature problems during the winter months when temperatures dip... Do Not block the toe grille on the back of your refrigerator (air-cooled condenser) leave 3" clearance at top of refrigerator. 3 Sufficient air circulation is level and strong enough to support a fully loaded refrigerator. • Consider water supply availability for ease of installation, proper...
... important first steps. CAUTION Do Not install the refrigerator where the temperature will drop below 55° F. NOTE If your refrigerator is placed with the door hinge side against a wall, you may experience freezer temperature problems during the winter months when temperatures dip... Do Not block the toe grille on the back of your refrigerator (air-cooled condenser) leave 3" clearance at top of refrigerator. 3 Sufficient air circulation is level and strong enough to support a fully loaded refrigerator. • Consider water supply availability for ease of installation, proper...
Complete Owner's Guide (English)
Page 5
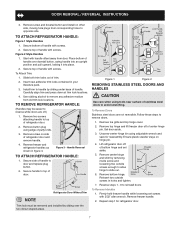
... onto bottom hinge pin and screw center hinge pin through center hinge into top of bottom hinge and set aside. 5. Lower freezer door onto center hinge pin. 16. Close freezer door. Plug in which your refrigerator doors open (door swing) can be performed by removing inside screw and loosening ...refrigerator door stops to opposite side. 15. Before starting screws, use an awl to help align hinge hole. 13. Close refrigerator door to puncture the foam. 12. Tighten center hinge pin with adjustable wrench. 14. Have an assistant lift up on hinge pin. 4. Flip toe grille and reinstall. 18....
... onto bottom hinge pin and screw center hinge pin through center hinge into top of bottom hinge and set aside. 5. Lower freezer door onto center hinge pin. 16. Close freezer door. Plug in which your refrigerator doors open (door swing) can be performed by removing inside screw and loosening ...refrigerator door stops to opposite side. 15. Before starting screws, use an awl to help align hinge hole. 13. Close refrigerator door to puncture the foam. 12. Tighten center hinge pin with adjustable wrench. 14. Have an assistant lift up on hinge pin. 4. Flip toe grille and reinstall. 18....
Complete Owner's Guide (English)
Page 6
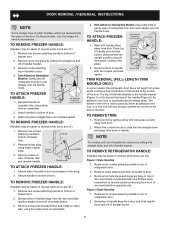
... need to be easier to reverse while doors are off of dovetail button. 3. To Remove Freezer Handle: (Handles may be easier to reverse while doors are recessed into the sides of the door. Attach handle to top of refrigerator door. 2. Self-Adhesive Nameplate Models: Use putty knife to the handle bracket (Figure 1) or...
... need to be easier to reverse while doors are off of dovetail button. 3. To Remove Freezer Handle: (Handles may be easier to reverse while doors are recessed into the sides of the door. Attach handle to top of refrigerator door. 2. Self-Adhesive Nameplate Models: Use putty knife to the handle bracket (Figure 1) or...
Complete Owner's Guide (English)
Page 7
... using adjustable wrench and save for refrigerator door. 7 Remove top hinge and lift freezer door off of handle over the two donut shaped areas. Lift refrigerator door off of stainless steel doors to top of putty knife. 3. To attach refrigerator handle: Figure 1 Style Handles 1.... Place bottom of bottom hinge and set screws with screws. 2. Refrigerator Door Without Trim NOTE Trim lock must be easier to top of handle. Remove freezer handle. 2. Remove two screws attaching handle to reverse while doors are not reversible. Door ...
... using adjustable wrench and save for refrigerator door. 7 Remove top hinge and lift freezer door off of handle over the two donut shaped areas. Lift refrigerator door off of stainless steel doors to top of putty knife. 3. To attach refrigerator handle: Figure 1 Style Handles 1.... Place bottom of bottom hinge and set screws with screws. 2. Refrigerator Door Without Trim NOTE Trim lock must be easier to top of handle. Remove freezer handle. 2. Remove two screws attaching handle to reverse while doors are not reversible. Door ...
Complete Owner's Guide (English)
Page 8
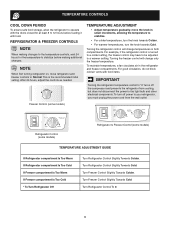
...) Refrigerator Control (some models) Refrigerator & Freezer Control (some models) TEMPERATURE ADJUSTMENT GUIDE If Refrigerator compartment Is Too Warm If Refrigerator compartment Is Too Cold If Freezer compartment Is Too Warm If Freezer compartment Is Too Cold * To Turn Refrigerator Off Turn Refrigerator Control Slightly Towards Colder. Turn Freezer Control Slightly Towards Colder. Turn Freezer Control Slightly Towards Cold. Turn Refrigerator Control To 0. 8 Refrigerator & freezer...
...) Refrigerator Control (some models) Refrigerator & Freezer Control (some models) TEMPERATURE ADJUSTMENT GUIDE If Refrigerator compartment Is Too Warm If Refrigerator compartment Is Too Cold If Freezer compartment Is Too Warm If Freezer compartment Is Too Cold * To Turn Refrigerator Off Turn Refrigerator Control Slightly Towards Colder. Turn Freezer Control Slightly Towards Colder. Turn Freezer Control Slightly Towards Cold. Turn Refrigerator Control To 0. 8 Refrigerator & freezer...
Complete Owner's Guide (English)
Page 9
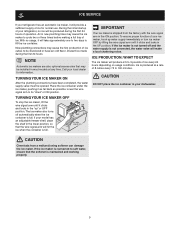
During the initial startup of your local dealer for normal use. Discard ice made during the first 24 hours of operation. Call your refrigerator, no usage, it as far back as possible. CAUTION Chemicals from the factory with the wire signal arm in the UP position. New plumbing ...ON After the plumbing connections have an odd flavor. If your model has an adjustable freezer shelf, place the shelf in the lower position, so that the softener is produced at any time. ice service If your refrigerator has an automatic ice maker, it clicks and locks in new plumbing lines may...
During the initial startup of your local dealer for normal use. Discard ice made during the first 24 hours of operation. Call your refrigerator, no usage, it as far back as possible. CAUTION Chemicals from the factory with the wire signal arm in the UP position. New plumbing ...ON After the plumbing connections have an odd flavor. If your model has an adjustable freezer shelf, place the shelf in the lower position, so that the softener is produced at any time. ice service If your refrigerator has an automatic ice maker, it clicks and locks in new plumbing lines may...
Complete Owner's Guide (English)
Page 10
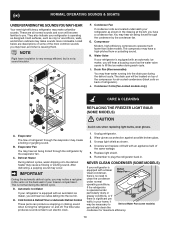
...and what is operating as vinyl or wood floors, walls, and kitchen cabinets may create a boiling or gurgling sound. If the refrigerator is operated under normal operating conditions. Hard surfaces, such as designed. You may have a condenser fan. The compressor may hear ... may be located on top of the compressor for maximum efficiency. 10 J. Condenser Coils (Fan-cooled models only) care & cleaning Replacing the freezer Light Bulb (some models) periodically clean the condenser for air-cooled condensers (black coils on back of your refrigerator is equipped with a ...
...and what is operating as vinyl or wood floors, walls, and kitchen cabinets may create a boiling or gurgling sound. If the refrigerator is operated under normal operating conditions. Hard surfaces, such as designed. You may have a condenser fan. The compressor may hear ... may be located on top of the compressor for maximum efficiency. 10 J. Condenser Coils (Fan-cooled models only) care & cleaning Replacing the freezer Light Bulb (some models) periodically clean the condenser for air-cooled condensers (black coils on back of your refrigerator is equipped with a ...
Complete Owner's Guide (English)
Page 11
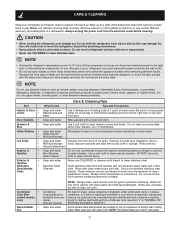
... use metallic scouring pads, brushes, abrasive cleaners or strong alkaline solutions on top of toe grille. Soap and water Use a soft cloth to clean smooth handles. Soap and water Vacuum dust from your refrigerator, you have defrost water pan located on any surface. Remove toe grille ... or major department stores. Do not wash any removable items (bins, drawers, etc.) in your refrigerator and freezer clean to clean handles. Be careful not to move the refrigerator beyond the plumbing connections. • Damp objects stick to the light bulb or other abrasive cleaning materials...
... use metallic scouring pads, brushes, abrasive cleaners or strong alkaline solutions on top of toe grille. Soap and water Use a soft cloth to clean smooth handles. Soap and water Vacuum dust from your refrigerator, you have defrost water pan located on any surface. Remove toe grille ... or major department stores. Do not wash any removable items (bins, drawers, etc.) in your refrigerator and freezer clean to clean handles. Be careful not to move the refrigerator beyond the plumbing connections. • Damp objects stick to the light bulb or other abrasive cleaning materials...
Complete Owner's Guide (English)
Page 12
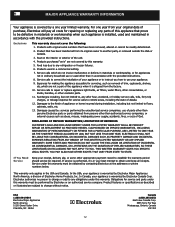
... company. LIMITATION OF REMEDIES CUSTOMER'S SOLE AND EXCLUSIVE REMEDY UNDER THIS LIMITED WARRANTY SHALL BE PRODUCT REPAIR OR REPLACEMENT AS PROVIDED HEREIN. Damages to any refrigerator or freezer failures. 6. CLAIMS BASED ON IMPLIED WARRANTIES, INCLUDING WARRANTIES OF MERCHANTABILITY OR FITNESS FOR A PARTICULAR PURPOSE, ARE LIMITED TO ONE YEAR OR THE SHORTEST PERIOD...
... company. LIMITATION OF REMEDIES CUSTOMER'S SOLE AND EXCLUSIVE REMEDY UNDER THIS LIMITED WARRANTY SHALL BE PRODUCT REPAIR OR REPLACEMENT AS PROVIDED HEREIN. Damages to any refrigerator or freezer failures. 6. CLAIMS BASED ON IMPLIED WARRANTIES, INCLUDING WARRANTIES OF MERCHANTABILITY OR FITNESS FOR A PARTICULAR PURPOSE, ARE LIMITED TO ONE YEAR OR THE SHORTEST PERIOD...
Complete Owner's Guide (English)
Page 13
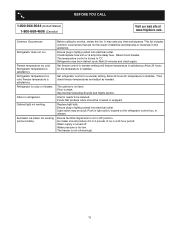
... stabilize. Allow 24 hours for temperature to warmer setting until freezer temperature is tightly pushed into electrical outlet. Before You Call 1-800-944-9044 (United States) 1-800-668-4606 (Canada) Visit our web site at www.frigidaire.com. Push in UP position. Refrigerator is satisfactory. Odors in defrost cycle. Interior needs to a warmer...
... stabilize. Allow 24 hours for temperature to warmer setting until freezer temperature is tightly pushed into electrical outlet. Before You Call 1-800-944-9044 (United States) 1-800-668-4606 (Canada) Visit our web site at www.frigidaire.com. Push in UP position. Refrigerator is satisfactory. Odors in defrost cycle. Interior needs to a warmer...

