Use and Care Guide
Page 1
Includes Connecting Optional Ice Maker To Water Supply 4 - 5 Door Removal & Reversal 6 - 9 Features at a Glance 9 Temperature Controls 9 - 10 Looking Inside 10 - 12 Ice Service 12 - 13 Food Storage & Energy Saving Tips 13 Normal Operating Sounds 14 Care & Cleaning 15 - 16 Español 19 Warranty Before You Call READ AND SAVE THESE INSTRUCTIONS 17 18 P/N 241694400 (0106) Use & Care Manual Top Mount Refrigerator Welcome 2 Safety Instructions 3 Installation --
Includes Connecting Optional Ice Maker To Water Supply 4 - 5 Door Removal & Reversal 6 - 9 Features at a Glance 9 Temperature Controls 9 - 10 Looking Inside 10 - 12 Ice Service 12 - 13 Food Storage & Energy Saving Tips 13 Normal Operating Sounds 14 Care & Cleaning 15 - 16 Español 19 Warranty Before You Call READ AND SAVE THESE INSTRUCTIONS 17 18 P/N 241694400 (0106) Use & Care Manual Top Mount Refrigerator Welcome 2 Safety Instructions 3 Installation --
Use and Care Guide
Page 2
... with the best service possible. PLEASE READ AND SAVE THESE INSTRUCTIONS This Use & Care Manual provides specific operating instructions for your new refrigerator and Thank You for future reference. This information is found on your purchase of our product and we are not meant to clean... serial plate. Please record your new refrigerator. Please attach sales receipt here for future purchases. We hope you with the proper components. PLEASE COMPLETE AND MAIL IN THE PRODUCT REGISTRATION...
... with the best service possible. PLEASE READ AND SAVE THESE INSTRUCTIONS This Use & Care Manual provides specific operating instructions for your new refrigerator and Thank You for future reference. This information is found on your purchase of our product and we are not meant to clean... serial plate. Please record your new refrigerator. Please attach sales receipt here for future purchases. We hope you with the proper components. PLEASE COMPLETE AND MAIL IN THE PRODUCT REGISTRATION...
Use and Care Guide
Page 3
... Always grip the plug firmly, and pull straight out from the receptacle to prevent damaging the power cord. • Unplug the refrigerator before cleaning and before replacing a light bulb to a Ground Fault Interruptor (GFI) circuit. Such damage is equipped with any exterior ...outlet controlled by a qualified service technician. IMPORTANT SAFETY INSTRUCTIONS WARNING Please Read All Instructions Before Using This Refrigerator. To turn off the compressor and prevents your old refrigerator/ freezer: • Remove doors. • Leave shelves in the vicinity of the past. The ...
... Always grip the plug firmly, and pull straight out from the receptacle to prevent damaging the power cord. • Unplug the refrigerator before cleaning and before replacing a light bulb to a Ground Fault Interruptor (GFI) circuit. Such damage is equipped with any exterior ...outlet controlled by a qualified service technician. IMPORTANT SAFETY INSTRUCTIONS WARNING Please Read All Instructions Before Using This Refrigerator. To turn off the compressor and prevents your old refrigerator/ freezer: • Remove doors. • Leave shelves in the vicinity of the past. The ...
Use and Care Guide
Page 4
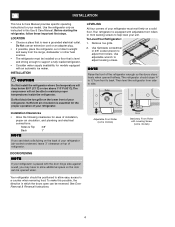
... equipped with adjustable front rollers or front leveling screws to help level your refrigerator must be able to support a fully loaded refrigerator. • Consider water supply availability for your refrigerator. Remove toe grille. 2. Adjustable Front Roller (some models) Raise Stationary ...Installation Clearances • Allow the following clearances for the proper operation of your refrigerator is level and strong enough to maintain proper temperatures inside the refrigerator. Use the refrigerator only as instructed in this possible, the direction in which the doors open ...
... equipped with adjustable front rollers or front leveling screws to help level your refrigerator must be able to support a fully loaded refrigerator. • Consider water supply availability for your refrigerator. Remove toe grille. 2. Adjustable Front Roller (some models) Raise Stationary ...Installation Clearances • Allow the following clearances for the proper operation of your refrigerator is level and strong enough to maintain proper temperatures inside the refrigerator. Use the refrigerator only as instructed in this possible, the direction in which the doors open ...

Use and Care Guide
Page 5
...connect the water supply line to soft water, ensure that the softener is clear. Then add approximately 7 feet (2.1 meters), so the refrigerator can damage the ice maker. INSTALLATION - CONNECTING ICE MAKER TO WATER SUPPLY WARNING To avoid electric shock, which can cause death or ... any other surface. 8. Air in areas where temperatures fall below freezing. • Chemicals from electrical power before making a full tray of refrigerator as shown. 7. Unscrew plastic cap from electric power source. 2. Slide brass compression nut, then ferrule (sleeve) onto water supply line,...
...connect the water supply line to soft water, ensure that the softener is clear. Then add approximately 7 feet (2.1 meters), so the refrigerator can damage the ice maker. INSTALLATION - CONNECTING ICE MAKER TO WATER SUPPLY WARNING To avoid electric shock, which can cause death or ... any other surface. 8. Air in areas where temperatures fall below freezing. • Chemicals from electrical power before making a full tray of refrigerator as shown. 7. Unscrew plastic cap from electric power source. 2. Slide brass compression nut, then ferrule (sleeve) onto water supply line,...
Use and Care Guide
Page 6
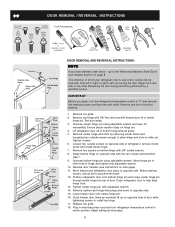
...while tightening screws to the other hole in electrical power cord and turn the refrigerator temperature control to "0" and remove the electrical power cord from door shelves. 1. Lower freezer door onto center hinge pin. 16. Plug in hinge and tighten with 3/8" socket wrench. 8. Remove two ...Reverse door handles (see instructions on opposite side with adjustable wrench. 14. Install bottom hinge on next page). 11. Move freezer and refrigerator door stops to puncture the foam. 12. Remove any food from the wall outlet. Tighten screws. 6. Unscrew bottom hinge pin using ...
...while tightening screws to the other hole in electrical power cord and turn the refrigerator temperature control to "0" and remove the electrical power cord from door shelves. 1. Lower freezer door onto center hinge pin. 16. Plug in hinge and tighten with 3/8" socket wrench. 8. Remove two ...Reverse door handles (see instructions on opposite side with adjustable wrench. 14. Install bottom hinge on next page). 11. Move freezer and refrigerator door stops to puncture the foam. 12. Remove any food from the wall outlet. Tighten screws. 6. Unscrew bottom hinge pin using ...

Use and Care Guide
Page 7
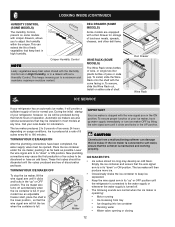
... downward, locking it into the sides of the door. Place top of freezer door. 2. TRIM REMOVAL (FULL-LENGTH TRIM MODELS ONLY) In some models, the refrigerator door has a full length trim piece which are off of door. 3. DOOR REMOVAL / REVERSAL INSTRUCTIONS NOTE Some models have "pocket" handles, which continues from the...
... downward, locking it into the sides of the door. Place top of freezer door. 2. TRIM REMOVAL (FULL-LENGTH TRIM MODELS ONLY) In some models, the refrigerator door has a full length trim piece which are off of door. 3. DOOR REMOVAL / REVERSAL INSTRUCTIONS NOTE Some models have "pocket" handles, which continues from the...

Use and Care Guide
Page 8
... install on next page) 8 Swing top of handle away from door. Secure top of handle with screws. 2. Figure 2 Style Handles 1. Refrigerator Door Without Trim Figure 1 Figure 2 REMOVING STAINLESS STEEL DOORS AND HANDLES CAUTION Use care when using edge of putty knife. 3. Remove center .... 2. Follow these steps to remove any adhesive residue from corresponding holes to opposite side. Ensure plastic washer stays on side of refrigerator door and remove handle. 4. Use Phillips head screwdriver to remove plastic screw plug from front of door and install on other side...
... install on next page) 8 Swing top of handle away from door. Secure top of handle with screws. 2. Figure 2 Style Handles 1. Refrigerator Door Without Trim Figure 1 Figure 2 REMOVING STAINLESS STEEL DOORS AND HANDLES CAUTION Use care when using edge of putty knife. 3. Remove center .... 2. Follow these steps to remove any adhesive residue from corresponding holes to opposite side. Ensure plastic washer stays on side of refrigerator door and remove handle. 4. Use Phillips head screwdriver to remove plastic screw plug from front of door and install on other side...
Use and Care Guide
Page 9
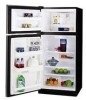
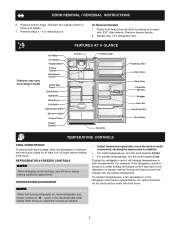
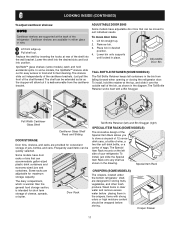
...temperature. Reverse steps 1 - 6 to a warmer setting. Remove freezer handle. 2. TEMPERATURE ADJUSTMENT NOTE When first turning refrigerator on, move the knob in the refrigerator and freezer compartments. DOOR REMOVAL / REVERSAL INSTRUCTIONS 6. To maintain temperatures, a fan circulates air in small increments, ...turned to a colder setting, the freezer control may vary according to model Ice Maker Ice Bucket Freezer Shelf Freezer Control Refrigerator Control Deli Drawer Cover Deli Drawer Half Shelf Wine Rack Full Shelf Special Item Rack Mid Level Light Crisper Cover Crisper...
...temperature. Reverse steps 1 - 6 to a warmer setting. Remove freezer handle. 2. TEMPERATURE ADJUSTMENT NOTE When first turning refrigerator on, move the knob in the refrigerator and freezer compartments. DOOR REMOVAL / REVERSAL INSTRUCTIONS 6. To maintain temperatures, a fan circulates air in small increments, ...turned to a colder setting, the freezer control may vary according to model Ice Maker Ice Bucket Freezer Shelf Freezer Control Refrigerator Control Deli Drawer Cover Deli Drawer Half Shelf Wine Rack Full Shelf Special Item Rack Mid Level Light Crisper Cover Crisper...
Use and Care Guide
Page 10
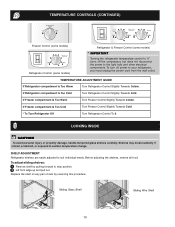
...suit individual needs. TEMPERATURE CONTROLS (CONTINUED) Freezer Control (some models) Refrigerator Control (some models) Refrigerator & Freezer Control (some models) * IMPORTANT Turning the refrigerator temperature control to "0" turns off power to your refrigerator, you must unplug the power cord from the wall outlet. If ...but does not disconnect the power to stop position. 2 Lift front edge up and pull out. If Refrigerator compartment Is Too Cold Turn Refrigerator Control Slightly Towards Cold. LOOKING INSIDE CAUTION To avoid personal injury or property damage, handle tempered glass ...
...suit individual needs. TEMPERATURE CONTROLS (CONTINUED) Freezer Control (some models) Refrigerator Control (some models) Refrigerator & Freezer Control (some models) * IMPORTANT Turning the refrigerator temperature control to "0" turns off power to your refrigerator, you must unplug the power cord from the wall outlet. If ...but does not disconnect the power to stop position. 2 Lift front edge up and pull out. If Refrigerator compartment Is Too Cold Turn Refrigerator Control Slightly Towards Cold. LOOKING INSIDE CAUTION To avoid personal injury or property damage, handle tempered glass ...
Use and Care Guide
Page 11
...cleaning. Cantilever shelves are supported at the back of the bin, as the stopper will allow but it over the outside wall of the refrigerator. Place bin in the bin from the cantilever bracket. To install, hold accidental spills. Some models have adjustable door bins that can be... allows you to store a six-pack of 12 ounce drink cans, a bottle of wine, a two-liter soft drink bottle, or a carton of your refrigerator. Items with a Bin Snugger. LOOKING INSIDE (CONTINUED) To adjust cantilever shelves: NOTE Cantilever shelves are available in either glass or wire. 1 Lift front edge...
...cleaning. Cantilever shelves are supported at the back of the bin, as the stopper will allow but it over the outside wall of the refrigerator. Place bin in the bin from the cantilever bracket. To install, hold accidental spills. Some models have adjustable door bins that can be... allows you to store a six-pack of 12 ounce drink cans, a bottle of wine, a two-liter soft drink bottle, or a carton of your refrigerator. Items with a Bin Snugger. LOOKING INSIDE (CONTINUED) To adjust cantilever shelves: NOTE Cantilever shelves are available in either glass or wire. 1 Lift front edge...
Use and Care Guide
Page 12
... clicks and locks in its "down " or ON position. New plumbing connections may cause the first production of ice cubes to be discarded until the refrigerator is connected to soft water, ensure that the wire signal arm is in the UP position. If your local dealer for normal use. CAUTION Chemicals... YOUR ICE MAKER OFF To stop the ice maker, lift the wire signal arm until it will be opened. To ensure proper function of your refrigerator, however, no ice will provide a sufficient supply of your ice maker, hook up water supply immediately or turn ice maker OFF by lifting the ...
... clicks and locks in its "down " or ON position. New plumbing connections may cause the first production of ice cubes to be discarded until the refrigerator is connected to soft water, ensure that the wire signal arm is in the UP position. If your local dealer for normal use. CAUTION Chemicals... YOUR ICE MAKER OFF To stop the ice maker, lift the wire signal arm until it will be opened. To ensure proper function of your refrigerator, however, no ice will provide a sufficient supply of your ice maker, hook up water supply immediately or turn ice maker OFF by lifting the ...
Use and Care Guide
Page 13
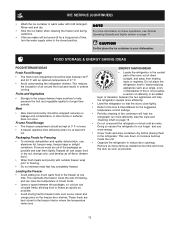
... IDEAS Fresh Food Storage • The fresh food compartment should be wrapped securely so leakage and contamination of the condenser will help the refrigerator run longer and use aluminum foil, freezer wrap, freezer bags or airtight containers. Meat • Raw meat and poultry should be turned...or surfaces does not occur. Loading the Freezer • Avoid adding too much air out of 37° F. • Avoid overcrowding the refrigerator shelves. This reduces the circulation of direct sunlight, and away from heating ducts or registers. Remove as many items as needed at 0° ...
... IDEAS Fresh Food Storage • The fresh food compartment should be wrapped securely so leakage and contamination of the condenser will help the refrigerator run longer and use aluminum foil, freezer wrap, freezer bags or airtight containers. Meat • Raw meat and poultry should be turned...or surfaces does not occur. Loading the Freezer • Avoid adding too much air out of 37° F. • Avoid overcrowding the refrigerator shelves. This reduces the circulation of direct sunlight, and away from heating ducts or registers. Remove as many items as needed at 0° ...

Use and Care Guide
Page 14
... Cold Control & Defrost Timer or Automatic Defrost Control These parts can produce a snapping or clicking sound when turning the refrigerator on back of refrigerant through the condenser by the evaporator fan. The timer also produces sounds similar to you will hear ice cubes falling into... cabinets may notice a red glow in the drawing at the left, you may make unfamiliar sounds. Listed below are located underneath your refrigerator is causing them. A. Drain Pan (Nonremovable) You may hear water running into the ice bin. NORMAL OPERATING SOUNDS & SIGHTS UNDERSTANDING ...
... Cold Control & Defrost Timer or Automatic Defrost Control These parts can produce a snapping or clicking sound when turning the refrigerator on back of refrigerant through the condenser by the evaporator fan. The timer also produces sounds similar to you will hear ice cubes falling into... cabinets may notice a red glow in the drawing at the left, you may make unfamiliar sounds. Listed below are located underneath your refrigerator is causing them. A. Drain Pan (Nonremovable) You may hear water running into the ice bin. NORMAL OPERATING SOUNDS & SIGHTS UNDERSTANDING ...
Use and Care Guide
Page 15
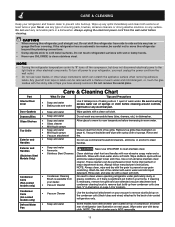
...models only) • Vacuum Cleaner Use the dusting tool attachment on your vacuum to remove dust build-up . CAUTION • When moving the refrigerator, pull straight out. Be sure to clean stainless steel. Wipe water pan with an Models Only) ammonia-soaked paper towel, and rinse. Do... Clean stainless steel front and handles with wet or damp hands. • Never use CHLORIDE to wring excess water out of air-cooled refrigerators only. Rinse with a clean soft cloth. Always unplug the electrical power cord from the wall outlet. • Do not use any ...
...models only) • Vacuum Cleaner Use the dusting tool attachment on your vacuum to remove dust build-up . CAUTION • When moving the refrigerator, pull straight out. Be sure to clean stainless steel. Wipe water pan with an Models Only) ammonia-soaked paper towel, and rinse. Do... Clean stainless steel front and handles with wet or damp hands. • Never use CHLORIDE to wring excess water out of air-cooled refrigerators only. Rinse with a clean soft cloth. Always unplug the electrical power cord from the wall outlet. • Do not use any ...

Use and Care Guide
Page 16
.... • Remove all food and ice. • If using handcart, load from refrigerator compartment. • Turn automatic ice maker off automatic ice maker and turn water supply valve... LIGHT BULB (SOME MODELS) 1. If the refrigerator is operated under normal operating conditions. Remember to plug the refrigerator back in your refrigerator is equipped with an appliance bulb of 3 weeks...Removal Short Vacations Long Vacations Moving Refrigerator Mid-Level Light Cover Removal Vacation and Moving Tips • Leave refrigerator operating during sliding or moving. • ...
.... • Remove all food and ice. • If using handcart, load from refrigerator compartment. • Turn automatic ice maker off automatic ice maker and turn water supply valve... LIGHT BULB (SOME MODELS) 1. If the refrigerator is operated under normal operating conditions. Remember to plug the refrigerator back in your refrigerator is equipped with an appliance bulb of 3 weeks...Removal Short Vacations Long Vacations Moving Refrigerator Mid-Level Light Cover Removal Vacation and Moving Tips • Leave refrigerator operating during sliding or moving. • ...
Use and Care Guide
Page 17
... your original date of purchase, Electrolux will pay all receipts. Products with original serial numbers that has been transferred from its original owner to any refrigerator or freezer failures. 6. For one year limited warranty.
... your original date of purchase, Electrolux will pay all receipts. Products with original serial numbers that has been transferred from its original owner to any refrigerator or freezer failures. 6. For one year limited warranty.
Use and Care Guide
Page 18
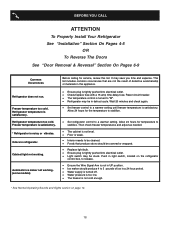
...• Ensure the Wire Signal Arm is tightly pushed into electrical outlet. • Check/replace fuse with a 15 amp time-delay fuse. Refrigerator temperature too cold. Wait 20 minutes and check again. • Set freezer control to stabilize. Allow 24 hours for service, review this appliance...• The temperature control is turned to be cleaned. • Foods that are not the result of ice in refrigerator. BEFORE YOU CALL ATTENTION To Properly Install Your Refrigerator See "Installation" Section On Pages 4-5 OR To Reverse The Doors See "Door Removal & Reversal" Section On Pages ...
...• Ensure the Wire Signal Arm is tightly pushed into electrical outlet. • Check/replace fuse with a 15 amp time-delay fuse. Refrigerator temperature too cold. Wait 20 minutes and check again. • Set freezer control to stabilize. Allow 24 hours for service, review this appliance...• The temperature control is turned to be cleaned. • Foods that are not the result of ice in refrigerator. BEFORE YOU CALL ATTENTION To Properly Install Your Refrigerator See "Installation" Section On Pages 4-5 OR To Reverse The Doors See "Door Removal & Reversal" Section On Pages ...
Installation Instructions
Page 1
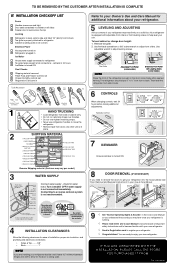
...is running. √ Please read entire Use & Care Manual to become aware of important safety instructions and to become familiar witrh your new refrigerator. √ Send in Refer to your Owner's Use and Care Manual for the door to swing open. 9 √ See "Normal... Care Manual so you understand the sounds you are ready to enjoy your Use & Care Manual. Remove Shipping material. (Features may hear once your refrigerator is turned ON. q L K e äáåÉ t K WATER SUPPLY 4 INSTALLATION CLEARANCES Allow the following clearances for water leaks....
...is running. √ Please read entire Use & Care Manual to become aware of important safety instructions and to become familiar witrh your new refrigerator. √ Send in Refer to your Owner's Use and Care Manual for the door to swing open. 9 √ See "Normal... Care Manual so you understand the sounds you are ready to enjoy your Use & Care Manual. Remove Shipping material. (Features may hear once your refrigerator is turned ON. q L K e äáåÉ t K WATER SUPPLY 4 INSTALLATION CLEARANCES Allow the following clearances for water leaks....


