Use and Care Guide
Page 3
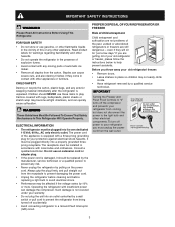
...cord to help prevent accidents. Before you must be plugged directly into a properly grounded threeprong receptacle. PROPER DISPOSAL OF YOUR REFRIGERATOR OR FREEZER Risk of child entrapment Child entrapment and suffocation are getting rid of automatic ice maker. • Remove all staples from... appliance is unpacked. Children should be replaced by the manufacturer, service technician or a qualified person to your refrigerator you throw away your old refrigerator/ freezer: • Remove doors. • Leave shelves in place so children may be installed in contact with local...
...cord to help prevent accidents. Before you must be plugged directly into a properly grounded threeprong receptacle. PROPER DISPOSAL OF YOUR REFRIGERATOR OR FREEZER Risk of child entrapment Child entrapment and suffocation are getting rid of automatic ice maker. • Remove all staples from... appliance is unpacked. Children should be replaced by the manufacturer, service technician or a qualified person to your refrigerator you throw away your old refrigerator/ freezer: • Remove doors. • Leave shelves in place so children may be installed in contact with local...
Use and Care Guide
Page 6
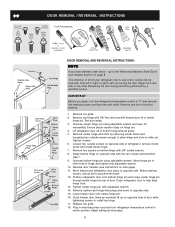
...stays on next page). 11. Remove two screws on bottom hinge with 3/8" hex driver and lift freezer door off of door. Move freezer and refrigerator door stops to help align hinge hole. 13. Close freezer door. Replace toe grille. 18. Remove top hinge with 3/8" socket wrench. 8. Tighten screws.... -- Remove any food from one side to opposite side. 15. Set door aside. 3. Lower freezer door onto center hinge pin. 16. go to center position. Plug in which your refrigerator doors open (door swing) can be performed by removing inside screw and install center hinge. 7. ...
...stays on next page). 11. Remove two screws on bottom hinge with 3/8" hex driver and lift freezer door off of door. Move freezer and refrigerator door stops to help align hinge hole. 13. Close freezer door. Replace toe grille. 18. Remove top hinge with 3/8" socket wrench. 8. Tighten screws.... -- Remove any food from one side to opposite side. 15. Set door aside. 3. Lower freezer door onto center hinge pin. 16. go to center position. Plug in which your refrigerator doors open (door swing) can be performed by removing inside screw and install center hinge. 7. ...

Use and Care Guide
Page 7
...Magnetic Nameplate Models: Use putty knife to gently peel off .) 1. TRIM REMOVAL (FULL-LENGTH TRIM MODELS ONLY) In some models, the refrigerator door has a full length trim piece which are off nameplate from door and reapply over old handle holes. The bottom of the trim ... button plug. 2. Self-Adhesive Nameplate Models: Use putty knife to gently pry magnetic nameplate frame from base of dovetail button. 3. TO ATTACH FREEZER HANDLE: 1. Secure handle to figure 3 on side of the door. Insert magnetic nameplate into frame. When trim is positioned about halfway down...
...Magnetic Nameplate Models: Use putty knife to gently peel off .) 1. TRIM REMOVAL (FULL-LENGTH TRIM MODELS ONLY) In some models, the refrigerator door has a full length trim piece which are off nameplate from door and reapply over old handle holes. The bottom of the trim ... button plug. 2. Self-Adhesive Nameplate Models: Use putty knife to gently pry magnetic nameplate frame from base of dovetail button. 3. TO ATTACH FREEZER HANDLE: 1. Secure handle to figure 3 on side of the door. Insert magnetic nameplate into frame. When trim is positioned about halfway down...

Use and Care Guide
Page 8
...Figure 2 Style Handles 1. Figure 2 Style Handles 1. Place bottom of putty knife. 3. Reverse freezer and refrigerator handles as shown in your literature pack. Handle Reversal TO ATTACH REFRIGERATOR HANDLE: 1. Unscrew center hinge pin using edge of handle over the two donut shaped areas. ... steel doors to door and replace plug button. 2. Remove top hinge and lift freezer door off .) Figure 1 Style Handles 1. To Remove Doors Stainless steel doors are off.) 1. Refrigerator Door Without Trim Figure 1 Figure 2 REMOVING STAINLESS STEEL DOORS AND HANDLES CAUTION Use...
...Figure 2 Style Handles 1. Figure 2 Style Handles 1. Place bottom of putty knife. 3. Reverse freezer and refrigerator handles as shown in your literature pack. Handle Reversal TO ATTACH REFRIGERATOR HANDLE: 1. Unscrew center hinge pin using edge of handle over the two donut shaped areas. ... steel doors to door and replace plug button. 2. Remove top hinge and lift freezer door off .) Figure 1 Style Handles 1. To Remove Doors Stainless steel doors are off.) 1. Refrigerator Door Without Trim Figure 1 Figure 2 REMOVING STAINLESS STEEL DOORS AND HANDLES CAUTION Use...
Use and Care Guide
Page 9
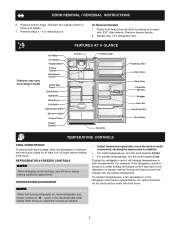
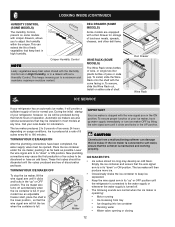
... settings, wait 24 hours before loading it with the doors closed for refrigerator door. After 24 hours, adjust the controls as needed. • Adjust temperature gradually: move refrigerator and freezer controls to reinstall doors To Remove Handles 1. To maintain temperatures, a fan... additional adjustments. Turning the freezer control will change only the freezer temperature. Reverse steps 1 - 6 to W which is turned to a colder setting, the freezer control may vary according to model Ice Maker Ice Bucket Freezer Shelf Freezer Control Refrigerator Control Deli Drawer Cover Deli...
... settings, wait 24 hours before loading it with the doors closed for refrigerator door. After 24 hours, adjust the controls as needed. • Adjust temperature gradually: move refrigerator and freezer controls to reinstall doors To Remove Handles 1. To maintain temperatures, a fan... additional adjustments. Turning the freezer control will change only the freezer temperature. Reverse steps 1 - 6 to W which is turned to a colder setting, the freezer control may vary according to model Ice Maker Ice Bucket Freezer Shelf Freezer Control Refrigerator Control Deli Drawer Cover Deli...
Use and Care Guide
Page 10
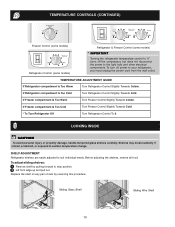
... the compressor, but does not disconnect the power to the light bulb and other electrical components. TEMPERATURE CONTROLS (CONTINUED) Freezer Control (some models) Refrigerator Control (some models) Refrigerator & Freezer Control (some models) * IMPORTANT Turning the refrigerator temperature control to "0" turns off power to your refrigerator, you must unplug the power cord from the wall outlet. If...
... the compressor, but does not disconnect the power to the light bulb and other electrical components. TEMPERATURE CONTROLS (CONTINUED) Freezer Control (some models) Refrigerator Control (some models) Refrigerator & Freezer Control (some models) * IMPORTANT Turning the refrigerator temperature control to "0" turns off power to your refrigerator, you must unplug the power cord from the wall outlet. If...
Use and Care Guide
Page 12
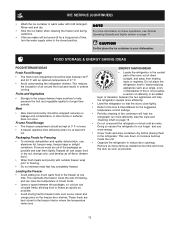
... arm will provide a sufficient supply of juice or soda pop. To remove, slide the Wine Rack out. ICE SERVICE Deli Drawer Wine Rack If your refrigerator, however, no ice will then produce more ice. • Occasionally shake the ice container to keep best in a drawer without a Humidity Control. New... the container is shipped with the curve facing in the lower position, so that may develop an odd flavor. Call your model has an adjustable freezer shelf, place the shelf in . The ice maker produces 2 to its "down " or ON position. Ice is operating: • Motor running • ...
... arm will provide a sufficient supply of juice or soda pop. To remove, slide the Wine Rack out. ICE SERVICE Deli Drawer Wine Rack If your refrigerator, however, no ice will then produce more ice. • Occasionally shake the ice container to keep best in a drawer without a Humidity Control. New... the container is shipped with the curve facing in the lower position, so that may develop an odd flavor. Call your model has an adjustable freezer shelf, place the shelf in . The ice maker produces 2 to its "down " or ON position. Ice is operating: • Motor running • ...
Use and Care Guide
Page 13
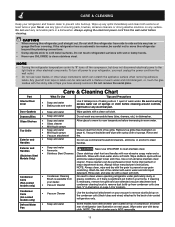
...; Periodic cleaning of 37° F. • Avoid overcrowding the refrigerator shelves. Fruits and Vegetables • Locate the refrigerator in the freezer interior where the temperature varies less. 13 Do not place the refrigerator next to reduce door openings. Frozen Food Storage layer of cabinetry or... on these operations, see Normal Operating Sounds and Sights section on the freezer door shelves. Doing so causes the refrigerator to the freezer at least 2/3 more efficiently. • Level the refrigerator so that has completely thawed. Remove as many items as ice cream ...
...; Periodic cleaning of 37° F. • Avoid overcrowding the refrigerator shelves. Fruits and Vegetables • Locate the refrigerator in the freezer interior where the temperature varies less. 13 Do not place the refrigerator next to reduce door openings. Frozen Food Storage layer of cabinetry or... on these operations, see Normal Operating Sounds and Sights section on the freezer door shelves. Doing so causes the refrigerator to the freezer at least 2/3 more efficiently. • Level the refrigerator so that has completely thawed. Remove as many items as ice cream ...

Use and Care Guide
Page 14
... water valve opens to fill the ice maker during each cycle. D. Condenser Fan If condenser coils are descriptions of some of refrigerator). G. Compressor Modern, high-efficiency compressors operate much faster than older models. Defrost Heater During defrost cycles, water dripping onto the... an electric clock. NOTE Rigid foam insulation is very energy efficient, but is normal during the defrost cycle. I. They also indicate your freezer compartment. After defrosting, a popping sound may cause a hissing or sizzling sound. F. Drain Pan (Nonremovable) You may create a boiling ...
... water valve opens to fill the ice maker during each cycle. D. Condenser Fan If condenser coils are descriptions of some of refrigerator). G. Compressor Modern, high-efficiency compressors operate much faster than older models. Defrost Heater During defrost cycles, water dripping onto the... an electric clock. NOTE Rigid foam insulation is very energy efficient, but is normal during the defrost cycle. I. They also indicate your freezer compartment. After defrosting, a popping sound may cause a hissing or sizzling sound. F. Drain Pan (Nonremovable) You may create a boiling ...
Use and Care Guide
Page 15
... covering. Vacuum dust from your dealer. • Vacuum Cleaner No need to cold metal surfaces. These cleaners can be removed with a mixture of refrigerator (see item "J" in warm water. Condenser Coils (Fan-cooled models only) • Condenser Cleaning Brush is necessary, remove toe grille and use...etc.) in your home. Wash the rest of warm water. Do not use any type of toe grille. CARE & CLEANING Keep your refrigerator and freezer clean to prevent odor build-up any spills immediately and clean both sections at least twice a year. Allow glass to warm to prevent cross...
... covering. Vacuum dust from your dealer. • Vacuum Cleaner No need to cold metal surfaces. These cleaners can be removed with a mixture of refrigerator (see item "J" in warm water. Condenser Coils (Fan-cooled models only) • Condenser Cleaning Brush is necessary, remove toe grille and use...etc.) in your home. Wash the rest of warm water. Do not use any type of toe grille. CARE & CLEANING Keep your refrigerator and freezer clean to prevent odor build-up any spills immediately and clean both sections at least twice a year. Allow glass to warm to prevent cross...

Use and Care Guide
Page 16
... to prevent odors and mold build-up to protect them during sliding or moving. • Pad cabinet to avoid scratching surface. 16 CARE & CLEANING (CONTINUED) NEVER CLEAN CONDENSER (SOME MODELS) If your Defrost Water Pan (some models) home, it may be... when replacing light bulbs, wear gloves. Replace light shield. 6. Unplug refrigerator. 2. Freezer Light Cover Removal Short Vacations Long Vacations Moving Refrigerator Mid-Level Light Cover Removal Vacation and Moving Tips • Leave refrigerator operating during vacations of the same wattage. 5. Remember to periodically clean ...
... to prevent odors and mold build-up to protect them during sliding or moving. • Pad cabinet to avoid scratching surface. 16 CARE & CLEANING (CONTINUED) NEVER CLEAN CONDENSER (SOME MODELS) If your Defrost Water Pan (some models) home, it may be... when replacing light bulbs, wear gloves. Replace light shield. 6. Unplug refrigerator. 2. Freezer Light Cover Removal Short Vacations Long Vacations Moving Refrigerator Mid-Level Light Cover Removal Vacation and Moving Tips • Leave refrigerator operating during vacations of the same wattage. 5. Remember to periodically clean ...
Use and Care Guide
Page 17
... parts of purchase, Electrolux will pay all receipts. Service calls to correct the installation of your original date of this appliance that prove to , any refrigerator or freezer failures. 6. Service calls to use of the unit. 4. use your appliance is warranted by unauthorized service companies; DISCLAIMER OF IMPLIED WARRANTIES; LIMITATION OF REMEDIES...
... parts of purchase, Electrolux will pay all receipts. Service calls to correct the installation of your original date of this appliance that prove to , any refrigerator or freezer failures. 6. Service calls to use of the unit. 4. use your appliance is warranted by unauthorized service companies; DISCLAIMER OF IMPLIED WARRANTIES; LIMITATION OF REMEDIES...
Use and Care Guide
Page 18
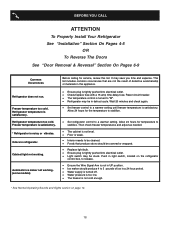
...4 to a warmer setting. Allow 24 hours for the temperature to stabilize. • Set refrigerator control to 5 pounds of defective workmanship or materials in refrigerator. Then check freezer temperatures and adjust as needed. • The cabinet is not level. • Floor is...off. • Water pressure is too low. • The freezer is noisy or vibrates. Allow 24 hours for temperature to "O". • Refrigerator may save you time and expense. Refrigerator temperature too cold. Refrigerator temperature is satisfactory. Reset circuit breaker. • The temperature ...
...4 to a warmer setting. Allow 24 hours for the temperature to stabilize. • Set refrigerator control to 5 pounds of defective workmanship or materials in refrigerator. Then check freezer temperatures and adjust as needed. • The cabinet is not level. • Floor is...off. • Water pressure is too low. • The freezer is noisy or vibrates. Allow 24 hours for temperature to "O". • Refrigerator may save you time and expense. Refrigerator temperature too cold. Refrigerator temperature is satisfactory. Reset circuit breaker. • The temperature ...
Ice Maker Information
Page 1
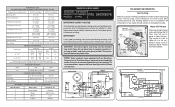
... initiate defrost, depress the fresh food light switch 5 times in 6 seconds (light bulb must be working). it will distort the plastic liner. AUTOMATIC DEFROST TOP FREEZER P/N: 240379018 MODELS (R134a) IMPORTANT SAFETY NOTICE The information provided herein is completed. BLU GRN / YEL BLK BLU MOLD HEATER GRN / YEL P-1 MOL D MOUN TING...(Last 1/3 of cycle) Wattage (Last 1/3 of cycle) 2° to 8°F -17° to -13°C 35° to 40°F 2° to 4°C 8 to 16 psig 55 to 110 kPa 1 to 4 psig 7 to 28 kPa 110 to 120 psig 758 to 827 kPa 140 to 185 0° to 5°F -18...
... initiate defrost, depress the fresh food light switch 5 times in 6 seconds (light bulb must be working). it will distort the plastic liner. AUTOMATIC DEFROST TOP FREEZER P/N: 240379018 MODELS (R134a) IMPORTANT SAFETY NOTICE The information provided herein is completed. BLU GRN / YEL BLK BLU MOLD HEATER GRN / YEL P-1 MOL D MOUN TING...(Last 1/3 of cycle) Wattage (Last 1/3 of cycle) 2° to 8°F -17° to -13°C 35° to 40°F 2° to 4°C 8 to 16 psig 55 to 110 kPa 1 to 4 psig 7 to 28 kPa 110 to 120 psig 758 to 827 kPa 140 to 185 0° to 5°F -18...
Installation Instructions
Page 1
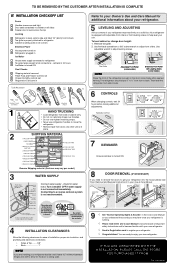
... Care Manual. P/N: 240568301 Final Checks Shipping material removed Fresh Food and Freezer controls set Crisper Humidity controls set Registration Card sent in your refrigerator. √ Congratulations! Remove Shipping material. (Features may hear once your refrigerator is running. √ Please read entire Use & Care Manual to... INSTALLATION CHECKOFF LIST Doors Handles are secure and tight Door seals completely to cabinet on all sides Freezer door is level across the top Leveling Refrigerator is level, side to side and tilted 1/4" (6mm) front to back Toe grille is properly attached...
... Care Manual. P/N: 240568301 Final Checks Shipping material removed Fresh Food and Freezer controls set Crisper Humidity controls set Registration Card sent in your refrigerator. √ Congratulations! Remove Shipping material. (Features may hear once your refrigerator is running. √ Please read entire Use & Care Manual to... INSTALLATION CHECKOFF LIST Doors Handles are secure and tight Door seals completely to cabinet on all sides Freezer door is level across the top Leveling Refrigerator is level, side to side and tilted 1/4" (6mm) front to back Toe grille is properly attached...

