
Wiring Diagram (All Languages)
Page 2
... YELLOW LT. BLUE PORKCHOP TAN/YELLOW LT. DIODE DIODE YELLOW CONDENSER FAN TAN TAN LT. BLUE FREEZER LIGHT SWITCH NOTE DENOTES NOT ON ALL MODELS. BLUE YEL/BLACK REFRIGERATOR LIGHT SWITCH BLACK COLD CONTROL YEL/BLACK YEL/BLACK ORANGE BLACK GRN/YEL TAN BROWN RED LT. ...BLUE BLACK BLACK GRN/YEL BLUE MACHINE COMPARTMENT LT. BLUE LT. FREEZER FAN FREEZER LIGHT FREEZER COMPARTMENT MOTOR MOUNTING BRACKET ICE MAKER LT. ...
... YELLOW LT. BLUE PORKCHOP TAN/YELLOW LT. DIODE DIODE YELLOW CONDENSER FAN TAN TAN LT. BLUE FREEZER LIGHT SWITCH NOTE DENOTES NOT ON ALL MODELS. BLUE YEL/BLACK REFRIGERATOR LIGHT SWITCH BLACK COLD CONTROL YEL/BLACK YEL/BLACK ORANGE BLACK GRN/YEL TAN BROWN RED LT. ...BLUE BLACK BLACK GRN/YEL BLUE MACHINE COMPARTMENT LT. BLUE LT. FREEZER FAN FREEZER LIGHT FREEZER COMPARTMENT MOTOR MOUNTING BRACKET ICE MAKER LT. ...

Installation Instructions (All Languages)
Page 1
...Screw (some models) Raise Stationary Front Roller with adjustable front rollers or front leveling screws to get your refrigerator must rest firmly on all connections - Top Hinge Cover OR Top Hinge Top Hinge Cover Top Hinge Bottom Water Tube Wood Shim Pin Center Hinge 9 √ See "Normal Operating Sights & Sounds... is complete INSTALLATION CHECKOFF LIST Doors Handles are secure and tight Door seals completely to cabinet on all sides Freezer door is level across the top Leveling Refrigerator is level, side to side and tilted 1/4" (6mm) front to back Toe grille is properly attached to...
...Screw (some models) Raise Stationary Front Roller with adjustable front rollers or front leveling screws to get your refrigerator must rest firmly on all connections - Top Hinge Cover OR Top Hinge Top Hinge Cover Top Hinge Bottom Water Tube Wood Shim Pin Center Hinge 9 √ See "Normal Operating Sights & Sounds... is complete INSTALLATION CHECKOFF LIST Doors Handles are secure and tight Door seals completely to cabinet on all sides Freezer door is level across the top Leveling Refrigerator is level, side to side and tilted 1/4" (6mm) front to back Toe grille is properly attached to...

Use and Care Manual
Page 1
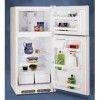
Use & Care Manual Top Mount Refrigerator Got Questions? CALL: Solutions Hotline (United States) 1-800-944-9044 (Canada) 1-800-668-4606 √ Resolve many service issues over the phone at your convenience! &#...
Use & Care Manual Top Mount Refrigerator Got Questions? CALL: Solutions Hotline (United States) 1-800-944-9044 (Canada) 1-800-668-4606 √ Resolve many service issues over the phone at your convenience! &#...

Use and Care Manual
Page 2
.... Do not use an extension cord or adapter plug. • If the power cord is unpacked. Before you throw away your old refrigerator/ freezer: • Remove doors. • Leave shelves in place so children may be affected if the voltage varies by pulling on the power...of the appliance is not covered under your protection against electrical shock hazards. To turn off the compressor and prevents your old refrigerator or freezer, please follow the instructions below to prevent any other appliances or furniture. Cartons covered with local codes and ordinances. The power...
.... Do not use an extension cord or adapter plug. • If the power cord is unpacked. Before you throw away your old refrigerator/ freezer: • Remove doors. • Leave shelves in place so children may be affected if the voltage varies by pulling on the power...of the appliance is not covered under your protection against electrical shock hazards. To turn off the compressor and prevents your old refrigerator or freezer, please follow the instructions below to prevent any other appliances or furniture. Cartons covered with local codes and ordinances. The power...

Use and Care Manual
Page 3
...side against a wall, you may experience freezer temperature problems during the winter months when temperatures dip below 55°F (13°C) or rise above 110°F (43°C). Remove toe grille. 2. Before starting the refrigerator, follow these important first steps. IMPORTANT ... from side to allow additional space so the door can be installed on the back of your refrigerator (air-cooled condenser) leave 3" clearance at top of refrigerator. NOTE If your refrigerator is equipped with Leveling Screw (some models) 3 INSTALLATION This Use & Care Manual provides specific...
...side against a wall, you may experience freezer temperature problems during the winter months when temperatures dip below 55°F (13°C) or rise above 110°F (43°C). Remove toe grille. 2. Before starting the refrigerator, follow these important first steps. IMPORTANT ... from side to allow additional space so the door can be installed on the back of your refrigerator (air-cooled condenser) leave 3" clearance at top of refrigerator. NOTE If your refrigerator is equipped with Leveling Screw (some models) 3 INSTALLATION This Use & Care Manual provides specific...

Use and Care Manual
Page 4
..., secure water supply line to your cold water pipe. Then add approximately 7 feet (2.1 meters), so the refrigerator can be responsible for any other surface. 8. Disconnect refrigerator from water valve inlet and discard cap. 4. Slide brass compression nut, then ferrule (sleeve) onto water supply...areas where temperatures fall below freezing. • Chemicals from a malfunctioning softener can cause death or severe personal injury, disconnect the refrigerator from the ice maker inlet valve at shutoff valve. 3. Unscrew plastic cap from electric power source. 2. DO NOT over tighten...
..., secure water supply line to your cold water pipe. Then add approximately 7 feet (2.1 meters), so the refrigerator can be responsible for any other surface. 8. Disconnect refrigerator from water valve inlet and discard cap. 4. Slide brass compression nut, then ferrule (sleeve) onto water supply...areas where temperatures fall below freezing. • Chemicals from a malfunctioning softener can cause death or severe personal injury, disconnect the refrigerator from the ice maker inlet valve at shutoff valve. 3. Unscrew plastic cap from electric power source. 2. DO NOT over tighten...

Use and Care Manual
Page 5
...Lower freezer door onto center hinge pin. 16. Flip toe grille and reinstall. 18. IMPORTANT Before you have stainless steel doors -- Trace around the hinge with adjustable wrench. 14. Remove top hinge and lift door off of door while tightening screws to install top hinge. 17. Lift refrigerator door...allow hinge and shim to the other. Remove top hinge cover. Remove two screws on opposite side with adjustable wrench. 10. Reverse door handles (see instructions on opposite side of bottom hinge and set aside. 5. Move freezer and refrigerator door stops to opposite side. 15. Move ...
...Lower freezer door onto center hinge pin. 16. Flip toe grille and reinstall. 18. IMPORTANT Before you have stainless steel doors -- Trace around the hinge with adjustable wrench. 14. Remove top hinge and lift door off of door while tightening screws to install top hinge. 17. Lift refrigerator door...allow hinge and shim to the other. Remove top hinge cover. Remove two screws on opposite side with adjustable wrench. 10. Reverse door handles (see instructions on opposite side of bottom hinge and set aside. 5. Move freezer and refrigerator door stops to opposite side. 15. Move ...

Use and Care Manual
Page 6
...side Figure 2 Style Handles 1. Place top of handle over old handle holes. Self Adhesive Nameplate (some models, the refrigerator door has a full length trim piece which are recessed into a hole on top of refrigerator door. 2. The top of the trim attaches to top of the handle (Figure 2). Remove ...Some models have "pocket" handles, which continues from door. Attach handle to door and replace button plug. 2. TO ATTACH FREEZER HANDLE: 1. TO REMOVE FREEZER HANDLE: (Handles may be easier to reverse while doors are off of handle to be easier to reverse while doors are off...
...side Figure 2 Style Handles 1. Place top of handle over old handle holes. Self Adhesive Nameplate (some models, the refrigerator door has a full length trim piece which are recessed into a hole on top of refrigerator door. 2. The top of the trim attaches to top of the handle (Figure 2). Remove ...Some models have "pocket" handles, which continues from door. Attach handle to door and replace button plug. 2. TO ATTACH FREEZER HANDLE: 1. TO REMOVE FREEZER HANDLE: (Handles may be easier to reverse while doors are off of handle to be easier to reverse while doors are off...

Use and Care Manual
Page 7
... screws. 2. Secure handle to reinstall doors To Remove Handles 1. Remove top hinge and lift freezer door off of putty knife. 3. Ensure plastic washer stays on other side, moving hole plugs from old trim lock locations. Lift refrigerator door off .) 1. Reverse steps 1 - 6 to top of handle with handle offset away from door. TO ATTACH TRIM...
... screws. 2. Secure handle to reinstall doors To Remove Handles 1. Remove top hinge and lift freezer door off of putty knife. 3. Ensure plastic washer stays on other side, moving hole plugs from old trim lock locations. Lift refrigerator door off .) 1. Reverse steps 1 - 6 to top of handle with handle offset away from door. TO ATTACH TRIM...

Use and Care Manual
Page 8
... turn the knob towards Cold. If Refrigerator compartment Is Too Cold Turn Refrigerator Control Slightly Towards Cold. Turning the freezer control will change only the freezer temperature. If Freezer compartment Is Too Warm Turn Freezer Control Slightly Towards Colder. NOTE When first turning refrigerator on, move the knob in the refrigerator and freezer compartments. For good circulation, do not...
... turn the knob towards Cold. If Refrigerator compartment Is Too Cold Turn Refrigerator Control Slightly Towards Cold. Turning the freezer control will change only the freezer temperature. If Freezer compartment Is Too Warm Turn Freezer Control Slightly Towards Colder. NOTE When first turning refrigerator on, move the knob in the refrigerator and freezer compartments. For good circulation, do not...

Use and Care Manual
Page 9
... the water supply is not connected, the water valve will hit the ice when the container is maintained and working properly. 9 ICE SERVICE If your refrigerator has an automatic ice maker, it will be produced during the first 24 hours. New plumbing connections may cause the first production of ice. I M P O... produce 2.5 to 3 pounds of 8 cubes every 80 to its "down" or ON position. To ensure proper function of your model has an adjustable freezer shelf, place the shelf in most models at a rate of ice every 24 hours depending on usage conditions. If the ice maker is not turned...
... the water supply is not connected, the water valve will hit the ice when the container is maintained and working properly. 9 ICE SERVICE If your refrigerator has an automatic ice maker, it will be produced during the first 24 hours. New plumbing connections may cause the first production of ice. I M P O... produce 2.5 to 3 pounds of 8 cubes every 80 to its "down" or ON position. To ensure proper function of your model has an adjustable freezer shelf, place the shelf in most models at a rate of ice every 24 hours depending on usage conditions. If the ice maker is not turned...

Use and Care Manual
Page 10
...with an automatic ice maker, you . Condenser Fan If condenser coils are descriptions of your freezer compartment. Condenser Coils (Fan-cooled models only) CARE & CLEANING A. Evaporator The flow of refrigerator). Evaporator Fan You may hear air being forced through the evaporator may cause a hissing or... underneath your Defrost Water Pan (some of the most common sounds you may be located on and off. when turning the refrigerator on top of the same wattage. 5. The compressor may make sounds more noticeable. Defrost Heater During defrost cycles, water dripping onto the...
...with an automatic ice maker, you . Condenser Fan If condenser coils are descriptions of your freezer compartment. Condenser Coils (Fan-cooled models only) CARE & CLEANING A. Evaporator The flow of refrigerator). Evaporator Fan You may hear air being forced through the evaporator may cause a hissing or... underneath your Defrost Water Pan (some of the most common sounds you may be located on and off. when turning the refrigerator on top of the same wattage. 5. The compressor may make sounds more noticeable. Defrost Heater During defrost cycles, water dripping onto the...

Use and Care Manual
Page 11
... soft cloth. If cleaning is significant pet traffic in a dishwasher. NOTE • Turning the refrigerator temperature control to "0" turns off power to your refrigerator, you have defrost water pan located on top of compressor at least twice a year. Do not use CHLORIDE to clean stainless steel. Do ... surface when removing adhesive labels. Rinse well, and wipe dry with sudsy cloth or sponge. CARE & CLEANING Keep your refrigerator and freezer clean to prevent odor build-up on the condenser coils (black tubes and wires) attached to the back of air-cooled...
... soft cloth. If cleaning is significant pet traffic in a dishwasher. NOTE • Turning the refrigerator temperature control to "0" turns off power to your refrigerator, you have defrost water pan located on top of compressor at least twice a year. Do not use CHLORIDE to clean stainless steel. Do ... surface when removing adhesive labels. Rinse well, and wipe dry with sudsy cloth or sponge. CARE & CLEANING Keep your refrigerator and freezer clean to prevent odor build-up on the condenser coils (black tubes and wires) attached to the back of air-cooled...

Use and Care Manual
Page 12
... PURPOSE, ARE LIMITED TO ONE YEAR OR THE SHORTEST PERIOD ALLOWED BY LAW, BUT NOT LESS THAN ONE YEAR. Electrolux authorizes no person to any refrigerator or freezer failures. 6. Product features or specifications as -is in your best interest to obtain and keep all costs for appliances not in ordinary household use...
... PURPOSE, ARE LIMITED TO ONE YEAR OR THE SHORTEST PERIOD ALLOWED BY LAW, BUT NOT LESS THAN ONE YEAR. Electrolux authorizes no person to any refrigerator or freezer failures. 6. Product features or specifications as -is in your best interest to obtain and keep all costs for appliances not in ordinary household use...

Use and Care Manual
Page 13
... (Canada) Visit our web site at www.frigidaire.com. Freezer temperature is satisfactory. Automatic ice maker not working . This list includes common occurrences that produce odors should produce 2.5 to a warmer setting. Wait 20 minutes and check again. • Set freezer control to be in refrigerator. Then check freezer temperatures and adjust as needed. • The...
... (Canada) Visit our web site at www.frigidaire.com. Freezer temperature is satisfactory. Automatic ice maker not working . This list includes common occurrences that produce odors should produce 2.5 to a warmer setting. Wait 20 minutes and check again. • Set freezer control to be in refrigerator. Then check freezer temperatures and adjust as needed. • The...


