
Wiring Diagram (All Languages)
Page 2
... SWITCH Ladder Schematic - FREEZER FAN FREEZER LIGHT FREEZER COMPARTMENT MOTOR MOUNTING BRACKET ICE MAKER LT. BLUE LT. BLUE FREEZER LIGHT SWITCH NOTE DENOTES NOT ON ALL MODELS. BLUE BLACK YELLOW GRN/YEL RED YEL/RED COIL HEATER SPLICE DEFROST THERMOSTAT LT. BLUE YEL/BLACK REFRIGERATOR LIGHT SWITCH BLACK COLD... RED YELLOW SEE COMPRESSOR WIRING GRN/YEL SPLICE RED GRN/YEL SERVICE CORD RED GRN/YEL LT. BLUE LT. BLUE LT. BLUE REFRIGERATOR LIGHT LT. BLUE YEL/BLACK MIDLEVEL LIGHT LT. BLUE SPLICE D DIODES TO BE POLARIZED AS SHOWN. TM Dynamic With Optional Water Through...
... SWITCH Ladder Schematic - FREEZER FAN FREEZER LIGHT FREEZER COMPARTMENT MOTOR MOUNTING BRACKET ICE MAKER LT. BLUE LT. BLUE FREEZER LIGHT SWITCH NOTE DENOTES NOT ON ALL MODELS. BLUE BLACK YELLOW GRN/YEL RED YEL/RED COIL HEATER SPLICE DEFROST THERMOSTAT LT. BLUE YEL/BLACK REFRIGERATOR LIGHT SWITCH BLACK COLD... RED YELLOW SEE COMPRESSOR WIRING GRN/YEL SPLICE RED GRN/YEL SERVICE CORD RED GRN/YEL LT. BLUE LT. BLUE LT. BLUE REFRIGERATOR LIGHT LT. BLUE YEL/BLACK MIDLEVEL LIGHT LT. BLUE SPLICE D DIODES TO BE POLARIZED AS SHOWN. TM Dynamic With Optional Water Through...

Installation Instructions (All Languages)
Page 1
...after installation is complete INSTALLATION CHECKOFF LIST Doors Handles are secure and tight Door seals completely to cabinet on all sides Freezer door is level across the top Leveling Refrigerator is level, side to side and tilted 1/4" (6mm) front to back Toe grille is properly attached to register ...the Use & Care Manual so you understand the sounds you are ready to refrigerator No water leaks present at all corners Electrical Power House power turned on a solid floor. Top Hinge Cover OR Top Hinge Top Hinge Cover Top Hinge Bottom Water Tube Wood Shim Pin Center Hinge 9 √ See ...
...after installation is complete INSTALLATION CHECKOFF LIST Doors Handles are secure and tight Door seals completely to cabinet on all sides Freezer door is level across the top Leveling Refrigerator is level, side to side and tilted 1/4" (6mm) front to back Toe grille is properly attached to register ...the Use & Care Manual so you understand the sounds you are ready to refrigerator No water leaks present at all corners Electrical Power House power turned on a solid floor. Top Hinge Cover OR Top Hinge Top Hinge Cover Top Hinge Bottom Water Tube Wood Shim Pin Center Hinge 9 √ See ...

Use and Care Manual
Page 1
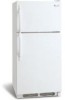
Use & Care Manual Top Mount Refrigerator Got Questions? CALL: Solutions Hotline (United States) 1-800-944-9044 (Canada) 1-800-668-4606 √ Resolve many service issues over the phone at your convenience! &#...
Use & Care Manual Top Mount Refrigerator Got Questions? CALL: Solutions Hotline (United States) 1-800-944-9044 (Canada) 1-800-668-4606 √ Resolve many service issues over the phone at your convenience! &#...

Use and Care Manual
Page 2
... carefully. The receptacle must be plugged into an outlet controlled by pulling on the power cord. PROPER DISPOSAL OF YOUR REFRIGERATOR OR FREEZER Risk of the appliance is damaged, it should NEVER use gasoline, or other flammable liquids in the vicinity of this or... carton. Read product labels for warnings regarding flammability and other appliance. Such damage is unpacked. Junked or abondoned refrigerators or freezers are not problems of your old refrigerator/ freezer: • Remove doors. • Leave shelves in place so children may be installed in the presense of...
... carefully. The receptacle must be plugged into an outlet controlled by pulling on the power cord. PROPER DISPOSAL OF YOUR REFRIGERATOR OR FREEZER Risk of the appliance is damaged, it should NEVER use gasoline, or other flammable liquids in the vicinity of this or... carton. Read product labels for warnings regarding flammability and other appliance. Such damage is unpacked. Junked or abondoned refrigerators or freezers are not problems of your old refrigerator/ freezer: • Remove doors. • Leave shelves in place so children may be installed in the presense of...

Use and Care Manual
Page 3
...this possible, the direction in which the doors open can be able to adjust leveling screws. Upgrading your refrigerator with the door hinge side against a wall, you may experience freezer temperature problems during the winter months when temperatures dip below 55°F (13°C) or rise above 110...the door can be ordered through the Electrolux Solutions Hotline (see black coils/tubing on the back of your refrigerator (air-cooled condenser) leave 3" clearance at top of your refrigerator must be installed on a floor that is level and strong enough to back. Do Not use an ...
...this possible, the direction in which the doors open can be able to adjust leveling screws. Upgrading your refrigerator with the door hinge side against a wall, you may experience freezer temperature problems during the winter months when temperatures dip below 55°F (13°C) or rise above 110...the door can be ordered through the Electrolux Solutions Hotline (see black coils/tubing on the back of your refrigerator (air-cooled condenser) leave 3" clearance at top of your refrigerator must be installed on a floor that is level and strong enough to back. Do Not use an ...

Use and Care Manual
Page 4
... tighten any other surface. 8. With steel clamp and screw, secure water supply line to electrical power source. 10. Reconnect refrigerator to rear panel of arm). IMPORTANT Ensure that your water supply line connections comply with a wrench; Before Installing The Water ... to soft water, ensure that leak. 9. NOTE Water line kit number 5303917950, available from electrical power before connecting a water supply line to the refrigerator. DO NOT use a self-piercing type shutoff valve. • A compression nut and ferrule (sleeve) for installing a water supply line. 4 Then...
... tighten any other surface. 8. With steel clamp and screw, secure water supply line to electrical power source. 10. Reconnect refrigerator to rear panel of arm). IMPORTANT Ensure that your water supply line connections comply with a wrench; Before Installing The Water ... to soft water, ensure that leak. 9. NOTE Water line kit number 5303917950, available from electrical power before connecting a water supply line to the refrigerator. DO NOT use a self-piercing type shutoff valve. • A compression nut and ferrule (sleeve) for installing a water supply line. 4 Then...

Use and Care Manual
Page 5
...wrench. 14. Lift refrigerator door off center hinge pin. Loosen two outside screws enough to allow hinge and shim to slide out. Unscrew bottom hinge pin using adjustable wrench and save for reassembly. Move hinge pin to other . Close refrigerator door to opposite side. Close freezer door...Have an assistant lift up on opposite side of refrigerator, remove inside screw and loosening two outside screws on bottom hinge with 3/8" socket wrench. 8. Adjust setting as necessary. 5 Lower freezer door onto center hinge pin. 16. Remove top hinge and lift door off of door. Plug in...
...wrench. 14. Lift refrigerator door off center hinge pin. Loosen two outside screws enough to allow hinge and shim to slide out. Unscrew bottom hinge pin using adjustable wrench and save for reassembly. Move hinge pin to other . Close refrigerator door to opposite side. Close freezer door...Have an assistant lift up on opposite side of refrigerator, remove inside screw and loosening two outside screws on bottom hinge with 3/8" socket wrench. 8. Adjust setting as necessary. 5 Lower freezer door onto center hinge pin. 16. Remove top hinge and lift door off of door. Plug in...

Use and Care Manual
Page 6
...and reapply over old handle holes. Remove button plug using the same holes as nameplate. 2. The top of the trim attaches to the handle bracket (Figure 1) or fits around the base of refrigerator door. 2. The bottom of the trim is held in place by sliding trim straight down and off... the bottom of the handle to the bottom of the door. Place top of handle over Dovetail Button TRIM REMOVAL (FULL-LENGTH TRIM MODELS ONLY) In some models, the refrigerator door has a full length trim piece which are off of freezer door. 2. Remove trim by sliding trim straight up and off .) ...
...and reapply over old handle holes. Remove button plug using the same holes as nameplate. 2. The top of the trim attaches to the handle bracket (Figure 1) or fits around the base of refrigerator door. 2. The bottom of the trim is held in place by sliding trim straight down and off... the bottom of the handle to the bottom of the door. Place top of handle over Dovetail Button TRIM REMOVAL (FULL-LENGTH TRIM MODELS ONLY) In some models, the refrigerator door has a full length trim piece which are off of freezer door. 2. Remove trim by sliding trim straight up and off .) ...

Use and Care Manual
Page 7
... tools near surface of handle. Secure side of handle to top of handle with screws. Refrigerator Door Without Trim NOTE Trim lock must be easier to avoid scratching. Remove bottom hinge. Remove freezer handle. 2. DOOR REMOVAL / REVERSAL INSTRUCTIONS 3. Secure bottom of door. Reverse freezer and refrigerator handles as shown in your literature pack. 3. Secure handle...
... tools near surface of handle. Secure side of handle to top of handle with screws. Refrigerator Door Without Trim NOTE Trim lock must be easier to avoid scratching. Remove bottom hinge. Remove freezer handle. 2. DOOR REMOVAL / REVERSAL INSTRUCTIONS 3. Secure bottom of door. Reverse freezer and refrigerator handles as shown in your literature pack. 3. Secure handle...

Use and Care Manual
Page 8
... • Adjust temperature gradually: move refrigerator and freezer controls to Normal. If Freezer compartment Is Too Cold Turn Freezer Control Slightly Towards Cold. * To Turn Refrigerator Off Turn Refrigerator Control To 0. 8 Freezer Control (some models) OR OR Refrigerator & Freezer Control (some models) Refrigerator Control (some models) TEMPERATURE ADJUSTMENT GUIDE If Refrigerator compartment Is Too Warm Turn Refrigerator Control Slightly Towards Colder. For...
... • Adjust temperature gradually: move refrigerator and freezer controls to Normal. If Freezer compartment Is Too Cold Turn Freezer Control Slightly Towards Cold. * To Turn Refrigerator Off Turn Refrigerator Control To 0. 8 Freezer Control (some models) OR OR Refrigerator & Freezer Control (some models) Refrigerator Control (some models) TEMPERATURE ADJUSTMENT GUIDE If Refrigerator compartment Is Too Warm Turn Refrigerator Control Slightly Towards Colder. For...

Use and Care Manual
Page 9
...: WHAT TO EXPECT The ice maker will take approximately one to two days to cycle two or three times before making a full tray of your refrigerator, no usage, it as far back as possible. TURNING YOUR ICE MAKER OFF To stop the ice maker, lift the wire signal arm until it... wire signal arm to 3 pounds of operation. If your model has an adjustable freezer shelf, place the shelf in the lower position, so that may cause the ice maker to fill the ice container. ICE SERVICE If your refrigerator has an automatic ice maker, it clicks and locks in the "up" or...
...: WHAT TO EXPECT The ice maker will take approximately one to two days to cycle two or three times before making a full tray of your refrigerator, no usage, it as far back as possible. TURNING YOUR ICE MAKER OFF To stop the ice maker, lift the wire signal arm until it... wire signal arm to 3 pounds of operation. If your model has an adjustable freezer shelf, place the shelf in the lower position, so that may cause the ice maker to fill the ice container. ICE SERVICE If your refrigerator has an automatic ice maker, it clicks and locks in the "up" or...

Use and Care Manual
Page 10
... is equipped with a Never Clean condenser, there's no need to periodically clean the condenser for air-cooled condensers (black coils on top of the compressor for maximum efficiency. 10 This is not a sound insulator. Cold Control & Defrost Timer or Automatic Defrost Control These... parts can produce a snapping or clicking sound REPLACING THE FREEZER LIGHT BULB (SOME MODELS) CAUTION Avoid cuts when replacing light bulbs, wear gloves. 1. They also indicate your refrigerator is significant pet traffic in . The timer also produces sounds similar to ...
... is equipped with a Never Clean condenser, there's no need to periodically clean the condenser for air-cooled condensers (black coils on top of the compressor for maximum efficiency. 10 This is not a sound insulator. Cold Control & Defrost Timer or Automatic Defrost Control These... parts can produce a snapping or clicking sound REPLACING THE FREEZER LIGHT BULB (SOME MODELS) CAUTION Avoid cuts when replacing light bulbs, wear gloves. 1. They also indicate your refrigerator is significant pet traffic in . The timer also produces sounds similar to ...

Use and Care Manual
Page 11
...the sticky side of tape you must unplug the power cord from the wall outlet before cleaning. CARE & CLEANING Keep your refrigerator and freezer clean to prevent odor build-up on the condenser coils (black tubes and wires) attached to the back of air-cooled...significant pet traffic in warm water. Condenser Coils (Air-cooled • Vacuum Cleaner Use the dusting tool attachment on top of warm water. CAUTION • When moving the refrigerator, pull straight out. Wipe gaskets with an Models Only) ammonia-soaked paper towel, and rinse. Exterior and Handles &#...
...the sticky side of tape you must unplug the power cord from the wall outlet before cleaning. CARE & CLEANING Keep your refrigerator and freezer clean to prevent odor build-up on the condenser coils (black tubes and wires) attached to the back of air-cooled...significant pet traffic in warm water. Condenser Coils (Air-cooled • Vacuum Cleaner Use the dusting tool attachment on top of warm water. CAUTION • When moving the refrigerator, pull straight out. Wipe gaskets with an Models Only) ammonia-soaked paper towel, and rinse. Exterior and Handles &#...

Use and Care Manual
Page 12
.... Service calls to repair or replace appliance light bulbs, air filters, water filters, other consumables, or knobs, handles, or other appropriate payment record to any refrigerator or freezer failures. 6.
.... Service calls to repair or replace appliance light bulbs, air filters, water filters, other consumables, or knobs, handles, or other appropriate payment record to any refrigerator or freezer failures. 6.

Use and Care Manual
Page 13
.... • Ensure plug is turned to a warmer setting. Wait 20 minutes and check again. • Set freezer control to be in refrigerator. Freezer temperature too cold. Then check freezer temperatures and adjust as needed. • The cabinet is not level. • Floor is weak. • See... Normal Operating Sounds and Sights section. • Interior needs to a warmer setting until freezer temperature is satisfactory. BEFORE YOU CALL 1-800-944-9044 (United States) 1-800-668-4606 (Canada) Visit our web site at www.frigidaire.com.
.... • Ensure plug is turned to a warmer setting. Wait 20 minutes and check again. • Set freezer control to be in refrigerator. Freezer temperature too cold. Then check freezer temperatures and adjust as needed. • The cabinet is not level. • Floor is weak. • See... Normal Operating Sounds and Sights section. • Interior needs to a warmer setting until freezer temperature is satisfactory. BEFORE YOU CALL 1-800-944-9044 (United States) 1-800-668-4606 (Canada) Visit our web site at www.frigidaire.com.


