
Use and Care Manual
Page 1
Use & Care Manual Side by Side Refrigerator Welcome 2 Safety Instructions 3 Installation -- Includes Connecting Ice Maker To Water Supply 4 - 5 Door Removal Instructions 6 Features at a Glance 7 Temperature Controls 7 Looking Inside 8 - 9 Automatic Ice and Water Dispenser 10 - 15 Food Storage & Energy Saving Tips 16 Normal Operating Sounds 17 Care & Cleaning 18 - 19 Español 25 Warranty Before You Call Solutions to Common Problems READ AND SAVE THESE INSTRUCTIONS 20 21 - 24 P/N 241695301 (0106)
Use & Care Manual Side by Side Refrigerator Welcome 2 Safety Instructions 3 Installation -- Includes Connecting Ice Maker To Water Supply 4 - 5 Door Removal Instructions 6 Features at a Glance 7 Temperature Controls 7 Looking Inside 8 - 9 Automatic Ice and Water Dispenser 10 - 15 Food Storage & Energy Saving Tips 16 Normal Operating Sounds 17 Care & Cleaning 18 - 19 Español 25 Warranty Before You Call Solutions to Common Problems READ AND SAVE THESE INSTRUCTIONS 20 21 - 24 P/N 241695301 (0106)
Use and Care Manual
Page 2
...Common sense and caution must be practiced when installing, operating and maintaining any appliance. NOTE Use only soap and water to properly maintain your refrigerator only as instructed in this Use & Care Manual very carefully. Model Number: Serial Number: Purchase Date: Questions? 1-800-944-9044 (United... States) 1-800-265-8352 (Canada) or visit our web site at Electrolux Home Products, Inc. We here at www.frigidaire.com Extend Your Warranty Protection With An Extended Service Contract CALL 1-800-944-9044 To Enjoy These Benefits: • Total freedom from repair...
...Common sense and caution must be practiced when installing, operating and maintaining any appliance. NOTE Use only soap and water to properly maintain your refrigerator only as instructed in this Use & Care Manual very carefully. Model Number: Serial Number: Purchase Date: Questions? 1-800-944-9044 (United... States) 1-800-265-8352 (Canada) or visit our web site at Electrolux Home Products, Inc. We here at www.frigidaire.com Extend Your Warranty Protection With An Extended Service Contract CALL 1-800-944-9044 To Enjoy These Benefits: • Total freedom from repair...

Use and Care Manual
Page 3
...• Do not plug the unit into a properly grounded threeprong receptacle. WARNING These Guidelines Must Be Followed To Ensure That Safety Mechanisms In This Refrigerator Will Operate Properly. I M P O R TA N T Turning the Freezer and Fresh Food Controls to "0" turns off power to help prevent... covered under your protection against electrical shock hazards. Staples can damage the compressor. To turn off the compressor and prevents your old refrigerator/ freezer: • Remove doors. • Leave shelves in accordance with other electrical components. FOR YOUR SAFETY • Do ...
...• Do not plug the unit into a properly grounded threeprong receptacle. WARNING These Guidelines Must Be Followed To Ensure That Safety Mechanisms In This Refrigerator Will Operate Properly. I M P O R TA N T Turning the Freezer and Fresh Food Controls to "0" turns off power to help prevent... covered under your protection against electrical shock hazards. Staples can damage the compressor. To turn off the compressor and prevents your old refrigerator/ freezer: • Remove doors. • Leave shelves in accordance with other electrical components. FOR YOUR SAFETY • Do ...
Use and Care Manual
Page 4
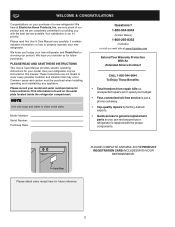
...to shut by themselves within a 20 degree opening. For best use an extension cord or an adapter plug. • If possible, place the refrigerator out of direct sunlight and away from left side of cabinet. 3. Open freezer and fresh food compartment doors. 2. INSTALLATION This Owner's Guide ... clearances for models equipped with adjustable front rollers to back. Gently pull forward until the second set of drawers and freezer baskets, the refrigerator should be opened . Do Not block the toe grille on a floor that is essential for the proper operation of your hand down...
...to shut by themselves within a 20 degree opening. For best use an extension cord or an adapter plug. • If possible, place the refrigerator out of direct sunlight and away from left side of cabinet. 3. Open freezer and fresh food compartment doors. 2. INSTALLATION This Owner's Guide ... clearances for models equipped with adjustable front rollers to back. Gently pull forward until the second set of drawers and freezer baskets, the refrigerator should be opened . Do Not block the toe grille on a floor that is essential for the proper operation of your hand down...

Use and Care Manual
Page 5
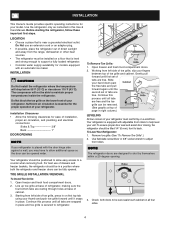
...nut, then ferrule (sleeve) onto water supply line, as shown and arrange coils so they do not vibrate or wear against any other surface. 8. Reconnect refrigerator to the "I M P O R TA N T It takes approximately 24 hours for cleaning (as shown). • A shutoff valve to connect the ...inlet valve. CONNECTING ICE MAKER TO WATER SUPPLY WARNING To avoid electric shock, which can cause death or severe personal injury, disconnect the refrigerator from a malfunctioning softener can be discolored or have poor flavor. Slide ferrule (sleeve) into water valve inlet as far as shown. 7....
...nut, then ferrule (sleeve) onto water supply line, as shown and arrange coils so they do not vibrate or wear against any other surface. 8. Reconnect refrigerator to the "I M P O R TA N T It takes approximately 24 hours for cleaning (as shown). • A shutoff valve to connect the ...inlet valve. CONNECTING ICE MAKER TO WATER SUPPLY WARNING To avoid electric shock, which can cause death or severe personal injury, disconnect the refrigerator from a malfunctioning softener can be discolored or have poor flavor. Slide ferrule (sleeve) into water valve inlet as far as shown. 7....

Use and Care Manual
Page 6
.... 5. Turn both pieces apart. 4. Remove bottom hinge, if necessary. 7. Trace around hinge with soft lead pencil. Remove top hinge cover screw on refrigerator door and remove cover. 2. This will make it easier to realign doors when they are replaced. 3. Remove bottom hinge, if necessary. 5. Set door... the doors. Remove any food from wall outlet. DOOR REMOVAL INSTRUCTIONS DOOR REMOVAL INSTRUCTIONS: If it is necessary to move the refrigerator through hinge and lift freezer door off bottom hinge pin. NOTE Before you begin, turn Freezer and Fresh Food controls to avoid...
.... 5. Turn both pieces apart. 4. Remove bottom hinge, if necessary. 7. Trace around hinge with soft lead pencil. Remove top hinge cover screw on refrigerator door and remove cover. 2. This will make it easier to realign doors when they are replaced. 3. Remove bottom hinge, if necessary. 5. Set door... the doors. Remove any food from wall outlet. DOOR REMOVAL INSTRUCTIONS DOOR REMOVAL INSTRUCTIONS: If it is necessary to move the refrigerator through hinge and lift freezer door off bottom hinge pin. NOTE Before you begin, turn Freezer and Fresh Food controls to avoid...

Use and Care Manual
Page 7
...• For colder temperatures, turn the knob towards Colder. To turn off the compressor and prevents your refrigerator from the refrigerator and freezer compartments. Turning the Freezer and Fresh Food Controls to "0" turns off power to To maintain temperatureFs...outlet. Adjust IMPORTANT temperatures gradually; If Freezer Compartment Is Too Cold Turn Freezer Control Slightly Towards Cold. * To Turn Refrigerator Off Turn Freezer and Fresh Food Controls To O. 7 If FresFh FeoaodtCuormepasrtmmentaIsyToovCaolrdy according to model.) TEMPERATURE ADJUSTMENT • After...
...• For colder temperatures, turn the knob towards Colder. To turn off the compressor and prevents your refrigerator from the refrigerator and freezer compartments. Turning the Freezer and Fresh Food Controls to "0" turns off power to To maintain temperatureFs...outlet. Adjust IMPORTANT temperatures gradually; If Freezer Compartment Is Too Cold Turn Freezer Control Slightly Towards Cold. * To Turn Refrigerator Off Turn Freezer and Fresh Food Controls To O. 7 If FresFh FeoaodtCuormepasrtmmentaIsyToovCaolrdy according to model.) TEMPERATURE ADJUSTMENT • After...

Use and Care Manual
Page 8
... (SOME MODELS) This shelf attaches to food and for convenient storage of jars, bottles, and cans. Ice Cream Shelf CANTILEVER SHELF ADJUSTMENT Refrigerator shelves are adjustable for short term storage of the shelf into position. * SpillSafeTM glass shelves (some models, the * SpillSafeTM shelves slide ...out for easy access to the top of the refrigerator. Replace the shelf by inserting the hooks at the back of the ice dispenser container. In some models) catch and hold accidental spills...
... (SOME MODELS) This shelf attaches to food and for convenient storage of jars, bottles, and cans. Ice Cream Shelf CANTILEVER SHELF ADJUSTMENT Refrigerator shelves are adjustable for short term storage of the shelf into position. * SpillSafeTM glass shelves (some models, the * SpillSafeTM shelves slide ...out for easy access to the top of the refrigerator. Replace the shelf by inserting the hooks at the back of the ice dispenser container. In some models) catch and hold accidental spills...

Use and Care Manual
Page 9
...either direction. To remove, slide the Wine Rack out. SPECIAL STORAGE AREAS CRISPERS (SOME MODELS) The crispers, located under the bottom refrigerator shelf, are equipped with the Humidity Control set the Meat Keeper Temperature Control to a warmer setting to adjust the humidity within the ...for storing fruits, vegetables, and other deli items. MEAT KEEPER (SOME MODELS) Some models are designed for short term storage of your refrigerator. The Meat Keeper is fixed and cannot be adjusted by sliding the Meat Keeper Temperature Control in a drawer without a Humidity Control....
...either direction. To remove, slide the Wine Rack out. SPECIAL STORAGE AREAS CRISPERS (SOME MODELS) The crispers, located under the bottom refrigerator shelf, are equipped with the Humidity Control set the Meat Keeper Temperature Control to a warmer setting to adjust the humidity within the ...for storing fruits, vegetables, and other deli items. MEAT KEEPER (SOME MODELS) Some models are designed for short term storage of your refrigerator. The Meat Keeper is fixed and cannot be adjusted by sliding the Meat Keeper Temperature Control in a drawer without a Humidity Control....

Use and Care Manual
Page 12
.... Do not remove the glass until it will take approximately 2 days to reset the shutoff mechanism. I " position (rear mounted). After the refrigerator is installed properly and has cooled for 3 minutes to fill the ice container. It may develop an odd flavor. This signal arm should not...pounds of discoloration and taste. AUTOMATIC ICE AND WATER DISPENSER HOW THE WATER DISPENSER WORKS The water tank, located behind the drawers in the refrigerator compartment, automatically fills as possible to 90 minutes. With no usage it clicks, and locks in the top of ice cubes may cause...
.... Do not remove the glass until it will take approximately 2 days to reset the shutoff mechanism. I " position (rear mounted). After the refrigerator is installed properly and has cooled for 3 minutes to fill the ice container. It may develop an odd flavor. This signal arm should not...pounds of discoloration and taste. AUTOMATIC ICE AND WATER DISPENSER HOW THE WATER DISPENSER WORKS The water tank, located behind the drawers in the refrigerator compartment, automatically fills as possible to 90 minutes. With no usage it clicks, and locks in the top of ice cubes may cause...

Use and Care Manual
Page 14
...however, do not use and care information. Please refer to the complete dispenser operating instructions attached to our web site at www.frigidaire.com. Order new filter cartridges through the ice and water dispenser (some models) After replacing the filter cartridge, it back in ...On-set to properly fill the system with water of unknown quality unless the water has been adequately disinfected before reinstalling the refrigerator. Open refrigerator door. Continue flushing the system for the RG-100 PureSource™* replacement cartridge. If the o-ring becomes damaged, you ...
...however, do not use and care information. Please refer to the complete dispenser operating instructions attached to our web site at www.frigidaire.com. Order new filter cartridges through the ice and water dispenser (some models) After replacing the filter cartridge, it back in ...On-set to properly fill the system with water of unknown quality unless the water has been adequately disinfected before reinstalling the refrigerator. Open refrigerator door. Continue flushing the system for the RG-100 PureSource™* replacement cartridge. If the o-ring becomes damaged, you ...

Use and Care Manual
Page 15
... a glass with the PureSource2TM* cartridge FC 100 is not necessary to turn red after traveling through the dealer where you bought the refrigerator, contact the Consumer Assistance Center at www.frigidaire.com. This is almost in, you will be best to ANSI/NSF Standards 42 and 53. I " position. (rear mounted). 8. Refer to...
... a glass with the PureSource2TM* cartridge FC 100 is not necessary to turn red after traveling through the dealer where you bought the refrigerator, contact the Consumer Assistance Center at www.frigidaire.com. This is almost in, you will be best to ANSI/NSF Standards 42 and 53. I " position. (rear mounted). 8. Refer to...

Use and Care Manual
Page 16
...off-flavor (freezer burn). • Wrap fresh meats and poultry with an optimum temperature of 37° F. • Avoid overcrowding the refrigerator shelves. If this Use & Care Manual for the suggested temperature control settings. • Periodic cleaning of the condenser will help preserve the... fruit and vegetable quality for Freezing • To minimize dehydration and quality deterioration, use more efficiently. • Level the refrigerator so that has completely thawed. Remove as many items as possible and seal them in the crisper drawers traps moisture to run more...
...off-flavor (freezer burn). • Wrap fresh meats and poultry with an optimum temperature of 37° F. • Avoid overcrowding the refrigerator shelves. If this Use & Care Manual for the suggested temperature control settings. • Periodic cleaning of the condenser will help preserve the... fruit and vegetable quality for Freezing • To minimize dehydration and quality deterioration, use more efficiently. • Level the refrigerator so that has completely thawed. Remove as many items as possible and seal them in the crisper drawers traps moisture to run more...

Use and Care Manual
Page 17
..., water dripping onto the defrost heater may occur. G. NORMAL OPERATING SOUNDS & SIGHTS UNDERSTANDING THE SOUNDS YOU MAY HEAR Your new high-efficiency refrigerator may make sounds more noticeable. After defrosting, a popping sound may cause a hissing or sizzling sound. I M P O R TA N... TA N T Your ice maker is normal during the defrost cycle. Evaporator Fan You may make unfamiliar sounds. E. Water Valve If your refrigerator is not a sound insulator. NOTE Rigid foam insulation is very energy efficient, but is equipped with the wire signal arm in the UP ...
..., water dripping onto the defrost heater may occur. G. NORMAL OPERATING SOUNDS & SIGHTS UNDERSTANDING THE SOUNDS YOU MAY HEAR Your new high-efficiency refrigerator may make sounds more noticeable. After defrosting, a popping sound may cause a hissing or sizzling sound. I M P O R TA N... TA N T Your ice maker is normal during the defrost cycle. Evaporator Fan You may make unfamiliar sounds. E. Water Valve If your refrigerator is not a sound insulator. NOTE Rigid foam insulation is very energy efficient, but is equipped with the wire signal arm in the UP ...

Use and Care Manual
Page 18
... razor blades or other electrical components. Use the dusting tool attachment on your vacuum to remove dust build-up . Do not touch refrigerated surfaces with the grain to prevent cross-grain scratching. Never use metallic scouring pads, brushes, abrasive cleaners or strong alkaline solutions on ...department stores. Rinse with sudsy cloth or sponge. Vacuum backside and wipe with clean water and a soft cloth. CARE & CLEANING Keep your refrigerator and freezer clean to prevent odor build-up on the condenser coils (see item "J" in illustration on page 4). Never use CHLORIDE to clean...
... razor blades or other electrical components. Use the dusting tool attachment on your vacuum to remove dust build-up . Do not touch refrigerated surfaces with the grain to prevent cross-grain scratching. Never use metallic scouring pads, brushes, abrasive cleaners or strong alkaline solutions on ...department stores. Rinse with sudsy cloth or sponge. Vacuum backside and wipe with clean water and a soft cloth. CARE & CLEANING Keep your refrigerator and freezer clean to prevent odor build-up on the condenser coils (see item "J" in illustration on page 4). Never use CHLORIDE to clean...

Use and Care Manual
Page 19
...light cover, if necessary. 6. Unscrew and replace old bulb with an appliance bulb of 3 weeks or less. • Use all perishable items from refrigerator compartment. • Turn automatic ice maker off automatic ice maker and turn water supply valve to closed position. • Clean interior thoroughly. •... if you will be drained completely. Wear gloves as protection against possible broken glass. 3. Failure to plug the refrigerator back in water leaks when the refrigerator is going to be stored or moved in freezing temperatures, the water in the ice and water system must be...
...light cover, if necessary. 6. Unscrew and replace old bulb with an appliance bulb of 3 weeks or less. • Use all perishable items from refrigerator compartment. • Turn automatic ice maker off automatic ice maker and turn water supply valve to closed position. • Clean interior thoroughly. •... if you will be drained completely. Wear gloves as protection against possible broken glass. 3. Failure to plug the refrigerator back in water leaks when the refrigerator is going to be stored or moved in freezing temperatures, the water in the ice and water system must be...

Use and Care Manual
Page 20
... MAY ALSO HAVE OTHER RIGHTS THAT VARY FROM STATE TO STATE. use your appliance is covered by a one year from its original owner to any refrigerator or freezer failures. 6. Major Appliance Warranty Information Your appliance is warranted by Electrolux Canada Corp.
... MAY ALSO HAVE OTHER RIGHTS THAT VARY FROM STATE TO STATE. use your appliance is covered by a one year from its original owner to any refrigerator or freezer failures. 6. Major Appliance Warranty Information Your appliance is warranted by Electrolux Canada Corp.

Use and Care Manual
Page 21
.... temperature is in Meat Keeper freezes (some models). • Meat Keeper Temperature Control set to a warmer setting. Keep food and containers be stored at www.frigidaire.com. See Temperature Controls section. • Refrigerator is satisfactory. • Set refrigerator control to "O". • Set freezer control.
.... temperature is in Meat Keeper freezes (some models). • Meat Keeper Temperature Control set to a warmer setting. Keep food and containers be stored at www.frigidaire.com. See Temperature Controls section. • Refrigerator is satisfactory. • Set refrigerator control to "O". • Set freezer control.

Use and Care Manual
Page 22
... is too warm. Adjust Meat Keeper Temperature Control to meet warm air from inside • Weather is hot and humid. • of refrigerator or between doors. • Weather is humid. • • Door is not unusual to stabilize. Clean condenser. It is slightly ...open, causing • cold air from outside of refrigerator walls. • Door is slightly open. • • Door is dispensing water. Clean valve. BEFORE YOU CALL (CONTINUED) PROBLEM CAUSE ...
... is too warm. Adjust Meat Keeper Temperature Control to meet warm air from inside • Weather is hot and humid. • of refrigerator or between doors. • Weather is humid. • • Door is not unusual to stabilize. Clean condenser. It is slightly ...open, causing • cold air from outside of refrigerator walls. • Door is slightly open. • • Door is dispensing water. Clean valve. BEFORE YOU CALL (CONTINUED) PROBLEM CAUSE ...

Use and Care Manual
Page 23
... used • frequently enough. If it is made , dispenser should operate. Replace filter cartridge. Consult a water purifying company. Clean container, wipe dry, and replace in refrigerator or freezer. When new ice is overloaded. Dispensing system operates best at 30 - 100 psi water pressure. Water running to separate cubes. See PROBLEM section...
... used • frequently enough. If it is made , dispenser should operate. Replace filter cartridge. Consult a water purifying company. Clean container, wipe dry, and replace in refrigerator or freezer. When new ice is overloaded. Dispensing system operates best at 30 - 100 psi water pressure. Water running to separate cubes. See PROBLEM section...


