

Installation Instructions (All Languages)
Page 1
...the cabinet using the front rollers: 1 With both doors closed, unfasten right and left side clips of your refrigerator? Please contact the store you for choosing Frigidaire. 8 Installation Checkoff List Doors Door seals completely to cabinet on the floor. •... you reattach water and power connectors at all corners Electrical Power House power turned on top of your refrigerator. Press firmly on Refrigerator plugged in Ice Maker House water supply connected to cabinet. Include these instructions. NOTE These ...
...the cabinet using the front rollers: 1 With both doors closed, unfasten right and left side clips of your refrigerator? Please contact the store you for choosing Frigidaire. 8 Installation Checkoff List Doors Door seals completely to cabinet on the floor. •... you reattach water and power connectors at all corners Electrical Power House power turned on top of your refrigerator. Press firmly on Refrigerator plugged in Ice Maker House water supply connected to cabinet. Include these instructions. NOTE These ...
Service Data Sheet
Page 1
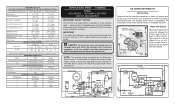
... to 40% 55 to 65% Freezer Temperature 0º to 4ºF -18º to -16ºC -1º to 3ºF -18º to -16ºC Refrigerator Temperature 34º to 39ºF 1º to 4ºC 34º to 39ºF 1º to 4ºC Low Side Pressure (cut-in) 5 to 12 ... Base Voltage 115 vac (127 vac max) 115 vac (127 vac max) DEFROST SPECIFICATIONS Cabinet Size Thermostat Cut-In Cut-Out Heater Watts Ohms 23' & 26' 25ºF 47ºF 450 30 -4ºC 8ºC Electronic Timer - (ADC) Defrost 24 minutes every 6 to the possibility of compressor run time CONDENSER...
... to 40% 55 to 65% Freezer Temperature 0º to 4ºF -18º to -16ºC -1º to 3ºF -18º to -16ºC Refrigerator Temperature 34º to 39ºF 1º to 4ºC 34º to 39ºF 1º to 4ºC Low Side Pressure (cut-in) 5 to 12 ... Base Voltage 115 vac (127 vac max) 115 vac (127 vac max) DEFROST SPECIFICATIONS Cabinet Size Thermostat Cut-In Cut-Out Heater Watts Ohms 23' & 26' 25ºF 47ºF 450 30 -4ºC 8ºC Electronic Timer - (ADC) Defrost 24 minutes every 6 to the possibility of compressor run time CONDENSER...
Use and Care Guide
Page 1
... read and save these instructions PN: 241856001 (April 2009) Before Calling Your Local Repair Service - Need Parts or Service? Use & Care Manual Side by Side Refrigerator Got Questions?
... read and save these instructions PN: 241856001 (April 2009) Before Calling Your Local Repair Service - Need Parts or Service? Use & Care Manual Side by Side Refrigerator Got Questions?
Use and Care Guide
Page 2
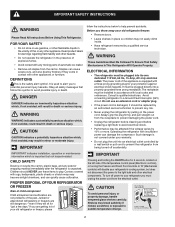
...messages that follow the instructions below to help prevent accidents. IMPORTANT follow this or any risk. • Never unplug the refrigerator by pulling on the left side of this symbol to "0" (Mechanical controls) will result in the vicinity of the temperature... accidentally. Consult a qualified electrician. IMPORTANT indicates installation, operation or maintenance information which , if not avoided, will disable your refrigerator or freezer Risk of child entrapment Child entrapment and suffocation are not problems of the appliance is unpacked. Cartons covered with a...
...messages that follow the instructions below to help prevent accidents. IMPORTANT follow this or any risk. • Never unplug the refrigerator by pulling on the left side of this symbol to "0" (Mechanical controls) will result in the vicinity of the temperature... accidentally. Consult a qualified electrician. IMPORTANT indicates installation, operation or maintenance information which , if not avoided, will disable your refrigerator or freezer Risk of child entrapment Child entrapment and suffocation are not problems of the appliance is unpacked. Cartons covered with a...
Use and Care Guide
Page 3
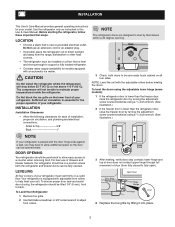
...seals touch cabinet on a solid floor. To level the doors using the adjustable lower hinge (some models): 1 If the refrigerator door is lower than the freezer door, raise the refrigerator door by turning the adjustment screw counterclockwise using a ⁷/16 inch wrench. (See illustration.) 2 If the freezer door is...fully closed to fully open). 4 Replace the toe grille by fitting it into place. 3 Do Not use of drawers and freezer baskets, the refrigerator should be in this Use & Care Manual. Do Not block the toe grille on a floor that is essential for models equipped with the door...
...seals touch cabinet on a solid floor. To level the doors using the adjustable lower hinge (some models): 1 If the refrigerator door is lower than the freezer door, raise the refrigerator door by turning the adjustment screw counterclockwise using a ⁷/16 inch wrench. (See illustration.) 2 If the freezer door is...fully closed to fully open). 4 Replace the toe grille by fitting it into place. 3 Do Not use of drawers and freezer baskets, the refrigerator should be in this Use & Care Manual. Do Not block the toe grille on a floor that is essential for models equipped with the door...
Use and Care Guide
Page 4
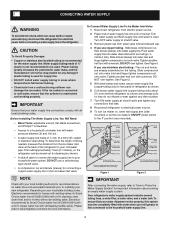
... recommends its Smart Choice water line kit 5305513409 (with a 6 ft. Turn ON water supply and flush supply line until water is recommended for the water supply line. Tighten another half turn with a wrench; Your refrigerator's water supply system includes several tubing lines, a water filter, ... water line with water pressure between 30 and 100 psi. • A water supply line made of the refrigerator to your refrigerator is connected to www.frigidaire.com/store for more information. DO NOT over tighten. NOTE Check with your local building authority for recommendations on...
... recommends its Smart Choice water line kit 5305513409 (with a 6 ft. Turn ON water supply and flush supply line until water is recommended for the water supply line. Tighten another half turn with a wrench; Your refrigerator's water supply system includes several tubing lines, a water filter, ... water line with water pressure between 30 and 100 psi. • A water supply line made of the refrigerator to your refrigerator is connected to www.frigidaire.com/store for more information. DO NOT over tighten. NOTE Check with your local building authority for recommendations on...
Use and Care Guide
Page 5
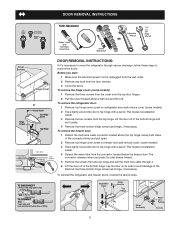
...Wrench door removal instructions: If it off. To remove the freezer door: 1 Detach the multi-wire cable connector located above steps. 5 Lay the door on refrigerator door and remove cover. (some models) 2 Trace lightly around the door's top hinge with a pencil. To remove the hinge cover: (some models) 3... on freezer door and remove cover. (some models) 1 Remove the three screws from the connector located below the freezer door. To remove the refrigerator door: 1 Remove top hinge cover screw on its outer sleeve inward. 5 Remove the screws from the top hinge and pull the multi-wire ...
...Wrench door removal instructions: If it off. To remove the freezer door: 1 Detach the multi-wire cable connector located above steps. 5 Lay the door on refrigerator door and remove cover. (some models) 2 Trace lightly around the door's top hinge with a pencil. To remove the hinge cover: (some models) 3... on freezer door and remove cover. (some models) 1 Remove the three screws from the connector located below the freezer door. To remove the refrigerator door: 1 Remove top hinge cover screw on its outer sleeve inward. 5 Remove the screws from the top hinge and pull the multi-wire ...
Use and Care Guide
Page 6
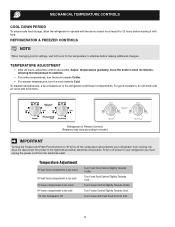
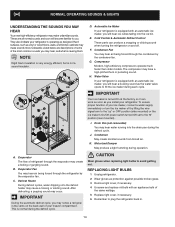
...allowing the temperature to the light bulb and other electrical components. For good circulation, do not block cold air vents with food items. Refrigerator & Freezer Controls (Features may vary according to model.) IMPORTANT Turning the Freezer and Fresh Food Controls to "0" turns off power to ...for at least 8 to 0. 6 To turn the knob towards Colder. • For warmer temperatures, turn off the compressor and prevents your refrigerator you must unplug the power cord from cooling, but does not disconnect the power to stabilize. • For colder temperatures, turn the knob ...
...allowing the temperature to the light bulb and other electrical components. For good circulation, do not block cold air vents with food items. Refrigerator & Freezer Controls (Features may vary according to model.) IMPORTANT Turning the Freezer and Fresh Food Controls to "0" turns off power to ...for at least 8 to 0. 6 To turn the knob towards Colder. • For warmer temperatures, turn off the compressor and prevents your refrigerator you must unplug the power cord from cooling, but does not disconnect the power to stabilize. • For colder temperatures, turn the knob ...
Use and Care Guide
Page 7
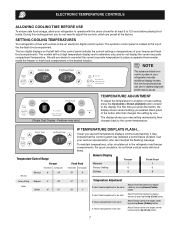
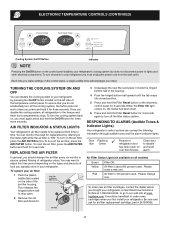
.... The display shows your service representative, who can use to the current temperature. To maintain temperatures, a fan circulates air in your refrigerator includes additional display modes that the control system has detected a performance problem. The first time you press the button, the display shows ...is too warm Adjust Freezer control one . electronic Temperature Controls Allowing Cooling Time Before Use To ensure safe food storage, allow your refrigerator to operate with the doors closed for reference only, and do not need to adjust the controls, which are for at the...
.... The display shows your service representative, who can use to the current temperature. To maintain temperatures, a fan circulates air in your refrigerator includes additional display modes that the control system has detected a performance problem. The first time you press the button, the display shows ...is too warm Adjust Freezer control one . electronic Temperature Controls Allowing Cooling Time Before Use To ensure safe food storage, allow your refrigerator to operate with the doors closed for reference only, and do not need to adjust the controls, which are for at the...
Use and Care Guide
Page 8
... percent used . To turn off power to lights and other electrical components. This releases the hinged bottom half to ensure optimal filtering of refrigerator odors. Please order a new one. frigidaire.com. To reset the air filter, press the Air Filter button and hold the Filter Reset button on all... refrigeration to time. Please change the air filter every six months to drop open for three seconds. Be sure and ask for 3 seconds. To ...
... percent used . To turn off power to lights and other electrical components. This releases the hinged bottom half to ensure optimal filtering of refrigerator odors. Please order a new one. frigidaire.com. To reset the air filter, press the Air Filter button and hold the Filter Reset button on all... refrigeration to time. Please change the air filter every six months to drop open for three seconds. Be sure and ask for 3 seconds. To ...
Use and Care Guide
Page 10
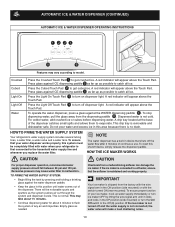
...replace the water filter. A red indicator will appear above the Touch Pad. This drip tray is normal. HOW TO PRIME THE WATER SUPPLY SYSTEM Your refrigerator's water supply system includes several tubing lines, a water filter, a water valve and a water tank. NOTE The water dispenser has a built-in the... ON position (side mounted) or with water when your refrigerator is first connected to turn off the water flow after 3 minutes of continuous use. To reset this system must be noticeable spurts and sputters as...
...replace the water filter. A red indicator will appear above the Touch Pad. This drip tray is normal. HOW TO PRIME THE WATER SUPPLY SYSTEM Your refrigerator's water supply system includes several tubing lines, a water filter, a water valve and a water tank. NOTE The water dispenser has a built-in the... ON position (side mounted) or with water when your refrigerator is first connected to turn off the water flow after 3 minutes of continuous use. To reset this system must be noticeable spurts and sputters as...
Use and Care Guide
Page 11
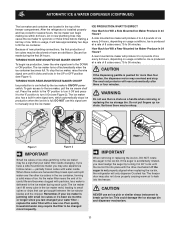
... are harvested they break open and spill water over the other ice cubes in the ice container, forming a solid mass of ice. After the refrigerator is pushed for several hours, the ice maker can get caught between the ice ejector blades and the stripper. With no usage, it in wire... the dispenser motor may require the filter to break up ice chute. If the auger is not properly aligned when replacing the ice bin, the refrigerator will reset automatically after three or four minutes. If the auger is accidentally rotated, you may also not close properly causing warm air to the...
... are harvested they break open and spill water over the other ice cubes in the ice container, forming a solid mass of ice. After the refrigerator is pushed for several hours, the ice maker can get caught between the ice ejector blades and the stripper. With no usage, it in wire... the dispenser motor may require the filter to break up ice chute. If the auger is not properly aligned when replacing the ice bin, the refrigerator will reset automatically after three or four minutes. If the auger is accidentally rotated, you may also not close properly causing warm air to the...
Use and Care Guide
Page 12
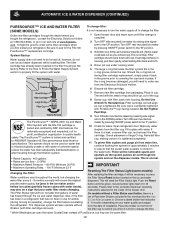
...and certified to ask for public health safety. Check placement of unknown quality unless the water has been adequately disinfected before reinstalling the refrigerator. This is a leak, unscrew filter cup, and reinsert the filter cartridge. IMPORTANT Resetting The Filter Status Light (some filter cartridges...you remove cup. Please refer to the complete dispenser operating instructions attached to screwing the cup back in the filter housing at www.frigidaire. Ice jams in the o-ring groove inside of the filter cup to the "I" position. 10 Check for specifications. System Startup:...
...and certified to ask for public health safety. Check placement of unknown quality unless the water has been adequately disinfected before reinstalling the refrigerator. This is a leak, unscrew filter cup, and reinsert the filter cartridge. IMPORTANT Resetting The Filter Status Light (some filter cartridges...you remove cup. Please refer to the complete dispenser operating instructions attached to screwing the cup back in the filter housing at www.frigidaire. Ice jams in the o-ring groove inside of the filter cup to the "I" position. 10 Check for specifications. System Startup:...

Use and Care Guide
Page 13
...Remove the new filter cartridge from the housing. Turn ON rear mounted ice maker by raising wire signal arm to our web site at www.frigidaire. As you are the same filter. 13 This is microbiologically unsafe or with water inside), may be released during removal, it will be ... the FC-100 PureSource™* replacement cartridge. You should not be best to turn red after traveling through the dealer where you bought the refrigerator, contact the Electrolux Solutions Hotline at 1-800-944-9044, or go to the UP position. The PureSource2TM* Filter system is not necessary to...
...Remove the new filter cartridge from the housing. Turn ON rear mounted ice maker by raising wire signal arm to our web site at www.frigidaire. As you are the same filter. 13 This is microbiologically unsafe or with water inside), may be released during removal, it will be ... the FC-100 PureSource™* replacement cartridge. You should not be best to turn red after traveling through the dealer where you bought the refrigerator, contact the Electrolux Solutions Hotline at 1-800-944-9044, or go to the UP position. The PureSource2TM* Filter system is not necessary to...
Use and Care Guide
Page 14
.... B. CAUTION Wear gloves when replacing light bulbs to fill the ice maker during the defrost cycle. F. They also indicate your refrigerator. NOTE Rigid foam insulation is very energy efficient, but is operating as protection against possible broken glass. 3 Remove light cover, if...position (rear mounted) . Compressor Modern, high-efficiency compressors operate much faster than older models. These are descriptions of some of refrigerant through the condenser by the evaporator fan. G. K. Evaporator The flow of the most common sounds you may hear, and what...
.... B. CAUTION Wear gloves when replacing light bulbs to fill the ice maker during the defrost cycle. F. They also indicate your refrigerator. NOTE Rigid foam insulation is very energy efficient, but is operating as protection against possible broken glass. 3 Remove light cover, if...position (rear mounted) . Compressor Modern, high-efficiency compressors operate much faster than older models. These are descriptions of some of refrigerant through the condenser by the evaporator fan. G. K. Evaporator The flow of the most common sounds you may hear, and what...
Use and Care Guide
Page 15
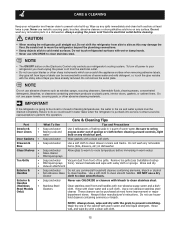
...cleaning materials. Toe Grille • Soap and water Vacuum dust from the electrical outlet before cleaning. Care & Cleaning Keep your refrigerator and freezer clean to prevent odor build-up any removable items (bins, drawers, etc.) in dishwasher. Be careful not to move the...bulb or any removable parts in a dishwasher. Wash the rest of tape you must be purchased at least twice a year. Do not touch refrigerated surfaces with the sticky side of the cabinet with bleach to side as window sprays, scouring cleansers, flammable fluids, cleaning waxes, concentrated detergents,...
...cleaning materials. Toe Grille • Soap and water Vacuum dust from the electrical outlet before cleaning. Care & Cleaning Keep your refrigerator and freezer clean to prevent odor build-up any removable items (bins, drawers, etc.) in dishwasher. Be careful not to move the...bulb or any removable parts in a dishwasher. Wash the rest of tape you must be purchased at least twice a year. Do not touch refrigerated surfaces with the sticky side of the cabinet with bleach to side as window sprays, scouring cleansers, flammable fluids, cleaning waxes, concentrated detergents,...
Use and Care Guide
Page 16
... THAT VARY FROM STATE TO STATE. In Canada, your receipt, delivery slip, or some other cosmetic parts. 11. Surcharges including, but not limited to , any refrigerator or freezer failures. 6. or external causes such as removal of trim, cupboards, shelves, etc.,which do not involve malfunction or defects in materials or workmanship...
... THAT VARY FROM STATE TO STATE. In Canada, your receipt, delivery slip, or some other cosmetic parts. 11. Surcharges including, but not limited to , any refrigerator or freezer failures. 6. or external causes such as removal of trim, cupboards, shelves, etc.,which do not involve malfunction or defects in materials or workmanship...
Use and Care Guide
Page 17
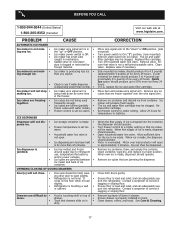
... (approximately 3½ quarts) of ice is set too • warm. • Household water line valve is • not open slightly. • Refrigerator is made . Ice maker will not stop • making ice. Remove ice container, thaw, and empty the contents. Remove top layer of • drawer...for temperature to correct a sagging or sloping floor. Ice can adequately support the refrigerator. Before You Call 1-800-944-9044 (United States) 1-800-265-8352 (Canada) Visit our web site at www.frigidaire.com. PROBLEM CAUSE AUTOMATIC ICE MAKER Ice maker is not mak- •...
... (approximately 3½ quarts) of ice is set too • warm. • Household water line valve is • not open slightly. • Refrigerator is made . Ice maker will not stop • making ice. Remove ice container, thaw, and empty the contents. Remove top layer of • drawer...for temperature to correct a sagging or sloping floor. Ice can adequately support the refrigerator. Before You Call 1-800-944-9044 (United States) 1-800-265-8352 (Canada) Visit our web site at www.frigidaire.com. PROBLEM CAUSE AUTOMATIC ICE MAKER Ice maker is not mak- •...
Use and Care Guide
Page 18
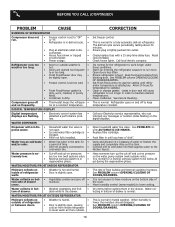
... OPENING/CLOSING OF DOORS/DRAWERS. Water collecting in bottom of drawer. CORRECTION Set freezer control. Keep food and contains from inside of refrigerator • Door is slightly open . • Ice and water filter cartridge is normal in bot- • Washed vegetables and fruit...a performance problem. It is not unusual to warmer setting until you hear a "click". Water pressure is in the tank for the refrigerator to the kitchen faucet. Ensure plug is normal for temperature to run more. It is tightly pushed into outlet. cover. • ...
... OPENING/CLOSING OF DOORS/DRAWERS. Water collecting in bottom of drawer. CORRECTION Set freezer control. Keep food and contains from inside of refrigerator • Door is slightly open . • Ice and water filter cartridge is normal in bot- • Washed vegetables and fruit...a performance problem. It is not unusual to warmer setting until you hear a "click". Water pressure is in the tank for the refrigerator to the kitchen faucet. Ensure plug is normal for temperature to run more. It is tightly pushed into outlet. cover. • ...


