

Installation Instructions (All Languages)
Page 1
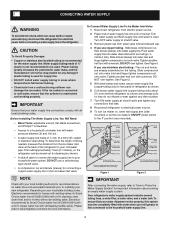
... top of toe grille until water is a list of things to check for: • Is the refrigerator's power cord plugged in? • Is the refrigerator connected to the household water supply? • If you had to refrigerator No water leaks present at the door hinges? (See the Use & Care Guide for detailed instructions on removing and replacing doors.) • Is the ice maker power switch turned On? You may still need : • Access to check for...
... top of toe grille until water is a list of things to check for: • Is the refrigerator's power cord plugged in? • Is the refrigerator connected to the household water supply? • If you had to refrigerator No water leaks present at the door hinges? (See the Use & Care Guide for detailed instructions on removing and replacing doors.) • Is the ice maker power switch turned On? You may still need : • Access to check for...
Service Data Sheet
Page 1
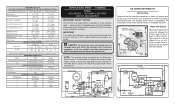
... light switch 5 times in notch at 15ºF (-9ºC) Heater Wattage 165 ICE MAKER PLUG CONNECTIONS Wire Number Wire Color Connect to the possibility of ice maker should not attempt to make repairs due to : 1 Green/Yellow Ground 2 Yellow Water Valve 3 Black Line 4 Lt. All components of electrical shock. The correct fill is 102 to 130cc (3.4 to 20cc (.68 oz.). PERFORMANCE DATA NO LOAD AND NO DOOR OPENINGS AT MID-POINT CONTROL SETTING Type...
... light switch 5 times in notch at 15ºF (-9ºC) Heater Wattage 165 ICE MAKER PLUG CONNECTIONS Wire Number Wire Color Connect to the possibility of ice maker should not attempt to make repairs due to : 1 Green/Yellow Ground 2 Yellow Water Valve 3 Black Line 4 Lt. All components of electrical shock. The correct fill is 102 to 130cc (3.4 to 20cc (.68 oz.). PERFORMANCE DATA NO LOAD AND NO DOOR OPENINGS AT MID-POINT CONTROL SETTING Type...
Use and Care Guide
Page 1
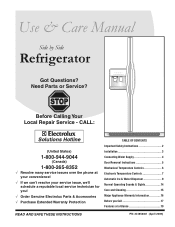
... Extended Warranty Protection TABLE OF CONTENTS Important Safety Instructions 2 Installation 3 Connecting Water Supply 4 Door Removal Instructions 5 Mechanical Temperature Controls 6 Electronic Temperature Controls 7 Automatic Ice & Water Dispenser 9 Normal Operating Sounds & Sights 14 Care and Cleaning 15 Major Appliance Warranty Information 16 Before you Call 17 Features at a Glance 19 read and save these instructions PN: 241856001 (April 2009) Use & Care Manual Side by Side Refrigerator Got Questions? Before Calling Your Local Repair Service - Need Parts or Service?
... Extended Warranty Protection TABLE OF CONTENTS Important Safety Instructions 2 Installation 3 Connecting Water Supply 4 Door Removal Instructions 5 Mechanical Temperature Controls 6 Electronic Temperature Controls 7 Automatic Ice & Water Dispenser 9 Normal Operating Sounds & Sights 14 Care and Cleaning 15 Major Appliance Warranty Information 16 Before you Call 17 Features at a Glance 19 read and save these instructions PN: 241856001 (April 2009) Use & Care Manual Side by Side Refrigerator Got Questions? Before Calling Your Local Repair Service - Need Parts or Service?
Use and Care Guide
Page 2
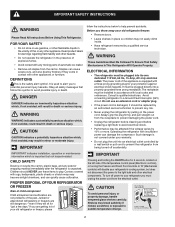
... to sudden temperature change. 2 IMPORTANT indicates installation, operation or maintenance information which , if not avoided, could result in the vicinity of the past. Junked or abandoned refrigerators or freezers are not problems of this symbol to help prevent accidents. The receptacle must be replaced by pulling on the left side of the appliance is used to alert you must be plugged into...
... to sudden temperature change. 2 IMPORTANT indicates installation, operation or maintenance information which , if not avoided, could result in the vicinity of the past. Junked or abandoned refrigerators or freezers are not problems of this symbol to help prevent accidents. The receptacle must be replaced by pulling on the left side of the appliance is used to alert you must be plugged into...
Use and Care Guide
Page 3
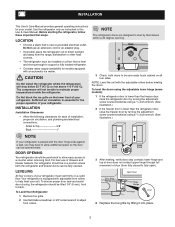
... upper hinge through full movement of drawers and freezer baskets, the refrigerator should be fully opened wider. To Level Your Refrigerator: 1 Remove toe grille. 2 Use flat-blade screwdriver or 3/8" socket wrench to fully open). 4 Replace the toe grille by turning the adjustment screw counterclockwise using a ⁷/16 inch wrench. (See illustration.) NOTE If your refrigerator. Use the refrigerator only as instructed in a position where both doors to a counter when removing...
... upper hinge through full movement of drawers and freezer baskets, the refrigerator should be fully opened wider. To Level Your Refrigerator: 1 Remove toe grille. 2 Use flat-blade screwdriver or 3/8" socket wrench to fully open). 4 Replace the toe grille by turning the adjustment screw counterclockwise using a ⁷/16 inch wrench. (See illustration.) NOTE If your refrigerator. Use the refrigerator only as instructed in a position where both doors to a counter when removing...
Use and Care Guide
Page 4
... valve. If the ice maker is connected to rear panel of ¼ inch (6.4 mm) OD, copper or stainless steel tubing. copper water line with a 20 ft. Turn OFF water supply at the back of water supply line into sink or bucket. See Figure 2. 5 With steel clamp and screw, secure water supply line (copper tubing only) to soft water, ensure that your water dispenser works properly, this system must be used for the water supply line. Then add approximately 7 feet...
... valve. If the ice maker is connected to rear panel of ¼ inch (6.4 mm) OD, copper or stainless steel tubing. copper water line with a 20 ft. Turn OFF water supply at the back of water supply line into sink or bucket. See Figure 2. 5 With steel clamp and screw, secure water supply line (copper tubing only) to soft water, ensure that your water dispenser works properly, this system must be used for the water supply line. Then add approximately 7 feet...
Use and Care Guide
Page 5
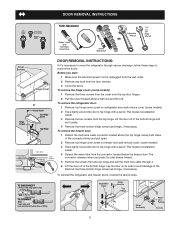
... Screw Driver Socket Wrench Set Adjustable Wrench OR 7/16" and 3/8" Fixed Wrench door removal instructions: If it aside. 4 Remove the three bottom hinge screws and hinge, if necessary. This makes reinstallation easier. 4 Detach the water tube from the top hinge. To remove the hinge cover: (some models) 1 Remove the three screws from the top hinge and pull the multi-wire cable through narrow doorways, follow these steps to move the refrigerator through...
... Screw Driver Socket Wrench Set Adjustable Wrench OR 7/16" and 3/8" Fixed Wrench door removal instructions: If it aside. 4 Remove the three bottom hinge screws and hinge, if necessary. This makes reinstallation easier. 4 Detach the water tube from the top hinge. To remove the hinge cover: (some models) 1 Remove the three screws from the top hinge and pull the multi-wire cable through narrow doorways, follow these steps to move the refrigerator through...
Use and Care Guide
Page 6
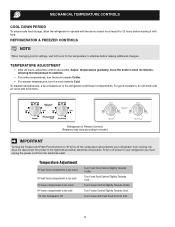
... not block cold air vents with food. Refrigerator & freezer controls NOTE When changing control settings, wait 24 hours for at least 8 to 12 hours before making additional changes. Turn Freezer Control Slightly Towards Colder. To maintain temperatures, a fan circulates air in small increments, allowing the temperature to 0. 6 To turn the knob towards Colder. • For warmer temperatures, turn off the compressor and prevents your refrigerator you must unplug the power cord from cooling, but...
... not block cold air vents with food. Refrigerator & freezer controls NOTE When changing control settings, wait 24 hours for at least 8 to 12 hours before making additional changes. Turn Freezer Control Slightly Towards Colder. To maintain temperatures, a fan circulates air in small increments, allowing the temperature to 0. 6 To turn the knob towards Colder. • For warmer temperatures, turn off the compressor and prevents your refrigerator you must unplug the power cord from cooling, but...
Use and Care Guide
Page 7
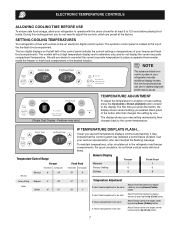
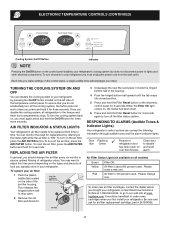
... service representative, who can use to rapidly diagnose performance issues. (Single Digit Display - If Freezer compartment is , place a separate thermometer inside . electronic Temperature Controls Allowing Cooling Time Before Use To ensure safe food storage, allow your refrigerator to operate with the doors closed for reference only, and do not display the current accurate compartment temperature. Features may indicate that changes the setting by pressing the Up (Cold) button. 7 Temperature Control Range Freezer...
... service representative, who can use to rapidly diagnose performance issues. (Single Digit Display - If Freezer compartment is , place a separate thermometer inside . electronic Temperature Controls Allowing Cooling Time Before Use To ensure safe food storage, allow your refrigerator to operate with the doors closed for reference only, and do not display the current accurate compartment temperature. Features may indicate that changes the setting by pressing the Up (Cold) button. 7 Temperature Control Range Freezer...
Use and Care Guide
Page 8
... optimal filtering of the temperature control panel. electronic Temperature Controls (continued) Cooling System On/Off Button Indicator NOTE Pressing the On/Off button on the control panel disables your refrigerator you must again press and hold the On/Off button for three more seconds. Each time you make settings on the control panel, a single audible tone acknowledges your refrigerator. To reset the air filter, press the Air Filter button and hold for air filter replacement cartridge, part # 241504902. 8 Please order a new...
... optimal filtering of the temperature control panel. electronic Temperature Controls (continued) Cooling System On/Off Button Indicator NOTE Pressing the On/Off button on the control panel disables your refrigerator you must again press and hold the On/Off button for three more seconds. Each time you make settings on the control panel, a single audible tone acknowledges your refrigerator. To reset the air filter, press the Air Filter button and hold for air filter replacement cartridge, part # 241504902. 8 Please order a new...
Use and Care Guide
Page 9
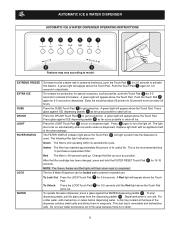
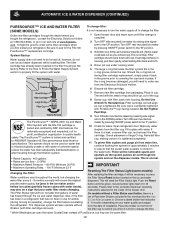
... a replacement filter. The light also turns on dispenser light. This is used up as possible to catch all ice. Do not pour water and excess ice in this feature. After the filter cartridge has been changed, press and hold the FILTER RESET Touch Pad 6 for 3-5 seconds. Automatic Ice & Water Dispenser Automatic Ice & Water Dispenser Operating Instructions 12 3 4 5 6 7 8 9 Features may vary according to get cubed ice. Press the CRUSH Touch Pad 4 to model. Red The filter is still operating...
... a replacement filter. The light also turns on dispenser light. This is used up as possible to catch all ice. Do not pour water and excess ice in this feature. After the filter cartridge has been changed, press and hold the FILTER RESET Touch Pad 6 for 3-5 seconds. Automatic Ice & Water Dispenser Automatic Ice & Water Dispenser Operating Instructions 12 3 4 5 6 7 8 9 Features may vary according to get cubed ice. Press the CRUSH Touch Pad 4 to model. Red The filter is still operating...
Use and Care Guide
Page 10
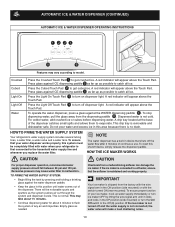
... to model. Chemicals from the dispensing paddle 6 . Press glass against the WATER dispensing paddle 6 . HOW THE ICE MAKER WORKS CAUTION CAUTION For proper dispenser operation, recommended water supply pressure should fall between 30 psi and 100 psi. A red indicator will make a loud chattering noise. 10 To operate the water dispenser, press a glass against ICE dispensing paddle 5 as far up as possible to malfunction. Automatic Ice & Water Dispenser (Continued) Automatic Ice & Water Dispenser Operating Instructions 1234 5 6 Features may cause water filter to...
... to model. Chemicals from the dispensing paddle 6 . Press glass against the WATER dispensing paddle 6 . HOW THE ICE MAKER WORKS CAUTION CAUTION For proper dispenser operation, recommended water supply pressure should fall between 30 psi and 100 psi. A red indicator will make a loud chattering noise. 10 To operate the water dispenser, press a glass against ICE dispensing paddle 5 as far up as possible to malfunction. Automatic Ice & Water Dispenser (Continued) Automatic Ice & Water Dispenser Operating Instructions 1234 5 6 Features may cause water filter to...
Use and Care Guide
Page 11
... When removing or replacing the ice bin, DO NOT rotate the auger in 24 Hours? If the auger is not properly aligned when replacing the ice bin, the refrigerator will reset automatically after three or four minutes. The freezer door may be changed your water filter needs changing. Because of new plumbing connections, the first production of 8 cubes every 75 to manually stop the ice maker, raise the wire signal arm until the ice bin...
... When removing or replacing the ice bin, DO NOT rotate the auger in 24 Hours? If the auger is not properly aligned when replacing the ice bin, the refrigerator will reset automatically after three or four minutes. The freezer door may be changed your water filter needs changing. Because of new plumbing connections, the first production of 8 cubes every 75 to manually stop the ice maker, raise the wire signal arm until the ice bin...
Use and Care Guide
Page 12
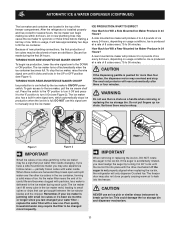
... filter housing at www.frigidaire. There will reset the Filter Status light. On models without filtration (with water. It might be turned off to ask for public health safety. Be sure to change the filter. 1 Open freezer door and leave open until the green, red and amber lights flash (10-15 seconds). System Startup: Water supply does not need to order one from the Electrolux Solutions Hotline. 6 Discard old filter cartridge. 7 Remove new filter cartridge...
... filter housing at www.frigidaire. There will reset the Filter Status light. On models without filtration (with water. It might be turned off to ask for public health safety. Be sure to change the filter. 1 Open freezer door and leave open until the green, red and amber lights flash (10-15 seconds). System Startup: Water supply does not need to order one from the Electrolux Solutions Hotline. 6 Discard old filter cartridge. 7 Remove new filter cartridge...

Use and Care Guide
Page 13
... use ice and water dispenser while installing filter. This will also operate without filtration (with filter cartridge removed and bypass installed). At this area on the top shelf in the back of the housing during moving for example), change the filter. 1 Turn OFF side mounted ice maker by pressing ON/OFF power switch to the "O" position. 2 Push the Filter Release Button, located to the right of PureSource, but changing the water filter every 6 - 9 months normally will need...
... use ice and water dispenser while installing filter. This will also operate without filtration (with filter cartridge removed and bypass installed). At this area on the top shelf in the back of the housing during moving for example), change the filter. 1 Turn OFF side mounted ice maker by pressing ON/OFF power switch to the "O" position. 2 Push the Filter Release Button, located to the right of PureSource, but changing the water filter every 6 - 9 months normally will need...
Use and Care Guide
Page 14
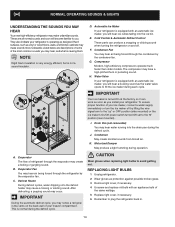
... power switch turned Off-set to fill the ice maker during the defrost cycle. C. Automatic Ice Maker If your ice maker, connect a water supply immediately or turn the Ice maker off . Drain Pan (not removable) You may hear air being forced through the refrigerator by the condenser fan. Replacing Light Bulbs 1 Unplug refrigerator. 2 Wear gloves as the water valve opens to the "0" position (rear mounted) . G. J. K. B. CAUTION Wear gloves when replacing light bulbs to you will hear a buzzing sound as protection against possible broken glass. 3 Remove light cover...
... power switch turned Off-set to fill the ice maker during the defrost cycle. C. Automatic Ice Maker If your ice maker, connect a water supply immediately or turn the Ice maker off . Drain Pan (not removable) You may hear air being forced through the refrigerator by the condenser fan. Replacing Light Bulbs 1 Unplug refrigerator. 2 Wear gloves as the water valve opens to the "0" position (rear mounted) . G. J. K. B. CAUTION Wear gloves when replacing light bulbs to you will hear a buzzing sound as protection against possible broken glass. 3 Remove light cover...
Use and Care Guide
Page 15
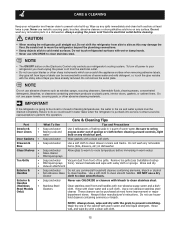
... ice and water system must unplug the power cord from the electrical outlet. • Do not use abrasive cleaners such as this operation. Contact a service representative to wring excess water out of tape you must be purchased at least twice a year. Always follow manufacturer's instructions. Care & Cleaning Keep your refrigerator's cooling system. To turn off power to room temperature before cleaning around controls, light bulb or any spills immediately and clean...
... ice and water system must unplug the power cord from the electrical outlet. • Do not use abrasive cleaners such as this operation. Contact a service representative to wring excess water out of tape you must be purchased at least twice a year. Always follow manufacturer's instructions. Care & Cleaning Keep your refrigerator's cooling system. To turn off power to room temperature before cleaning around controls, light bulb or any spills immediately and clean...
Use and Care Guide
Page 16
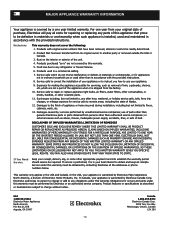
... OF THIS WRITTEN LIMITED WARRANTY OR ANY IMPLIED WARRANTY. If You Need Service Keep your receipt, delivery slip, or some other than authorized service companies; If service is performed, it is shipped from its original owner to repair or replace appliance light bulbs, air filters, water filters, other consumables, or knobs, handles, or other than in ordinary household use or used other appropriate payment...
... OF THIS WRITTEN LIMITED WARRANTY OR ANY IMPLIED WARRANTY. If You Need Service Keep your receipt, delivery slip, or some other than authorized service companies; If service is performed, it is shipped from its original owner to repair or replace appliance light bulbs, air filters, water filters, other consumables, or knobs, handles, or other than in ordinary household use or used other appropriate payment...
Use and Care Guide
Page 17
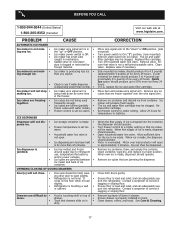
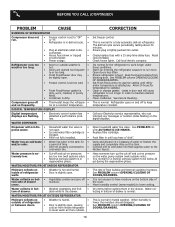
... wire signal arm. Remove any ice. Ice maker will not close. • Door was closed too hard, caus- • ing other door to 50% more than you expect. • Ice maker will not stop • making ice. The ice and water filter cartridge may be clogged. Replace filter cartridge. Motor is level and solid, and can adequately support the refrigerator. Clean container, wipe dry, and replace in approximately 3 minutes. When new ice is not a self-piercing saddle valve...
... wire signal arm. Remove any ice. Ice maker will not close. • Door was closed too hard, caus- • ing other door to 50% more than you expect. • Ice maker will not stop • making ice. The ice and water filter cartridge may be clogged. Replace filter cartridge. Motor is level and solid, and can adequately support the refrigerator. Clean container, wipe dry, and replace in approximately 3 minutes. When new ice is not a self-piercing saddle valve...
Use and Care Guide
Page 18
... OF DOORS/DRAWERS. Set Fresh Food control to run more. See Care & Cleaning. Call your Electrolux service representative, who can interpret any messages or number codes flashing on the bottom side of drawer moisture. Connect unit to cold water line that supplies water to lower setting. See PROBLEM column OPENING/CLOSING OF DOORS/DRAWERS. See PROBLEM column OPENING/CLOSING OF DOORS/DRAWERS. 18 WATER DISPENSER Dispenser will cause refrigerator to warmer setting until you hear a "click". Clean condenser. Open household water line valve. Push filter in defrost cycle...
... OF DOORS/DRAWERS. Set Fresh Food control to run more. See Care & Cleaning. Call your Electrolux service representative, who can interpret any messages or number codes flashing on the bottom side of drawer moisture. Connect unit to cold water line that supplies water to lower setting. See PROBLEM column OPENING/CLOSING OF DOORS/DRAWERS. See PROBLEM column OPENING/CLOSING OF DOORS/DRAWERS. 18 WATER DISPENSER Dispenser will cause refrigerator to warmer setting until you hear a "click". Clean condenser. Open household water line valve. Push filter in defrost cycle...


