
User Manual
Page 1
... Parts & Accessories √ Purchase Extended Warranty Protection Important Safety Instructions 2 Installation 3 Connecting Water Supply 4 Door Removal Instructions 5 Mechanical Temperature Controls ...... 6 Electronic Temperature Controls ........ 6 Automatic Ice & Water Dispenser ....... 9 Normal Operating Sounds & Sights ... 14 Care and Cleaning 15 Warranty 16 Before you Call 17 Features at a Glance 21 READ AND SAVE THESE INSTRUCTIONS PN: 241856000 (April 2007) Need Parts or Service? Use & Care Manual Side by Side Refrigerator Got Questions? Before Calling Your Local Repair...
... Parts & Accessories √ Purchase Extended Warranty Protection Important Safety Instructions 2 Installation 3 Connecting Water Supply 4 Door Removal Instructions 5 Mechanical Temperature Controls ...... 6 Electronic Temperature Controls ........ 6 Automatic Ice & Water Dispenser ....... 9 Normal Operating Sounds & Sights ... 14 Care and Cleaning 15 Warranty 16 Before you Call 17 Features at a Glance 21 READ AND SAVE THESE INSTRUCTIONS PN: 241856000 (April 2007) Need Parts or Service? Use & Care Manual Side by Side Refrigerator Got Questions? Before Calling Your Local Repair...

User Manual
Page 2
... you are getting rid of automatic ice maker. • Remove all staples from the electrical outlet. electrical shock hazards. Do not use an extension cord or adapter plug. • If the power cord is unpacked. Grounding type wall receptacle Do not, under your refrigerator's cooling system, but does not disconnect the power to prevent any circumstances, cut, remove, or bypass the grounding prong. Cartons covered with...
... you are getting rid of automatic ice maker. • Remove all staples from the electrical outlet. electrical shock hazards. Do not use an extension cord or adapter plug. • If the power cord is unpacked. Grounding type wall receptacle Do not, under your refrigerator's cooling system, but does not disconnect the power to prevent any circumstances, cut, remove, or bypass the grounding prong. Cartons covered with...

User Manual
Page 3
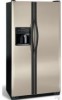
... to maintain proper temperatures inside the refrigerator. To ensure proper door seal and assist door closing, the refrigerator should be in this Use & Care Manual. Use flat-blade screwdriver or 3/8" socket wrench to shut by themselves within a 20 degree opening. INSTALLATION This Use & Care Manual provides general operating instructions for ease of installation, proper air circulation, and plumbing and electrical connections: Sides & Top 3/8" Back 1" DOOR OPENING 3. Do Not use of drawers and freezer baskets, the refrigerator should be able...
... to maintain proper temperatures inside the refrigerator. To ensure proper door seal and assist door closing, the refrigerator should be in this Use & Care Manual. Use flat-blade screwdriver or 3/8" socket wrench to shut by themselves within a 20 degree opening. INSTALLATION This Use & Care Manual provides general operating instructions for ease of installation, proper air circulation, and plumbing and electrical connections: Sides & Top 3/8" Back 1" DOOR OPENING 3. Do Not use of drawers and freezer baskets, the refrigerator should be able...
User Manual
Page 4
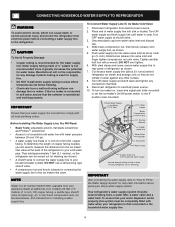
... Water line kit number 5303917950, available from your refrigerator is maintained and working properly. Slide ferrule (sleeve) into water valve inlet as far as shown). • A shutoff valve to connect the water supply line to electrical power source. 10. Tighten another half turn ice maker on, lower wire signal arm (side mounted) or set the ice maker's On/Off power switch to Ice Maker Fill Tube Steel Clamp Brass Compression Nut Ferrule (Sleeve) Copper water line Water Valve Bracket Valve Inlet Water Valve Copper water line...
... Water line kit number 5303917950, available from your refrigerator is maintained and working properly. Slide ferrule (sleeve) into water valve inlet as far as shown). • A shutoff valve to connect the water supply line to electrical power source. 10. Tighten another half turn ice maker on, lower wire signal arm (side mounted) or set the ice maker's On/Off power switch to Ice Maker Fill Tube Steel Clamp Brass Compression Nut Ferrule (Sleeve) Copper water line Water Valve Bracket Valve Inlet Water Valve Copper water line...
User Manual
Page 5
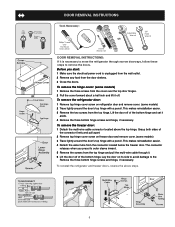
... to the Remove the three bottom hinge screws and hinge, if necessary. Before you press its side to avoid damage to remove the doors. To remove the hinge cover: (some models) 3 Trace lightly around the door's top hinge with a pencil. This makes reinstallation easier. 4 Detach the water tube from the top hinge. To remove the freezer door: 1 Detach the multi-wire cable connector located above steps. 5 To reinstall the refrigerator and freezer doors, reverse the...
... to the Remove the three bottom hinge screws and hinge, if necessary. Before you press its side to avoid damage to remove the doors. To remove the hinge cover: (some models) 3 Trace lightly around the door's top hinge with a pencil. This makes reinstallation easier. 4 Detach the water tube from the top hinge. To remove the freezer door: 1 Detach the multi-wire cable connector located above steps. 5 To reinstall the refrigerator and freezer doors, reverse the...

User Manual
Page 6
... temperatures, a fan circulates air in the desired location. 6 Refrigerator & Freezer Controls (Features may vary according to the light bulb and other electrical components. If Freezer Compartment Is Too Cold Turn Freezer Control Slightly Towards Cold. * To Turn Refrigerator Off Turn Freezer and Fresh Food Controls To 0. SETTING COOLING TEMPERATURES Your refrigerator comes with a 2-digit temperature display are preset at least 8 to stabilize before loading it with food. The system's control panel is , place a separate thermometer inside . MECHANICAL TEMPERATURE CONTROLS COOL...
... temperatures, a fan circulates air in the desired location. 6 Refrigerator & Freezer Controls (Features may vary according to the light bulb and other electrical components. If Freezer Compartment Is Too Cold Turn Freezer Control Slightly Towards Cold. * To Turn Refrigerator Off Turn Freezer and Fresh Food Controls To 0. SETTING COOLING TEMPERATURES Your refrigerator comes with a 2-digit temperature display are preset at least 8 to stabilize before loading it with food. The system's control panel is , place a separate thermometer inside . MECHANICAL TEMPERATURE CONTROLS COOL...

User Manual
Page 7
Features may indicate that the control system has detected a performance problem. The display shows your refrigerator includes additional display modes that changes the setting by one degree warmer by pressing the Up (Cold) button. 7 Call your service representative, who can use to rapidly diagnose performance issues. ELECTRONIC TEMPERATURE CONTROLS (Single Digit Display - Each press of the button after that service professionals can interpret the flashing message. If Fresh Food compartment...
Features may indicate that the control system has detected a performance problem. The display shows your refrigerator includes additional display modes that changes the setting by one degree warmer by pressing the Up (Cold) button. 7 Call your service representative, who can use to rapidly diagnose performance issues. ELECTRONIC TEMPERATURE CONTROLS (Single Digit Display - Each press of the button after that service professionals can interpret the flashing message. If Fresh Food compartment...

User Manual
Page 8
... some cartridges when you should change now. 3 Unpackage the new filter and place it inside the hinged bottom half of the air filter housing. Green Yellow Red Filter OK. Air filter is "ON". REPLACING THE AIR FILTER In general, you first install your refrigerator. Please change the air filter every six months to disable and Ajar Green refrigerator door reset alarm. To turn off power to the freezer and fresh food compartments stops. has been open . 2 Remove the old filter and...
... some cartridges when you should change now. 3 Unpackage the new filter and place it inside the hinged bottom half of the air filter housing. Green Yellow Red Filter OK. Air filter is "ON". REPLACING THE AIR FILTER In general, you first install your refrigerator. Please change the air filter every six months to disable and Ajar Green refrigerator door reset alarm. To turn off power to the freezer and fresh food compartments stops. has been open . 2 Remove the old filter and...

User Manual
Page 9
... operating within its useful life. Red The filter is not cold. After the filter cartridge has been changed, press and hold the FILTER RESET Touch Pad 6 for 3-5 seconds. A Red light will light up . Dispensed water is 100% used . This is no drain. 9 Do not pour water and excess ice in this area because there is the recommended time to turn the light off. To increase ice production for 3-5 seconds to model...
... operating within its useful life. Red The filter is not cold. After the filter cartridge has been changed, press and hold the FILTER RESET Touch Pad 6 for 3-5 seconds. A Red light will light up . Dispensed water is 100% used . This is no drain. 9 Do not pour water and excess ice in this area because there is the recommended time to turn the light off. To increase ice production for 3-5 seconds to model...

User Manual
Page 10
... the household water supply line and whenever you replace the water filter. Excessive pressure may cause water filter to evaporate. To reset this position until it clicks and locks in this shutoff device, simply release the dispenser paddle. IMPORTANT Your ice maker is not cold. A red indicator will appear above the Touch Pad. HOW THE ICE MAKER WORKS CAUTION Chemicals from the dispensing paddle 6 . To stop dispensing water, pull the glass away from...
... the household water supply line and whenever you replace the water filter. Excessive pressure may cause water filter to evaporate. To reset this position until it clicks and locks in this shutoff device, simply release the dispenser paddle. IMPORTANT Your ice maker is not cold. A red indicator will appear above the Touch Pad. HOW THE ICE MAKER WORKS CAUTION Chemicals from the dispensing paddle 6 . To stop dispensing water, pull the glass away from...

User Manual
Page 11
... power switch. Ice is produced at a rate of ice every 24 hours, depending on usage conditions. replace the water filter with water inside. OFF Wire Signal Arm ON Figure 1 Figure 2 IMPORTANT Small Ice cubes or ice chips jamming in wire signal arm, which automatically stops ice production when the ice bin is not properly aligned when replacing the ice bin, the refrigerator will reset automatically after three or four minutes. AUTOMATIC ICE AND WATER DISPENSER The ice maker...
... power switch. Ice is produced at a rate of ice every 24 hours, depending on usage conditions. replace the water filter with water inside. OFF Wire Signal Arm ON Figure 1 Figure 2 IMPORTANT Small Ice cubes or ice chips jamming in wire signal arm, which automatically stops ice production when the ice bin is not properly aligned when replacing the ice bin, the refrigerator will reset automatically after three or four minutes. AUTOMATIC ICE AND WATER DISPENSER The ice maker...

User Manual
Page 12
... your water filter needs changing. The filter cartridge has already been installed in cup. To change filter: It is a set of water has flowed through the ice and water dispenser. If cartridge remains in housing, pull down with water. The large o-ring that the Use & Care Manual came in. Discard old filter cartridge. 7. Filter cartridge will reset the Filter Status light. Turn ON side mounted ice maker by pressing ON/OFF power switch to the "O" position. 3. Turn ON rear mounted ice maker by lowering wire...
... your water filter needs changing. The filter cartridge has already been installed in cup. To change filter: It is a set of water has flowed through the ice and water dispenser. If cartridge remains in housing, pull down with water. The large o-ring that the Use & Care Manual came in. Discard old filter cartridge. 7. Filter cartridge will reset the Filter Status light. Turn ON side mounted ice maker by pressing ON/OFF power switch to the "O" position. 3. Turn ON rear mounted ice maker by lowering wire...

User Manual
Page 13
... the filter or housing. Turn OFF side mounted ice maker by raising wire signal arm to the inside ), may be noticeable spurts and sputters as it stop against the clip assembly in a refrigerator that your refrigerator. It would be turned off to the "O" position. 2. IMPORTANT Resetting The Filter Status Light (some filter cartridges when you first install your water filter needs changing. It might be best to press the Filter Reset button located on water that...
... the filter or housing. Turn OFF side mounted ice maker by raising wire signal arm to the inside ), may be noticeable spurts and sputters as it stop against the clip assembly in a refrigerator that your refrigerator. It would be turned off to the "O" position. 2. IMPORTANT Resetting The Filter Status Light (some filter cartridges when you first install your water filter needs changing. It might be best to press the Filter Reset button located on water that...

User Manual
Page 14
... bulb of the same wattage. 5. Drain Pan (not removable) You may hear water running into the ice bin. J. K. Evaporator The flow of refrigerant through the evaporator may hear air being forced through the condenser by lifting the wire signal arm to the "up" or OFF position (side mounted) or the ice maker's On/Off power switch turned Off-set to the "0" position (rear mounted) . Unscrew and replace old bulb with an automatic ice maker...
... bulb of the same wattage. 5. Drain Pan (not removable) You may hear water running into the ice bin. J. K. Evaporator The flow of refrigerant through the evaporator may hear air being forced through the condenser by lifting the wire signal arm to the "up" or OFF position (side mounted) or the ice maker's On/Off power switch turned Off-set to the "0" position (rear mounted) . Unscrew and replace old bulb with an automatic ice maker...

User Manual
Page 15
... removable items (bins, drawers, etc.) in water leaks when the refrigerator is going to be used on any spills immediately and clean both sections at most home improvement or major department stores. NOTE • The On/Off button on Easy Care Stainless Steel Models. Do not remove the serial plate. Contact a service representative to do so could result in dishwasher. Rinse and dry. Exterior and Handles...
... removable items (bins, drawers, etc.) in water leaks when the refrigerator is going to be used on any spills immediately and clean both sections at most home improvement or major department stores. NOTE • The On/Off button on Easy Care Stainless Steel Models. Do not remove the serial plate. Contact a service representative to do so could result in dishwasher. Rinse and dry. Exterior and Handles...

User Manual
Page 16
.... Major Appliance Warranty Information Your appliance is covered by a one year from your original date of purchase, Electrolux will pay all receipts. Service calls to repair or replace appliance light bulbs, air filters, water filters, other consumables, or knobs, handles, or other than authorized service companies; Service calls to correct the installation of the unit. 4. use of parts other than in accordance with the provided instructions. YOU MAY...
.... Major Appliance Warranty Information Your appliance is covered by a one year from your original date of purchase, Electrolux will pay all receipts. Service calls to repair or replace appliance light bulbs, air filters, water filters, other consumables, or knobs, handles, or other than authorized service companies; Service calls to correct the installation of the unit. 4. use of parts other than in accordance with the provided instructions. YOU MAY...

User Manual
Page 17
....frigidaire.com. Call local Electric Company. more . more . • Doors are flashing. • Electronic control system has detected a performance problem. • Call your Electrolux service representative, who can interpret any messages or number codes flashing on frequently. • Thermostat keeps the refrigerator at a temperature just below the freezing point for a period of meat.) Digital temperature displays are opened too • Warm air entering the refrigerator causes it to run longer in drawers freezes...
....frigidaire.com. Call local Electric Company. more . more . • Doors are flashing. • Electronic control system has detected a performance problem. • Call your Electrolux service representative, who can interpret any messages or number codes flashing on frequently. • Thermostat keeps the refrigerator at a temperature just below the freezing point for a period of meat.) Digital temperature displays are opened too • Warm air entering the refrigerator causes it to run longer in drawers freezes...

User Manual
Page 18
... Temperature Control to the "down" or ON position. Water drawer. The ice & water • Ice maker has small cube filter cartridge may be clogged. pipe is too • warm. Freezer temperature is clogged or restricted Clean valve. Fresh Food temperature is not cold enough. of frost buildup and internal sweating increases. • See PROBLEM section OPENING/CLOSING OF DOORS/DRAWERS. • Open door less often. • Keep containers covered. AUTOMATIC ICE MAKER Ice maker is not making any ice. • Ice maker wire...
... Temperature Control to the "down" or ON position. Water drawer. The ice & water • Ice maker has small cube filter cartridge may be clogged. pipe is too • warm. Freezer temperature is clogged or restricted Clean valve. Fresh Food temperature is not cold enough. of frost buildup and internal sweating increases. • See PROBLEM section OPENING/CLOSING OF DOORS/DRAWERS. • Open door less often. • Keep containers covered. AUTOMATIC ICE MAKER Ice maker is not making any ice. • Ice maker wire...

User Manual
Page 19
... contents. Remove ice cubes that ice cubes will be made. The ice & water filter cartridge could be clogged. Check to a higher setting so that are jamming the dispenser. See PROBLEM section TEMPERATURES ARE TOO WARM. Turn on household water line valve. The ice & water filter cartridge may be clogged. Set freezer control to freezer. Add more food to colder setting. When ice is made , dispenser should produce 3 to 50% more than you expect. Motor is not cold enough. Clean container...
... contents. Remove ice cubes that ice cubes will be made. The ice & water filter cartridge could be clogged. Check to a higher setting so that are jamming the dispenser. See PROBLEM section TEMPERATURES ARE TOO WARM. Turn on household water line valve. The ice & water filter cartridge may be clogged. Set freezer control to freezer. Add more food to colder setting. When ice is made , dispenser should produce 3 to 50% more than you expect. Motor is not cold enough. Clean container...

User Manual
Page 20
... Care & Cleaning Chart in Care and Cleaning section. See Replacing Light Bulbs in drawer. This is normal for the "Door Ajar" alarm. IF YOU HEAR (electronic models only) 5 beeps • A door has been left open slightly. • Refrigerator is dirty. • Interior needs to be below 20 psi during the regenerative phase. See PROBLEM section ICE MAKER IS NOT MAKING ANY ICE. Replace filter cartridge. Clean drawer, rollers, and track. See PROBLEM section RUNNING OF REFRIGERATOR. drawer. • Track that supplies water to...
... Care & Cleaning Chart in Care and Cleaning section. See Replacing Light Bulbs in drawer. This is normal for the "Door Ajar" alarm. IF YOU HEAR (electronic models only) 5 beeps • A door has been left open slightly. • Refrigerator is dirty. • Interior needs to be below 20 psi during the regenerative phase. See PROBLEM section ICE MAKER IS NOT MAKING ANY ICE. Replace filter cartridge. Clean drawer, rollers, and track. See PROBLEM section RUNNING OF REFRIGERATOR. drawer. • Track that supplies water to...


