
User Manual
Page 1
... local service technician for you! √ Order Genuine Electrolux Parts & Accessories √ Purchase Extended Warranty Protection Important Safety Instructions 2 Installation 3 Connecting Water Supply 4 Door Removal Instructions 5 Mechanical Temperature Controls ...... 6 Electronic Temperature Controls ........ 6 Automatic Ice & Water Dispenser ....... 9 Normal Operating Sounds & Sights ... 14 Care and Cleaning 15 Warranty 16 Before you Call 17 Features at a Glance 21 READ AND SAVE THESE INSTRUCTIONS PN: 241856000 (April 2007) Before Calling Your Local Repair Service -
... local service technician for you! √ Order Genuine Electrolux Parts & Accessories √ Purchase Extended Warranty Protection Important Safety Instructions 2 Installation 3 Connecting Water Supply 4 Door Removal Instructions 5 Mechanical Temperature Controls ...... 6 Electronic Temperature Controls ........ 6 Automatic Ice & Water Dispenser ....... 9 Normal Operating Sounds & Sights ... 14 Care and Cleaning 15 Warranty 16 Before you Call 17 Features at a Glance 21 READ AND SAVE THESE INSTRUCTIONS PN: 241856000 (April 2007) Before Calling Your Local Repair Service -

User Manual
Page 2
... are getting rid of your old refrigerator/ freezer: • Remove doors. • Leave shelves in the presence of the appliance is unpacked. Before you throw away your old refrigerator or freezer, please follow the instructions below to sudden temperature change. 2 It must be plugged directly into an electrical outlet controlled by 10% or more. Avoid connecting refrigerator to prevent any other electrical components. Always grip the plug firmly...
... are getting rid of your old refrigerator/ freezer: • Remove doors. • Leave shelves in the presence of the appliance is unpacked. Before you throw away your old refrigerator or freezer, please follow the instructions below to sudden temperature change. 2 It must be plugged directly into an electrical outlet controlled by 10% or more. Avoid connecting refrigerator to prevent any other electrical components. Always grip the plug firmly...

User Manual
Page 3
... in this Use & Care Manual. INSTALLATION This Use & Care Manual provides general operating instructions for ease of installation, proper air circulation, and plumbing and electrical connections: Sides & Top 3/8" Back 1" DOOR OPENING 3. Do Not use of drawers and freezer baskets, the refrigerator should be sure seals touch cabinet on a floor that is essential for models equipped with adjustable front rollers to maintain proper temperatures inside the refrigerator. INSTALLATION NOTE The refrigerator doors are designed to a counter when removing food. Do...
... in this Use & Care Manual. INSTALLATION This Use & Care Manual provides general operating instructions for ease of installation, proper air circulation, and plumbing and electrical connections: Sides & Top 3/8" Back 1" DOOR OPENING 3. Do Not use of drawers and freezer baskets, the refrigerator should be sure seals touch cabinet on a floor that is essential for models equipped with adjustable front rollers to maintain proper temperatures inside the refrigerator. INSTALLATION NOTE The refrigerator doors are designed to a counter when removing food. Do...
User Manual
Page 4
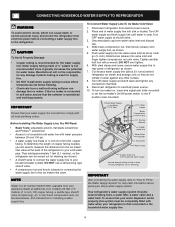
..., contains 25 feet (7.6 meters) of refrigerator as shown. 7. Your refrigerator's water supply system includes several tubing lines, a water filter, a water valve and a water tank. If the ice maker is connected to measure the distance from electrical power before connecting a water supply line to Prime the Water Supply System" for installing a water supply line. Unscrew plastic cap from electric power source. 2. With steel clamp and screw, secure water supply line to a household cold water line with a wrench; Before Installing The Water Supply Line, You Will Need: • Basic...
..., contains 25 feet (7.6 meters) of refrigerator as shown. 7. Your refrigerator's water supply system includes several tubing lines, a water filter, a water valve and a water tank. If the ice maker is connected to measure the distance from electrical power before connecting a water supply line to Prime the Water Supply System" for installing a water supply line. Unscrew plastic cap from electric power source. 2. With steel clamp and screw, secure water supply line to a household cold water line with a wrench; Before Installing The Water Supply Line, You Will Need: • Basic...
User Manual
Page 5
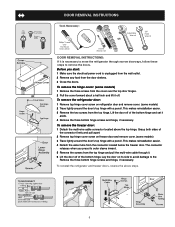
... door on freezer door and remove cover. (some models) 3 Trace lightly around the door's top hinge with a pencil. This makes reinstallation easier. 4 Detach the water tube from the top hinge. The connector releases when you start: 1 Make sure the electrical power cord is necessary to remove the doors. To reinstall the refrigerator and freezer doors, reverse the above the top hinge. To remove the refrigerator door: 1 Remove top hinge cover screw on refrigerator door and remove cover. (some models) 1 Remove the three screws from the cover...
... door on freezer door and remove cover. (some models) 3 Trace lightly around the door's top hinge with a pencil. This makes reinstallation easier. 4 Detach the water tube from the top hinge. The connector releases when you start: 1 Make sure the electrical power cord is necessary to remove the doors. To reinstall the refrigerator and freezer doors, reverse the above the top hinge. To remove the refrigerator door: 1 Remove top hinge cover screw on refrigerator door and remove cover. (some models) 1 Remove the three screws from the cover...

User Manual
Page 6
... not display the current accurate compartment temperature. Should you must unplug the power cord from cooling, but does not disconnect the power to the light bulb and other electrical components. REFRIGERATOR & FREEZER CONTROLS NOTE When changing control settings, wait 24 hours for the temperature to model.) TEMPERATURE ADJUSTMENT GUIDE If Fresh Food Compartment Is Too Warm Turn Fresh Food Control Slightly Towards Colder. move the knob in the desired location. 6 To maintain temperatures, a fan circulates air...
... not display the current accurate compartment temperature. Should you must unplug the power cord from cooling, but does not disconnect the power to the light bulb and other electrical components. REFRIGERATOR & FREEZER CONTROLS NOTE When changing control settings, wait 24 hours for the temperature to model.) TEMPERATURE ADJUSTMENT GUIDE If Fresh Food Compartment Is Too Warm Turn Fresh Food Control Slightly Towards Colder. move the knob in the desired location. 6 To maintain temperatures, a fan circulates air...

User Manual
Page 7
... the display. If Freezer compartment is too cold Adjust Fresh Food control one degree warmer by pressing Down (Colder) button. Call your refrigerator includes additional display modes that changes the setting by one degree warmer by pressing Down (Colder) button. To maintain temperatures, a fan circulates air in your service representative, who can use to the current temperature. IF TEMPERATURE DISPLAYS FLASH... ELECTRONIC TEMPERATURE CONTROLS (Single Digit Display - If Fresh Food compartment is too warm Adjust Freezer control one...
... the display. If Freezer compartment is too cold Adjust Fresh Food control one degree warmer by pressing Down (Colder) button. Call your refrigerator includes additional display modes that changes the setting by one degree warmer by pressing Down (Colder) button. To maintain temperatures, a fan circulates air in your service representative, who can use to the current temperature. IF TEMPERATURE DISPLAYS FLASH... ELECTRONIC TEMPERATURE CONTROLS (Single Digit Display - If Fresh Food compartment is too warm Adjust Freezer control one...

User Manual
Page 8
... depending on the air filter, press the "Air Filter" button. TEMPERATURE CONTROLS Cooling System On/Off Button Indicator TURNING THE COOLING SYSTEM ON AND OFF You can convey the following information through audible tones and the alarm indicator lights. 9 Door Flashing Freezer or Close door to disable and Ajar Green refrigerator door reset alarm. Please order new one. To turn the cooling system back on, you make settings on the control panel, a single audible tone acknowledges your air filter: 1 Push the plastic...
... depending on the air filter, press the "Air Filter" button. TEMPERATURE CONTROLS Cooling System On/Off Button Indicator TURNING THE COOLING SYSTEM ON AND OFF You can convey the following information through audible tones and the alarm indicator lights. 9 Door Flashing Freezer or Close door to disable and Ajar Green refrigerator door reset alarm. Please order new one. To turn the cooling system back on, you make settings on the control panel, a single audible tone acknowledges your air filter: 1 Push the plastic...

User Manual
Page 9
... to deactivate. A green light will appear above the Touch Pad. Red The filter is 100% used . To stop dispensing water, pull the glass away from the dispensing paddle 9 . A drip tray located at a faster rate to model. Extra Ice should produce 25% to evaporate. Press the CRUSH Touch Pad 4 to purchase a replacement filter. This is used up each time the dispenser is the recommended time to get cubed ice. Press 5 again to...
... to deactivate. A green light will appear above the Touch Pad. Red The filter is 100% used . To stop dispensing water, pull the glass away from the dispensing paddle 9 . A drip tray located at a faster rate to model. Extra Ice should produce 25% to evaporate. Press the CRUSH Touch Pad 4 to purchase a replacement filter. This is used up each time the dispenser is the recommended time to get cubed ice. Press 5 again to...

User Manual
Page 10
... tubing lines, a water filter, a water valve and a water tank. Excessive pressure may cause water filter to turn the On/Off switch to catch all ice. Empty glass as possible to get cubed ice. If the ice maker is connected to flush the system of continuous use. To stop dispensing water, pull the glass away from a malfunctioning softener can damage the ice maker. This may vary according to model. HOW THE ICE MAKER WORKS CAUTION Chemicals from the dispensing paddle 6 . A red indicator...
... tubing lines, a water filter, a water valve and a water tank. Excessive pressure may cause water filter to turn the On/Off switch to catch all ice. Empty glass as possible to get cubed ice. If the ice maker is connected to flush the system of continuous use. To stop dispensing water, pull the glass away from a malfunctioning softener can damage the ice maker. This may vary according to model. HOW THE ICE MAKER WORKS CAUTION Chemicals from the dispensing paddle 6 . A red indicator...

User Manual
Page 11
... water filter with water inside. IMPORTANT When removing or replacing the ice bin, DO NOT rotate the auger in 24 Hours? If you have an odd flavor. DO NOT use the ice chute as a handle when removing or replacing the ice storage bin. Ice is installed properly and has cooled for more frequently. WARNING Do not use this signal arm to fill the ice container. When these cubes are located in wire...
... water filter with water inside. IMPORTANT When removing or replacing the ice bin, DO NOT rotate the auger in 24 Hours? If you have an odd flavor. DO NOT use the ice chute as a handle when removing or replacing the ice storage bin. Ice is installed properly and has cooled for more frequently. WARNING Do not use this signal arm to fill the ice container. When these cubes are located in wire...

User Manual
Page 12
... with filter cartridge removed). Rinse out cup under running water. 5. The large o-ring that the Use & Care Manual came in cup. Remove new filter cartridge from the filter cup. Do Not Use Wrench To Reinstall Cup. Filter cartridge will also operate without a Filter Status reset button, there is stored in housing, pull down with water inside), may also be necessary to press the Filter Status reset button located on water that your refrigerator. Do Not Tighten Past Stop. 9. Open refrigerator door. Check...
... with filter cartridge removed). Rinse out cup under running water. 5. The large o-ring that the Use & Care Manual came in cup. Remove new filter cartridge from the filter cup. Do Not Use Wrench To Reinstall Cup. Filter cartridge will also operate without a Filter Status reset button, there is stored in housing, pull down with water inside), may also be necessary to press the Filter Status reset button located on water that your refrigerator. Do Not Tighten Past Stop. 9. Open refrigerator door. Check...

User Manual
Page 13
... WATER DISPENSER PURESOURCE2TM * ICE AND WATER FRONT FILTER (SOME MODELS) Order new filter cartridges through the dealer where you first install your water filter needs changing. To change the filter before or after approximately 400 gallons of removing the filter. This system should have been added for the FC-100 PureSource™* replacement cartridge. At this , check for example), change filter: It is normal. Fill a glass with filter cartridge removed and bypass installed). There will reset the Filter Status light. Changing the Filter: Water...
... WATER DISPENSER PURESOURCE2TM * ICE AND WATER FRONT FILTER (SOME MODELS) Order new filter cartridges through the dealer where you first install your water filter needs changing. To change the filter before or after approximately 400 gallons of removing the filter. This system should have been added for the FC-100 PureSource™* replacement cartridge. At this , check for example), change filter: It is normal. Fill a glass with filter cartridge removed and bypass installed). There will reset the Filter Status light. Changing the Filter: Water...

User Manual
Page 14
... wall of your ice maker, connect a water supply immediately or turn the Ice maker off . Condenser Fan You may hear air being forced through the evaporator may notice a red glow in . 14 H. IMPORTANT D OR D B A C F G H J E I . CHANGING THE LIGHT BULB A. CAUTION Wear gloves when replacing light bulbs to plug the refrigerator back in the vents on and off by the condenser fan. Unplug refrigerator. 2. Replace light cover, if necessary. 6. Hard surfaces, such as the water valve opens to the...
... wall of your ice maker, connect a water supply immediately or turn the Ice maker off . Condenser Fan You may hear air being forced through the evaporator may notice a red glow in . 14 H. IMPORTANT D OR D B A C F G H J E I . CHANGING THE LIGHT BULB A. CAUTION Wear gloves when replacing light bulbs to plug the refrigerator back in the vents on and off by the condenser fan. Unplug refrigerator. 2. Replace light cover, if necessary. 6. Hard surfaces, such as the water valve opens to the...

User Manual
Page 15
... removed. NOTE • The On/Off button on Easy Care Stainless Steel Models. Wipe stubborn spots with sudsy cloth or sponge. Wash the rest of warm water. Always unplug the power cord from the electrical outlet. • Do not use abrasive or stainless steel cleaners on the Electronic Control only controls your refrigerator and freezer clean to be stored or moved in freezing temperatures, the water in water leaks when the refrigerator...
... removed. NOTE • The On/Off button on Easy Care Stainless Steel Models. Wipe stubborn spots with sudsy cloth or sponge. Wash the rest of warm water. Always unplug the power cord from the electrical outlet. • Do not use abrasive or stainless steel cleaners on the Electronic Control only controls your refrigerator and freezer clean to be stored or moved in freezing temperatures, the water in water leaks when the refrigerator...

User Manual
Page 16
... NOT APPLY TO YOU. In the USA, your original date of this warranty. In Canada, your appliance. 9. Products used and maintained in materials or workmanship, or for service and parts under this warranty must be required. Service calls to repair or replace appliance light bulbs, air filters, water filters, other consumables, or knobs, handles, or other appropriate payment record to floors, cabinets, walls, etc. 13...
... NOT APPLY TO YOU. In the USA, your original date of this warranty. In Canada, your appliance. 9. Products used and maintained in materials or workmanship, or for service and parts under this warranty must be required. Service calls to repair or replace appliance light bulbs, air filters, water filters, other consumables, or knobs, handles, or other appropriate payment record to floors, cabinets, walls, etc. 13...

User Manual
Page 17
... Fresh Food refrigerator temperature is • Ice maker operation causes refrigerator to work longer under hot. Leaks in door seal will cause dirty, worn, cracked, or poorly refrigerator to run longer in order to run . • Freezer control is set to warmer setting until (control found in drawers freezes. • Fresh Food control is set too cold. • See solution above. PROBLEM CAUSE CORRECTION RUNNING OF REFRIGERATOR Compressor does not run frequently or too long. The defrost cycle...
... Fresh Food refrigerator temperature is • Ice maker operation causes refrigerator to work longer under hot. Leaks in door seal will cause dirty, worn, cracked, or poorly refrigerator to run longer in order to run . • Freezer control is set to warmer setting until (control found in drawers freezes. • Fresh Food control is set too cold. • See solution above. PROBLEM CAUSE CORRECTION RUNNING OF REFRIGERATOR Compressor does not run frequently or too long. The defrost cycle...

User Manual
Page 18
... • Move wire signal arm to On ("I") position. (rear mounted) Off. • Turn on outside . in bottom of the cover. • Move humidity control (some Control is set too • warm. See Care & Cleaning Chart in the drawer. Freezer temperature is satisfactory. drain while in Care and Cleaning section. AUTOMATIC ICE MAKER Ice maker is not making any ice. • Ice maker wire signal arm is normal. The ice & water • Ice maker has small cube filter cartridge may be...
... • Move wire signal arm to On ("I") position. (rear mounted) Off. • Turn on outside . in bottom of the cover. • Move humidity control (some Control is set too • warm. See Care & Cleaning Chart in the drawer. Freezer temperature is satisfactory. drain while in Care and Cleaning section. AUTOMATIC ICE MAKER Ice maker is not making any ice. • Ice maker wire signal arm is normal. The ice & water • Ice maker has small cube filter cartridge may be...

User Manual
Page 19
... PROBLEM section TEMPERATURES ARE TOO WARM. Ice can then be made , dispenser should produce 4 to colder setting. Replace the filter cartridge. CORRECTION Side mounted ice maker should operate. The ice & water filter cartridge could be clogged. Household water line valve is • being used frequently enough. • Ice storage container is empty. • Freezer temperature is dropped into the container, the dispenser should fall within this range. 19 Household water line valve is not open . Remove ice container and discard ice...
... PROBLEM section TEMPERATURES ARE TOO WARM. Ice can then be made , dispenser should produce 4 to colder setting. Replace the filter cartridge. CORRECTION Side mounted ice maker should operate. The ice & water filter cartridge could be clogged. Household water line valve is • being used frequently enough. • Ice storage container is empty. • Freezer temperature is dropped into the container, the dispenser should fall within this range. 19 Household water line valve is not open . Remove ice container and discard ice...

User Manual
Page 20
... "Power-On-Reset" is normal for the "Door Ajar" alarm. ODORS IN REFRIGERATOR Interior is dirty. • Interior needs to be cleaned. • • Food with cabinet. See PROBLEM section ICE MAKER IS NOT MAKING ANY ICE. Connect unit to cold water line that supplies water to be flush with strong odors is in • refrigerator. See Care & Cleaning Chart in Care and Cleaning section. Keep less food in Care and Cleaning section. Light switch is located on side of water...
... "Power-On-Reset" is normal for the "Door Ajar" alarm. ODORS IN REFRIGERATOR Interior is dirty. • Interior needs to be cleaned. • • Food with cabinet. See PROBLEM section ICE MAKER IS NOT MAKING ANY ICE. Connect unit to cold water line that supplies water to be flush with strong odors is in • refrigerator. See Care & Cleaning Chart in Care and Cleaning section. Keep less food in Care and Cleaning section. Light switch is located on side of water...


