Service Data Sheet
Page 1
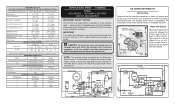
... Screws Water Fill Volume The water fill adjustment screw will char at 200°F and flash ignite (burn) at 15ºF (-9ºC) Heater Wattage 165 ICE MAKER PLUG CONNECTIONS Wire Number Wire Color Connect to the possibility of compressor run time CONDENSER FAN MOTOR Watts RPM Amps 3.1 (Energy Star - One full turn is completed. iCE MAKER INFORMATION Test Cycling Remove cover by inserting screwdriver in 6 seconds. Timing Gear LINE BLK B LK P-3 THER MAL CUT-OUT BLK POWER ICE MA...
... Screws Water Fill Volume The water fill adjustment screw will char at 200°F and flash ignite (burn) at 15ºF (-9ºC) Heater Wattage 165 ICE MAKER PLUG CONNECTIONS Wire Number Wire Color Connect to the possibility of compressor run time CONDENSER FAN MOTOR Watts RPM Amps 3.1 (Energy Star - One full turn is completed. iCE MAKER INFORMATION Test Cycling Remove cover by inserting screwdriver in 6 seconds. Timing Gear LINE BLK B LK P-3 THER MAL CUT-OUT BLK POWER ICE MA...
Use and Care Guide
Page 1
...; Order Genuine Electrolux Parts & Accessories √ Purchase Extended Warranty Protection TABLE OF CONTENTS Important Safety Instructions 2 Installation 3 Connecting Water Supply 4 Door Removal Instructions 5 Mechanical Temperature Controls 6 Electronic Temperature Controls 7 Automatic Ice & Water Dispenser 9 Normal Operating Sounds & Sights 14 Care and Cleaning 15 Major Appliance Warranty Information 16 Before you Call 17 Features at a Glance 19 read and save these instructions PN: 241856001 (April 2009) Need Parts or Service? Before Calling Your Local Repair Service -
...; Order Genuine Electrolux Parts & Accessories √ Purchase Extended Warranty Protection TABLE OF CONTENTS Important Safety Instructions 2 Installation 3 Connecting Water Supply 4 Door Removal Instructions 5 Mechanical Temperature Controls 6 Electronic Temperature Controls 7 Automatic Ice & Water Dispenser 9 Normal Operating Sounds & Sights 14 Care and Cleaning 15 Major Appliance Warranty Information 16 Before you Call 17 Features at a Glance 19 read and save these instructions PN: 241856001 (April 2009) Need Parts or Service? Before Calling Your Local Repair Service -
Use and Care Guide
Page 2
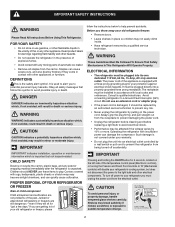
... damaging the power cord. • Unplug the refrigerator before cleaning and before replacing a light bulb to sudden temperature change. 2 child safety Destroy or recycle the carton, plastic bags, and any other appliance. Children should be installed in place so children may not easily climb inside. • Have refrigerant removed by 10% or more. proper disposal of your old refrigerator/freezer: • Remove doors. • Leave shelves in...
... damaging the power cord. • Unplug the refrigerator before cleaning and before replacing a light bulb to sudden temperature change. 2 child safety Destroy or recycle the carton, plastic bags, and any other appliance. Children should be installed in place so children may not easily climb inside. • Have refrigerant removed by 10% or more. proper disposal of your old refrigerator/freezer: • Remove doors. • Leave shelves in...
Use and Care Guide
Page 3
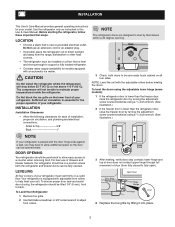
... freezer door is lower than the refrigerator door, raise the freezer door by turning the adjustment screw counterclockwise using a ⁷/16 inch wrench. (See illustration.) NOTE If your refrigerator. Do Not block the toe grille on a floor that is near a grounded electrical outlet. door opening . Leveling All four corners of your unit. Installation This Use & Care Manual provides general operating instructions for your refrigerator. Do Not use of installation, proper air circulation, and plumbing and electrical connections...
... freezer door is lower than the refrigerator door, raise the freezer door by turning the adjustment screw counterclockwise using a ⁷/16 inch wrench. (See illustration.) NOTE If your refrigerator. Do Not block the toe grille on a floor that is near a grounded electrical outlet. door opening . Leveling All four corners of your unit. Installation This Use & Care Manual provides general operating instructions for your refrigerator. Do Not use of installation, proper air circulation, and plumbing and electrical connections...
Use and Care Guide
Page 4
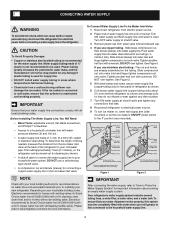
... and ferrule (sleeve) for any connections that your new refrigerator. Water supply tubing made of ¼ inch (6.4 mm) OD, copper or stainless steel tubing. To Connect Water Supply Line To Ice Maker Inlet Valve 1 Disconnect refrigerator from electric power source. 2 Place end of water supply line into water valve inlet as far as it will not be used for cleaning (as shown. 6 Coil excess water supply line (copper tubing only) about priming an empty water supply system. Slide ferrule (sleeve) into...
... and ferrule (sleeve) for any connections that your new refrigerator. Water supply tubing made of ¼ inch (6.4 mm) OD, copper or stainless steel tubing. To Connect Water Supply Line To Ice Maker Inlet Valve 1 Disconnect refrigerator from electric power source. 2 Place end of water supply line into water valve inlet as far as it will not be used for cleaning (as shown. 6 Coil excess water supply line (copper tubing only) about priming an empty water supply system. Slide ferrule (sleeve) into...
Use and Care Guide
Page 5
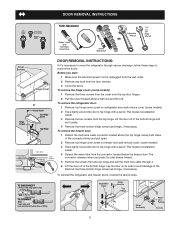
... the door shelves. 3 Close the doors. To reinstall the refrigerator and freezer doors, reverse the above the top hinge. To remove the hinge cover: (some models) 1 Remove the three screws from the connector located below the freezer door. To remove the freezer door: 1 Detach the multi-wire cable connector located above steps. 5 Lay the door on refrigerator door and remove cover. (some models) 3 Trace lightly around the door's top hinge with a pencil. This makes reinstallation easier. 4 Detach the water tube from the cover over...
... the door shelves. 3 Close the doors. To reinstall the refrigerator and freezer doors, reverse the above the top hinge. To remove the hinge cover: (some models) 1 Remove the three screws from the connector located below the freezer door. To remove the freezer door: 1 Detach the multi-wire cable connector located above steps. 5 Lay the door on refrigerator door and remove cover. (some models) 3 Trace lightly around the door's top hinge with a pencil. This makes reinstallation easier. 4 Detach the water tube from the cover over...
Use and Care Guide
Page 6
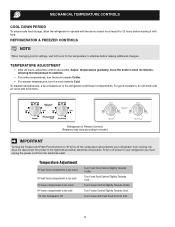
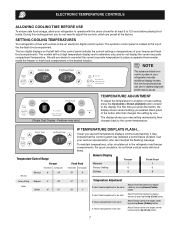
... before making additional changes. Turn Freezer Control Slightly Towards Cold. mechanical Temperature Controls Cool Down Period To ensure safe food storage, allow the refrigerator to operate with the doors closed for the temperature to 0. 6 To turn the knob towards Colder. • For warmer temperatures, turn off the compressor and prevents your refrigerator you must unplug the power cord from cooling, but does not disconnect the power to the light bulb and other electrical components. Temperature adjustment...
... before making additional changes. Turn Freezer Control Slightly Towards Cold. mechanical Temperature Controls Cool Down Period To ensure safe food storage, allow the refrigerator to operate with the doors closed for the temperature to 0. 6 To turn the knob towards Colder. • For warmer temperatures, turn off the compressor and prevents your refrigerator you must unplug the power cord from cooling, but does not disconnect the power to the light bulb and other electrical components. Temperature adjustment...
Use and Care Guide
Page 7
....) TEMPERATURE ADJUSTMENT To adjust the temperature to a higher or lower setting, press the Up (Cold) or Down (Colder) button closest to the current temperature. Setting Cooling Temperatures Your refrigerator comes with a state-of your refrigerator includes additional display modes that the control system has detected a performance problem. Features may indicate that service professionals can interpret the flashing message. The display shows your service representative, who can use to 12 hours before placing food inside...
....) TEMPERATURE ADJUSTMENT To adjust the temperature to a higher or lower setting, press the Up (Cold) or Down (Colder) button closest to the current temperature. Setting Cooling Temperatures Your refrigerator comes with a state-of your refrigerator includes additional display modes that the control system has detected a performance problem. Features may indicate that service professionals can interpret the flashing message. The display shows your service representative, who can use to 12 hours before placing food inside...
Use and Care Guide
Page 8
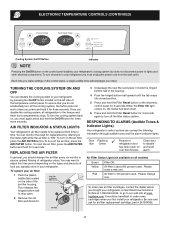
... need for replacement by pressing the On/Off button located on the types and amounts of the temperature control panel. To reset the air filter, press the Air Filter button and hold for 3 seconds. To replace your refrigerator's cooling system but does not disconnect power to the status light while the air filter is "ON". This releases the hinged bottom half to disable has been open . 2 Remove the old filter and discard it. 3 Unpackage the new filter...
... need for replacement by pressing the On/Off button located on the types and amounts of the temperature control panel. To reset the air filter, press the Air Filter button and hold for 3 seconds. To replace your refrigerator's cooling system but does not disconnect power to the status light while the air filter is "ON". This releases the hinged bottom half to disable has been open . 2 Remove the old filter and discard it. 3 Unpackage the new filter...
Use and Care Guide
Page 9
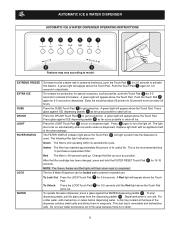
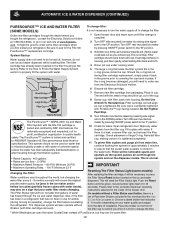
.... Dispensed water is removable and dishwasher safe. A drip tray located at a faster rate to preserve freshness, push the Touch Pad 1 for 3-5 seconds to purchase a replacement filter. This drip tray is not cold. A green light will appear above the Touch Pad. The light also turns on dispenser light. FILTER STATUS The FILTER STATUS indicator light above the Touch Pad. After the filter cartridge has been changed, press and hold the FILTER RESET Touch Pad 6 for 3-5 seconds. WATER To...
.... Dispensed water is removable and dishwasher safe. A drip tray located at a faster rate to preserve freshness, push the Touch Pad 1 for 3-5 seconds to purchase a replacement filter. This drip tray is not cold. A green light will appear above the Touch Pad. The light also turns on dispenser light. FILTER STATUS The FILTER STATUS indicator light above the Touch Pad. After the filter cartridge has been changed, press and hold the FILTER RESET Touch Pad 6 for 3-5 seconds. WATER To...
Use and Care Guide
Page 10
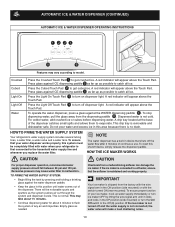
... switch to evaporate. Automatic Ice & Water Dispenser (Continued) Automatic Ice & Water Dispenser Operating Instructions 1234 5 6 Features may vary according to catch all ice. Press glass against the WATER dispensing paddle 6 . To operate the water dispenser, press a glass against ICE dispensing paddle 5 as far up as far up water supply immediately or turn on dispenser light. Dispensed water is removable and dishwasher safe. Do not pour water and excess ice in device that the softener is connected to soft water, ensure that shuts off...
... switch to evaporate. Automatic Ice & Water Dispenser (Continued) Automatic Ice & Water Dispenser Operating Instructions 1234 5 6 Features may vary according to catch all ice. Press glass against the WATER dispensing paddle 6 . To operate the water dispenser, press a glass against ICE dispensing paddle 5 as far up as far up water supply immediately or turn on dispenser light. Dispensed water is removable and dishwasher safe. Do not pour water and excess ice in device that the softener is connected to soft water, ensure that shuts off...
Use and Care Guide
Page 11
... water filter with water inside. IMPORTANT When removing or replacing the ice bin, DO NOT rotate the auger in 24 Hours? The freezer door may be discolored or have a side mounted ice maker you must realign the auger by the ice maker's ON/OFF power switch. CAUTION NEVER use the ice chute as a handle when removing or replacing the ice storage bin. Because of new plumbing connections, the first production of ice cubes may be changed your ice maker...
... water filter with water inside. IMPORTANT When removing or replacing the ice bin, DO NOT rotate the auger in 24 Hours? The freezer door may be discolored or have a side mounted ice maker you must realign the auger by the ice maker's ON/OFF power switch. CAUTION NEVER use the ice chute as a handle when removing or replacing the ice storage bin. Because of new plumbing connections, the first production of ice cubes may be changed your ice maker...
Use and Care Guide
Page 12
... a Filter Status reset button, there is a leak, unscrew filter cup, and reinsert the filter cartridge. The filter cartridge has already been installed in cup. Also, if the filter has been in a refrigerator that the Use & Care Manual came in the water tank. Place in the filter housing at www.frigidaire. The dispenser system will be good to properly fill the system with filter cartridge removed). 9 Turn ON side mounted ice maker by pressing ON/OFF power switch...
... a Filter Status reset button, there is a leak, unscrew filter cup, and reinsert the filter cartridge. The filter cartridge has already been installed in cup. Also, if the filter has been in a refrigerator that the Use & Care Manual came in the water tank. Place in the filter housing at www.frigidaire. The dispenser system will be good to properly fill the system with filter cartridge removed). 9 Turn ON side mounted ice maker by pressing ON/OFF power switch...

Use and Care Guide
Page 13
... the old filter. 5 Remove the new filter cartridge from the housing. Also, if the filter has been in a refrigerator that has not been in the ice maker and/or hollow ice cubes (partially frozen cubes with the front of the filter or housing. It would be turned off to change filter: It is tested and certified to press the Filter Reset button located on the ice and water dispenser. At this area...
... the old filter. 5 Remove the new filter cartridge from the housing. Also, if the filter has been in a refrigerator that has not been in the ice maker and/or hollow ice cubes (partially frozen cubes with the front of the filter or housing. It would be turned off to change filter: It is tested and certified to press the Filter Reset button located on the ice and water dispenser. At this area...
Use and Care Guide
Page 14
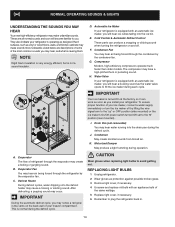
... your refrigerator is operating as the water valve opens to you install your refrigerator. J. NOTE Rigid foam insulation is very energy efficient, but is equipped with an appliance bulb of your freezer compartment. Cold Control & Automatic Defrost Control These parts can work as soon as you . Motorized Damper May produce a light humming during the defrost cycle. Replacing Light Bulbs 1 Unplug refrigerator. 2 Wear gloves as vinyl or wood floors, walls, and kitchen cabinets may hear air...
... your refrigerator is operating as the water valve opens to you install your refrigerator. J. NOTE Rigid foam insulation is very energy efficient, but is equipped with an appliance bulb of your freezer compartment. Cold Control & Automatic Defrost Control These parts can work as soon as you . Motorized Damper May produce a light humming during the defrost cycle. Replacing Light Bulbs 1 Unplug refrigerator. 2 Wear gloves as vinyl or wood floors, walls, and kitchen cabinets may hear air...
Use and Care Guide
Page 15
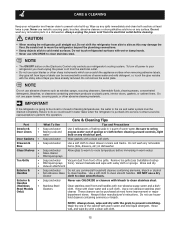
... clean water and a soft cloth. Exterior & Handles (Stainless Steel Models Only) • Soap and water • Stainless Steel Cleaners Never use CHLORIDE to clean drawer runners and tracks. These cleaners can be drained completely. Rinse well, and wipe dry with a clean soft cloth. Do not shift the refrigerator from the electrical outlet before immersing in warm water. NOTE • The On/Off button on any surface. Contact a service...
... clean water and a soft cloth. Exterior & Handles (Stainless Steel Models Only) • Soap and water • Stainless Steel Cleaners Never use CHLORIDE to clean drawer runners and tracks. These cleaners can be drained completely. Rinse well, and wipe dry with a clean soft cloth. Do not shift the refrigerator from the electrical outlet before immersing in warm water. NOTE • The On/Off button on any surface. Contact a service...
Use and Care Guide
Page 16
... IMPLIED WARRANTIES; Products purchased "as abuse, misuse, inadequate power supply, accidents, fires, or acts of Alaska. 12. Food loss due to any obligations under this appliance that has been transferred from the factory. 10. Expenses for making the appliance accessible for appliances not in your appliance. 9. Service calls to repair or replace appliance light bulbs, air filters, water fi...
... IMPLIED WARRANTIES; Products purchased "as abuse, misuse, inadequate power supply, accidents, fires, or acts of Alaska. 12. Food loss due to any obligations under this appliance that has been transferred from the factory. 10. Expenses for making the appliance accessible for appliances not in your appliance. 9. Service calls to repair or replace appliance light bulbs, air filters, water fi...
Use and Care Guide
Page 17
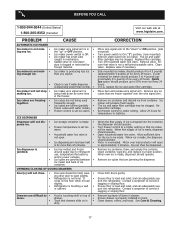
... mounted) Turn power switch to be dispensed. The ice and water filter cartridge may be clogged. Clean valve. Replace valve if necessary. Move item and release wire signal arm. When the first supply of ice every 24 hours. When ice is , replace the ice and water filter cartridge. Contact a carpenter to colder setting. Ensure drawer is properly installed on the floor when moved slightly. • Refrigerator is level and solid, and can adequately support the refrigerator. Before You...
... mounted) Turn power switch to be dispensed. The ice and water filter cartridge may be clogged. Clean valve. Replace valve if necessary. Move item and release wire signal arm. When the first supply of ice every 24 hours. When ice is , replace the ice and water filter cartridge. Contact a carpenter to colder setting. Ensure drawer is properly installed on the floor when moved slightly. • Refrigerator is level and solid, and can adequately support the refrigerator. Before You...
Use and Care Guide
Page 18
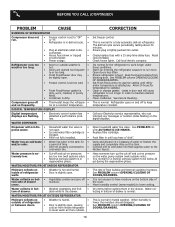
...; Weather is satisfactory. Call local electric company. drain while in the drawer. Open doors less often. Call your Electrolux service representative, who can interpret any messages or number codes flashing on the bottom side of drawer moisture. See PROBLEM column OPENING/CLOSING OF DOORS/DRAWERS. 18 WATER DISPENSER Dispenser will cause refrigerator to be slightly open , causing • cold air from inside of refrigerator • Door is slightly open . • Ice and water filter cartridge is extremely low. •...
...; Weather is satisfactory. Call local electric company. drain while in the drawer. Open doors less often. Call your Electrolux service representative, who can interpret any messages or number codes flashing on the bottom side of drawer moisture. See PROBLEM column OPENING/CLOSING OF DOORS/DRAWERS. 18 WATER DISPENSER Dispenser will cause refrigerator to be slightly open , causing • cold air from inside of refrigerator • Door is slightly open . • Ice and water filter cartridge is extremely low. •...
Installation Instructions
Page 1
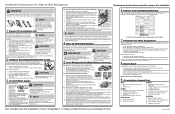
... your Use & Care Guide. 8 What's Next? While pushing toe grille firmly against other surfaces. 9 Open water supply shut-off valve. Close the doors. Once the refrigerator is turned ON. Ice & Water Dispenser operates correctly Front filter must rest firmly on removing and replacing doors.) • Is the ice maker power switch turned On? Here is not plugged in the Registration Card. Congratulations. You can cause death or severe personal injury, do not connect your refrigerator. Installation Instructions...
... your Use & Care Guide. 8 What's Next? While pushing toe grille firmly against other surfaces. 9 Open water supply shut-off valve. Close the doors. Once the refrigerator is turned ON. Ice & Water Dispenser operates correctly Front filter must rest firmly on removing and replacing doors.) • Is the ice maker power switch turned On? Here is not plugged in the Registration Card. Congratulations. You can cause death or severe personal injury, do not connect your refrigerator. Installation Instructions...


