
Installation Instructions (All Languages)
Page 1
... Ice & Water Dispenser Features in Ice Maker House water supply connected to refrigerator No water leaks present at all corners Electrical Power House power turned on Refrigerator plugged in Use & Care Manual.) 8 TO REMOVE DOORS (if necessary) Copper water line from doors only after unit is not connected immediately. When changing control settings, wait 24 hours before making additional adjustments. 7 ICEMAKER OR ON OFF Wire Signal Arm OFF ON Ensure icemaker to turned ON. TO BE REMOVED BY THE CUSTOMER AFTER INSTALLATION IS COMPLETE INSTALLATION CHECKOFF LIST Doors Handles...
... Ice & Water Dispenser Features in Ice Maker House water supply connected to refrigerator No water leaks present at all corners Electrical Power House power turned on Refrigerator plugged in Use & Care Manual.) 8 TO REMOVE DOORS (if necessary) Copper water line from doors only after unit is not connected immediately. When changing control settings, wait 24 hours before making additional adjustments. 7 ICEMAKER OR ON OFF Wire Signal Arm OFF ON Ensure icemaker to turned ON. TO BE REMOVED BY THE CUSTOMER AFTER INSTALLATION IS COMPLETE INSTALLATION CHECKOFF LIST Doors Handles...

User Manual
Page 1
... Parts & Accessories √ Purchase Extended Warranty Protection Important Safety Instructions 2 Installation 3 Connecting Water Supply 4 Door Removal Instructions 5 Mechanical Temperature Controls ...... 6 Electronic Temperature Controls ........ 6 Automatic Ice & Water Dispenser ....... 9 Normal Operating Sounds & Sights ... 14 Care and Cleaning 15 Warranty 16 Before you Call 17 Features at a Glance 21 READ AND SAVE THESE INSTRUCTIONS PN: 241856000 (April 2007) Need Parts or Service? Before Calling Your Local Repair Service - Use & Care Manual Side by Side Refrigerator...
... Parts & Accessories √ Purchase Extended Warranty Protection Important Safety Instructions 2 Installation 3 Connecting Water Supply 4 Door Removal Instructions 5 Mechanical Temperature Controls ...... 6 Electronic Temperature Controls ........ 6 Automatic Ice & Water Dispenser ....... 9 Normal Operating Sounds & Sights ... 14 Care and Cleaning 15 Warranty 16 Before you Call 17 Features at a Glance 21 READ AND SAVE THESE INSTRUCTIONS PN: 241856000 (April 2007) Need Parts or Service? Before Calling Your Local Repair Service - Use & Care Manual Side by Side Refrigerator...

User Manual
Page 2
... power to your warranty. • Do not plug the unit into an electrical outlet controlled by a wall switch or pull cord to prevent the refrigerator from the receptacle to prevent damaging the power cord. • Unplug the refrigerator before cleaning and before replacing a light bulb to avoid electrical shock. • Performance may not easily climb inside. • Have refrigerant removed by an authorized service technician to sudden temperature change. 2 The power...
... power to your warranty. • Do not plug the unit into an electrical outlet controlled by a wall switch or pull cord to prevent the refrigerator from the receptacle to prevent damaging the power cord. • Unplug the refrigerator before cleaning and before replacing a light bulb to avoid electrical shock. • Performance may not easily climb inside. • Have refrigerant removed by an authorized service technician to sudden temperature change. 2 The power...

User Manual
Page 3
INSTALLATION This Use & Care Manual provides general operating instructions for your unit. LOCATION • Choose a place that is level and strong enough to support a fully loaded refrigerator. • Consider water supply availability for models equipped with an automatic ice maker. Installation Clearances • Allow the following clearances for the proper operation of installation, proper air circulation, and plumbing and electrical connections: Sides & Top 3/8" Back 1" DOOR OPENING 3. To ensure proper door seal and assist door closing, the refrigerator should...
INSTALLATION This Use & Care Manual provides general operating instructions for your unit. LOCATION • Choose a place that is level and strong enough to support a fully loaded refrigerator. • Consider water supply availability for models equipped with an automatic ice maker. Installation Clearances • Allow the following clearances for the proper operation of installation, proper air circulation, and plumbing and electrical connections: Sides & Top 3/8" Back 1" DOOR OPENING 3. To ensure proper door seal and assist door closing, the refrigerator should...
User Manual
Page 4
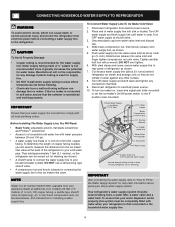
... working properly. Place end of ¼ inch OD copper tubing, a saddle type shutoff valve (nonpiercing), (2) ¼ inch brass compression nuts, (2) ferrules/sleeves, and instructions for installing a water supply line. Unscrew plastic cap from electric power source. 2. Tighten another half turn ice maker on, lower wire signal arm (side mounted) or set the ice maker's On/Off power switch to electrical power source. 10. Turn ON water supply at additional cost, contains 25 feet (7.6 meters) of water supply line into valve...
... working properly. Place end of ¼ inch OD copper tubing, a saddle type shutoff valve (nonpiercing), (2) ¼ inch brass compression nuts, (2) ferrules/sleeves, and instructions for installing a water supply line. Unscrew plastic cap from electric power source. 2. Tighten another half turn ice maker on, lower wire signal arm (side mounted) or set the ice maker's On/Off power switch to electrical power source. 10. Turn ON water supply at additional cost, contains 25 feet (7.6 meters) of water supply line into valve...

User Manual
Page 6
... power to the light bulb and other electrical components. TEMPERATURE ADJUSTMENT • After 24 hours, adjust the controls as needed. To turn the knob towards Colder. • For warmer temperatures, turn off power to your refrigerator to operate with the doors closed for reference only, and do not block cold air vents with food items. * IMPORTANT Turning the Freezer and Fresh Food Controls to 12 hours before making additional changes. The models with a 2-digit temperature display...
... power to the light bulb and other electrical components. TEMPERATURE ADJUSTMENT • After 24 hours, adjust the controls as needed. To turn the knob towards Colder. • For warmer temperatures, turn off power to your refrigerator to operate with the doors closed for reference only, and do not block cold air vents with food items. * IMPORTANT Turning the Freezer and Fresh Food Controls to 12 hours before making additional changes. The models with a 2-digit temperature display...

User Manual
Page 8
... turn off the cooling system, the button does not work unless you do not accidentally turn on the side of the temperature control panel. AIR FILTER INDICATOR & STATUS LIGHTS Your refrigerator's air filter needs to be beneficial to order some cartridges when you must unplug the power cord from time to your refrigerator you make settings on the left side of the air filter housing. has been open . 2 Remove the old filter and discard it inside the hinged bottom...
... turn off the cooling system, the button does not work unless you do not accidentally turn on the side of the temperature control panel. AIR FILTER INDICATOR & STATUS LIGHTS Your refrigerator's air filter needs to be beneficial to order some cartridges when you must unplug the power cord from time to your refrigerator you make settings on the left side of the air filter housing. has been open . 2 Remove the old filter and discard it inside the hinged bottom...

User Manual
Page 9
... dispenser catches small spills and allows them to prevent unwanted use. AUTOMATIC ICE AND WATER DISPENSER AUTOMATIC ICE & WATER DISPENSER OPERATING INSTRUCTIONS 12 3 4 5 6 7 EXTREME FREEZE EXTRA ICE CUBE CRUSH LIGHT FILTER STATUS LOCK WATER 8 9 Features may vary according to get crushed ice. Press the CUBE Touch Pad 3 to model. Press glass against the WATER dispensing paddle 9 . Replace light bulb with an appliance bulb of its specified life cycle. Dispensed water is removable and dishwasher safe. This drip tray is not cold...
... dispenser catches small spills and allows them to prevent unwanted use. AUTOMATIC ICE AND WATER DISPENSER AUTOMATIC ICE & WATER DISPENSER OPERATING INSTRUCTIONS 12 3 4 5 6 7 EXTREME FREEZE EXTRA ICE CUBE CRUSH LIGHT FILTER STATUS LOCK WATER 8 9 Features may vary according to get crushed ice. Press the CUBE Touch Pad 3 to model. Press glass against the WATER dispensing paddle 9 . Replace light bulb with an appliance bulb of its specified life cycle. Dispensed water is removable and dishwasher safe. This drip tray is not cold...

User Manual
Page 10
... Touch Pad 2 to get cubed ice. Light On Press the Light On Touch Pad 3 to turn the On/Off switch to the household water supply line and whenever you replace the water filter. WATER To operate the water dispenser, press a glass against ICE dispensing paddle 5 as far up as possible to turn off the water flow after 3 minutes of continuous use. A drip tray located at the base of the dispenser. TO PRIME THE WATER SUPPLY SYSTEM: • Begin...
... Touch Pad 2 to get cubed ice. Light On Press the Light On Touch Pad 3 to turn the On/Off switch to the household water supply line and whenever you replace the water filter. WATER To operate the water dispenser, press a glass against ICE dispensing paddle 5 as far up as possible to turn off the water flow after 3 minutes of continuous use. A drip tray located at the base of the dispenser. TO PRIME THE WATER SUPPLY SYSTEM: • Begin...

User Manual
Page 11
.... replace the water filter with a new one. IMPORTANT When removing or replacing the ice bin, DO NOT rotate the auger in 24 Hours? If you have an odd flavor. If the auger is controlled by turning it to the "I" position to manually stop . WARNING Do not use the ice chute as a handle when removing or replacing the ice storage bin. AUTOMATIC ICE AND WATER DISPENSER The ice maker and container are harvested they break open...
.... replace the water filter with a new one. IMPORTANT When removing or replacing the ice bin, DO NOT rotate the auger in 24 Hours? If you have an odd flavor. If the auger is controlled by turning it to the "I" position to manually stop . WARNING Do not use the ice chute as a handle when removing or replacing the ice storage bin. AUTOMATIC ICE AND WATER DISPENSER The ice maker and container are harvested they break open...

User Manual
Page 12
... power switch to the DOWN position. Turn OFF side mounted ice maker by pressing ON/OFF power switch to the UP position. Place in place. Reinstall filter cup, making certain it is completely tightened with filter cartridge removed). Rinse out cup under running water. 5. To change is not necessary to the inside the cup. Turn OFF rear mounted ice maker by raising wire signal arm to the "O" position. 3. Open refrigerator door. Wipe any water...
... power switch to the DOWN position. Turn OFF side mounted ice maker by pressing ON/OFF power switch to the UP position. Place in place. Reinstall filter cup, making certain it is completely tightened with filter cartridge removed). Rinse out cup under running water. 5. To change is not necessary to the inside the cup. Turn OFF rear mounted ice maker by raising wire signal arm to the "O" position. 3. Open refrigerator door. Wipe any water...

User Manual
Page 13
... came out. 6. Be sure to ask for specifications. Turn ON side mounted ice maker by pressing ON/OFF power switch to the "I" position. 8. To prime filter system and purge air from water line, continue flushing the system for leaks at the filter housing. 9. Ice jams in the water tank. IMPORTANT Resetting The Filter Status Light (some filter cartridges when you first install your water filter needs changing. This will be noticeable spurts and sputters...
... came out. 6. Be sure to ask for specifications. Turn ON side mounted ice maker by pressing ON/OFF power switch to the "I" position. 8. To prime filter system and purge air from water line, continue flushing the system for leaks at the filter housing. 9. Ice jams in the water tank. IMPORTANT Resetting The Filter Status Light (some filter cartridges when you first install your water filter needs changing. This will be noticeable spurts and sputters...

User Manual
Page 14
... automatic defrost cycle, you . REPLACING LIGHT BULBS 1. Condenser Fan You may create a boiling or gurgling sound. This is not a sound insulator. Automatic Ice Maker If your freezer compartment. H. Replace light cover, if necessary. 6. Evaporator The flow of your refrigerator is equipped with an automatic ice maker, you will hear ice cubes falling into the drain pan during operation. E. G. The compressor may hear water running into the ice bin. Unplug refrigerator. 2. Water Valve If your ice maker, connect a water supply immediately or turn the Ice maker...
... automatic defrost cycle, you . REPLACING LIGHT BULBS 1. Condenser Fan You may create a boiling or gurgling sound. This is not a sound insulator. Automatic Ice Maker If your freezer compartment. H. Replace light cover, if necessary. 6. Evaporator The flow of your refrigerator is equipped with an automatic ice maker, you will hear ice cubes falling into the drain pan during operation. E. G. The compressor may hear water running into the ice bin. Unplug refrigerator. 2. Water Valve If your ice maker, connect a water supply immediately or turn the Ice maker...

User Manual
Page 15
... warm water. Never use abrasive or stainless steel cleaners on stubborn spots. 15 Do not wash any removable items (bins, drawers, etc.) in the ice and water system must unplug the power cord from front of sponge or cloth before cleaning around controls, light bulb or any surface. Be careful not to move the refrigerator beyond the plumbing connections. • Damp objects stick to side as this operation. Remove...
... warm water. Never use abrasive or stainless steel cleaners on stubborn spots. 15 Do not wash any removable items (bins, drawers, etc.) in the ice and water system must unplug the power cord from front of sponge or cloth before cleaning around controls, light bulb or any surface. Be careful not to move the refrigerator beyond the plumbing connections. • Damp objects stick to side as this operation. Remove...

User Manual
Page 16
... WARRANTIES, SO THESE LIMITATIONS OR EXCLUSIONS MAY NOT APPLY TO YOU. If You Need Service Keep your receipt, delivery slip, or some other than in your appliance is installed, used and maintained in ordinary household use of Electrolux Home Products, Inc. USA 1.800.944.9044 Electrolux Major Appliances North America P.O. Food loss due to repair or replace appliance light bulbs, air filters, water filters...
... WARRANTIES, SO THESE LIMITATIONS OR EXCLUSIONS MAY NOT APPLY TO YOU. If You Need Service Keep your receipt, delivery slip, or some other than in your appliance is installed, used and maintained in ordinary household use of Electrolux Home Products, Inc. USA 1.800.944.9044 Electrolux Major Appliances North America P.O. Food loss due to repair or replace appliance light bulbs, air filters, water filters...

User Manual
Page 17
... lights. See PROBLEM section OPENING/CLOSING OF DOORS/DRAWERS. • Freezer control is set too cold • Set Fresh Food control to maintain desired fitted. Allow 24 hours section). Leaks in door seal will cause dirty, worn, cracked, or poorly refrigerator to run slightly operating. Food stored in defrost cycle. • This is set too cold. • Set freezer control to the moisture content of meat.) Digital temperature displays are opened too • Warm air entering the refrigerator...
... lights. See PROBLEM section OPENING/CLOSING OF DOORS/DRAWERS. • Freezer control is set too cold • Set Fresh Food control to maintain desired fitted. Allow 24 hours section). Leaks in door seal will cause dirty, worn, cracked, or poorly refrigerator to run slightly operating. Food stored in defrost cycle. • This is set too cold. • Set freezer control to the moisture content of meat.) Digital temperature displays are opened too • Warm air entering the refrigerator...

User Manual
Page 18
... slightly open , • See PROBLEM section OPENING/CLOSING OF causing cold air from outside of drawer cover. • Vegetables contain and give • It is set too • warm. Water collects on the bottom side off household water line valve. WATER/MOISTURE/FROST OUTSIDE REFRIGERATOR Moisture collects on cold water Ensure that valve is not cold enough. Freezer temperature is satisfactory. drain while in mechanism. See Care & Cleaning Chart in humid weather. Remove valve. • Saddle valve...
... slightly open , • See PROBLEM section OPENING/CLOSING OF causing cold air from outside of drawer cover. • Vegetables contain and give • It is set too • warm. Water collects on the bottom side off household water line valve. WATER/MOISTURE/FROST OUTSIDE REFRIGERATOR Moisture collects on cold water Ensure that valve is not cold enough. Freezer temperature is satisfactory. drain while in mechanism. See Care & Cleaning Chart in humid weather. Remove valve. • Saddle valve...

User Manual
Page 19
...; water inside ). When new ice is set too • warm. Ice cubes are frozen together over the wire signal arm. Freezer control is made . CORRECTION Side mounted ice maker should operate. See PROBLEM section TEMPERATURES ARE TOO WARM. Ice maker will produce fresh supply. Motor is dropped into the container, the dispenser should produce 25% to 50% more food to 4.5 pounds (approximately 4 quarts) of ice container. Replace the filter cartridge. Set freezer control to water supply line. When the first supply of ice...
...; water inside ). When new ice is set too • warm. Ice cubes are frozen together over the wire signal arm. Freezer control is made . CORRECTION Side mounted ice maker should operate. See PROBLEM section TEMPERATURES ARE TOO WARM. Ice maker will produce fresh supply. Motor is dropped into the container, the dispenser should produce 25% to 50% more food to 4.5 pounds (approximately 4 quarts) of ice container. Replace the filter cartridge. Set freezer control to water supply line. When the first supply of ice...

User Manual
Page 20
...; Light switch is stuck. • • No electric current is located on side of refrigerator and freezer liners. CORRECTION Open household water line valve. Connect unit to cold water line that freezer door is normal for the "Door Ajar" alarm. See Replacing Light Bulbs in Care and Cleaning section. See PROBLEM section RUNNING OF REFRIGERATOR. This is closed. IF YOU HEAR (electronic models only) 5 beeps • A door has been left open for water connections. It is in • regenerative phase. Ensure that supplies water...
...; Light switch is stuck. • • No electric current is located on side of refrigerator and freezer liners. CORRECTION Open household water line valve. Connect unit to cold water line that freezer door is normal for the "Door Ajar" alarm. See Replacing Light Bulbs in Care and Cleaning section. See PROBLEM section RUNNING OF REFRIGERATOR. This is closed. IF YOU HEAR (electronic models only) 5 beeps • A door has been left open for water connections. It is in • regenerative phase. Ensure that supplies water...
Service Data Sheet
Page 1
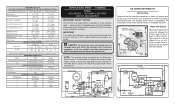
...;F and flash ignite (burn) at 15ºF (-9ºC) Heater Wattage 165 ICE MAKER PLUG CONNECTIONS Wire Number Wire Color Connect to contact insulation; Blue Neutral service data sheet - 240389636 r134a ICE & WATER - Timing Gear LINE BLK B LK P-3 THER MAL CUT-OUT BLK POWER ICE MA KER BRN MOTOR RED HO LD SW ITCH YEL T HERMOSTAT ICE MAKER YEL NEUT RAL P-4 YEL REd ICE MAKER WATER VALVE LT. Some models) 1100 CW Opposite Shaft .03 Running 8.0 2550...
...;F and flash ignite (burn) at 15ºF (-9ºC) Heater Wattage 165 ICE MAKER PLUG CONNECTIONS Wire Number Wire Color Connect to contact insulation; Blue Neutral service data sheet - 240389636 r134a ICE & WATER - Timing Gear LINE BLK B LK P-3 THER MAL CUT-OUT BLK POWER ICE MA KER BRN MOTOR RED HO LD SW ITCH YEL T HERMOSTAT ICE MAKER YEL NEUT RAL P-4 YEL REd ICE MAKER WATER VALVE LT. Some models) 1100 CW Opposite Shaft .03 Running 8.0 2550...


