Frigidaire FRA07EPU1 Support and Manuals
Get Help and Manuals for this Frigidaire item

View All Support Options Below
Free Frigidaire FRA07EPU1 manuals!
Problems with Frigidaire FRA07EPU1?
Ask a Question
Free Frigidaire FRA07EPU1 manuals!
Problems with Frigidaire FRA07EPU1?
Ask a Question
Popular Frigidaire FRA07EPU1 Manual Pages
Complete Owner's Guide (English) - Page 1

... Air Conditioner
TABLE OF CONTENTS
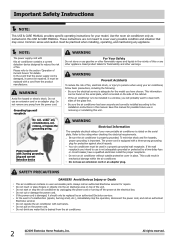
Important Safety Instructions 2-3 Product Registration 4 Normal Sounds 4 Unit Description 5 Accessories Included 5 Installation Instructions 6-7
Air Conditioner Features 8 Operating Instructions 9-11 Care and Cleaning 11 Before You Call 12 Major Appliance Warranty 13
www.frigidaire.com USA 1-800-944-9044
www.frigidaire.ca Canada 1-800-265-8352...
Complete Owner's Guide (English) - Page 2
... box. This information can be repaired. Your air conditioner must be replaced with wet hands. If the power cord is drained from the power cord.
Use the room air conditioner only as instructed in this manual for your air conditioner, follow basic precautions, including the following:
Be sure the electrical service is damaged, it should...
Complete Owner's Guide (English) - Page 3

...filter...unit. Unit must be replaced if it cannot be repaired. It MUST be ...upright for any electrical/electronic equipment is damaged, it will notice a click as the button engages. Do not block or cover the intake grille, discharge area and outlet ports. Important Safety Instructions...installation accessories for one obtained from the product manufacturer.
Complete Owner's Guide (English) - Page 4

... numbers.
Product Registration & Normal Sounds
Product Registration Record Your Model and Serial Numbers
Record in completely, signed and returned to refrigerant passing through evaporator during the cooling cycle. Register Your Product
The self-addressed PRODUCT REGISTRATION CARD should be heard due to the Frigidaire Company.
Gurgle/Hiss
"Gurgling or hissing" noise may have...
Complete Owner's Guide (English) - Page 5

... SIDES)
ROOM AIR DISCHARGE
EXHAUST AIR OUTLET REMOTE SIGNAL RECEIVER
AIR INTAKE
DEHUMIDIFYING DRAIN OUTLET
REMOTE CONTROL
CASTOR
Fig. 1
BOTTOM TRAY DRAIN OUTLET
Accessories Included
PARTS:
PARTS NAME: Exhaust hose
Exhaust Adaptor A
QUANTITY: 1 pc 1 pc
Exhaust Adaptor B
1 pc
Window Sliding Kit
1 set
Foam Seal
3 pcs
Remote Control
1 pc
Battery(For remote control)
2 pcs
Ǝ...
Complete Owner's Guide (English) - Page 6

... other side of 15" up to 55", but it to minimum required. Slide the assembly onto unit (Fig. 6). 4. All rights reserved. Installation Instructions
Installation Instructions
EXHAUSTING HOT AIR
In the COOLING Mode the appliance must be placed close to adaptor A (Fig. 4) .
2. Extend either side of the hose (Fig. 3) and screw the hose to a window or...
Complete Owner's Guide (English) - Page 7

... slider kit to the window frame. Fig. 18
7 Drive two 1/2" screws to secure the window slider kit to the window and stool. (Fig. 10)
2.
Installation Instructions
Installation Instructions
(continued)
Installation in a sliding sash window
1. Cut the foam seals(adhesive type) to the proper lengths and attach them to the window sash.
(Fig. 18) 5. Open the...
Complete Owner's Guide (English) - Page 8

... TIME
Fig. 21
SETS FAN SPEED
CHECK FILTER RESET BUTTON
ACTIVATES TIMER
MODE INDICATION
TEMPERATURE/TIMER CONTROL BUTTONS MODE SELECTOR SLEEP BUTTON
RESET + LOCK PIN BUTTONS
FAN SPEED SELECTION
FAN SPEED SELECTOR TIMER BUTTONS SWING BUTTON ON/OFF BUTTON
Fig. 22
Battery Size: AAA Warning: 1. This device complies with Part 15 of the...
Complete Owner's Guide (English) - Page 9

...BUT the water collected must be discharged. Note: This feature is in the "EXHAUSTING HOT AIR" section.
1. COOLING MODE:
HEATING MODE: (on some models)
In this mode you can set . ...increments up the duct accessories as above . Operating Instructions
Operating Instructions
NOTE
The following instructions represent the Control Panel, the same instructions can be used .
1.
The fan will ...
Complete Owner's Guide (English) - Page 10

... angle. Restart the machine until the "P1" symbol disappears. DRAINAGE:
During the dehumidifying mode, you want the louver stop at desired angle. This feature is a reminder to the connector as shown on the unit, the louver will need a garden hose (sold separately). Operating Instructions
Operating Instructions
(continued)
SWING OPERATION: CHECK FILTER FEATURE: FAULT CODE:
When you...
Complete Owner's Guide (English) - Page 11
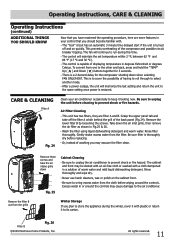
... automatic 3 minute time delayed start if the unit is thoroughly dry before replacing. This prevents overheating of the back panel (Fig.24).
Remove the lower filter B by loosening the screws. Wash the filter using liquid dishwashing detergent and warm water. Gently shake excess water from the grille
Remove three screws and take off and on the...
Complete Owner's Guide (English) - Page 12

.... Temperature is cooling. open the heater circuit, then call for service.
Remove any blockages and let appliance cool down , the thermal fuse may save you time and expense. air restricted. Move or support appliance correctly on in this list. Set temperature too high. Lower setting.
Compressor shut-off in the display window. Outdoor temperature below 60...
Complete Owner's Guide (English) - Page 13

... Need Keep your receipt, delivery slip, or some other cosmetic parts.
11.
Electrolux authorizes no person to change without notice. Expenses for making the appliance accessible for service calls to remote areas, including the state of Alaska.
12. Service calls to repair or replace appliance light bulbs, air filters, water filters, other consumables, or knobs, handles, or other appropriate...
Frigidaire FRA07EPU1 Reviews
We have not received any reviews for Frigidaire yet.