Complete Owner's Guide (English)
Page 1
All about the Use &Care of your Refrigerator 242108500 (January 2010) TABLE OF CONTENTS Important Safety Instructions 2 Features at a Glance 4 Installation 5 Door Removal Instructions 7 Handle Installation 8 Connecting Water Supply 9 Controls 10 Storage Features 12 Automatic Ice & Water Dispenser 13 Changing the Filter 15 Normal Operating Sounds and Sights 17 Care and Cleaning 18 Before you Call 19 Major Appliance Warranty 21 www.frigidaire.com USA 1-800-944-9044 www.frigidaire.ca Canada 1-800-265-8352
All about the Use &Care of your Refrigerator 242108500 (January 2010) TABLE OF CONTENTS Important Safety Instructions 2 Features at a Glance 4 Installation 5 Door Removal Instructions 7 Handle Installation 8 Connecting Water Supply 9 Controls 10 Storage Features 12 Automatic Ice & Water Dispenser 13 Changing the Filter 15 Normal Operating Sounds and Sights 17 Care and Cleaning 18 Before you Call 19 Major Appliance Warranty 21 www.frigidaire.com USA 1-800-944-9044 www.frigidaire.ca Canada 1-800-265-8352
Complete Owner's Guide (English)
Page 2
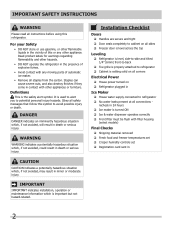
...are secure and tight Door seals completely to cabinet on all sides Freezer door is level across the top Leveling Refrigerator is level, side-to-side and tilted 1/4" (6mm) front-to-back Toe grille is properly attached to potential personal injury hazards.... WARNING WARNING indicates a potentially hazardous situation which is used to alert you to refrigerator Cabinet is the safety alert symbol. Read product labels for warnings regarding flammability and other hazards. • DO NOT operate the...
...are secure and tight Door seals completely to cabinet on all sides Freezer door is level across the top Leveling Refrigerator is level, side-to-side and tilted 1/4" (6mm) front-to-back Toe grille is properly attached to potential personal injury hazards.... WARNING WARNING indicates a potentially hazardous situation which is used to alert you to refrigerator Cabinet is the safety alert symbol. Read product labels for warnings regarding flammability and other hazards. • DO NOT operate the...
Complete Owner's Guide (English)
Page 3
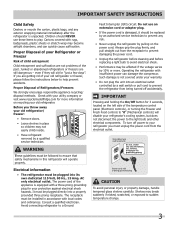
...CAUTION To avoid personal injury or property damage, handle tempered glass shelves carefully. Consult a qualified electrician. If you throw away your old refrigerator/ freezer: • Remove doors. • Leave shelves in place so children may be plugged into a properly grounded three prong receptacle. ... - Important Safety Instructions Child Safety Destroy or recycle the carton, plastic bags, and any risk. • Never unplug the refrigerator by 10% or more information on the left side of the appliance is unpacked. The power cord of the temperature control panel...
...CAUTION To avoid personal injury or property damage, handle tempered glass shelves carefully. Consult a qualified electrician. If you throw away your old refrigerator/ freezer: • Remove doors. • Leave shelves in place so children may be plugged into a properly grounded three prong receptacle. ... - Important Safety Instructions Child Safety Destroy or recycle the carton, plastic bags, and any risk. • Never unplug the refrigerator by 10% or more information on the left side of the appliance is unpacked. The power cord of the temperature control panel...
Complete Owner's Guide (English)
Page 5
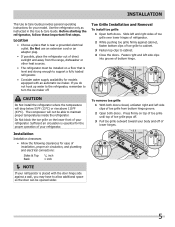
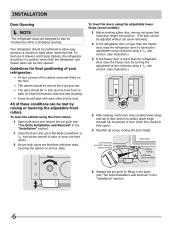
... 1 With both doors closed, unfasten right and left side clips into groove of toe grille to cabinet. 3 Fasten top clips to support a fully loaded refrigerator. • Consider water supply availability for models equipped with the door hinge side against cabinet, fasten bottom clips of bottom hinge. Use the... the toe grille on the lower front of direct sunlight and away from bottom hinge groove. 2 Open both doors. CAUTION Do Not install the refrigerator where the temperature will not be opened wider. Do Not use an extension cord or an adapter plug. • If possible, place the...
... 1 With both doors closed, unfasten right and left side clips into groove of toe grille to cabinet. 3 Fasten top clips to support a fully loaded refrigerator. • Consider water supply availability for models equipped with the door hinge side against cabinet, fasten bottom clips of bottom hinge. Use the... the toe grille on the lower front of direct sunlight and away from bottom hinge groove. 2 Open both doors. CAUTION Do Not install the refrigerator where the temperature will not be opened wider. Do Not use an extension cord or an adapter plug. • If possible, place the...
Complete Owner's Guide (English)
Page 6
... use a flat-blade screwdriver or 3/8 inch socket wrench to raise or lower the front rollers. 3 Ensure both the refrigerator and freezer doors can be fully opened. Your refrigerator should be adjusted without set screw that doors close and seal properly). • Doors should align with their seals touching...Installation" section). 2 Close the doors and use of the cabinet must rest firmly on all four sides. Installation Door Opening NOTE The refrigerator doors are bind-free with each other and be level at the front and rear. • The sides should tilt ¼ inch (6 mm)...
... use a flat-blade screwdriver or 3/8 inch socket wrench to raise or lower the front rollers. 3 Ensure both the refrigerator and freezer doors can be fully opened. Your refrigerator should be adjusted without set screw that doors close and seal properly). • Doors should align with their seals touching...Installation" section). 2 Close the doors and use of the cabinet must rest firmly on all four sides. Installation Door Opening NOTE The refrigerator doors are bind-free with each other and be level at the front and rear. • The sides should tilt ¼ inch (6 mm)...
Complete Owner's Guide (English)
Page 7
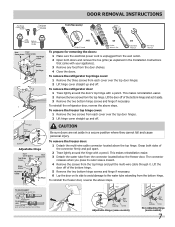
... sure doors are set it . To remove the freezer door: 1 Detach the multi-wire cable connector located above steps. To reinstall the refrigerator door, reverse the above the top hinge. The connector releases when you press its side to avoid damage to remove tube TO CONNECT Insert... appliance). 3 Remove any food from the door shelves. 4 Close the doors. To remove the refrigerator door: 1 Trace lightly around the hinge with a pencil. Lift the door off . To remove the refrigerator top hinge cover: 1 Remove the three screws from the connector located below the freezer door. Pull...
... sure doors are set it . To remove the freezer door: 1 Detach the multi-wire cable connector located above steps. To reinstall the refrigerator door, reverse the above the top hinge. The connector releases when you press its side to avoid damage to remove tube TO CONNECT Insert... appliance). 3 Remove any food from the door shelves. 4 Close the doors. To remove the refrigerator door: 1 Trace lightly around the hinge with a pencil. Lift the door off . To remove the refrigerator top hinge cover: 1 Remove the three screws from the connector located below the freezer door. Pull...
Complete Owner's Guide (English)
Page 8
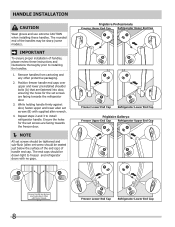
... the holes for the set screw should be sharp (some models). Frigidaire Professional® Freezer Upper End Cap Refrigerator Upper End Cap Freezer Lower End Cap Refrigerator Lower End Cap Frigidaire Gallery® Freezer Upper End Cap Refrigerator Upper End Cap Freezer Lower End Cap Refrigerator Lower End Cap 8 Position freezer handle end caps over upper...
... the holes for the set screw should be sharp (some models). Frigidaire Professional® Freezer Upper End Cap Refrigerator Upper End Cap Freezer Lower End Cap Refrigerator Lower End Cap Frigidaire Gallery® Freezer Upper End Cap Refrigerator Upper End Cap Freezer Lower End Cap Refrigerator Lower End Cap 8 Position freezer handle end caps over upper...
Complete Owner's Guide (English)
Page 9
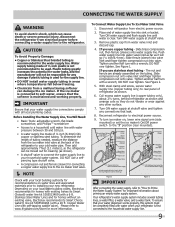
...supply tubing in areas where temperatures fall below freezing. • Chemicals from household water supply (Include enough tubing in loop to allow moving refrigerator out for cleaning.) Figure 1 Figure 2 IMPORTANT After connecting the water supply, refer to "How to the ice maker inlet valve. ... 1. See Figure 1. Slide compression nut onto valve inlet and finger tighten compression nut onto valve. Plastic Water Tubing to www.frigidaire.com/store for homes without an existing valve, Electrolux recommends its Smart Choice® water line kit 5305513409 (with a 20 ft...
...supply tubing in areas where temperatures fall below freezing. • Chemicals from household water supply (Include enough tubing in loop to allow moving refrigerator out for cleaning.) Figure 1 Figure 2 IMPORTANT After connecting the water supply, refer to "How to the ice maker inlet valve. ... 1. See Figure 1. Slide compression nut onto valve inlet and finger tighten compression nut onto valve. Plastic Water Tubing to www.frigidaire.com/store for homes without an existing valve, Electrolux recommends its Smart Choice® water line kit 5305513409 (with a 20 ft...
Complete Owner's Guide (English)
Page 10
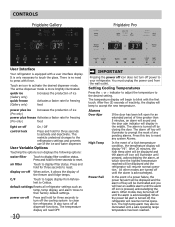
... an alarm will sound and the door ajar indicator will resume normal operation. The alarm off key will be displayed and the refrigerator will hear an audible alarm until the alarm is pressed, acknowledging the alarm. display on-off When active, it allows the ... display will beep to press with force. It is only necessary to blink with a user interface display. Controls Frigidaire Gallery Frigidaire Pro User Interface Your refrigerator is equipped with the first touch. Touch an icon to display filter condition status. User Variable Options Touching the ...
... an alarm will sound and the door ajar indicator will resume normal operation. The alarm off key will be displayed and the refrigerator will hear an audible alarm until the alarm is pressed, acknowledging the alarm. display on-off When active, it allows the ... display will beep to press with force. It is only necessary to blink with a user interface display. Controls Frigidaire Gallery Frigidaire Pro User Interface Your refrigerator is equipped with the first touch. Touch an icon to display filter condition status. User Variable Options Touching the ...
Complete Owner's Guide (English)
Page 11
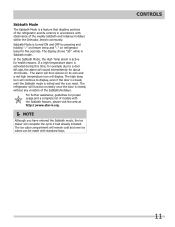
... for five seconds. The ice cube compartment will display. In the Sabbath Mode, the High Temp alarm is a feature that disables portions of the refrigerator and its own and a red high temperature icon will remain cold and new ice cubes can be made with the Sabbath feature, please visit the ... the Sabbath mode is turned ON and OFF by pressing and holding "∨" on freezer temp and "∧" on its controls in Sabbath mode. The refrigerator will function normally once the door is activated during this time, for example due to display, even if the door is closed , without any violation...
... for five seconds. The ice cube compartment will display. In the Sabbath Mode, the High Temp alarm is a feature that disables portions of the refrigerator and its own and a red high temperature icon will remain cold and new ice cubes can be made with the Sabbath feature, please visit the ... the Sabbath mode is turned ON and OFF by pressing and holding "∨" on freezer temp and "∧" on its controls in Sabbath mode. The refrigerator will function normally once the door is activated during this time, for example due to display, even if the door is closed , without any violation...

Complete Owner's Guide (English)
Page 12
... can accommodate gallon-sized plastic drink containers and economysized jars and containers. The Chill Drawer is intended for storage of the refrigerator. If fruits or vegetables are equipped with a Cool Drawer for short term storage of items including fruits, vegetables, nuts,...equipped with a Chill Drawer. Cool Drawer (some models) The fresh drawers, located under the bottom refrigerator shelf, are to suit individual needs. Cantilever Shelf Adjustment Refrigerator shelves are adjustable for easy access to a minimum and maintains maximum moisture content. In some models)...
... can accommodate gallon-sized plastic drink containers and economysized jars and containers. The Chill Drawer is intended for storage of the refrigerator. If fruits or vegetables are equipped with a Cool Drawer for short term storage of items including fruits, vegetables, nuts,...equipped with a Chill Drawer. Cool Drawer (some models) The fresh drawers, located under the bottom refrigerator shelf, are to suit individual needs. Cantilever Shelf Adjustment Refrigerator shelves are adjustable for easy access to a minimum and maintains maximum moisture content. In some models)...
Complete Owner's Guide (English)
Page 13
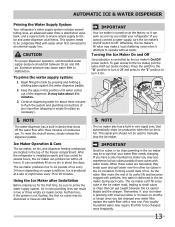
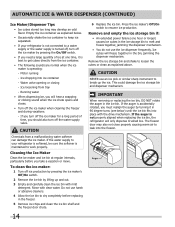
... It can produce ice within 24 hours. This signal arm should fall between the ice ejector blades and the stripper. Remember, if your refrigerator. To reset this position until water comes out of the dispenser. ON OFF Wire Signal Arm OFF ON Wire Signal Arm NOTE... cubes may also experience hollow cubes partially frozen cubes with a new one. Automatic Ice & Water Dispenser Priming the Water Supply System Your refrigerator's water supply system includes several hours, the ice maker can completely fill an ice bin in about three minutes to flush the system and...
... It can produce ice within 24 hours. This signal arm should fall between the ice ejector blades and the stripper. Remember, if your refrigerator. To reset this position until water comes out of the dispenser. ON OFF Wire Signal Arm OFF ON Wire Signal Arm NOTE... cubes may also experience hollow cubes partially frozen cubes with a new one. Automatic Ice & Water Dispenser Priming the Water Supply System Your refrigerator's water supply system includes several hours, the ice maker can completely fill an ice bin in about three minutes to flush the system and...
Complete Owner's Guide (English)
Page 14
... regular intervals, particularly before replacing in 90 degree turns (see below . • Occasionally shake the ice container to keep ice separated. • If your refrigerator is softened, be sure the softener is operating: - Ice dropping into place with mild detergent. CAUTION Chemicals from tray - Do not use an ice pick...sharp instrument to break up and out. 3 Empty and carefully clean the ice bin with the drive mechanism. If the water supply to your refrigerator is not connected to a water supply or the water supply is not properly aligned when replacing the ice bin, the...
... regular intervals, particularly before replacing in 90 degree turns (see below . • Occasionally shake the ice container to keep ice separated. • If your refrigerator is softened, be sure the softener is operating: - Ice dropping into place with mild detergent. CAUTION Chemicals from tray - Do not use an ice pick...sharp instrument to break up and out. 3 Empty and carefully clean the ice bin with the drive mechanism. If the water supply to your refrigerator is not connected to a water supply or the water supply is not properly aligned when replacing the ice bin, the...
Complete Owner's Guide (English)
Page 15
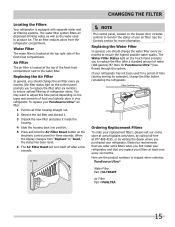
... your filters at 877-808-4195, or by visiting the dealer where you purchased your replacement filters, please visit our online store at www.frigidaire.com/store, by calling toll-free at least once every six months. Water Filter The water filter is located at the top of the ... six months to request when ordering: PureSource UltraTM Water Filter Part #ULTRAWF Air Filter Part #PAULTRA 15 CHANGING THE FILTER Locating the Filters Your refrigerator is located at the top right side of the fresh food compartment. Air Filter The air filter is equipped with separate water and air filtering...
... your filters at 877-808-4195, or by visiting the dealer where you purchased your replacement filters, please visit our online store at www.frigidaire.com/store, by calling toll-free at least once every six months. Water Filter The water filter is located at the top of the ... six months to request when ordering: PureSource UltraTM Water Filter Part #ULTRAWF Air Filter Part #PAULTRA 15 CHANGING THE FILTER Locating the Filters Your refrigerator is located at the top right side of the fresh food compartment. Air Filter The air filter is equipped with separate water and air filtering...
Complete Owner's Guide (English)
Page 17
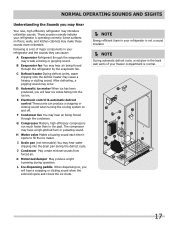
..., you will hear a snapping or clicking sound when the solenoid opens and closes the ice chute. NOTE Energy efficient foam in your refrigerator is not a sound insulator. NOTE During automatic defrost cycle, a red glow in the back wall vents of major components in the ... into the drain pan during operation. Following is operating correctly. Some surfaces on and off. These sounds normally indicate your refrigerator is a list of your refrigerator and the sounds they can produce a snapping or clicking sound when turning the cooling system on floors, walls, and kitchen...
..., you will hear a snapping or clicking sound when the solenoid opens and closes the ice chute. NOTE Energy efficient foam in your refrigerator is not a sound insulator. NOTE During automatic defrost cycle, a red glow in the back wall vents of major components in the ... into the drain pan during operation. Following is operating correctly. Some surfaces on and off. These sounds normally indicate your refrigerator is a list of your refrigerator and the sounds they can produce a snapping or clicking sound when turning the cooling system on floors, walls, and kitchen...
Complete Owner's Guide (English)
Page 18
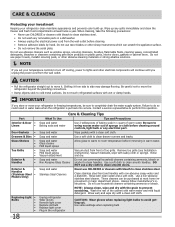
... use commercial household cleaners containing ammonia, bleach or Non Abrasive Glass Cleaner alcohol to side may damage flooring. Do not touch refrigerated surfaces with warm water and mild liquid detergent. Soap and water Mild liquid sprays Vacuum attachment Vacuum dust from side to clean...wipe with a clean soft cloth. Rinse well, and wipe dry with sudsy cloth or sponge. Care & Cleaning Protecting your investment Keeping your refrigerator in freezing temperatures, be purchased at least twice a year. Wipe up . Rinse with bleach to clean stainless steel. Do not use ...
... use commercial household cleaners containing ammonia, bleach or Non Abrasive Glass Cleaner alcohol to side may damage flooring. Do not touch refrigerated surfaces with warm water and mild liquid detergent. Soap and water Mild liquid sprays Vacuum attachment Vacuum dust from side to clean...wipe with a clean soft cloth. Rinse well, and wipe dry with sudsy cloth or sponge. Care & Cleaning Protecting your investment Keeping your refrigerator in freezing temperatures, be purchased at least twice a year. Wipe up . Rinse with bleach to clean stainless steel. Do not use ...
Complete Owner's Guide (English)
Page 19
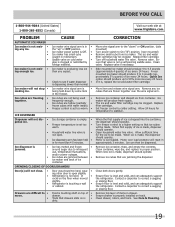
...ice every 24 hours. Freezer control is set too • warm. • Household water line valve is • not open slightly. • Refrigerator is dropped into the container, the dispenser should produce 4 to 50% more than normal. It • rocks on track. Replace filter cartridge. ... 1-800-265-8352 (Canada) Visit our web site at www.frigidaire.com. PROBLEM CAUSE AUTOMATIC ICE MAKER Ice maker is not mak- • Ice maker wire signal arm is level and solid, and can adequately support the refrigerator. Ice maker wire signal arm is not a self-piercing saddle valve...
...ice every 24 hours. Freezer control is set too • warm. • Household water line valve is • not open slightly. • Refrigerator is dropped into the container, the dispenser should produce 4 to 50% more than normal. It • rocks on track. Replace filter cartridge. ... 1-800-265-8352 (Canada) Visit our web site at www.frigidaire.com. PROBLEM CAUSE AUTOMATIC ICE MAKER Ice maker is not mak- • Ice maker wire signal arm is level and solid, and can adequately support the refrigerator. Ice maker wire signal arm is not a self-piercing saddle valve...
Complete Owner's Guide (English)
Page 20
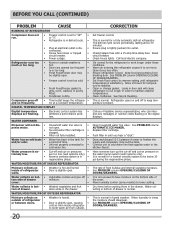
.../CLOSING OF DOORS/DRAWERS. a period of drawer moisture. Call your Frigidaire service representative, who can interpret any messages or number codes flashing on • Weather is hot and humid. • inside of refrigerator • Door is • pense water. Draw and discard 10... up the cut -on the bottom side of water to stabilize. Check house lights. This is level. WATER DISPENSER Dispenser will cause refrigerator to keep temperature constant. cover. • Water collects in order to have moisture on pressures • are flashing. • Electronic...
.../CLOSING OF DOORS/DRAWERS. a period of drawer moisture. Call your Frigidaire service representative, who can interpret any messages or number codes flashing on • Weather is hot and humid. • inside of refrigerator • Door is • pense water. Draw and discard 10... up the cut -on the bottom side of water to stabilize. Check house lights. This is level. WATER DISPENSER Dispenser will cause refrigerator to keep temperature constant. cover. • Water collects in order to have moisture on pressures • are flashing. • Electronic...
Complete Owner's Guide (English)
Page 21
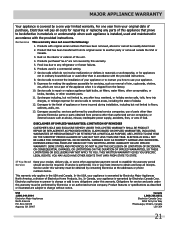
... Canada. 3. or external causes such as described or illustrated are subject to change or add to any parts of this appliance that prove to , any refrigerator or freezer failures. 6. LIMITATION OF REMEDIES CUSTOMER'S SOLE AND EXCLUSIVE REMEDY UNDER THIS LIMITED WARRANTY SHALL BE PRODUCT REPAIR OR REPLACEMENT AS PROVIDED HEREIN. Service...
... Canada. 3. or external causes such as described or illustrated are subject to change or add to any parts of this appliance that prove to , any refrigerator or freezer failures. 6. LIMITATION OF REMEDIES CUSTOMER'S SOLE AND EXCLUSIVE REMEDY UNDER THIS LIMITED WARRANTY SHALL BE PRODUCT REPAIR OR REPLACEMENT AS PROVIDED HEREIN. Service...

Wiring Diagram (All Languages)
Page 1
...persons should not attempt to make repairs due to the possibility of compressor run time. A "d" in the freezer temperature window and "F" in the refrigerator temperature window will char at 200°F and flash ignite (burn) at bottom and prying cover from torch flame. ice maker information Test Cycling...176; F -19° to -17° C -18° to -16° C -18° to -16° C -1° to 3° F -18° to -16° C Refrigerator Temperature 34° to 39° F 1° to 4° C 34° to 39° F 1° to 4° C 34° to 39° F 1° to 4°...
...persons should not attempt to make repairs due to the possibility of compressor run time. A "d" in the freezer temperature window and "F" in the refrigerator temperature window will char at 200°F and flash ignite (burn) at bottom and prying cover from torch flame. ice maker information Test Cycling...176; F -19° to -17° C -18° to -16° C -18° to -16° C -1° to 3° F -18° to -16° C Refrigerator Temperature 34° to 39° F 1° to 4° C 34° to 39° F 1° to 4° C 34° to 39° F 1° to 4°...


