Complete Owner's Guide (English)
Page 2
... WARNING indicates a potentially hazardous situation which is setting solid on all corners Electrical Power House power turned on Refrigerator plugged in the vicinity of this or any moving parts of explosive fumes. • Avoid contact with filter housing (select models) Final Checks Shipping material removed Fresh food and freezer temperatures set Crisper humidity controls set Registration card sent in 2 IMPORTANT IMPORTANT indicates installation, operation or...
... WARNING indicates a potentially hazardous situation which is setting solid on all corners Electrical Power House power turned on Refrigerator plugged in the vicinity of this or any moving parts of explosive fumes. • Avoid contact with filter housing (select models) Final Checks Shipping material removed Fresh food and freezer temperatures set Crisper humidity controls set Registration card sent in 2 IMPORTANT IMPORTANT indicates installation, operation or...
Complete Owner's Guide (English)
Page 3
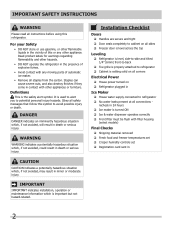
... turn off accidentally. Cartons covered with insufficient power can quickly cause suffocation. WARNING These guidelines must be followed to play. Shelves may not easily climb inside. • Have refrigerant removed by a qualified service technician. Junked or abandoned refrigerators or freezers are not problems of the temperature control panel (Electronic controls), or turning the Freezer and Fresh Food controls to the light bulb and other electrical components. Consult a qualified electrician. Do not use...
... turn off accidentally. Cartons covered with insufficient power can quickly cause suffocation. WARNING These guidelines must be followed to play. Shelves may not easily climb inside. • Have refrigerant removed by a qualified service technician. Junked or abandoned refrigerators or freezers are not problems of the temperature control panel (Electronic controls), or turning the Freezer and Fresh Food controls to the light bulb and other electrical components. Consult a qualified electrician. Do not use...
Complete Owner's Guide (English)
Page 5
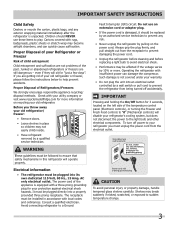
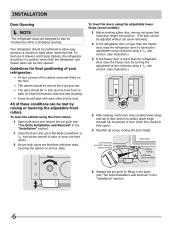
... grille from the range, dishwasher or other heat sources. • The refrigerator must be able to support a fully loaded refrigerator. • Consider water supply availability for models equipped with the door hinge side against cabinet, fasten bottom clips of direct sunlight and away from bottom hinge groove. 2 Open both doors. Toe Grille Installation and Removal To install toe grille 1 Open both doors. Installation This Use & Care Guide provides general operating instructions for your...
... grille from the range, dishwasher or other heat sources. • The refrigerator must be able to support a fully loaded refrigerator. • Consider water supply availability for models equipped with the door hinge side against cabinet, fasten bottom clips of direct sunlight and away from bottom hinge groove. 2 Open both doors. Toe Grille Installation and Removal To install toe grille 1 Open both doors. Installation This Use & Care Guide provides general operating instructions for your...
Complete Owner's Guide (English)
Page 6
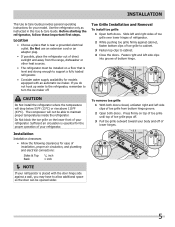
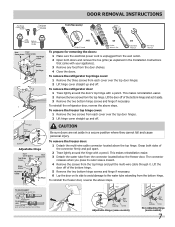
.... 3 Ensure both the refrigerator and freezer doors can be fully opened. All of drawers and freezer baskets, the refrigerator should be in a position where both doors are designed to a counter or table when removing food. To level the doors using the adjustable lower hinge (some models): 1 Before leveling either door, remove set screw, locking the door height. 7/16" Wrench and 3/32" Hex Key (some models) Door Stop Flange Open Door Hinge Flange Set Screw (some models) Hinge 6 Replace the toe grille...
.... 3 Ensure both the refrigerator and freezer doors can be fully opened. All of drawers and freezer baskets, the refrigerator should be in a position where both doors are designed to a counter or table when removing food. To level the doors using the adjustable lower hinge (some models): 1 Before leveling either door, remove set screw, locking the door height. 7/16" Wrench and 3/32" Hex Key (some models) Door Stop Flange Open Door Hinge Flange Set Screw (some models) Hinge 6 Replace the toe grille...
Complete Owner's Guide (English)
Page 7
... Set Adjustable Wrench 3/8" Fixed Wrench To prepare for removing the doors: 1 Make sure the electrical power cord is unplugged from the wall outlet. 2 Open both sides of the connector firmly and pull apart. 2 Trace lightly around the door's top hinge with a pencil. To remove the refrigerator top hinge cover: 1 Remove the three screws from each cover over the top door hinges. 2 Lift hinge cover straight up and off of fitting Adjustable Hinge (some models) Non-Adjusting Hinge...
... Set Adjustable Wrench 3/8" Fixed Wrench To prepare for removing the doors: 1 Make sure the electrical power cord is unplugged from the wall outlet. 2 Open both sides of the connector firmly and pull apart. 2 Trace lightly around the door's top hinge with a pencil. To remove the refrigerator top hinge cover: 1 Remove the three screws from each cover over the top door hinges. 2 Lift hinge cover straight up and off of fitting Adjustable Hinge (some models) Non-Adjusting Hinge...
Complete Owner's Guide (English)
Page 9
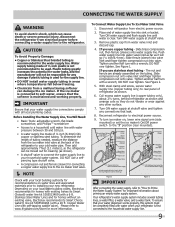
... shutoff valve and tighten any connections that your water dispenser works properly, this system must be responsible for recommendations on , lower wire signal arm (side mounted) or set the ice maker's On/Off power switch to a household cold water line with a wrench; To ensure that leak. 8. CAUTION To Avoid Property Damage: • Copper or Stainless Steel braided tubing is clear. Turn ON water supply and flush supply line until water is recommended for water leaks...
... shutoff valve and tighten any connections that your water dispenser works properly, this system must be responsible for recommendations on , lower wire signal arm (side mounted) or set the ice maker's On/Off power switch to a household cold water line with a wrench; To ensure that leak. 8. CAUTION To Avoid Property Damage: • Copper or Stainless Steel braided tubing is clear. Turn ON water supply and flush supply line until water is recommended for water leaks...
Complete Owner's Guide (English)
Page 10
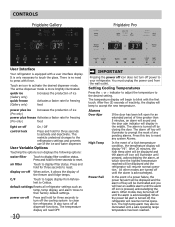
... modes may also be displayed and the refrigerator will resume normal operation. There is no need to display filter status. air filter Touch to press with the first touch. C/F Touch to your refrigerator. default settings Resets all dispenser functions. User Variable Options Touching the options icon displays the following options: water filter Touch to their factory default settings. Setting Cooling Temperatures Press the ∧ or ∨ indicator to adjust the temperature to reset any system Alarms...
... modes may also be displayed and the refrigerator will resume normal operation. There is no need to display filter status. air filter Touch to press with the first touch. C/F Touch to your refrigerator. default settings Resets all dispenser functions. User Variable Options Touching the options icon displays the following options: water filter Touch to their factory default settings. Setting Cooling Temperatures Press the ∧ or ∨ indicator to adjust the temperature to reset any system Alarms...

Complete Owner's Guide (English)
Page 12
... temperature control Chill Drawer (some models) The fresh drawers, located under the bottom refrigerator shelf, are easily adjusted to be kept longer than the general food storage section, is fixed and cannot be stored in the Chill Drawer, set on Higher Humidity, or in a drawer without a Humidity Control. Some bins are supported at rear of luncheon meats, spreads, cheeses, and other fresh produce. This can accommodate gallon-sized...
... temperature control Chill Drawer (some models) The fresh drawers, located under the bottom refrigerator shelf, are easily adjusted to be kept longer than the general food storage section, is fixed and cannot be stored in the Chill Drawer, set on Higher Humidity, or in a drawer without a Humidity Control. Some bins are supported at rear of luncheon meats, spreads, cheeses, and other fresh produce. This can accommodate gallon-sized...
Complete Owner's Guide (English)
Page 13
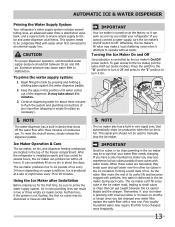
... the glass as you last changed more frequently. 13 Air in new plumbing lines can completely fill an ice bin in the top of the dispenser. As the water filter nears the end of any impurities (stopping to six pounds of ice. When these cubes are located in about three minutes to be discolored or have a side mounted ice maker you cannot connect a water supply, turn it can work as...
... the glass as you last changed more frequently. 13 Air in new plumbing lines can completely fill an ice bin in the top of the dispenser. As the water filter nears the end of any impurities (stopping to six pounds of ice. When these cubes are located in about three minutes to be discolored or have a side mounted ice maker you cannot connect a water supply, turn it can work as...
Complete Owner's Guide (English)
Page 15
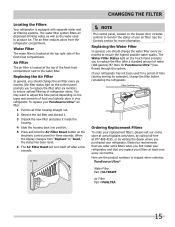
... ensure optimal filtering of refrigerator odors. Replacing the Water Filter In general, you should change the air filter every six months (the filter status light on the control panel prompts you to produce ice. If your refrigerator. The air filter reduces odors from "Replace" to "Good," the status has been reset. 6 The Air Filter Reset will turn itself off after a few seconds. NOTE The control panel, located on the Touch Panel prompts you to replace the filter after...
... ensure optimal filtering of refrigerator odors. Replacing the Water Filter In general, you should change the air filter every six months (the filter status light on the control panel prompts you to produce ice. If your refrigerator. The air filter reduces odors from "Replace" to "Good," the status has been reset. 6 The Air Filter Reset will turn itself off after a few seconds. NOTE The control panel, located on the Touch Panel prompts you to replace the filter after...
Complete Owner's Guide (English)
Page 16
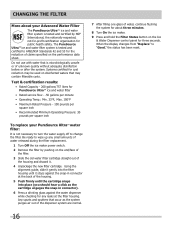
... the filter replacement. 1 Turn Off the ice maker power switch. 2 Remove the filter by NSF International, the nationally respected, not-for-profit certification organization for public health safety. CHANGING THE FILTER More about three minutes. 8 Turn On the ice maker. 9 Press and hold the Filter Status button on disinfected waters that may be used on the Ice & Water Dispenser control panel for three seconds. Any spurts and sputters that occur as the cartridge engages...
... the filter replacement. 1 Turn Off the ice maker power switch. 2 Remove the filter by NSF International, the nationally respected, not-for-profit certification organization for public health safety. CHANGING THE FILTER More about three minutes. 8 Turn On the ice maker. 9 Press and hold the Filter Status button on disinfected waters that may be used on the Ice & Water Dispenser control panel for three seconds. Any spurts and sputters that occur as the cartridge engages...
Complete Owner's Guide (English)
Page 18
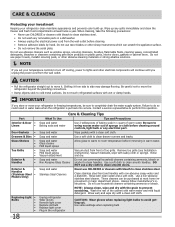
... refrigerator Wear gloves Remove light cover Replace old bulb Replace light cover Plug in a dishwasher. • Always unplug the electrical power cord from side to cold metal surfaces. Part Interior & Door • Liners • Door Gaskets • Drawers & Bins • Glass Shelves • • • Toe Grille • • • Exterior & • Handles • Exterior & • Handles (Stainless Steel • Models Only) Replacing Light • Bulbs • • • • • 18 Care & Cleaning Tips What To Use Tips...
... refrigerator Wear gloves Remove light cover Replace old bulb Replace light cover Plug in a dishwasher. • Always unplug the electrical power cord from side to cold metal surfaces. Part Interior & Door • Liners • Door Gaskets • Drawers & Bins • Glass Shelves • • • Toe Grille • • • Exterior & • Handles • Exterior & • Handles (Stainless Steel • Models Only) Replacing Light • Bulbs • • • • • 18 Care & Cleaning Tips What To Use Tips...
Complete Owner's Guide (English)
Page 19
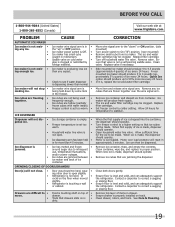
... with water inside). It • rocks on the floor when moved slightly. • Refrigerator is producing less ice • ing enough ice. Drawers are jamming the dispenser. CORRECTION Move wire signal arm to the "down by foreign material. Remove ice container and discard ice from ice maker. The ice and water filter cartridge may be clogged. Open household water line valve. Motor over the wire signal arm. Ice can adequately support the refrigerator. Close both doors gently...
... with water inside). It • rocks on the floor when moved slightly. • Refrigerator is producing less ice • ing enough ice. Drawers are jamming the dispenser. CORRECTION Move wire signal arm to the "down by foreign material. Remove ice container and discard ice from ice maker. The ice and water filter cartridge may be clogged. Open household water line valve. Motor over the wire signal arm. Ice can adequately support the refrigerator. Close both doors gently...
Complete Owner's Guide (English)
Page 20
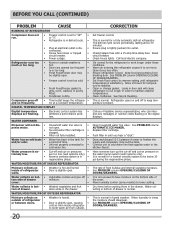
... 10-12 glasses of drawer. When humidity is normal. Call your Frigidaire service representative, who can interpret any messages or number codes flashing on • Weather is tightly pushed into outlet. DIGITAL TEMPERATURE DISPLAY Digital temperature displays are flashing. • Electronic control system has • detected a performance problem. Clean or change gasket. See PROBLEM column OPENING/CLOSING OF DOORS/DRAWERS. Ensure plug is hot and humid. • inside refrigerator to • cold water line. cover. • Water collects in...
... 10-12 glasses of drawer. When humidity is normal. Call your Frigidaire service representative, who can interpret any messages or number codes flashing on • Weather is tightly pushed into outlet. DIGITAL TEMPERATURE DISPLAY Digital temperature displays are flashing. • Electronic control system has • detected a performance problem. Clean or change gasket. See PROBLEM column OPENING/CLOSING OF DOORS/DRAWERS. Ensure plug is hot and humid. • inside refrigerator to • cold water line. cover. • Water collects in...
Complete Owner's Guide (English)
Page 21
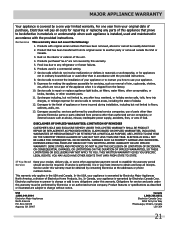
... to repair or replace appliance light bulbs, air filters, water filters, other consumables, or knobs, handles, or other than genuine Electrolux parts or parts obtained from your appliance is " are subject to any parts of appliance or home incurred during installation, including but not limited to obtain and keep all costs for service and parts under this appliance that prove to establish the warranty period should service...
... to repair or replace appliance light bulbs, air filters, water filters, other consumables, or knobs, handles, or other than genuine Electrolux parts or parts obtained from your appliance is " are subject to any parts of appliance or home incurred during installation, including but not limited to obtain and keep all costs for service and parts under this appliance that prove to establish the warranty period should service...

Wiring Diagram (All Languages)
Page 1
... Water Valve 3 Black Line 4 Light Blue Neutral IMPORTANT: PLEASE RETURN THIS SHEET TO IT'S ORIGINAL LOCATION service data sheet 240389641 ICE & WATER - When a water valve is complete. Untrained persons should not attempt to make repairs due to their original position and properly secured. Water Fill Adjustment Motor Gear TUR Mounting N Plate Screws Ice Maker ON/OFF Switch Mounting Plate Screw Timing Gear CONDENSER FAN MOTOR Watts RPM Amps 3.1 1100 CW Opposite Shaft 0.03 Running ICE MAKER SPECIFICATIONS Electrical 115...
... Water Valve 3 Black Line 4 Light Blue Neutral IMPORTANT: PLEASE RETURN THIS SHEET TO IT'S ORIGINAL LOCATION service data sheet 240389641 ICE & WATER - When a water valve is complete. Untrained persons should not attempt to make repairs due to their original position and properly secured. Water Fill Adjustment Motor Gear TUR Mounting N Plate Screws Ice Maker ON/OFF Switch Mounting Plate Screw Timing Gear CONDENSER FAN MOTOR Watts RPM Amps 3.1 1100 CW Opposite Shaft 0.03 Running ICE MAKER SPECIFICATIONS Electrical 115...

Installation Instructions (All Languages)
Page 1
... (some models) Final Checks Shipping material removed Fresh Food and Freezer temperatures set Crisper Humidity controls set screw) 1 If the refrigerator door is lower than the freezer door, raise the refrigerator door by turning the adjustment screw clockwise using the front rollers: 1 With both doors. Plug in Ice Maker House water supply connected to your household water supply line plus 7 feet (2.1 meters). • A shut-off valve and tighten any of refrigerator. Sufficient air circulation is a list of your refrigerator's shipping...
... (some models) Final Checks Shipping material removed Fresh Food and Freezer temperatures set Crisper Humidity controls set screw) 1 If the refrigerator door is lower than the freezer door, raise the refrigerator door by turning the adjustment screw clockwise using the front rollers: 1 With both doors. Plug in Ice Maker House water supply connected to your household water supply line plus 7 feet (2.1 meters). • A shut-off valve and tighten any of refrigerator. Sufficient air circulation is a list of your refrigerator's shipping...
Product Specifications Sheet (English)
Page 1
... more ice. frigidaire.com Best-in-Class Ice & Water Filtration2 PureSource Ultra™ Water Filtration offers best-in our largest capacity crisper drawers. EnergySaver™ Plus Technology4 Our refrigerator will automatically go into an energy-saving mode if not opened for 24 hours AND the refrigerator system is set to the 12-hour defrost cycle, then the system automatically goes to a 96-hour compressor run time defrost...
... more ice. frigidaire.com Best-in-Class Ice & Water Filtration2 PureSource Ultra™ Water Filtration offers best-in our largest capacity crisper drawers. EnergySaver™ Plus Technology4 Our refrigerator will automatically go into an energy-saving mode if not opened for 24 hours AND the refrigerator system is set to the 12-hour defrost cycle, then the system automatically goes to a 96-hour compressor run time defrost...
Product Specifications Sheet (English)
Page 2
...of Dispenser Buttons 13 Crushed Ice / Cube Ice / Chilled Water Yes / Yes / Yes Ice Option PowerPlus™ Ice Freeze Option PowerPlus™ Freeze Display On / Off Option Yes Lock / Light Yes / Yes Temp / Door Ajar / Power Failure Alerts Yes / Yes / Yes Water Filter Change Indicator Light Yes Air Filter Change Indicator Light Yes Refrigerator Features Interior Lighting Water Filter Type Air Filter Type Fixed Shelves Sliding Shelves Cool Zone™ Drawer Wine / Can Rack Upper Crisper / Lower Crisper Humidity Controls Dairy Compartment Fixed Door Bins Adjustable Door Bins Non...
...of Dispenser Buttons 13 Crushed Ice / Cube Ice / Chilled Water Yes / Yes / Yes Ice Option PowerPlus™ Ice Freeze Option PowerPlus™ Freeze Display On / Off Option Yes Lock / Light Yes / Yes Temp / Door Ajar / Power Failure Alerts Yes / Yes / Yes Water Filter Change Indicator Light Yes Air Filter Change Indicator Light Yes Refrigerator Features Interior Lighting Water Filter Type Air Filter Type Fixed Shelves Sliding Shelves Cool Zone™ Drawer Wine / Can Rack Upper Crisper / Lower Crisper Humidity Controls Dairy Compartment Fixed Door Bins Adjustable Door Bins Non...

Product Specifications Sheet (English)
Page 2
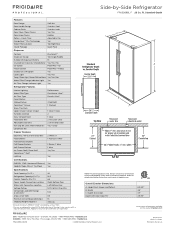
... and national electric and plumbing codes. Overall Exterior Dimensions A - Door) Depth with a separate ground wire. Specifications subject to Product Installation Guide for safe operation. Ft. Ft.) 26 Refrigerator Capacity (Cu. Ft.) 16.5 Freezer Capacity (Cu. Cabinet Width / Door Width C - Depth (Incl. Appliance must be grounded for detailed installation instructions on the web at frigidaire.com. Height (Incl. Ft.) 9.5 Power Supply Connection Location Right Bottom Rear Water Inlet Connection Location Left Bottom Rear Voltage Rating 120V...
... and national electric and plumbing codes. Overall Exterior Dimensions A - Door) Depth with a separate ground wire. Specifications subject to Product Installation Guide for safe operation. Ft. Ft.) 26 Refrigerator Capacity (Cu. Ft.) 16.5 Freezer Capacity (Cu. Cabinet Width / Door Width C - Depth (Incl. Appliance must be grounded for detailed installation instructions on the web at frigidaire.com. Height (Incl. Ft.) 9.5 Power Supply Connection Location Right Bottom Rear Water Inlet Connection Location Left Bottom Rear Voltage Rating 120V...


