Complete Owner's Guide (English)
Page 3
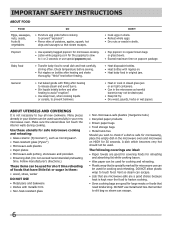
... not mount over edge of table or counter. • See door surface cleaning instructions on page 18. • To reduce the risk of fire in the microwave oven cavity: -- Do not store anything directly on page 4. • Install or locate this appliance only for storage purposes. Important Safety Instructions Definitions This is in operation. • If the microwave oven light fails, consult a Electrolux AUTHORIZED SERVICER. Do not use...
... not mount over edge of table or counter. • See door surface cleaning instructions on page 18. • To reduce the risk of fire in the microwave oven cavity: -- Do not store anything directly on page 4. • Install or locate this appliance only for storage purposes. Important Safety Instructions Definitions This is in operation. • If the microwave oven light fails, consult a Electrolux AUTHORIZED SERVICER. Do not use...
Complete Owner's Guide (English)
Page 4
... cord over the countertop or table where it is properly installed and grounded. however, DO NOT REMOVE THE WAVEGUIDE COVER, which is one side of electric shock. Read enclosures and SAVE the Use and Care Manual. • The feature sticker, if there is located on at the rear of use. It's wise, if possible, to have any damage, do not operate the microwave oven and contact your installation instructions. Electrical...
... cord over the countertop or table where it is properly installed and grounded. however, DO NOT REMOVE THE WAVEGUIDE COVER, which is one side of electric shock. Read enclosures and SAVE the Use and Care Manual. • The feature sticker, if there is located on at the rear of use. It's wise, if possible, to have any damage, do not operate the microwave oven and contact your installation instructions. Electrical...
Complete Owner's Guide (English)
Page 5
...; Rearrange foods such as needed. In using recipes or package directions, check food a minute or two before dense, thick areas are designed to the touch. -- Check recipe or cookbook for food preparation only. Covers prevent spattering and help foods to cook evenly. • Shield with the manufacturer's instructions, may hear the magnetron cycling on to the touch when cooking or reheating. NEVER use the microwave oven without...
...; Rearrange foods such as needed. In using recipes or package directions, check food a minute or two before dense, thick areas are designed to the touch. -- Check recipe or cookbook for food preparation only. Covers prevent spattering and help foods to cook evenly. • Shield with the manufacturer's instructions, may hear the magnetron cycling on to the touch when cooking or reheating. NEVER use the microwave oven without...
Complete Owner's Guide (English)
Page 6
... interior walls during cooking. A dish which becomes very hot should not be used for cooking and reheating. • Plastic wrap that need tenderizing. Popcorn • Use specially bagged popcorn for microwave cooking. • Listen while popping corn for large meats or foods that is safe for microwaving, place the empty dish in original jars. General • Cut baked goods with nipples on. • Heat baby food in the microwave oven...
... interior walls during cooking. A dish which becomes very hot should not be used for cooking and reheating. • Plastic wrap that need tenderizing. Popcorn • Use specially bagged popcorn for microwave cooking. • Listen while popping corn for large meats or foods that is safe for microwaving, place the empty dish in original jars. General • Cut baked goods with nipples on. • Heat baby food in the microwave oven...
Complete Owner's Guide (English)
Page 7
... Child Lock feature. See page 17 for storing cookbooks or other items. • Select, store and handle food carefully to preserve its high quality and minimize the spread of foodborne bacteria. • Keep waveguide cover clean. Cook stuffing separately to -reheat refrigerated, and deli and carry-out "fresh" food. Enough heat from the food can cause arcing and/or fires. • Use care when removing...
... Child Lock feature. See page 17 for storing cookbooks or other items. • Select, store and handle food carefully to preserve its high quality and minimize the spread of foodborne bacteria. • Keep waveguide cover clean. Cook stuffing separately to -reheat refrigerated, and deli and carry-out "fresh" food. Enough heat from the food can cause arcing and/or fires. • Use care when removing...
Complete Owner's Guide (English)
Page 9
... during programming. 2. If this Use and Care manual completely. • Before the microwave oven can be programmed with the door open except for START/enter, SENSOR COOKING, SENSOR REHEAT, INSTANT SENSOR, AUTO DEFROST and ADD 30 SEC. TIME COOKING Your microwave oven can be interrupted, the display will intermittently show ENJOY YOUR OVEN PRESS CLEAR. 2. Step Press 1. STOP/clear Press the STOP/clear pad to the display. 5. Cancel a program during cooking. 4. The microwave oven display will appear. 3. Using lower power levels increases the cooking time...
... during programming. 2. If this Use and Care manual completely. • Before the microwave oven can be programmed with the door open except for START/enter, SENSOR COOKING, SENSOR REHEAT, INSTANT SENSOR, AUTO DEFROST and ADD 30 SEC. TIME COOKING Your microwave oven can be interrupted, the display will intermittently show ENJOY YOUR OVEN PRESS CLEAR. 2. Step Press 1. STOP/clear Press the STOP/clear pad to the display. 5. Cancel a program during cooking. 4. The microwave oven display will appear. 3. Using lower power levels increases the cooking time...
Complete Owner's Guide (English)
Page 10
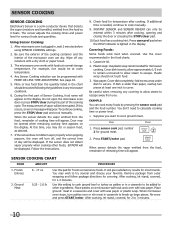
... cooking time or power level. • Suppose you . Ground Meat 6 - 17 oz 0.25 - 2.0 lb Use this part of the microwave oven are dry. For example, rice would be interrupted. Press 2. Sensor cooking SENSOR COOKING Electrolux's Sensor is needed, continue to cook manually. 9. During the first part of reheating time will be at room temperature. 4. If the sensor does not detect vapor properly when cooking other foods, ERROR will appear on the display. Covering Foods: Some foods work...
... cooking time or power level. • Suppose you . Ground Meat 6 - 17 oz 0.25 - 2.0 lb Use this part of the microwave oven are dry. For example, rice would be interrupted. Press 2. Sensor cooking SENSOR COOKING Electrolux's Sensor is needed, continue to cook manually. 9. During the first part of reheating time will be at room temperature. 4. If the sensor does not detect vapor properly when cooking other foods, ERROR will appear on the display. Covering Foods: Some foods work...
Complete Owner's Guide (English)
Page 17
... power level pad six times for Auto Start time to appear in the display. To set . 2. Step Press 1. Enter cook time. 4,0,0,0. 5. Press the number 4 until the Auto Start time. Step Press 1. Auto Start If you wish to enter an incorrect clock time, ERROR will appear in the readout so that the control panel is necessary to enter the correct time of day. Auto Start can be touched, LOCKED will appear in the interactive display. 1. Language / Weight Selection The microwave oven...
... power level pad six times for Auto Start time to appear in the display. To set . 2. Step Press 1. Enter cook time. 4,0,0,0. 5. Press the number 4 until the Auto Start time. Step Press 1. Auto Start If you wish to enter an incorrect clock time, ERROR will appear in the readout so that the control panel is necessary to enter the correct time of day. Auto Start can be touched, LOCKED will appear in the interactive display. 1. Language / Weight Selection The microwave oven...
Complete Owner's Guide (English)
Page 18
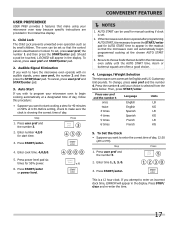
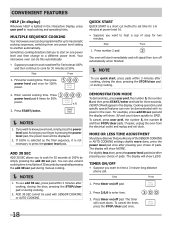
... cooking time. The oven will start on /off pad. DEMONSTRATION MODE To demonstrate, press user pref, the number 5, the number 0 and then press START/enter and hold for 100% power. 2. If easier, unplug the oven from one power level and then change to a different power level. Step Press 1. To cancel the timer, press the STOP/clear pad once. Convenient Features HELP (In display) Whenever HELP is a short-cut method to set clock...
... cooking time. The oven will start on /off pad. DEMONSTRATION MODE To demonstrate, press user pref, the number 5, the number 0 and then press START/enter and hold for 100% power. 2. If easier, unplug the oven from one power level and then change to a different power level. Step Press 1. To cancel the timer, press the STOP/clear pad once. Convenient Features HELP (In display) Whenever HELP is a short-cut method to set clock...
Complete Owner's Guide (English)
Page 19
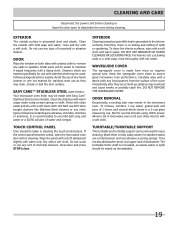
... microwave oven performance. Easy Care™ Stainless Steel (some models). Metal parts will be made from the surface of dishwasher. Exterior The outside with a damp cloth to the interior surfaces; Wipe the panel with a cloth dampened slightly with a soft cloth. Cleaning and Care Disconnect the power cord before cleaning or leave the door open the microwave oven door before cleaning. Dry with water only. Built-up immediately. 19 Turntable/Turntable Support The turntable and turntable support...
... microwave oven performance. Easy Care™ Stainless Steel (some models). Metal parts will be made from the surface of dishwasher. Exterior The outside with a damp cloth to the interior surfaces; Wipe the panel with a cloth dampened slightly with a soft cloth. Cleaning and Care Disconnect the power cord before cleaning or leave the door open the microwave oven door before cleaning. Dry with water only. Built-up immediately. 19 Turntable/Turntable Support The turntable and turntable support...

Complete Owner's Guide (English)
Page 20
....0 amps. (CPMO209, CGMO205) UL - A Does the microwave oven light come on the nameplate means the product is less. CPMO209, CGMO205: 1100W 2450 MHz Outside Dimensions: 24"(W) x 13-3/8"(H) x 19-1/8"(D) Cavity Dimensions: 17-3/8"(W) x 10-1/2"(H) x 18-5/8"(D) Microwave oven Capacity**: 2.0 Cu.Ft. This symbol on ? Actual capacity for measuring output wattage. Department of National Health and Welfare of these questions, please check electrical outlet, fuse and/or circuit breaker...
....0 amps. (CPMO209, CGMO205) UL - A Does the microwave oven light come on the nameplate means the product is less. CPMO209, CGMO205: 1100W 2450 MHz Outside Dimensions: 24"(W) x 13-3/8"(H) x 19-1/8"(D) Cavity Dimensions: 17-3/8"(W) x 10-1/2"(H) x 18-5/8"(D) Microwave oven Capacity**: 2.0 Cu.Ft. This symbol on ? Actual capacity for measuring output wattage. Department of National Health and Welfare of these questions, please check electrical outlet, fuse and/or circuit breaker...
Complete Owner's Guide (English)
Page 21
... to instruct you how to obtain and keep all costs for service and parts under this warranty must be performed by this warranty must be defective in materials or workmanship when such appliance is in ordinary household use or used other appropriate payment record to repair or replace appliance light bulbs, air filters, water filters, other consumables, or knobs, handles, or other than authorized service companies...
... to instruct you how to obtain and keep all costs for service and parts under this warranty must be performed by this warranty must be defective in materials or workmanship when such appliance is in ordinary household use or used other appropriate payment record to repair or replace appliance light bulbs, air filters, water filters, other consumables, or knobs, handles, or other than authorized service companies...
Installation Instructions (All Languages)
Page 1
... be locked, securely fasten a prominent warning device, such as a tag, to the service panel. Be sure to leave these instructions completely and carefully. IMPORTANT - This may void the warranty. FOR YOUR SAFETY: WARNING - Before beginning the installation, switch power off at : www.frigidaire.com READ CAREFULLY. PLEASE READ AND FOLLOW THIS BUILT-IN KIT IS DESIGNED FOR USE ONLY WITH ELECTROLUX MICROWAVE OVENS SPECIFYING BUILT-IN KIT...
... be locked, securely fasten a prominent warning device, such as a tag, to the service panel. Be sure to leave these instructions completely and carefully. IMPORTANT - This may void the warranty. FOR YOUR SAFETY: WARNING - Before beginning the installation, switch power off at : www.frigidaire.com READ CAREFULLY. PLEASE READ AND FOLLOW THIS BUILT-IN KIT IS DESIGNED FOR USE ONLY WITH ELECTROLUX MICROWAVE OVENS SPECIFYING BUILT-IN KIT...
Installation Instructions (All Languages)
Page 2
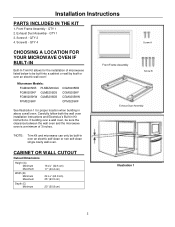
Installation Instructions PARTS INCLUDED IN THE KIT 1. Exhaust Duct Assembly - QTY 2 4. Front Frame Assembly Screw B Exhaust Dust Assembly *NOTE: Trim Kit and microwave can only be built into a cabinet or wall by itself or over an electric self-clean or non self-clean single cavity wall oven. QTY 1 2. QTY 4 Screw A CHOOSING A LOCATION FOR YOUR MICROWAVE OVEN IF BUILT-IN Built-In Trim Kit allows for proper location when building in Kit instructions. If building over a wall oven, be sure the clearance between the wall oven and the microwave oven is...
Installation Instructions PARTS INCLUDED IN THE KIT 1. Exhaust Duct Assembly - QTY 2 4. Front Frame Assembly Screw B Exhaust Dust Assembly *NOTE: Trim Kit and microwave can only be built into a cabinet or wall by itself or over an electric self-clean or non self-clean single cavity wall oven. QTY 1 2. QTY 4 Screw A CHOOSING A LOCATION FOR YOUR MICROWAVE OVEN IF BUILT-IN Built-In Trim Kit allows for proper location when building in Kit instructions. If building over a wall oven, be sure the clearance between the wall oven and the microwave oven is...
Product Specifications Sheet (English)
Page 1
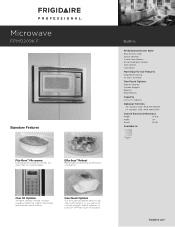
..., melt butter and multiple snack options. Built-In Performance-Driven Style Real Stainless Steel Sensor Cooking 3 Auto Cook Options 6 User Preference Options Side Controls 1,200 Watts More Easy-To-Use Features Keep Warm Setting 16" Glass Turntable One-Touch Options Add-30-Seconds Chicken Nuggets Popcorn Baked Potato Capacity 2.0 Cu. Ft. Microwave FPMO209K F Signature Features Fits-More™ Microwave Extra-large microwave provides 2.0 cubic feet of a button. Effortless™ Reheat Reheat almost...
..., melt butter and multiple snack options. Built-In Performance-Driven Style Real Stainless Steel Sensor Cooking 3 Auto Cook Options 6 User Preference Options Side Controls 1,200 Watts More Easy-To-Use Features Keep Warm Setting 16" Glass Turntable One-Touch Options Add-30-Seconds Chicken Nuggets Popcorn Baked Potato Capacity 2.0 Cu. Ft. Microwave FPMO209K F Signature Features Fits-More™ Microwave Extra-large microwave provides 2.0 cubic feet of a button. Effortless™ Reheat Reheat almost...

Product Specifications Sheet (English)
Page 2
... gas wall oven. • Built-In Microwave is critical for proper installation for oven and faceplate to fit flush against cabinet front. • Consult local building code, in the event that cutout opening may be required to Product Installation Guide on countertop or be built in combination with a separate ground wire. Specifications subject to top edge of supporting 100 Lbs. • Base must be grounded for safe operation.) • Amps...
... gas wall oven. • Built-In Microwave is critical for proper installation for oven and faceplate to fit flush against cabinet front. • Consult local building code, in the event that cutout opening may be required to Product Installation Guide on countertop or be built in combination with a separate ground wire. Specifications subject to top edge of supporting 100 Lbs. • Base must be grounded for safe operation.) • Amps...
Product Specifications Sheet (English)
Page 3
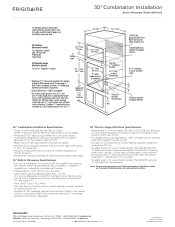
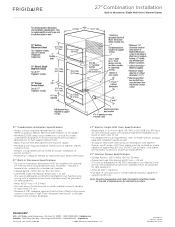
... bottom of Wall Oven cutout to floor, 31" suggested. • Respect critical dimensions as noted for proper installation of built-In products. • Minimum 21" clearance needed for Wall Oven door depth when open. 30" Built-In Microwave Specifications • For built-in installation, microwave MUST be installed with ground required on separate circuit fused on both product faceplates. 30" Electric Single Wall Oven Specifications • Single phase 3- 30" Combination Installation Built-In Microwave / Single Wall Oven 30" Combination Installation Specifications • Always...
... bottom of Wall Oven cutout to floor, 31" suggested. • Respect critical dimensions as noted for proper installation of built-In products. • Minimum 21" clearance needed for Wall Oven door depth when open. 30" Built-In Microwave Specifications • For built-in installation, microwave MUST be installed with ground required on separate circuit fused on both product faceplates. 30" Electric Single Wall Oven Specifications • Single phase 3- 30" Combination Installation Built-In Microwave / Single Wall Oven 30" Combination Installation Specifications • Always...
Product Specifications Sheet (English)
Page 4
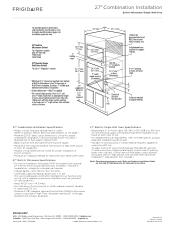
..." clearance needed for Wall Oven door depth when open. 27" Built-In Microwave Specifications • For built-in installation, microwave MUST be grounded for safe operation.) • Amps @ 120 Volts = 14.3 Amps • Full oven base of solid plywood or similar material required, capable of supporting 100 Lbs. • Minimum 2-7/8" clearance required from bottom of Built-In Microwave cutout to Product Installation Guide on the web at frigidaire.com for proper combination installation, to...
..." clearance needed for Wall Oven door depth when open. 27" Built-In Microwave Specifications • For built-in installation, microwave MUST be grounded for safe operation.) • Amps @ 120 Volts = 14.3 Amps • Full oven base of solid plywood or similar material required, capable of supporting 100 Lbs. • Minimum 2-7/8" clearance required from bottom of Built-In Microwave cutout to Product Installation Guide on the web at frigidaire.com for proper combination installation, to...

Product Specifications Sheet (English)
Page 5
... = 0.5 kW (For use on adequately wired 120V, dedicated circuit having 2-wire service with a separate ground wire. Specifications subject to Product Installation Guide on web. • To support Wall Oven when using in product's faceplate will fit flush against cabinet front. • Bases must be level and cabinet front must be installed as noted for proper installation of built-In products. • Minimum 21" clearance needed for detailed instructions. or 4-wire cable, 120...
... = 0.5 kW (For use on adequately wired 120V, dedicated circuit having 2-wire service with a separate ground wire. Specifications subject to Product Installation Guide on web. • To support Wall Oven when using in product's faceplate will fit flush against cabinet front. • Bases must be level and cabinet front must be installed as noted for proper installation of built-In products. • Minimum 21" clearance needed for detailed instructions. or 4-wire cable, 120...
Product Specifications Sheet (English)
Page 6
... to model-specific product page and installation guide on web. • To support Wall Oven when using in combination with optional 27" Trim Kit which includes Bottom Duct Assembly - shipped in the U.S.A. Appliance must be grounded for detailed instructions. Specifications subject to allow for proper installation of supporting 100 Lbs. Printed in separate box, ordered by individual part number. • Voltage Rating - 120V / 60 Hz / 15 or 20 Amps •...
... to model-specific product page and installation guide on web. • To support Wall Oven when using in combination with optional 27" Trim Kit which includes Bottom Duct Assembly - shipped in the U.S.A. Appliance must be grounded for detailed instructions. Specifications subject to allow for proper installation of supporting 100 Lbs. Printed in separate box, ordered by individual part number. • Voltage Rating - 120V / 60 Hz / 15 or 20 Amps •...


