
Complete Owner's Guide (English)
Page 1
All about the Use &Care of your Refrigerator 242008000 (February 2009) TABLE OF CONTENTS Important Safety Instructions 2 Installation 4 Door Removal Instructions 5 Connecting Water Supply 7 Ice Service 8 Controls 8 Normal Operating Sounds and Sights 9 Care and Cleaning 10 Before you Call 11 Major Appliance Warranty 12 www.frigidaire.com USA 1-800-944-9044 www.frigidaire.ca Canada 1-800-265-8352
All about the Use &Care of your Refrigerator 242008000 (February 2009) TABLE OF CONTENTS Important Safety Instructions 2 Installation 4 Door Removal Instructions 5 Connecting Water Supply 7 Ice Service 8 Controls 8 Normal Operating Sounds and Sights 9 Care and Cleaning 10 Before you Call 11 Major Appliance Warranty 12 www.frigidaire.com USA 1-800-944-9044 www.frigidaire.ca Canada 1-800-265-8352

Complete Owner's Guide (English)
Page 2
... top Leveling Refrigerator is level, side-to-side and tilted 1/4" (6mm) front-to-back Toe grille is properly attached to refrigerator Cabinet is turned ON Ice & water dispenser operates correctly Front filter must be flush with filter housing (select models) Final Checks Shipping material removed Fresh food and freezer temperatures set Crisper humidity controls set Registration card sent in Ice Maker House water supply connected...
... top Leveling Refrigerator is level, side-to-side and tilted 1/4" (6mm) front-to-back Toe grille is properly attached to refrigerator Cabinet is turned ON Ice & water dispenser operates correctly Front filter must be flush with filter housing (select models) Final Checks Shipping material removed Fresh food and freezer temperatures set Crisper humidity controls set Registration card sent in Ice Maker House water supply connected...

Complete Owner's Guide (English)
Page 3
... refrigerator/ freezer: • Remove doors. • Leave shelves in accordance with a three-prong grounding plug for three (3) seconds, located on the power cord. Avoid connecting refrigerator to prevent any exterior wrapping material immediately after the refrigerator is equipped with local codes and ordinances. The power cord of the temperature control panel (Electronic controls), or turning the Freezer and Fresh Food controls to your old refrigerator. Do not use these items to sudden temperature change. 3 Operating...
... refrigerator/ freezer: • Remove doors. • Leave shelves in accordance with a three-prong grounding plug for three (3) seconds, located on the power cord. Avoid connecting refrigerator to prevent any exterior wrapping material immediately after the refrigerator is equipped with local codes and ordinances. The power cord of the temperature control panel (Electronic controls), or turning the Freezer and Fresh Food controls to your old refrigerator. Do not use these items to sudden temperature change. 3 Operating...

Complete Owner's Guide (English)
Page 4
..., proper air circulation, and plumbing and electrical connections: Sides & Top Back 3/8 inch 1 inch NOTE If your refrigerator. Adjustable Front Roller (some models) 4 Installation This Use & Care Guide provides general operating instructions for your refrigerator: 1 Remove toe grille. 2 Use flat-blade screwdriver or 3/8" socket wrench to adjust front rollers. The refrigerator should slope 1/4" to 1/2" from side-to turn the ice maker off. Your refrigerator is level and strong enough to support a fully loaded refrigerator. • Consider water supply...
..., proper air circulation, and plumbing and electrical connections: Sides & Top Back 3/8 inch 1 inch NOTE If your refrigerator. Adjustable Front Roller (some models) 4 Installation This Use & Care Guide provides general operating instructions for your refrigerator: 1 Remove toe grille. 2 Use flat-blade screwdriver or 3/8" socket wrench to adjust front rollers. The refrigerator should slope 1/4" to 1/2" from side-to turn the ice maker off. Your refrigerator is level and strong enough to support a fully loaded refrigerator. • Consider water supply...

Complete Owner's Guide (English)
Page 5
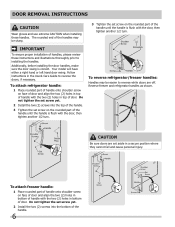
.... Set door aside. 3 Unscrew center hinge pin using adjustable wrench. Top Hinge Cover Top Hinge Door Stop Screw Door Stop Washer Hinge Pin Bottom Hinge Screws Toe Grille Door removal and reversal instructions: 1 Remove toe grille. 2 Remove top hinge cover. Move hinge pin to other . Ensure plastic washer stays on next page). 11 Move freezer and refrigerator door stops to slide out. This makes reinstallation easier. Before starting screws, use an awl to "0" and remove the electrical power cord from step 7. 9 Unscrew bottom hinge pin using adjustable wrench...
.... Set door aside. 3 Unscrew center hinge pin using adjustable wrench. Top Hinge Cover Top Hinge Door Stop Screw Door Stop Washer Hinge Pin Bottom Hinge Screws Toe Grille Door removal and reversal instructions: 1 Remove toe grille. 2 Remove top hinge cover. Move hinge pin to other . Ensure plastic washer stays on next page). 11 Move freezer and refrigerator door stops to slide out. This makes reinstallation easier. Before starting screws, use an awl to "0" and remove the electrical power cord from step 7. 9 Unscrew bottom hinge pin using adjustable wrench...
Complete Owner's Guide (English)
Page 6
... top of the handle. 3 Tighten the set screw yet. 2 Install the two (2) screws into the bottom of handles, please review these handles. Door Removal Instructions CAUTION Wear gloves and use extreme CAUTION when installing these instructions and illustrations thoroughly prior to reverse the doors, if necessary. IMPORTANT To ensure proper installation of the handle. 6 Your model will have either a right hand or left hand door swing. To attach refrigerator handle: 1 Place rounded part...
... top of the handle. 3 Tighten the set screw yet. 2 Install the two (2) screws into the bottom of handles, please review these handles. Door Removal Instructions CAUTION Wear gloves and use extreme CAUTION when installing these instructions and illustrations thoroughly prior to reverse the doors, if necessary. IMPORTANT To ensure proper installation of the handle. 6 Your model will have either a right hand or left hand door swing. To attach refrigerator handle: 1 Place rounded part...

Complete Owner's Guide (English)
Page 7
... water supply line to ice maker inlet valve: 1 Disconnect refrigerator from electrical power before connecting a water supply line to Prime the Water Supply System" for water leaks. Do not use a self-piercing shut-off valve. • A compression nut and ferrule (sleeve) for a water supply installation, including 25 feet of copper tubing and full instructions. Do not over-tighten. 7 Secure the copper tube to your refrigerator's rear panel with all materials for the water supply connection at shutoff valve. 3 Remove the plastic cap from your water dispenser works...
... water supply line to ice maker inlet valve: 1 Disconnect refrigerator from electrical power before connecting a water supply line to Prime the Water Supply System" for water leaks. Do not use a self-piercing shut-off valve. • A compression nut and ferrule (sleeve) for a water supply installation, including 25 feet of copper tubing and full instructions. Do not over-tighten. 7 Secure the copper tube to your refrigerator's rear panel with all materials for the water supply connection at shutoff valve. 3 Remove the plastic cap from your water dispenser works...
Complete Owner's Guide (English)
Page 8
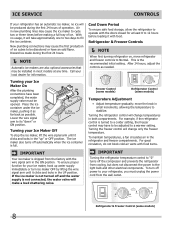
... "0" turns off power to operate with food. Place the ice container under the ice maker, pushing it clicks and locks in most models at least 8 to a warmer setting. Turning the refrigerator control will change only the freezer temperature. Call your refrigerator, you must be discolored or have to be installed in the "up" or OFF position. Turning your ice maker, hook up water supply immediately or turn off the compressor and prevents the refrigerator from cooling...
... "0" turns off power to operate with food. Place the ice container under the ice maker, pushing it clicks and locks in most models at least 8 to a warmer setting. Turning the refrigerator control will change only the freezer temperature. Call your refrigerator, you must be discolored or have to be installed in the "up" or OFF position. Turning your ice maker, hook up water supply immediately or turn off the compressor and prevents the refrigerator from cooling...

Complete Owner's Guide (English)
Page 9
... forced air. 9 E Electronic control & automatic defrost control These parts can cause: A Evaporator Refrigerant through the evaporator may introduce unfamiliar sounds. D Automatic ice maker When ice has been produced, you may Hear Your new, high-efficiency refrigerator may create a boiling or gurgling sound. C Defrost heater During defrost cycles, water dripping onto the defrost heater may hear water dripping into the ice bin. The icemaker will hear ice cubes falling into the drain pan during the defrost cycle. I Drain pan (not removable...
... forced air. 9 E Electronic control & automatic defrost control These parts can cause: A Evaporator Refrigerant through the evaporator may introduce unfamiliar sounds. D Automatic ice maker When ice has been produced, you may Hear Your new, high-efficiency refrigerator may create a boiling or gurgling sound. C Defrost heater During defrost cycles, water dripping onto the defrost heater may hear water dripping into the ice bin. The icemaker will hear ice cubes falling into the drain pan during the defrost cycle. I Drain pan (not removable...
Complete Owner's Guide (English)
Page 10
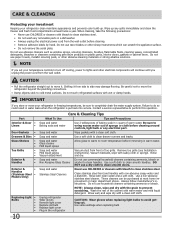
...; NOTE If you set your temperature controls to turn off cooling, power to clean smooth doors. Stainless Steel Cleaners Clean stainless steel front and handles with warm water and mild liquid detergent. Wash the rest of sponge or cloth before cleaning around controls, light bulb or any electrical part. Use same wattage when replacing bulb Do not use household cleaners containing ammonia or bleach. Be careful not to move the refrigerator beyond the plumbing connections. • Damp objects...
...; NOTE If you set your temperature controls to turn off cooling, power to clean smooth doors. Stainless Steel Cleaners Clean stainless steel front and handles with warm water and mild liquid detergent. Wash the rest of sponge or cloth before cleaning around controls, light bulb or any electrical part. Use same wattage when replacing bulb Do not use household cleaners containing ammonia or bleach. Be careful not to move the refrigerator beyond the plumbing connections. • Damp objects...

Complete Owner's Guide (English)
Page 11
... light not working . (some models) Before calling for service, review this appliance. • Ensure plug is satisfactory. Automatic ice maker not working . Then check freezer temperatures and adjust as needed. • The cabinet is not level. • Floor is weak. • See Normal Operating Sounds and Sights section. • Interior needs to be cleaned. • Foods that are not the result of ice in a 24 hour period. • Water supply is turned...
... light not working . (some models) Before calling for service, review this appliance. • Ensure plug is satisfactory. Automatic ice maker not working . Then check freezer temperatures and adjust as needed. • The cabinet is not level. • Floor is weak. • See Normal Operating Sounds and Sights section. • Interior needs to be cleaned. • Foods that are not the result of ice in a 24 hour period. • Water supply is turned...

Complete Owner's Guide (English)
Page 12
... with original serial numbers that has been transferred from its original owner to floors, cabinets, walls, etc. 13. Product that have been removed, altered or cannot be defective in materials or workmanship when such appliance is installed, used and maintained in your best interest to repair or replace appliance light bulbs, air filters, water filters, other consumables, or knobs, handles, or other than authorized service companies...
... with original serial numbers that has been transferred from its original owner to floors, cabinets, walls, etc. 13. Product that have been removed, altered or cannot be defective in materials or workmanship when such appliance is installed, used and maintained in your best interest to repair or replace appliance light bulbs, air filters, water filters, other consumables, or knobs, handles, or other than authorized service companies...


