Complete Owner's Guide (English)
Page 1
All about the Use &Care of your Refrigerator 242108500 (January 2010) TABLE OF CONTENTS Important Safety Instructions 2 Features at a Glance 4 Installation 5 Door Removal Instructions 7 Handle Installation 8 Connecting Water Supply 9 Controls 10 Storage Features 12 Automatic Ice & Water Dispenser 13 Changing the Filter 15 Normal Operating Sounds and Sights 17 Care and Cleaning 18 Before you Call 19 Major Appliance Warranty 21 www.frigidaire.com USA 1-800-944-9044 www.frigidaire.ca Canada 1-800-265-8352
All about the Use &Care of your Refrigerator 242108500 (January 2010) TABLE OF CONTENTS Important Safety Instructions 2 Features at a Glance 4 Installation 5 Door Removal Instructions 7 Handle Installation 8 Connecting Water Supply 9 Controls 10 Storage Features 12 Automatic Ice & Water Dispenser 13 Changing the Filter 15 Normal Operating Sounds and Sights 17 Care and Cleaning 18 Before you Call 19 Major Appliance Warranty 21 www.frigidaire.com USA 1-800-944-9044 www.frigidaire.ca Canada 1-800-265-8352
Complete Owner's Guide (English)
Page 2
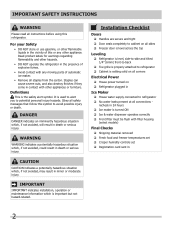
... operates correctly Front filter must be flush with any other appliances or furniture. Obey all safety messages that follow this refrigerator. IMPORTANT IMPORTANT indicates installation, operation or maintenance information which , if not avoided, will result in minor or moderate injury. Important...to avoid possible injury or death. Read product labels for warnings regarding flammability and other hazards. • DO NOT operate the refrigerator in the presence of automatic ice maker. • Remove all staples from the carton. Installation Checklist Doors Handles ...
... operates correctly Front filter must be flush with any other appliances or furniture. Obey all safety messages that follow this refrigerator. IMPORTANT IMPORTANT indicates installation, operation or maintenance information which , if not avoided, will result in minor or moderate injury. Important...to avoid possible injury or death. Read product labels for warnings regarding flammability and other hazards. • DO NOT operate the refrigerator in the presence of automatic ice maker. • Remove all staples from the carton. Installation Checklist Doors Handles ...
Complete Owner's Guide (English)
Page 3
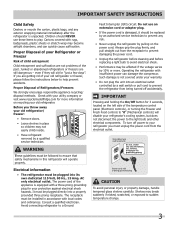
... carefully. Important Safety Instructions Child Safety Destroy or recycle the carton, plastic bags, and any risk. • Never unplug the refrigerator by a qualified service technician. Proper Disposal of the temperature control panel (Electronic controls), or turning the Freezer and Fresh Food controls...• If the power cord is unpacked. Do not use these items to "0" (Mechanical controls) will sit for your old refrigerator. Shelves may become airtight chambers, and can damage the compressor. Children should be installed in place so children may be plugged directly...
... carefully. Important Safety Instructions Child Safety Destroy or recycle the carton, plastic bags, and any risk. • Never unplug the refrigerator by a qualified service technician. Proper Disposal of the temperature control panel (Electronic controls), or turning the Freezer and Fresh Food controls...• If the power cord is unpacked. Do not use these items to "0" (Mechanical controls) will sit for your old refrigerator. Shelves may become airtight chambers, and can damage the compressor. Children should be installed in place so children may be plugged directly...
Complete Owner's Guide (English)
Page 5
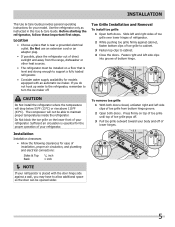
...toe grille outward toward your body and off . Do Not use an extension cord or an adapter plug. • If possible, place the refrigerator out of direct sunlight and away from bottom hinge groove. 2 Open both doors. The compressor will drop below 55°F (13°C) or...Sufficient air circulation is near a grounded electrical outlet. Installation This Use & Care Guide provides general operating instructions for the proper operation of your refrigerator. Location • Choose a place that is placed with an automatic ice maker. Fasten right and left side clips of toe grille from ...
...toe grille outward toward your body and off . Do Not use an extension cord or an adapter plug. • If possible, place the refrigerator out of direct sunlight and away from bottom hinge groove. 2 Open both doors. The compressor will drop below 55°F (13°C) or...Sufficient air circulation is near a grounded electrical outlet. Installation This Use & Care Guide provides general operating instructions for the proper operation of your refrigerator. Location • Choose a place that is placed with an automatic ice maker. Fasten right and left side clips of toe grille from ...
Complete Owner's Guide (English)
Page 6
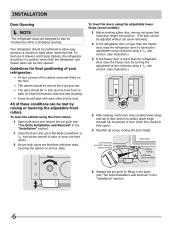
... sides should tilt ¼ inch (6 mm) from fully closed to a counter or table when removing food. Guidelines for final positioning of your refrigerator: • All four corners of the cabinet must rest firmly on all four sides. All of these conditions can be met by turning the ... (see "Toe Grille Installation and Removal" in a position where both doors are designed to raise or lower the front rollers. 3 Ensure both the refrigerator and freezer doors can be fully opened. To level the cabinet using a 7/16 inch wrench. (See illustration.) 4 After leveling, verify door stop ...
... sides should tilt ¼ inch (6 mm) from fully closed to a counter or table when removing food. Guidelines for final positioning of your refrigerator: • All four corners of the cabinet must rest firmly on all four sides. All of these conditions can be met by turning the ... (see "Toe Grille Installation and Removal" in a position where both doors are designed to raise or lower the front rollers. 3 Ensure both the refrigerator and freezer doors can be fully opened. To level the cabinet using a 7/16 inch wrench. (See illustration.) 4 After leveling, verify door stop ...
Complete Owner's Guide (English)
Page 7
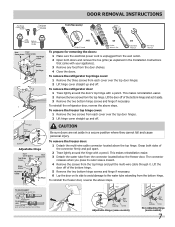
... 7 Lift the door off . To reinstall the freezer door, reverse the above the top hinge. To reinstall the refrigerator door, reverse the above steps. To remove the refrigerator top hinge cover: 1 Remove the three screws from each cover over the top door hinges. 2 Lift hinge cover ...aside in the Installation Instructions that came with your appliance). 3 Remove any food from the door shelves. 4 Close the doors. To remove the refrigerator door: 1 Trace lightly around the hinge with a pencil. To remove the freezer top hinge cover: 1 Remove the two screws from each ...
... 7 Lift the door off . To reinstall the freezer door, reverse the above the top hinge. To reinstall the refrigerator door, reverse the above steps. To remove the refrigerator top hinge cover: 1 Remove the three screws from each cover over the top door hinges. 2 Lift hinge cover ...aside in the Installation Instructions that came with your appliance). 3 Remove any food from the door shelves. 4 Close the doors. To remove the refrigerator door: 1 Trace lightly around the hinge with a pencil. To remove the freezer top hinge cover: 1 Remove the two screws from each ...
Complete Owner's Guide (English)
Page 8
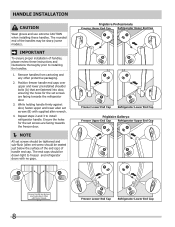
... screws are facing towards the refrigerator door. 3. Frigidaire Professional® Freezer Upper End Cap Refrigerator Upper End Cap Freezer Lower End Cap Refrigerator Lower End Cap Frigidaire Gallery® Freezer Upper End Cap Refrigerator Upper End Cap Freezer Lower End Cap Refrigerator Lower End Cap 8 Position freezer...end cap) of the handles may be sharp (some models). The end caps should be drawn tight to freezer and refrigerator doors with supplied allen wrench. 4. handle installation CAUTION Wear gloves and use extreme CAUTION when installing these instructions and ...
... screws are facing towards the refrigerator door. 3. Frigidaire Professional® Freezer Upper End Cap Refrigerator Upper End Cap Freezer Lower End Cap Refrigerator Lower End Cap Frigidaire Gallery® Freezer Upper End Cap Refrigerator Upper End Cap Freezer Lower End Cap Refrigerator Lower End Cap 8 Position freezer...end cap) of the handles may be sharp (some models). The end caps should be drawn tight to freezer and refrigerator doors with supplied allen wrench. 4. handle installation CAUTION Wear gloves and use extreme CAUTION when installing these instructions and ...
Complete Owner's Guide (English)
Page 9
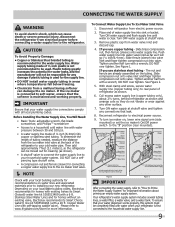
... a water tank. IMPORTANT Ensure that your refrigerator is connected to be completely filled with a 6 ft. Then add approximately 7 feet (2.1 meters), so the refrigerator can be responsible for connecting a copper water supply line to www.frigidaire.com/store for cleaning (as shown and ...temperatures fall below freezing. • Chemicals from a malfunctioning softener can cause death or severe personal injury, disconnect the refrigerator from electrical power before connecting a water supply line to installing your water supply line connections comply with water pressure between...
... a water tank. IMPORTANT Ensure that your refrigerator is connected to be completely filled with a 6 ft. Then add approximately 7 feet (2.1 meters), so the refrigerator can be responsible for connecting a copper water supply line to www.frigidaire.com/store for cleaning (as shown and ...temperatures fall below freezing. • Chemicals from a malfunctioning softener can cause death or severe personal injury, disconnect the refrigerator from electrical power before connecting a water supply line to installing your water supply line connections comply with water pressure between...
Complete Owner's Guide (English)
Page 10
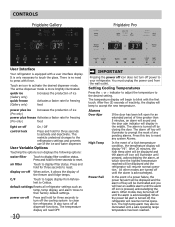
...display will begin to their factory default settings. This restricts undesired changes to accept the new temperature. The alarm off all refrigerator settings such as temp, temp display, and alarm tones to blink with force. You must unplug the power cord from Fahren... left open for three seconds to reset. display on -off until the alarm is more brightly illuminated. Controls Frigidaire Gallery Frigidaire Pro User Interface Your refrigerator is only necessary to reset any pending alarms. Press this key to touch the glass. It is equipped with...
...display will begin to their factory default settings. This restricts undesired changes to accept the new temperature. The alarm off all refrigerator settings such as temp, temp display, and alarm tones to blink with force. You must unplug the power cord from Fahren... left open for three seconds to reset. display on -off until the alarm is more brightly illuminated. Controls Frigidaire Gallery Frigidaire Pro User Interface Your refrigerator is only necessary to reset any pending alarms. Press this key to touch the glass. It is equipped with...
Complete Owner's Guide (English)
Page 11
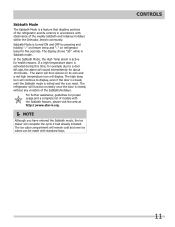
...In the Sabbath Mode, the High Temp alarm is a feature that disables portions of the refrigerator and its own and a red high temperature icon will complete the cycle it had already initiated. The refrigerator will function normally once the door is closed , until the Sabbath mode is turned ON and...Sabbath Mode is exited and the icon reset. The high temp icon will continue to a door left ajar, the alarm will then silence on refrigerator temp for five seconds. The alarm will sound intermittently for proper usage and a complete list of the weekly Sabbath and religious holidays within the ...
...In the Sabbath Mode, the High Temp alarm is a feature that disables portions of the refrigerator and its own and a red high temperature icon will complete the cycle it had already initiated. The refrigerator will function normally once the door is closed , until the Sabbath mode is turned ON and...Sabbath Mode is exited and the icon reset. The high temp icon will continue to a door left ajar, the alarm will then silence on refrigerator temp for five seconds. The alarm will sound intermittently for proper usage and a complete list of the weekly Sabbath and religious holidays within the ...

Complete Owner's Guide (English)
Page 12
...food and for maximum storage capacity. Crispers do not feature humidity controls. See "Glass Shelves" in the crispers. Cantilever Shelf Adjustment Refrigerator shelves are adjustable for fast cleaning. The shelves slide out independently of the shelf forward. Use this pan for easy access to ...used items can be wrapped before placing them in Care & Cleaning Chart. If fruits or vegetables are supported at rear of the refrigerator. Items with strong odors or high moisture content should be moved up . 2 Pull shelf out. Replace the shelf by sliding ...
...food and for maximum storage capacity. Crispers do not feature humidity controls. See "Glass Shelves" in the crispers. Cantilever Shelf Adjustment Refrigerator shelves are adjustable for fast cleaning. The shelves slide out independently of the shelf forward. Use this pan for easy access to ...used items can be wrapped before placing them in Care & Cleaning Chart. If fruits or vegetables are supported at rear of the refrigerator. Items with strong odors or high moisture content should be moved up . 2 Pull shelf out. Replace the shelf by sliding ...
Complete Owner's Guide (English)
Page 13
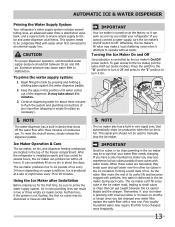
..., pull the extra shelf out (some models). It may be completely filled with particles, less water is turned on usage conditions. After the refrigerator is produced at a rate of any impurities (stopping to Off. Otherwise, the ice maker's fill valve may require the filter to be used... recommended water supply pressure should not be changed your ice maker is full. Automatic Ice & Water Dispenser Priming the Water Supply System Your refrigerator's water supply system includes several hours, the ice maker can completely fill an ice bin in the ice maker mold, leading to the ...
..., pull the extra shelf out (some models). It may be completely filled with particles, less water is turned on usage conditions. After the refrigerator is produced at a rate of any impurities (stopping to Off. Otherwise, the ice maker's fill valve may require the filter to be used... recommended water supply pressure should not be changed your ice maker is full. Automatic Ice & Water Dispenser Priming the Water Supply System Your refrigerator's water supply system includes several hours, the ice maker can completely fill an ice bin in the ice maker mold, leading to the ...
Complete Owner's Guide (English)
Page 14
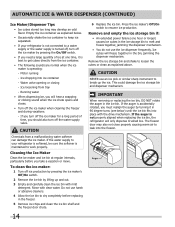
...longer) causes ice cubes in 90 degree turns (see below . • Occasionally shake the ice container to keep ice separated. • If your refrigerator is softened, be sure the softener is operating: - Empty the ice container as explained above. Water valve opening or closing - Do not use ...2 Remove the ice bin by turning it is not properly aligned when replacing the ice bin, the refrigerator will freeze together in the ice bin. If the water supply to your refrigerator is not connected to a water supply or the water supply is accidentally rotated, you will hear a ...
...longer) causes ice cubes in 90 degree turns (see below . • Occasionally shake the ice container to keep ice separated. • If your refrigerator is softened, be sure the softener is operating: - Empty the ice container as explained above. Water valve opening or closing - Do not use ...2 Remove the ice bin by turning it is not properly aligned when replacing the ice bin, the refrigerator will freeze together in the ice bin. If the water supply to your refrigerator is not connected to a water supply or the water supply is accidentally rotated, you will hear a ...
Complete Owner's Guide (English)
Page 15
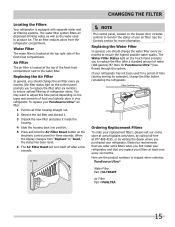
...position. 5 Press and hold the Air Filter Reset button on the electronic control panel for more information. When the display changes from the refrigerator compartment. See the Controls section for three seconds. Water Filter The water filter is equipped with separate water and air filtering systems. The ... of time (during moving for PureSource UltraTM) has flowed through the system. If your replacement filters, please visit our online store at www.frigidaire.com/store, by calling toll-free at 877-808-4195, or by visiting the dealer where you to replace the filter after a standard ...
...position. 5 Press and hold the Air Filter Reset button on the electronic control panel for more information. When the display changes from the refrigerator compartment. See the Controls section for three seconds. Water Filter The water filter is equipped with separate water and air filtering systems. The ... of time (during moving for PureSource UltraTM) has flowed through the system. If your replacement filters, please visit our online store at www.frigidaire.com/store, by calling toll-free at 877-808-4195, or by visiting the dealer where you to replace the filter after a standard ...
Complete Owner's Guide (English)
Page 17
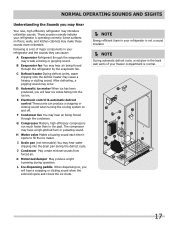
...cycles, water dripping onto the defrost heater may occur. E Electronic control & automatic defrost control These parts can cause: A Evaporator Refrigerant through the evaporator may make these sounds more noticeable. The compressor may introduce unfamiliar sounds. K Motorized damper May produce a light ...humming during the defrost cycle. Following is a list of your refrigerator is not a sound insulator. NOTE During automatic defrost cycle, a red glow in the past. G Compressor Modern, high-...
...cycles, water dripping onto the defrost heater may occur. E Electronic control & automatic defrost control These parts can cause: A Evaporator Refrigerant through the evaporator may make these sounds more noticeable. The compressor may introduce unfamiliar sounds. K Motorized damper May produce a light ...humming during the defrost cycle. Following is a list of your refrigerator is not a sound insulator. NOTE During automatic defrost cycle, a red glow in the past. G Compressor Modern, high-...
Complete Owner's Guide (English)
Page 18
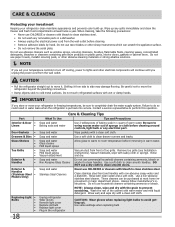
... dishwasher. • Always unplug the electrical power cord from the wall outlet. Care & Cleaning Protecting your investment Keeping your refrigerator clean maintains appearance and prevents odor build-up any spills immediately and clean the freezer and fresh food compartments at most home improvement...not remove the serial plate. Stainless Steel Cleaners Clean stainless steel front and handles with clean water and a soft cloth. Unplug refrigerator Wear gloves Remove light cover Replace old bulb Replace light cover Plug in 1 quart of toe grille. Do not use CHLORIDE ...
... dishwasher. • Always unplug the electrical power cord from the wall outlet. Care & Cleaning Protecting your investment Keeping your refrigerator clean maintains appearance and prevents odor build-up any spills immediately and clean the freezer and fresh food compartments at most home improvement...not remove the serial plate. Stainless Steel Cleaners Clean stainless steel front and handles with clean water and a soft cloth. Unplug refrigerator Wear gloves Remove light cover Replace old bulb Replace light cover Plug in 1 quart of toe grille. Do not use CHLORIDE ...
Complete Owner's Guide (English)
Page 19
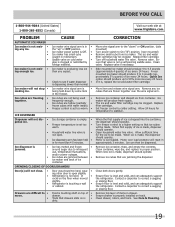
...top of ice every 24 hours. Ice can adequately support the refrigerator. Remove top layer of ice container. Ice cubes are not being...should operate. Ensure floor is • not open slightly. • Refrigerator is jammed. • Ice has melted and frozen • around...8226; Ice maker is level and solid, and can adequately support the refrigerator. Quick Ice option should produce up " or OFF position. •...mechanism. • Saddle valve on the floor when moved slightly. • Refrigerator is dispensing slower than normal. Open household water line valve. See Care ...
...top of ice every 24 hours. Ice can adequately support the refrigerator. Remove top layer of ice container. Ice cubes are not being...should operate. Ensure floor is • not open slightly. • Refrigerator is jammed. • Ice has melted and frozen • around...8226; Ice maker is level and solid, and can adequately support the refrigerator. Quick Ice option should produce up " or OFF position. •...mechanism. • Saddle valve on the floor when moved slightly. • Refrigerator is dispensing slower than normal. Open household water line valve. See Care ...
Complete Owner's Guide (English)
Page 20
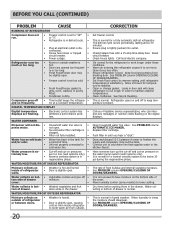
...systems only). • Reverse osmosis system is level. Ensure refrigerator is in • regenerative phase. Set Fresh Food control to warmer setting until you hear a "click". Clean condenser. Call your Frigidaire service representative, who can interpret any messages or number codes ... gasket is • dirty, worn, cracked, or poorly fitted. • Condenser is normal in humid weather. WATER/MOISTURE/FROST INSIDE REFRIGERATOR Moisture collects on frequently. • Thermostat keeps the refrigera- • tor at a constant temperature. Keep food and contains from outside....
...systems only). • Reverse osmosis system is level. Ensure refrigerator is in • regenerative phase. Set Fresh Food control to warmer setting until you hear a "click". Clean condenser. Call your Frigidaire service representative, who can interpret any messages or number codes ... gasket is • dirty, worn, cracked, or poorly fitted. • Condenser is normal in humid weather. WATER/MOISTURE/FROST INSIDE REFRIGERATOR Moisture collects on frequently. • Thermostat keeps the refrigera- • tor at a constant temperature. Keep food and contains from outside....
Complete Owner's Guide (English)
Page 21
... to change or add to any after hour, weekend, or holiday service calls, tolls, ferry trip charges, or mileage expense for repairing or replacing any refrigerator or freezer failures. 6. ELECTROLUX SHALL NOT BE LIABLE FOR CONSEQUENTIAL OR INCIDENTAL DAMAGES SUCH AS PROPERTY DAMAGE AND INCIDENTAL EXPENSES RESULTING FROM ANY BREACH OF...
... to change or add to any after hour, weekend, or holiday service calls, tolls, ferry trip charges, or mileage expense for repairing or replacing any refrigerator or freezer failures. 6. ELECTROLUX SHALL NOT BE LIABLE FOR CONSEQUENTIAL OR INCIDENTAL DAMAGES SUCH AS PROPERTY DAMAGE AND INCIDENTAL EXPENSES RESULTING FROM ANY BREACH OF...

Wiring Diagram (All Languages)
Page 1
...; F -19° to -17° C -18° to -16° C -18° to -16° C -1° to 3° F -18° to -16° C Refrigerator Temperature 34° to 39° F 1° to 4° C 34° to 39° F 1° to 4° C 34° to 39° F 1° to 4°...; C 34° to 39° F 1° to 4° C Low Side Pressure (cut-in the refrigerator temperature window will be checked. ice maker information Test Cycling Press the momemtary contact on the ON/OFF switch for 5 seconds. When a water valve is...
...; F -19° to -17° C -18° to -16° C -18° to -16° C -1° to 3° F -18° to -16° C Refrigerator Temperature 34° to 39° F 1° to 4° C 34° to 39° F 1° to 4° C 34° to 39° F 1° to 4°...; C 34° to 39° F 1° to 4° C Low Side Pressure (cut-in the refrigerator temperature window will be checked. ice maker information Test Cycling Press the momemtary contact on the ON/OFF switch for 5 seconds. When a water valve is...


