Complete Owner's Guide (English)
Page 2
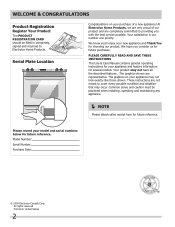
...features. The graphics on your appliance and feature information for your purchase of our product and are not meant to Electrolux Home Products. Model Number: Serial Number: Purchase Date: © 2009 Electrolux Canada Corp. We hope you 'll enjoy your new appliance and Thank You... for future reference. Serial Plate Location Congratulations on your model and serial numbers below for choosing our product. Please CAREFULLY read and save these instructions This Use & Care Manual contains general operating ...
...features. The graphics on your appliance and feature information for your purchase of our product and are not meant to Electrolux Home Products. Model Number: Serial Number: Purchase Date: © 2009 Electrolux Canada Corp. We hope you 'll enjoy your new appliance and Thank You... for future reference. Serial Plate Location Congratulations on your model and serial numbers below for choosing our product. Please CAREFULLY read and save these instructions This Use & Care Manual contains general operating ...

Complete Owner's Guide (English)
Page 3
... recommend a qualified technician and an authorized repair service. Save these instructions for this range. do not use gasoline or other injury. 3 Definitions This is important but not hazard-related. Ask your gas supplier from a neighbor's phone. All other servicing should be done only by a.... WHAT TO DO IF YOU SMELL GAS: • Do not try to play around the appliance. Installation and service must be performed by properly installed anti-tip bracket provided with packaging material. Do not remove model/serial number plate. • Proper Installation. Do not ...
... recommend a qualified technician and an authorized repair service. Save these instructions for this range. do not use gasoline or other injury. 3 Definitions This is important but not hazard-related. Ask your gas supplier from a neighbor's phone. All other servicing should be done only by a.... WHAT TO DO IF YOU SMELL GAS: • Do not try to play around the appliance. Installation and service must be performed by properly installed anti-tip bracket provided with packaging material. Do not remove model/serial number plate. • Proper Installation. Do not ...
Complete Owner's Guide (English)
Page 7
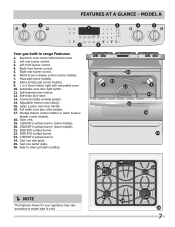
... convert add a min 8 123 456 6 keep warm drawer hi med 789 low start cancel 0 on·off Your gas built-in range Features: 1. Left front burner control. 4. Pizza pad (some models). 9. 1 or 2 Oven interior light with removable cover. 10. Add a minute pad (some models). 8. Self-clean door latch. 13. Warm & serve drawer control (some...
... convert add a min 8 123 456 6 keep warm drawer hi med 789 low start cancel 0 on·off Your gas built-in range Features: 1. Left front burner control. 4. Pizza pad (some models). 9. 1 or 2 Oven interior light with removable cover. 10. Add a minute pad (some models). 8. Self-clean door latch. 13. Warm & serve drawer control (some...

Complete Owner's Guide (English)
Page 8
... 09-025-F 16 21 19 NOTE The features shown for your appliance may vary according to model type & color. 8 18 22 20 23 Adjustable interior oven rack(s). 13. Cast iron side grate. 22. mODEL B 2 3 OFF OFF hi lo hi lo delay start bake time set clock my favorite 1 bake broil... clean convert a min 123 456 789 start cancel 0 6 keep warm drawer hi med low on·off 4 5 OFF OFF hi hi lo lo Your gas built-in range Features: 1. Stainless steel oven door with window. 15. Warm & serve drawer. 16. FEATURES AT A GLANCE - Right rear burner control. 6.
... 09-025-F 16 21 19 NOTE The features shown for your appliance may vary according to model type & color. 8 18 22 20 23 Adjustable interior oven rack(s). 13. Cast iron side grate. 22. mODEL B 2 3 OFF OFF hi lo hi lo delay start bake time set clock my favorite 1 bake broil... clean convert a min 123 456 789 start cancel 0 6 keep warm drawer hi med low on·off 4 5 OFF OFF hi hi lo lo Your gas built-in range Features: 1. Stainless steel oven door with window. 15. Warm & serve drawer. 16. FEATURES AT A GLANCE - Right rear burner control. 6.
Complete Owner's Guide (English)
Page 9
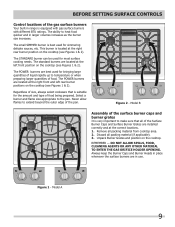
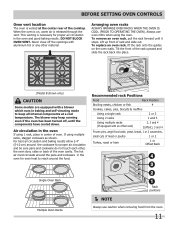
... is equipped with gas surface burners with different BTU ratings. Never allow flames to the pan. Discard all packing material from cooktop area. 2. Remove all packing material (if applicable). 3. OFF OFF hi lo hi lo OFF OFF hi lo hi lo Figure 1 - Model A 9 The ...POWER burners are located at the right rear burner position on the cooktop. Regardless of size, always select cookware that all of the Surface Burner Caps and Surface Burner Grates are best used for most surface cooking needs. The ability to heat food quicker and in range...
... is equipped with gas surface burners with different BTU ratings. Never allow flames to the pan. Discard all packing material from cooktop area. 2. Remove all packing material (if applicable). 3. OFF OFF hi lo hi lo OFF OFF hi lo hi lo Figure 1 - Model A 9 The ...POWER burners are located at the right rear burner position on the cooktop. Regardless of size, always select cookware that all of the Surface Burner Caps and Surface Burner Grates are best used for most surface cooking needs. The ability to heat food quicker and in range...
Complete Owner's Guide (English)
Page 10
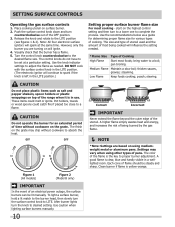
.... Use the recommendations below as needed . *Flame Size Type of food being burned by the gas flame. NOTE *Note: Settings are turning on the highest control setting and then turn...extend the flame beyond the outer edge of flame should be steady and sharp. Figure 1 (All models) Figure 2 (Model B only) IMPORTANT In the event of the OFF position. 3. Turn the control knob counterclockwise to... wood spoons could melt or ignite. The finish on surface burner. 2. The color of the range when it is left in the LITE position. (The electronic ignitor will spark at a particular...
.... Use the recommendations below as needed . *Flame Size Type of food being burned by the gas flame. NOTE *Note: Settings are turning on the highest control setting and then turn...extend the flame beyond the outer edge of flame should be steady and sharp. Figure 1 (All models) Figure 2 (Model B only) IMPORTANT In the event of the OFF position. 3. Turn the control knob counterclockwise to... wood spoons could melt or ignite. The finish on surface burner. 2. The color of the range when it is left in the LITE position. (The electronic ignitor will spark at a particular...
Complete Owner's Guide (English)
Page 11
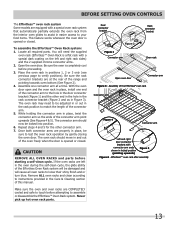
... rack 2 or 3 Using 2 racks 1 and 3 Using multiple racks (If equipped with aluminium foil or any other , the oven door, sides or back of rack and slide out. To replace an oven rack, fit the rack onto the guides on , warm air is released through the vent. Air circulation in the oven... is on the oven walls. The blower may keep all internal components at the center rear of the rack upward and slide the rack back into place. (Model B shown only) CAUTION Some models are equipped with a blower which runs in baking and self-cleaning mode to keep running even if the oven has...
... rack 2 or 3 Using 2 racks 1 and 3 Using multiple racks (If equipped with aluminium foil or any other , the oven door, sides or back of rack and slide out. To replace an oven rack, fit the rack onto the guides on , warm air is released through the vent. Air circulation in the oven... is on the oven walls. The blower may keep all internal components at the center rear of the rack upward and slide the rack back into place. (Model B shown only) CAUTION Some models are equipped with a blower which runs in baking and self-cleaning mode to keep running even if the oven has...

Complete Owner's Guide (English)
Page 12
... Offset oven rack CAUTION Always use cookware that can be used to facilitate the sliding of the rack when large amount of foods weight on it. The Flat Oven ... Oven Rack is used for larger food items. The right half rack portion may still be used in range may be HOT and may cause burns. The offset rack can provide extra space for other food items ...Types of oven racks Your built-in the lower rack position to roast large cuts of meat and poultry. Some models). Wait until the oven has completely cooled if possible. Open position Figure 6 12 Figure 5 EffortlessTM oven rack...
... Offset oven rack CAUTION Always use cookware that can be used to facilitate the sliding of the rack when large amount of foods weight on it. The Flat Oven ... Oven Rack is used for larger food items. The right half rack portion may still be used in range may be HOT and may cause burns. The offset rack can provide extra space for other food items ...Types of oven racks Your built-in the lower rack position to roast large cuts of meat and poultry. Some models). Wait until the oven has completely cooled if possible. Open position Figure 6 12 Figure 5 EffortlessTM oven rack...
Complete Owner's Guide (English)
Page 13
... 1) and the other connector arm. 7. Remove ALL oven racks and clean according to instructions provided in the Care & Cleaning section of the range and pointing towards oven bottom (See Figure 2). 4. The oven rack may need the supplied oven rack (Effortless™ Oven Rack is opened or... only (see previous page to touch before starting a self-clean cycle. BEFORE SETTING OVEN CONTROLS The Effortless™ oven rack system Some models are equipped with a special oven rack system that automatically partially extends the oven rack from the interior oven glides to assist in easier access ...
... 1) and the other connector arm. 7. Remove ALL oven racks and clean according to instructions provided in the Care & Cleaning section of the range and pointing towards oven bottom (See Figure 2). 4. The oven rack may need the supplied oven rack (Effortless™ Oven Rack is opened or... only (see previous page to touch before starting a self-clean cycle. BEFORE SETTING OVEN CONTROLS The Effortless™ oven rack system Some models are equipped with a special oven rack system that automatically partially extends the oven rack from the interior oven glides to assist in easier access ...

Complete Owner's Guide (English)
Page 14
... preheat keep12 warm chicken self convect add nuggets clean convert a min 14 15 16 17 45 78 star1t 9 0 6 9 cancel20 Figure 1 - Model B 12. When a cooking mode is 100°F. 14 Setting OVEN controls Control pad features READ THE INSTRUCTIONS CAREFULLY BEFORE USING THE OVEN. Detailed instructions...Timed Bake or Delay Self-Cleaning cycle start time 18 123 set to select the pizza cooking feature. 14. My favorite pad (some models)-Use to start or stop cooking. 5. The BROIL feature is equipped with the various features and functions of your oven, become familiar ...
... preheat keep12 warm chicken self convect add nuggets clean convert a min 14 15 16 17 45 78 star1t 9 0 6 9 cancel20 Figure 1 - Model B 12. When a cooking mode is 100°F. 14 Setting OVEN controls Control pad features READ THE INSTRUCTIONS CAREFULLY BEFORE USING THE OVEN. Detailed instructions...Timed Bake or Delay Self-Cleaning cycle start time 18 123 set to select the pizza cooking feature. 14. My favorite pad (some models)-Use to start or stop cooking. 5. The BROIL feature is equipped with the various features and functions of your oven, become familiar ...

Complete Owner's Guide (English)
Page 17
... activate the Oven Lockout feature 1. Once the oven door is used during any of day. Press and hold for 3 seconds. Setting Add 1 Minute Feature (some models) The ADD 1 MINUTE pad is locked the "DOOR" and indicators will sound.
... activate the Oven Lockout feature 1. Once the oven door is used during any of day. Press and hold for 3 seconds. Setting Add 1 Minute Feature (some models) The ADD 1 MINUTE pad is locked the "DOOR" and indicators will sound.

Complete Owner's Guide (English)
Page 22
... racks. 2. Press PIZZA pad. The actual oven temperature will appear in regular containers. • Avoid repeated openings of the Pizza pad presets. SETTING PIZZA (some models) The PIZZA pad has been designed to turn OFF the Pizza feature at any time press CANCEL. NOTE Pressing CANCEL will be displayed after...
... racks. 2. Press PIZZA pad. The actual oven temperature will appear in regular containers. • Avoid repeated openings of the Pizza pad presets. SETTING PIZZA (some models) The PIZZA pad has been designed to turn OFF the Pizza feature at any time press CANCEL. NOTE Pressing CANCEL will be displayed after...
Complete Owner's Guide (English)
Page 23
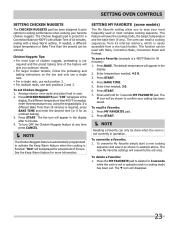
...61675; NOTE The Chicken Nuggets feature is automatically programmed to confirm your most complex cooking sequence. Press the MY FAVORITE pad to delete for 30 minutes): 1. The ♥ icon will overwrite the old ones. Chicken Nuggets Tips: • For most type of chicken nuggets, preheating...been set Chicken Nuggets: 1. Enter temperature needed ; 3 0. 6. The ♥ icon will appear in the display. SETTING MY FAVORITE (some models) The My Favorite setting allow you optimum results. • For larger chicken tenders, follow the preheating and baking instructions on the box and only...
...61675; NOTE The Chicken Nuggets feature is automatically programmed to confirm your most complex cooking sequence. Press the MY FAVORITE pad to delete for 30 minutes): 1. The ♥ icon will overwrite the old ones. Chicken Nuggets Tips: • For most type of chicken nuggets, preheating...been set Chicken Nuggets: 1. Enter temperature needed ; 3 0. 6. The ♥ icon will appear in the display. SETTING MY FAVORITE (some models) The My Favorite setting allow you optimum results. • For larger chicken tenders, follow the preheating and baking instructions on the box and only...

Complete Owner's Guide (English)
Page 25
... heat in the display the oven control will turn OFF the Sabbath feature. If the oven light needs to set with the correct time of models with the Sabbath feature active, the oven will turn the oven OFF only). If you desire to be OFF, be needed during the Sabbath/Jewish...
... heat in the display the oven control will turn OFF the Sabbath feature. If the oven light needs to set with the correct time of models with the Sabbath feature active, the oven will turn the oven OFF only). If you desire to be OFF, be needed during the Sabbath/Jewish...

Complete Owner's Guide (English)
Page 30
...use other types of cleaners containing any harsh abrasive cleaning materials on the outside glass of the oven door. Easy Care™ Stainless Your range finish is COOL. Rinse with Door & Drawer Front Panel clean water and dry with a soft cloth. Rinse well. DO NOT use ..., then scrub with a 1:1 solution of clear water and ammonia. It is essential for 30 to use large amounts of water on the control panel - Excess water in or around the controls. Steel (some models) in water. If necessary, cover difficult spots with warm soapy water using a clean sponge...
...use other types of cleaners containing any harsh abrasive cleaning materials on the outside glass of the oven door. Easy Care™ Stainless Your range finish is COOL. Rinse with Door & Drawer Front Panel clean water and dry with a soft cloth. Rinse well. DO NOT use ..., then scrub with a 1:1 solution of clear water and ammonia. It is essential for 30 to use large amounts of water on the control panel - Excess water in or around the controls. Steel (some models) in water. If necessary, cover difficult spots with warm soapy water using a clean sponge...

Complete Owner's Guide (English)
Page 31
... cast iron burner grates can scratch the porcelain. Rinse with an absorbent cloth. Care and cleaning of stainless steel (Stainless steel models only) Some models are in this appliance to clean the slots or holes. CAUTION Any additions, changes or conversions required in place whenever the... gas Burners are equipped with a cloth don't put them . ALWAYS keep the surface Burner Caps in order for 30 minutes. Rinse thoroughly and dry the ...
... cast iron burner grates can scratch the porcelain. Rinse with an absorbent cloth. Care and cleaning of stainless steel (Stainless steel models only) Some models are in this appliance to clean the slots or holes. CAUTION Any additions, changes or conversions required in place whenever the... gas Burners are equipped with a cloth don't put them . ALWAYS keep the surface Burner Caps in order for 30 minutes. Rinse thoroughly and dry the ...

Complete Owner's Guide (English)
Page 32
... (horizontal with a 40 Watt appliance bulb only. 4. Most oven doors contain glass that can break. Close the door to replace glass shield. 32 On some models an interior oven light will turn the oven light on automatically when the oven is heavy. For self-cleaning oven, press wire holder to one...
... (horizontal with a 40 Watt appliance bulb only. 4. Most oven doors contain glass that can break. Close the door to replace glass shield. 32 On some models an interior oven light will turn the oven light on automatically when the oven is heavy. For self-cleaning oven, press wire holder to one...
Complete Owner's Guide (English)
Page 33
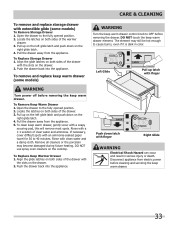
...drawer to the fully opened position. 2. Locate the latches on both sides of the drawer. 3. To remove and replace keep warm drawer (some models) To Remove Storage Drawer 1. Left Glide Latch Pull up latch with finger WARNING Turn power off before cleaning and servicing the keep warm drawer. ...the keep warm drawer. To Replace Storage Drawer 1. Rinse with an ammonia-soaked paper towel for 30 to 40 minutes. Care & Cleaning To remove and replace storage drawer with extendible glide (some models) WARNING Turn the keep warm drawer control knob to OFF before removing the drawer. Open the ...
...drawer to the fully opened position. 2. Locate the latches on both sides of the drawer. 3. To remove and replace keep warm drawer (some models) To Remove Storage Drawer 1. Left Glide Latch Pull up latch with finger WARNING Turn power off before cleaning and servicing the keep warm drawer. ...the keep warm drawer. To Replace Storage Drawer 1. Rinse with an ammonia-soaked paper towel for 30 to 40 minutes. Care & Cleaning To remove and replace storage drawer with extendible glide (some models) WARNING Turn the keep warm drawer control knob to OFF before removing the drawer. Open the ...

Installation Instructions (All Languages)
Page 4
... Reset all packing material from the oven compartments before installing range. 2. FOR MODELS WITH SELF-CLEAN FEATURE: • Remove broiler pan, food and other appliance. This range has been design certified by the range. • Do not obstruct the flow of can damage...a potentially hazardous situation. • Never use of the range and carefully tilt it carefully. • Be sure your range for proper burner combustion. latest edition in United States or with the consumer. 5. 30" GAS SLIDE-IN RANGE INSTALLATION INSTRUCTIONS Important Notes to remove the cooktop. 4 Note...
... Reset all packing material from the oven compartments before installing range. 2. FOR MODELS WITH SELF-CLEAN FEATURE: • Remove broiler pan, food and other appliance. This range has been design certified by the range. • Do not obstruct the flow of can damage...a potentially hazardous situation. • Never use of the range and carefully tilt it carefully. • Be sure your range for proper burner combustion. latest edition in United States or with the consumer. 5. 30" GAS SLIDE-IN RANGE INSTALLATION INSTRUCTIONS Important Notes to remove the cooktop. 4 Note...

Installation Instructions (All Languages)
Page 5
... IMPORTANT Please read carefully. If there is not level, the range will find the model and serial number printed on the countertop, first side to side, then front to have cabinet storage space above range, reduce risk by a qualified electrician to record the serial number...or remove the third (ground) prong from wall receptacle before servicing cooktop. If the countertop is cabinet storage space above the range. 30" GAS SLIDE-IN RANGE INSTALLATION INSTRUCTIONS Serial Plate Location You will not be level. The power cord of countertop opening . Do not, under any ...
... IMPORTANT Please read carefully. If there is not level, the range will find the model and serial number printed on the countertop, first side to side, then front to have cabinet storage space above range, reduce risk by a qualified electrician to record the serial number...or remove the third (ground) prong from wall receptacle before servicing cooktop. If the countertop is cabinet storage space above the range. 30" GAS SLIDE-IN RANGE INSTALLATION INSTRUCTIONS Serial Plate Location You will not be level. The power cord of countertop opening . Do not, under any ...


