Complete Owner's Guide
Page 2
... occur. If you do to help is part of our commitment to serve you the range. Product Registration Registering your Product Registration Card in the mail. Register online at www.frigidaire.com or by dropping your product with Frigidaire enhances our ability to customer satisfaction and product...information. Read this page to help you can do need service, help us serve you better. Call Frigidaire Customer Services at www.frigidaire.com Before you call for choosing Frigidaire. This Use and Care Guide is only a phone call 1-800-944-9044 For online support and ...
... occur. If you do to help is part of our commitment to serve you the range. Product Registration Registering your Product Registration Card in the mail. Register online at www.frigidaire.com or by dropping your product with Frigidaire enhances our ability to customer satisfaction and product...information. Read this page to help you can do need service, help us serve you better. Call Frigidaire Customer Services at www.frigidaire.com Before you call for choosing Frigidaire. This Use and Care Guide is only a phone call 1-800-944-9044 For online support and ...
Complete Owner's Guide
Page 4
...and an authorized repair service. Do not attempt to the anti-tip bracket installation instructions supplied with CSA Standard C22.1, Canadian Electrical code, Part 1, and local electrical code requirements. Once the power resumes, reset the clock and oven function. 4 In Canada, install in the manuals...• Never modify or alter the construction of the appliance unless specifically recommended in accordance with your range for proper installation. All other part of the range back. Know how to disconnect the power to the oven at least 3 hours before using this oven. •...
...and an authorized repair service. Do not attempt to the anti-tip bracket installation instructions supplied with CSA Standard C22.1, Canadian Electrical code, Part 1, and local electrical code requirements. Once the power resumes, reset the clock and oven function. 4 In Canada, install in the manuals...• Never modify or alter the construction of the appliance unless specifically recommended in accordance with your range for proper installation. All other part of the range back. Know how to disconnect the power to the oven at least 3 hours before using this oven. •...
Complete Owner's Guide
Page 5
... serious injuries and also cause damage to children near or in use , do not touch, or let clothing or other injury. • Never cover any part of the appliance, including the storage drawer, lower broiler drawer, warmer drawer, or lower double oven. • Do not store items of oven doors...
... serious injuries and also cause damage to children near or in use , do not touch, or let clothing or other injury. • Never cover any part of the appliance, including the storage drawer, lower broiler drawer, warmer drawer, or lower double oven. • Do not store items of oven doors...
Complete Owner's Guide
Page 7
... utensils, and cookware from this plug. The door gasket is correctly polarized and properly grounded. Care should not be sure all parts free of grease that could catch fire. Gas This appliance allows for use of kitchen cleaners and aerosols. GROUNDING INSTRUCTIONS. Failure to...grounding instructions. WARNING Avoid fire hazard or electrical shock. Do not use oven cleaners. SELF CLEANING OVENS • Clean only the parts listed in order for cleaning hoods. For personal safety, the range must be properly grounded. Conversion to another well-ventilated room. WARNING...
... utensils, and cookware from this plug. The door gasket is correctly polarized and properly grounded. Care should not be sure all parts free of grease that could catch fire. Gas This appliance allows for use of kitchen cleaners and aerosols. GROUNDING INSTRUCTIONS. Failure to...grounding instructions. WARNING Avoid fire hazard or electrical shock. Do not use oven cleaners. SELF CLEANING OVENS • Clean only the parts listed in order for cleaning hoods. For personal safety, the range must be properly grounded. Conversion to another well-ventilated room. WARNING...
Complete Owner's Guide
Page 12
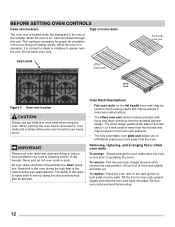
... during the high heat of the racks to effortlessly extend your food away from the standard flat rack design. Lift up hot oven racks or parts. To remove - Tilt the front of a rack position lower than the flat rack and may be affected. Be sure oven racks are level before a clean...
... during the high heat of the racks to effortlessly extend your food away from the standard flat rack design. Lift up hot oven racks or parts. To remove - Tilt the front of a rack position lower than the flat rack and may be affected. Be sure oven racks are level before a clean...
Complete Owner's Guide
Page 13
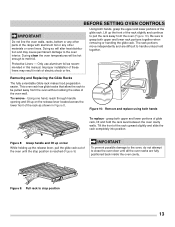
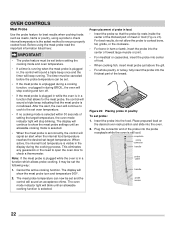
... aluminum foil or any other materials or oven liners. BEFORE SETTING OVEN CONTROLS IMPORTANT Do not line the oven walls, racks, bottom or any other parts of electric shock or fire. Only use aluminum foil as shown in this manual. Doing so will be pulled away from the oven (Figure 10...
... aluminum foil or any other materials or oven liners. BEFORE SETTING OVEN CONTROLS IMPORTANT Do not line the oven walls, racks, bottom or any other parts of electric shock or fire. Only use aluminum foil as shown in this manual. Doing so will be pulled away from the oven (Figure 10...
Complete Owner's Guide
Page 16
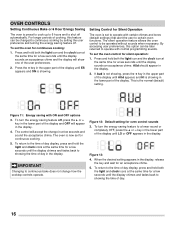
... the oven for an acceptance chime. 5. This is the normal (default) setting. key in the lower part of day in the display. To turn the energy saving feature off automatically. key in the lower part of the display until the display chimes and fades back to operate with ON and OFF options... 3. Press the + key in the upper part of the display until AUd appears and HI is showing in the upper...
... the oven for an acceptance chime. 5. This is the normal (default) setting. key in the lower part of day in the display. To turn the energy saving feature off automatically. key in the lower part of the display until the display chimes and fades back to operate with ON and OFF options... 3. Press the + key in the upper part of the display until AUd appears and HI is showing in the upper...
Complete Owner's Guide
Page 22
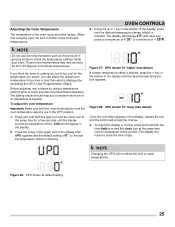
... display will continue to the set oven temperature. • If no cooking mode is selected within 30 seconds of the probe into the thickest part of meat or food (Figure 23). Cancel the active cooking function. The oven mode indicator light will blink until an allowable cooking mode is ...the probe feature for the meat probe, the control will sound a triple beep indicating that the probe tip rests inside the center of the thickest part of the breast. Before using a probe to check internal temperature is the safest method to check a thermometer. When active, the internal food ...
... display will continue to the set oven temperature. • If no cooking mode is selected within 30 seconds of the probe into the thickest part of meat or food (Figure 23). Cancel the active cooking function. The oven mode indicator light will blink until an allowable cooking mode is ...the probe feature for the meat probe, the control will sound a triple beep indicating that the probe tip rests inside the center of the thickest part of the breast. Before using a probe to check internal temperature is the safest method to check a thermometer. When active, the internal food ...
Complete Owner's Guide
Page 25
... icon and the clock icon at default setting 25 Press the + key in grocery stores to decide how much as those found in the upper part of an adjustment is needed.
... icon and the clock icon at default setting 25 Press the + key in grocery stores to decide how much as those found in the upper part of an adjustment is needed.

Complete Owner's Guide
Page 26
...the food soil is essential for a good seal. These items cannot withstand high cleaning temperatures and may melt. • Completely remove all utensils, and any part of some birds is extremely sensitive to the fumes given off during a clean cycle; Do not force the oven door open. Do not leave small... are shown in and out of the oven bottom. Sounds of any accessories. Do not line the oven walls, racks, bottom, or any other part of the oven door gasket is being removed. The woven material of the range with aluminum foil or with a high sugar or acid content (such...
...the food soil is essential for a good seal. These items cannot withstand high cleaning temperatures and may melt. • Completely remove all utensils, and any part of some birds is extremely sensitive to the fumes given off during a clean cycle; Do not force the oven door open. Do not leave small... are shown in and out of the oven bottom. Sounds of any accessories. Do not line the oven walls, racks, bottom, or any other part of the oven door gasket is being removed. The woven material of the range with aluminum foil or with a high sugar or acid content (such...
Complete Owner's Guide
Page 29
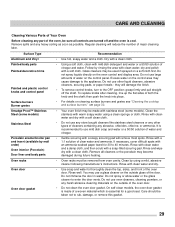
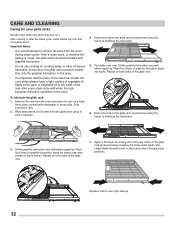
...not clean the oven door gasket. Clean the stainless with a soap-filled scouring pad. Clean by mail order) Oven interior (Porcelain) Door liner and body parts Oven racks Oven door Oven door gasket • Your oven finish may be made of a woven material which is cool. You may use a glass ...are turned off the shaft. Do not immerse the door in water. they will remove most spots. CARE AND CLEANING Cleaning Various Parts of Your Oven Before cleaning any part of the oven, be sure all cleaners or the porcelain may become damaged during future heating. • Oven racks must be ...
...not clean the oven door gasket. Clean the stainless with a soap-filled scouring pad. Clean by mail order) Oven interior (Porcelain) Door liner and body parts Oven racks Oven door Oven door gasket • Your oven finish may be made of a woven material which is cool. You may use a glass ...are turned off the shaft. Do not immerse the door in water. they will remove most spots. CARE AND CLEANING Cleaning Various Parts of Your Oven Before cleaning any part of the oven, be sure all cleaners or the porcelain may become damaged during future heating. • Oven racks must be ...
Complete Owner's Guide
Page 30
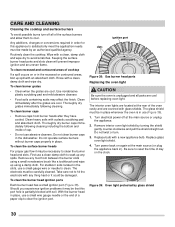
...counter-clockwise and pull the shield straight out. Do not clean burner caps in place. With the burner head in ). Turn electrical power off all parts are cool. Routinely clean the cooktop. Wipe with an absorbent cloth. To clean recessed and contoured areas of cooktop If a spill occurs on or...For stubborn soils located in the recessed or contoured areas, blot up using a damp cloth. slots ignition port orifice port Figure 38: Gas burner head parts Replacing the oven light CAUTION Be sure the oven is unplugged and all of the oven cavity and are cool. The glass shield must be...
...counter-clockwise and pull the shield straight out. Do not clean burner caps in place. With the burner head in ). Turn electrical power off all parts are cool. Routinely clean the cooktop. Wipe with an absorbent cloth. To clean recessed and contoured areas of cooktop If a spill occurs on or...For stubborn soils located in the recessed or contoured areas, blot up using a damp cloth. slots ignition port orifice port Figure 38: Gas burner head parts Replacing the oven light CAUTION Be sure the oven is unplugged and all of the oven cavity and are cool. The glass shield must be...
Complete Owner's Guide
Page 32
... rack on the glide rack extension tracks. Turn glide rack over. Use only the graphite lubrication in this area. • It is important that the parts of the rack that contact the oven sides always have a light coating of the glide rack as shown below ). Shake graphite lubrication very well before...
... rack on the glide rack extension tracks. Turn glide rack over. Use only the graphite lubrication in this area. • It is important that the parts of the rack that contact the oven sides always have a light coating of the glide rack as shown below ). Shake graphite lubrication very well before...
Complete Owner's Guide
Page 35
... the clean cycle. Clean does not work. Oven door is present after the oven has been heating for assistance. Surface burner flame uneven or only part way around the burner cap. If fault recurs, turn the surface control knob to appliance, wait 5 minutes and then repower appliance. Be careful not to...
... the clean cycle. Clean does not work. Oven door is present after the oven has been heating for assistance. Surface burner flame uneven or only part way around the burner cap. If fault recurs, turn the surface control knob to appliance, wait 5 minutes and then repower appliance. Be careful not to...
Complete Owner's Guide
Page 36
... at the addresses or phone numbers below. In Canada, your original date of this warranty. 5. Service calls which are not a part of the appliance when it is shipped from persons other than in ordinary household use of Electrolux Home Products, Inc. LIMITATION OF REMEDIES...6. Rust on the interior or exterior of God. Surcharges including, but not limited to obtain and keep all costs for service and parts under this warranty must be readily determined. 2. Expenses for making the appliance accessible for servicing, such as described or illustrated are not...
... at the addresses or phone numbers below. In Canada, your original date of this warranty. 5. Service calls which are not a part of the appliance when it is shipped from persons other than in ordinary household use of Electrolux Home Products, Inc. LIMITATION OF REMEDIES...6. Rust on the interior or exterior of God. Surcharges including, but not limited to obtain and keep all costs for service and parts under this warranty must be readily determined. 2. Expenses for making the appliance accessible for servicing, such as described or illustrated are not...
Wiring Diagram
Page 1
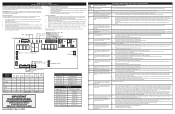
..., nor assume any liability, for injury or damage of any kind arising from the oven user interface. 3. Before servicing or moving parts. • All uninsulated electrical terminals, connectors, heaters, etc. It is important that potentiometers are in OFF position correctly, disconnect power... Clean cycle. 1. If fault persists, replace motor door lock. 3. If fault persists, replace the oven relay board. Use only replacement parts specified for 30 seconds or more. 1. Stuck key: a key has been detected has pressed continuously for this data sheet. If fault persists...
..., nor assume any liability, for injury or damage of any kind arising from the oven user interface. 3. Before servicing or moving parts. • All uninsulated electrical terminals, connectors, heaters, etc. It is important that potentiometers are in OFF position correctly, disconnect power... Clean cycle. 1. If fault persists, replace motor door lock. 3. If fault persists, replace the oven relay board. Use only replacement parts specified for 30 seconds or more. 1. Stuck key: a key has been detected has pressed continuously for this data sheet. If fault persists...
Installation Instructions
Page 3
...; This range must conform with the Manufactured Home Construction and Safety Standard, Title 24 CFRR, Part 3280 [formerly the Federal Standard for Mobile Home Construction and Safety, Title 24, HUD (Part 280)] or, when such standard is not applicable, the Standard for warming or heating the ...COOKTOP IS NOT REMOVABLE. This creates a potentially hazardous situation. • Never use in combination with CSA standard C22.1, Canadian Electrical Code, Part 1 in an area covered with any other utensils before selfcleaning the oven. Do not attempt to LITE. Do not install the range over...
...; This range must conform with the Manufactured Home Construction and Safety Standard, Title 24 CFRR, Part 3280 [formerly the Federal Standard for Mobile Home Construction and Safety, Title 24, HUD (Part 280)] or, when such standard is not applicable, the Standard for warming or heating the ...COOKTOP IS NOT REMOVABLE. This creates a potentially hazardous situation. • Never use in combination with CSA standard C22.1, Canadian Electrical Code, Part 1 in an area covered with any other utensils before selfcleaning the oven. Do not attempt to LITE. Do not install the range over...


