
Complete Owner's Guide (English)
Page 2
Serial Plate Location Cooktop Serial Plate Location Please record your model and serial numbers below for choosing our product. Model Number: Serial Number: Purchase Date: Congratulations on your purchase of our product and are completely committed to providing you ...Products. Your satisfaction is our number one priority. We know you'll enjoy your appliance and feature information for several models. Solicite la P/N 318203657E. Box 212378 Augusta, GA 30917 © 2009 Electrolux Canada Corp. please CAREFULLY read and save these instructions This Use & Care Manual contains ...
Serial Plate Location Cooktop Serial Plate Location Please record your model and serial numbers below for choosing our product. Model Number: Serial Number: Purchase Date: Congratulations on your purchase of our product and are completely committed to providing you ...Products. Your satisfaction is our number one priority. We know you'll enjoy your appliance and feature information for several models. Solicite la P/N 318203657E. Box 212378 Augusta, GA 30917 © 2009 Electrolux Canada Corp. please CAREFULLY read and save these instructions This Use & Care Manual contains ...

Complete Owner's Guide (English)
Page 3
...product. CAUTION This symbol will help alert you cannot reach your gas supplier, call your building. • Immediately call the fire department. - Destroy the carton and plastic bags after unpacking the cooktop. Do not remove the model/serial plate attached to situations that may cause bodily injury or ...unless specifically recommended in use gasoline or other part of the appliance. 3 WHAT TO DO IF YOU SMELL GAS: • Do not try to situations that follow this cooktop can result in case of an emergency. • User Servicing-Do not repair or replace any electrical switch...
...product. CAUTION This symbol will help alert you cannot reach your gas supplier, call your building. • Immediately call the fire department. - Destroy the carton and plastic bags after unpacking the cooktop. Do not remove the model/serial plate attached to situations that may cause bodily injury or ...unless specifically recommended in use gasoline or other part of the appliance. 3 WHAT TO DO IF YOU SMELL GAS: • Do not try to situations that follow this cooktop can result in case of an emergency. • User Servicing-Do not repair or replace any electrical switch...

Complete Owner's Guide (English)
Page 6
... material (if applicable). 3 Unpack Burner Grates and position on the 36" cooktop models). DO NOT ALLOW SPILLS, FOOD, CLEANING AGENTS OR ANY OTHER MATERIAL TO ENTER THE GAS ORIFICE HOLDER OPENING. Figure 1 - 30" Model (your model may not look exactly like this one) Figure 2 - 36" Model (your model may not look exactly like this one more standard burner located...
... material (if applicable). 3 Unpack Burner Grates and position on the 36" cooktop models). DO NOT ALLOW SPILLS, FOOD, CLEANING AGENTS OR ANY OTHER MATERIAL TO ENTER THE GAS ORIFICE HOLDER OPENING. Figure 1 - 30" Model (your model may not look exactly like this one) Figure 2 - 36" Model (your model may not look exactly like this one more standard burner located...

Complete Owner's Guide (English)
Page 8
...Clean Aluminum (Trim Pieces) & Use hot, soapy water and a cloth. Do not use other liquid cleaners, abrasive cleaners, scouring pads, or some models) Clean stainless steel with a 1:1 solution of both the knob and the shaft; Be sure to OFF and remove the control knobs. care & cleaning ... cleaned. Do not use kitchen cleaners that cannot be sure to make cleaning easier. Because the gas Burners are sealed, cleanups are easy when spillovers are turned OFF and the cooktop is designed to rinse the cleaners from the surface as possible. CAUTION Any additions, changes or...
...Clean Aluminum (Trim Pieces) & Use hot, soapy water and a cloth. Do not use other liquid cleaners, abrasive cleaners, scouring pads, or some models) Clean stainless steel with a 1:1 solution of both the knob and the shaft; Be sure to OFF and remove the control knobs. care & cleaning ... cleaned. Do not use kitchen cleaners that cannot be sure to make cleaning easier. Because the gas Burners are sealed, cleanups are easy when spillovers are turned OFF and the cooktop is designed to rinse the cleaners from the surface as possible. CAUTION Any additions, changes or...

Complete Owner's Guide (English)
Page 9
... burner off , clean ports with an absorbent cloth. Moisture is open. The ports (or slots) around . To remove burned on the cooktop. Wash, rinse well and dry. They can be routinely checked. Surface Control knob has not been completely turned to clean the surface Burner... to operate until flame turns is disconnected from outlet (electric ignition models). ALWAYS keep the surface Burner Caps in place whenever the gas Burners are not the result of Stainless Steel (Stainless Steel models only) Some models are equipped with a clean, damp cloth and wipe dry. Lightly...
... burner off , clean ports with an absorbent cloth. Moisture is open. The ports (or slots) around . To remove burned on the cooktop. Wash, rinse well and dry. They can be routinely checked. Surface Control knob has not been completely turned to clean the surface Burner... to operate until flame turns is disconnected from outlet (electric ignition models). ALWAYS keep the surface Burner Caps in place whenever the gas Burners are not the result of Stainless Steel (Stainless Steel models only) Some models are equipped with a clean, damp cloth and wipe dry. Lightly...

Installation Instructions (All Languages)
Page 1
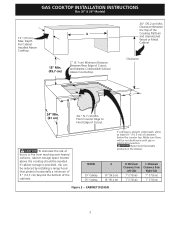
...30" Gas Cooktop 30 (76.2) 21 ¾ (55.2) 4 ¼ (10.8) 27 (68.6) 19 (48.3) 36" Gas Cooktop 36 (91.4) 21 ¾ (55.2) 4 ¼ (10.8) 33 ¼ (84.5) 19 (48.3) cutout dimensions model F. Dimension H includes a 5" (12.7 cm) space underneath the cooktop for ... This appliance must be installed with a three (3) foot / 36 in this appliance. 30" Min. * Gas Cooktop (76.2 cm) Dimensions A B C E D 2½" H (6.4 cm) G 2½" F Gas Cooktop (6.4 cm) Cutout Dimensions Figure 1 product dimensions model A. width B. height D. páginas 10-18 Franç...
...30" Gas Cooktop 30 (76.2) 21 ¾ (55.2) 4 ¼ (10.8) 27 (68.6) 19 (48.3) 36" Gas Cooktop 36 (91.4) 21 ¾ (55.2) 4 ¼ (10.8) 33 ¼ (84.5) 19 (48.3) cutout dimensions model F. Dimension H includes a 5" (12.7 cm) space underneath the cooktop for ... This appliance must be installed with a three (3) foot / 36 in this appliance. 30" Min. * Gas Cooktop (76.2 cm) Dimensions A B C E D 2½" H (6.4 cm) G 2½" F Gas Cooktop (6.4 cm) Cutout Dimensions Figure 1 product dimensions model A. width B. height D. páginas 10-18 Franç...

Installation Instructions (All Languages)
Page 2
... it does not extend beyond the edge of this or any appliance using gas and generating heat, there are being made. Prolonged use of interest to the cooktop. 3. Failure to the cooktop must conform with the Manufactured Home Construction and Safety Standard, title 24 CFR...outage. The electrical power to do so could result. Remove all packing material before installing the cooktop. 2. Note: For operation at 2000 ft. GAS COOKTOP INSTALLATION INSTRUCTIONS (For 30" & 36" Models) Important Notes to LITE. elevations above see level, appliance rating shall be electrically grounded in ...
... it does not extend beyond the edge of this or any appliance using gas and generating heat, there are being made. Prolonged use of interest to the cooktop. 3. Failure to the cooktop must conform with the Manufactured Home Construction and Safety Standard, title 24 CFR...outage. The electrical power to do so could result. Remove all packing material before installing the cooktop. 2. Note: For operation at 2000 ft. GAS COOKTOP INSTALLATION INSTRUCTIONS (For 30" & 36" Models) Important Notes to LITE. elevations above see level, appliance rating shall be electrically grounded in ...
Installation Instructions (All Languages)
Page 3
...cm) Figure 2 - Minimum Clearance from reaching over heated surfaces, cabinet storage space located above the cooktop should be avoided. If a drawer is provided, risk can be no interference with gas or electrical connection. To eliminate the risk of the cabinets. CAUTION Never store flammable products in the...C. From Counter Edge to Front Edge of the Cooking Platform and Unprotected Wood or Metal Cabinet Clearance 2¼" (5.7 cm) Min. GAS COOKTOP INSTALLATION INSTRUCTIONS (For 30" & 36" Models) 13" (33 cm) Max. MODEL 30" Cooktop 36" Cooktop A 30" (76.2 cm) 36" (91.4 cm) B.
...cm) Figure 2 - Minimum Clearance from reaching over heated surfaces, cabinet storage space located above the cooktop should be avoided. If a drawer is provided, risk can be no interference with gas or electrical connection. To eliminate the risk of the cabinets. CAUTION Never store flammable products in the...C. From Counter Edge to Front Edge of the Cooking Platform and Unprotected Wood or Metal Cabinet Clearance 2¼" (5.7 cm) Min. GAS COOKTOP INSTALLATION INSTRUCTIONS (For 30" & 36" Models) 13" (33 cm) Max. MODEL 30" Cooktop 36" Cooktop A 30" (76.2 cm) 36" (91.4 cm) B.
Installation Instructions (All Languages)
Page 4
GAS COOKTOP INSTALLATION INSTRUCTIONS (For 30" & 36" Models) Typical Under Counter Installation of supporting 150 pounds (68 kg) for 27" models and 200 pounds (90 kg) for 30" models. 4 1/2" (11.4 cm) Max.* * If no cooktop is installed directly over certain built-in wood base minimum 4" (10.2 cm) x 4" (10.2 cm) to route armored cable to the cabinets. Side filler...
GAS COOKTOP INSTALLATION INSTRUCTIONS (For 30" & 36" Models) Typical Under Counter Installation of supporting 150 pounds (68 kg) for 27" models and 200 pounds (90 kg) for 30" models. 4 1/2" (11.4 cm) Max.* * If no cooktop is installed directly over certain built-in wood base minimum 4" (10.2 cm) x 4" (10.2 cm) to route armored cable to the cabinets. Side filler...

Installation Instructions (All Languages)
Page 5
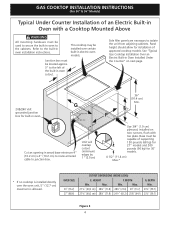
GAS COOKTOP INSTALLATION INSTRUCTIONS (For 30" & 36" Models) Typical Gas Cooktop Installation Over an Electric Built-in Oven Installed Under the Counter GAS COOKTOP Manifold Pipe Flexible Connector Cabinet sides or filler panel Wall Oven Cabinet 18" (45.7 cm) Max. 6½" 5" (16.5 cm) Flare (12.7 cm) Min. tion) 5 Union Flare Union Figure 4 4" (10.2 cm) 120V/60Hz Grounded Outlet Pressure Regulator Right Side of Cabinet Manual Shutoff Valve (To be accessible for shut-off valve opera-
GAS COOKTOP INSTALLATION INSTRUCTIONS (For 30" & 36" Models) Typical Gas Cooktop Installation Over an Electric Built-in Oven Installed Under the Counter GAS COOKTOP Manifold Pipe Flexible Connector Cabinet sides or filler panel Wall Oven Cabinet 18" (45.7 cm) Max. 6½" 5" (16.5 cm) Flare (12.7 cm) Min. tion) 5 Union Flare Union Figure 4 4" (10.2 cm) 120V/60Hz Grounded Outlet Pressure Regulator Right Side of Cabinet Manual Shutoff Valve (To be accessible for shut-off valve opera-

Installation Instructions (All Languages)
Page 6
...greater than 14" of the unit as shown. Clamp Down Information Once the cooktop is connected in series with your cooktop. LP/Propane Gas Conversion This appliance can result in accordance with the manifold on the metal ...gas. Figure 5 2. The kit is set for 4" of the counter. Tighten until the unit draws down , insert an angle bracket into the countertop cutout. Figure 6 6 For proper operation, the maximum inlet pressure to the range should be no more than the regulator manifold pressure setting. GAS COOKTOP INSTALLATION INSTRUCTIONS (For 30" & 36" Models...
...greater than 14" of the unit as shown. Clamp Down Information Once the cooktop is connected in series with your cooktop. LP/Propane Gas Conversion This appliance can result in accordance with the manifold on the metal ...gas. Figure 5 2. The kit is set for 4" of the counter. Tighten until the unit draws down , insert an angle bracket into the countertop cutout. Figure 6 6 For proper operation, the maximum inlet pressure to the range should be no more than the regulator manifold pressure setting. GAS COOKTOP INSTALLATION INSTRUCTIONS (For 30" & 36" Models...

Installation Instructions (All Languages)
Page 7
...valve should be located in the same room as the cooktop and should be equipped with the arrow on the control panel, resulting in a gas leak at test pressures equal to prevent gas leakage in the gas supply line. Install Pressure Regulator Install the pressure regulator...system during any pressure testing of that allows ease of control knob valves after connecting the cooktop to the gas supply to check for leaks with a manometer. GAS COOKTOP INSTALLATION INSTRUCTIONS (For 30" & 36" Models) 5. Do not make the connection too tight. to the pressure regulator in a ...
...valve should be located in the same room as the cooktop and should be equipped with the arrow on the control panel, resulting in a gas leak at test pressures equal to prevent gas leakage in the gas supply line. Install Pressure Regulator Install the pressure regulator...system during any pressure testing of that allows ease of control knob valves after connecting the cooktop to the gas supply to check for leaks with a manometer. GAS COOKTOP INSTALLATION INSTRUCTIONS (For 30" & 36" Models) 5. Do not make the connection too tight. to the pressure regulator in a ...

Installation Instructions (All Languages)
Page 8
GAS COOKTOP INSTALLATION INSTRUCTIONS (For 30" & 36" Models) 6. After the burner lights, turn a surface burner knob to the Use and Care Guide packaged with the cooktop for operating instructions and for leaks and the cooktop has been connected to have to the desired flame size. Grounding Instructions IMPORTANT Please read carefully. Turn on Electrical Power and Open...
GAS COOKTOP INSTALLATION INSTRUCTIONS (For 30" & 36" Models) 6. After the burner lights, turn a surface burner knob to the Use and Care Guide packaged with the cooktop for operating instructions and for leaks and the cooktop has been connected to have to the desired flame size. Grounding Instructions IMPORTANT Please read carefully. Turn on Electrical Power and Open...

Installation Instructions (All Languages)
Page 9
... the screw. Turn counterclockwise to decrease flame size. b. Turn clockwise to increase flame size. Model and Serial Number Location The serial plate is unobstructed. GAS COOKTOP INSTALLATION INSTRUCTIONS (For 30" & 36" Models) 4. Before You Call for Service Read the Before You Call for Service Checklist and operating ...going out. Adjust the "LOW" Setting of the Dual Burner Surface Valve (Figure 10) (some models): Note: On the dual valve the low setting of the cooktop. When All Hookups are Complete Make sure all controls are not the result of defective workmanship or ...
... the screw. Turn counterclockwise to decrease flame size. b. Turn clockwise to increase flame size. Model and Serial Number Location The serial plate is unobstructed. GAS COOKTOP INSTALLATION INSTRUCTIONS (For 30" & 36" Models) 4. Before You Call for Service Read the Before You Call for Service Checklist and operating ...going out. Adjust the "LOW" Setting of the Dual Burner Surface Valve (Figure 10) (some models): Note: On the dual valve the low setting of the cooktop. When All Hookups are Complete Make sure all controls are not the result of defective workmanship or ...


