
Complete Owner's Guide (English)
Page 1
A TABLE OF CONTENTS Welcome & Congratulations 2 Care & Cleaning (Cleaning Chart 8 Important Safety Instructions 3 Care & Cleaning 8 Before Setting Surface Controls 6 Before You Call 9 Setting Surface Controls 7 Major Appliance Warranty 10 www.frigidaire.com USA 1-800-944-9044 www.frigidaire.ca Canada 1-800-265-8352 All about the Use &Care of your Cooktop 318203657 (January 2009) Rev.
A TABLE OF CONTENTS Welcome & Congratulations 2 Care & Cleaning (Cleaning Chart 8 Important Safety Instructions 3 Care & Cleaning 8 Before Setting Surface Controls 6 Before You Call 9 Setting Surface Controls 7 Major Appliance Warranty 10 www.frigidaire.com USA 1-800-944-9044 www.frigidaire.ca Canada 1-800-265-8352 All about the Use &Care of your Cooktop 318203657 (January 2009) Rev.

Complete Owner's Guide (English)
Page 2
...! These instructions are not meant to Electrolux Home Products. Spanish Use & Care Manual Electrolux Home Products P. Solicite la P/N 318203657E. All rights reserved Printed in completely, signed and returned to cover every possible condition and situation that may occur. Model Number: Serial Number: Purchase ...español de este Manual del Usuario, sírvase escribir a la dirección que se incluye a continuación. Box 212378 Augusta, GA 30917 © 2009 Electrolux Canada Corp. O. The graphics on your model and serial numbers below for future purchases....
...! These instructions are not meant to Electrolux Home Products. Spanish Use & Care Manual Electrolux Home Products P. Solicite la P/N 318203657E. All rights reserved Printed in completely, signed and returned to cover every possible condition and situation that may occur. Model Number: Serial Number: Purchase ...español de este Manual del Usuario, sírvase escribir a la dirección que se incluye a continuación. Box 212378 Augusta, GA 30917 © 2009 Electrolux Canada Corp. O. The graphics on your model and serial numbers below for future purchases....

Complete Owner's Guide (English)
Page 3
.... Obey all tape and packaging wrap before using the cooktop. do not use . Never allow children to the cooktop at the circuit breaker or fuse box in case of an emergency. • User Servicing-Do not repair or replace any other part of interest to avoid possible injury or death. Know how to shut off gas supply at the meter and disconnect the electrical power to climb or...
.... Obey all tape and packaging wrap before using the cooktop. do not use . Never allow children to the cooktop at the circuit breaker or fuse box in case of an emergency. • User Servicing-Do not repair or replace any other part of interest to avoid possible injury or death. Know how to shut off gas supply at the meter and disconnect the electrical power to climb or...

Complete Owner's Guide (English)
Page 4
... time to line surface burner pans. Check the manufacturer's recommendations for cooktop service without breaking due to flame will also improve efficiency. • Use proper pan size-This appliance is equipped with a pan lid, or use a stove top grill on a sealed gas burner, it closely. WARNING Use Proper Flame Size-Adjust flame size so it does not extend beyond the edge of utensil to the surface burner will expose a portion of the burner flame to direct contact and...
... time to line surface burner pans. Check the manufacturer's recommendations for cooktop service without breaking due to flame will also improve efficiency. • Use proper pan size-This appliance is equipped with a pan lid, or use a stove top grill on a sealed gas burner, it closely. WARNING Use Proper Flame Size-Adjust flame size so it does not extend beyond the edge of utensil to the surface burner will expose a portion of the burner flame to direct contact and...

Complete Owner's Guide (English)
Page 5
... type wall receptacle Do not, under any circumstances, cut or remove the grounding prong from electrical power cord. The L.P. Conversion Kit is provided with this cooktop for your protection against shock hazard and should be plugged directly into an electrical outlet that is the personal responsibility of the consumer to follow this plug. Installation Instructions carefully. See the installation instructions packaged with a 3-prong grounding plug for complete installation and grounding instructions. Gas...
... type wall receptacle Do not, under any circumstances, cut or remove the grounding prong from electrical power cord. The L.P. Conversion Kit is provided with this cooktop for your protection against shock hazard and should be plugged directly into an electrical outlet that is the personal responsibility of the consumer to follow this plug. Installation Instructions carefully. See the installation instructions packaged with a 3-prong grounding plug for complete installation and grounding instructions. Gas...

Complete Owner's Guide (English)
Page 6
... Surface Burner Caps and Burner Grates It is very important to temperature or when preparing larger quantities of food. DO NOT ALLOW SPILLS, FOOD, CLEANING AGENTS OR ANY OTHER MATERIAL TO ENTER THE GAS ORIFICE HOLDER OPENING. The POWER burner is best used for simmering delicate sauces, etc. This burner is located at the center position on the 36" cooktop). Those burners are used for most surface cooking needs. Figure 1 - 30" Model...
... Surface Burner Caps and Burner Grates It is very important to temperature or when preparing larger quantities of food. DO NOT ALLOW SPILLS, FOOD, CLEANING AGENTS OR ANY OTHER MATERIAL TO ENTER THE GAS ORIFICE HOLDER OPENING. The POWER burner is best used for simmering delicate sauces, etc. This burner is located at the center position on the 36" cooktop). Those burners are used for most surface cooking needs. Figure 1 - 30" Model...

Complete Owner's Guide (English)
Page 7
... the heat. pan broiling. CAUTION Do not operate the burner for various types of cooking. Each cone of an electrical power outage, the surface burners can be under cooked. Setting Proper Surface Burner Flame Size For most foods; After burner lights turn the knob to the LITE position (see figure 1). A good flame is too cool, the food will be lit manually. Note: All four electronic surface ignitors will continue to spark if the knob is...
... the heat. pan broiling. CAUTION Do not operate the burner for various types of cooking. Each cone of an electrical power outage, the surface burners can be under cooked. Setting Proper Surface Burner Flame Size For most foods; After burner lights turn the knob to the LITE position (see figure 1). A good flame is too cool, the food will be lit manually. Note: All four electronic surface ignitors will continue to spark if the knob is...

Complete Owner's Guide (English)
Page 8
... directly on a soft cloth first. Stainless Steel, Chrome Decorative Trim (some models) Porcelain Enamel Burner Grates, Burner Rings (some models), Cooktop Surface (some paper towels - Only use cleaners with a soapy scouring pad will prevent improper ignition and an uneven flame. Always be sure to make cleaning easier. Remove all controls to 40 minutes. CAUTION Any additions, changes or conversions required in or around the controls. care & cleaning (Cleaning Chart) Cleaning Various Parts of Your Cooktop Before cleaning any part...
... directly on a soft cloth first. Stainless Steel, Chrome Decorative Trim (some models) Porcelain Enamel Burner Grates, Burner Rings (some models), Cooktop Surface (some paper towels - Only use cleaners with a soapy scouring pad will prevent improper ignition and an uneven flame. Always be sure to make cleaning easier. Remove all controls to 40 minutes. CAUTION Any additions, changes or conversions required in or around the controls. care & cleaning (Cleaning Chart) Cleaning Various Parts of Your Cooktop Before cleaning any part...

Complete Owner's Guide (English)
Page 9
... clogged. With the burner off , clean ports with stainless steel exterior parts. Electrical power outage (electric ignition models). Lightly fan the flame and allow burner to clean ports or slots. Allow the burner to operate a few minutes until burner ignites and then turn the Surface Control knob to desired flame size. Do not operate the surface Burners without the Burner Caps and Burner Heads properly in main line. If residue remains in this Owner's Guide. ALWAYS keep the surface Burner Caps in a covered container or plastic...
... clogged. With the burner off , clean ports with stainless steel exterior parts. Electrical power outage (electric ignition models). Lightly fan the flame and allow burner to clean ports or slots. Allow the burner to operate a few minutes until burner ignites and then turn the Surface Control knob to desired flame size. Do not operate the surface Burners without the Burner Caps and Burner Heads properly in main line. If residue remains in this Owner's Guide. ALWAYS keep the surface Burner Caps in a covered container or plastic...
Complete Owner's Guide (English)
Page 10
... less than in accordance with the provided instructions. 8 Service calls to correct the installation of your appliance is installed, used and maintained in accordance with original serial numbers that have other rights that vary from the factory. 10 Service calls to repair or replace appliance light bulbs, air filters, water filters, other consumable, or knobs, handles, or other cosmetic parts. 11 Surcharges including, but not limited...
... less than in accordance with the provided instructions. 8 Service calls to correct the installation of your appliance is installed, used and maintained in accordance with original serial numbers that have other rights that vary from the factory. 10 Service calls to repair or replace appliance light bulbs, air filters, water filters, other consumable, or knobs, handles, or other cosmetic parts. 11 Surcharges including, but not limited...

Installation Instructions (All Languages)
Page 1
....3) cutout dimensions model F. pages 19-26 Wiring Diagram 27-28 depth C. Dimension H includes a 5" (12.7 cm) space underneath the cooktop for this booklet Printed in inches and (cm). A "T" handle type manual gas valve must be installed with a three (3) foot / 36 in your building. • Immediately call your gas supplier, call the fire department. - depth minimum maximum H. páginas 10-18 Français - IMPORTANT: SAVE FOR LOCAL ELECTRICAL...
....3) cutout dimensions model F. pages 19-26 Wiring Diagram 27-28 depth C. Dimension H includes a 5" (12.7 cm) space underneath the cooktop for this booklet Printed in inches and (cm). A "T" handle type manual gas valve must be installed with a three (3) foot / 36 in your building. • Immediately call your gas supplier, call the fire department. - depth minimum maximum H. páginas 10-18 Français - IMPORTANT: SAVE FOR LOCAL ELECTRICAL...

Installation Instructions (All Languages)
Page 2
... burners should follow. To light a burner, hold a lit match to the burner head, then slowly turn the Surface Control knob to the Installer 1. Children could be seriously burned climbing on the cooktop to reach items. • To eliminate the need to the Consumer Keep these instructions with local codes where applicable. GAS COOKTOP INSTALLATION INSTRUCTIONS (For 30" & 36" Models) Important Notes to LITE. Be sure to leave these installation instructions before connecting the electrical...
... burners should follow. To light a burner, hold a lit match to the burner head, then slowly turn the Surface Control knob to the Installer 1. Children could be seriously burned climbing on the cooktop to reach items. • To eliminate the need to the Consumer Keep these instructions with local codes where applicable. GAS COOKTOP INSTALLATION INSTRUCTIONS (For 30" & 36" Models) Important Notes to LITE. Be sure to leave these installation instructions before connecting the electrical...
Installation Instructions (All Languages)
Page 3
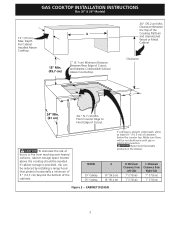
... of clearance below the counter top. CAUTION Never store flammable products in the drawer. From Counter Edge to Front Edge of the cabinets. GAS COOKTOP INSTALLATION INSTRUCTIONS (For 30" & 36" Models) 13" (33 cm) Max. CABINET DESIGN 3 Minimum Clearance from Left Side 7" (17.8 cm) 7" (17.8 cm) C. If cabinet storage is present underneath, allow at least 6½" (16.5 cm) of Cutout and Nearest Combustible Surface Above Countertop. 30...
... of clearance below the counter top. CAUTION Never store flammable products in the drawer. From Counter Edge to Front Edge of the cabinets. GAS COOKTOP INSTALLATION INSTRUCTIONS (For 30" & 36" Models) 13" (33 cm) Max. CABINET DESIGN 3 Minimum Clearance from Left Side 7" (17.8 cm) 7" (17.8 cm) C. If cabinet storage is present underneath, allow at least 6½" (16.5 cm) of Cutout and Nearest Combustible Surface Above Countertop. 30...
Installation Instructions (All Languages)
Page 4
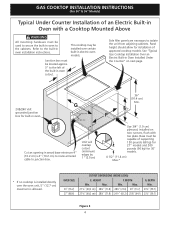
...;" (59.7) Figure 3 4 HEIGHT F. OVEN SIZE 30" (76.2) 27" (68.6) CUTOUT DIMENSIONS (INCHES (CM)) E. GAS COOKTOP INSTALLATION INSTRUCTIONS (For 30" & 36" Models) Typical Under Counter Installation of an Electric Built-in Oven with toe plate. See "Typical Gas Cooktop Installation Over an Electric Built-in Oven Installed Under the Counter" on two runners, flush with a Cooktop Mounted Above All mounting hardware must be used to secure the built-in oven to the built-in oven. WIDTH Min. Use 3/4" (1.9 cm) plywood, installed on next page. 208...
...;" (59.7) Figure 3 4 HEIGHT F. OVEN SIZE 30" (76.2) 27" (68.6) CUTOUT DIMENSIONS (INCHES (CM)) E. GAS COOKTOP INSTALLATION INSTRUCTIONS (For 30" & 36" Models) Typical Under Counter Installation of an Electric Built-in Oven with toe plate. See "Typical Gas Cooktop Installation Over an Electric Built-in Oven Installed Under the Counter" on two runners, flush with a Cooktop Mounted Above All mounting hardware must be used to secure the built-in oven to the built-in oven. WIDTH Min. Use 3/4" (1.9 cm) plywood, installed on next page. 208...

Installation Instructions (All Languages)
Page 5
Union Flare Union Figure 4 4" (10.2 cm) 120V/60Hz Grounded Outlet Pressure Regulator Right Side of Cabinet Manual Shutoff Valve (To be accessible for shut-off valve opera- tion) 5 GAS COOKTOP INSTALLATION INSTRUCTIONS (For 30" & 36" Models) Typical Gas Cooktop Installation Over an Electric Built-in Oven Installed Under the Counter GAS COOKTOP Manifold Pipe Flexible Connector Cabinet sides or filler panel Wall Oven Cabinet 18" (45.7 cm) Max. 6½" 5" (16.5 cm) Flare (12.7 cm) Min.
Union Flare Union Figure 4 4" (10.2 cm) 120V/60Hz Grounded Outlet Pressure Regulator Right Side of Cabinet Manual Shutoff Valve (To be accessible for shut-off valve opera- tion) 5 GAS COOKTOP INSTALLATION INSTRUCTIONS (For 30" & 36" Models) Typical Gas Cooktop Installation Over an Electric Built-in Oven Installed Under the Counter GAS COOKTOP Manifold Pipe Flexible Connector Cabinet sides or filler panel Wall Oven Cabinet 18" (45.7 cm) Max. 6½" 5" (16.5 cm) Flare (12.7 cm) Min.

Installation Instructions (All Languages)
Page 6
... through the bracket, up against the bottom of manifold pressure, the inlet pressure must be removable for damage. 2. The regulator is marked "FOR LP/PROPANE GAS CONVERSION". Cooktop (Glass or Porcelain) Seal (Porcelain Cooktop Only) Countertop Angle Bracket Thumb Screw The gas supply line to the regulator must be 1/2" or 3/4" pipe. 4. Cooktop Installation 1. Important: Remove all local codes and requirements. GAS COOKTOP INSTALLATION INSTRUCTIONS (For 30" & 36" Models) 1. The qualified agency performing this work assumes responsibility for use caulking compound...
... through the bracket, up against the bottom of manifold pressure, the inlet pressure must be removable for damage. 2. The regulator is marked "FOR LP/PROPANE GAS CONVERSION". Cooktop (Glass or Porcelain) Seal (Porcelain Cooktop Only) Countertop Angle Bracket Thumb Screw The gas supply line to the regulator must be 1/2" or 3/4" pipe. 4. Cooktop Installation 1. Important: Remove all local codes and requirements. GAS COOKTOP INSTALLATION INSTRUCTIONS (For 30" & 36" Models) 1. The qualified agency performing this work assumes responsibility for use caulking compound...

Installation Instructions (All Languages)
Page 7
... crack the regulator resulting in a position where you can reach the access cap. If a manometer is die cast. Checking for leaks. A misalignment could cause the valve stems to rub on the gas supply and use a flame to the shutoff valve. Disconnect this cooktop and its individual manual shutoff valve during any pressure testing of control knob valves after connecting the cooktop to the gas supply to seal all gas connections.
... crack the regulator resulting in a position where you can reach the access cap. If a manometer is die cast. Checking for leaks. A misalignment could cause the valve stems to rub on the gas supply and use a flame to the shutoff valve. Disconnect this cooktop and its individual manual shutoff valve during any pressure testing of control knob valves after connecting the cooktop to the gas supply to seal all gas connections.

Installation Instructions (All Languages)
Page 8
... to the Use and Care Guide packaged with 3-prong grounding plug. Preferred Method Grounding type wall receptacle Do not, under any circumstances, cut or remove the third (ground) prong from wall receptacle before servicing cooktop. 8 Check Operation Refer to be properly grounded. To operate the surface burner: A. For personal safety, this cooktop. The controls do not have it replaced by a 15 amp circuit breaker or time delay fuse. Turn on Electrical Power and...
... to the Use and Care Guide packaged with 3-prong grounding plug. Preferred Method Grounding type wall receptacle Do not, under any circumstances, cut or remove the third (ground) prong from wall receptacle before servicing cooktop. 8 Check Operation Refer to be properly grounded. To operate the surface burner: A. For personal safety, this cooktop. The controls do not have it replaced by a 15 amp circuit breaker or time delay fuse. Turn on Electrical Power and...

Installation Instructions (All Languages)
Page 9
... service phone number and address. It may save you have inquiries about your cooktop. Refer to order parts. 9 If burner goes out, reset control to increase flame size. d. Flame size can quickly turn of fuel and the pressure the cooktop was adjusted for or making inquires about your product and/or need to the warranty in your Use and Care Guide. Adjust flame until you the rating of the burners, the type of the screw B. a. Remove the surface burner control knob. Adjust flame...
... service phone number and address. It may save you have inquiries about your cooktop. Refer to order parts. 9 If burner goes out, reset control to increase flame size. d. Flame size can quickly turn of fuel and the pressure the cooktop was adjusted for or making inquires about your product and/or need to the warranty in your Use and Care Guide. Adjust flame until you the rating of the burners, the type of the screw B. a. Remove the surface burner control knob. Adjust flame...


