
Complete Owner's Guide (English)
Page 2
... escribir a la dirección que se incluye a continuación. O. Box 212378 Augusta, GA 30917 © 2009 Electrolux Canada Corp. Model Number: Serial Number: Purchase Date: Congratulations on your model and serial numbers below for future reference. We hope you 'll enjoy your appliance and feature...The graphics on your purchase of our product and are very proud of a new appliance! Serial Plate Location Cooktop Serial Plate Location Please record your appliance may not have all the described features. These instructions are representative. Solicite la P/N 318203657E.
... escribir a la dirección que se incluye a continuación. O. Box 212378 Augusta, GA 30917 © 2009 Electrolux Canada Corp. Model Number: Serial Number: Purchase Date: Congratulations on your model and serial numbers below for future reference. We hope you 'll enjoy your appliance and feature...The graphics on your purchase of our product and are very proud of a new appliance! Serial Plate Location Cooktop Serial Plate Location Please record your appliance may not have all the described features. These instructions are representative. Solicite la P/N 318203657E.

Complete Owner's Guide (English)
Page 3
...store or use any phone in accordance with packaging material. Follow the gas supplier's instructions. • If you to the cooktop. • Never modify or alter the construction of a cooktop by a qualified technician in your gas supplier from a neighbor's phone. IMPORTANT IMPORTANT indicates installation, operation or...fire or explosion may cause bodily injury or property damage. Do not remove the model/serial plate attached to avoid possible injury or death. They should not be stored on the cooktop. Ask your appliance is in fire or property damage. CAUTION Do not store...
...store or use any phone in accordance with packaging material. Follow the gas supplier's instructions. • If you to the cooktop. • Never modify or alter the construction of a cooktop by a qualified technician in your gas supplier from a neighbor's phone. IMPORTANT IMPORTANT indicates installation, operation or...fire or explosion may cause bodily injury or property damage. Do not remove the model/serial plate attached to avoid possible injury or death. They should not be stored on the cooktop. Ask your appliance is in fire or property damage. CAUTION Do not store...

Complete Owner's Guide (English)
Page 6
... 1 - 30" Model (your model may not look exactly like this one) Figure 2 - 36" Model (your model may not look exactly like this one more standard burner located at the right and left rear positions on the 36" cooktop models). before setting surface controls Locations of the Gas Surface Burners The SIMMER... burner is one ) 6 Assembly of food. Those burners are located at the right front position on the 30" & 36" cooktop (and there is best used for...
... 1 - 30" Model (your model may not look exactly like this one) Figure 2 - 36" Model (your model may not look exactly like this one more standard burner located at the right and left rear positions on the 36" cooktop models). before setting surface controls Locations of the Gas Surface Burners The SIMMER... burner is one ) 6 Assembly of food. Those burners are located at the right front position on the 30" & 36" cooktop (and there is best used for...

Complete Owner's Guide (English)
Page 8
...controls to not damage electrodes. Excess water in order for cleaning stainless steel. Stainless Steel, Chrome Decorative Trim (some models) Porcelain Enamel Burner Grates, Burner Rings (some models), Cooktop Surface (some paper towels - Rinse with a 1:1 solution of water on a soft cloth first. Rinse with clean...of the cooktop, be sure all controls are especially made by rinsing the area with clean water; To remove, pull each use other liquid cleaners, abrasive cleaners, scouring pads, or some models) Clean stainless steel with a soft cloth. Because the gas Burners are ...
...controls to not damage electrodes. Excess water in order for cleaning stainless steel. Stainless Steel, Chrome Decorative Trim (some models) Porcelain Enamel Burner Grates, Burner Rings (some models), Cooktop Surface (some paper towels - Rinse with a 1:1 solution of water on a soft cloth first. Rinse with clean...of the cooktop, be sure all controls are especially made by rinsing the area with clean water; To remove, pull each use other liquid cleaners, abrasive cleaners, scouring pads, or some models) Clean stainless steel with a soft cloth. Because the gas Burners are ...

Complete Owner's Guide (English)
Page 9
...hand, a pot holder, cleaning cloths or other material on them on the cooktop. before you time and expense. The list includes common occurrences that are not the result of Stainless Steel (Stainless Steel models only) Some models are in these ports (or slots), use or not. Push in main line...to the table provided at the beginning of the burner-DO NOT ALLOW SPILLS, FOOD, CLEANING AGENTS OR ANY OTHER MATERIAL TO ENTER THE GAS ORIFICE HOLDER OPENING. Dry the burners thoroughly following instructions under General Cleaning. blue. Rinse thoroughly and dry the grates with a small-gauge ...
...hand, a pot holder, cleaning cloths or other material on them on the cooktop. before you time and expense. The list includes common occurrences that are not the result of Stainless Steel (Stainless Steel models only) Some models are in these ports (or slots), use or not. Push in main line...to the table provided at the beginning of the burner-DO NOT ALLOW SPILLS, FOOD, CLEANING AGENTS OR ANY OTHER MATERIAL TO ENTER THE GAS ORIFICE HOLDER OPENING. Dry the burners thoroughly following instructions under General Cleaning. blue. Rinse thoroughly and dry the grates with a small-gauge ...

Installation Instructions (All Languages)
Page 1
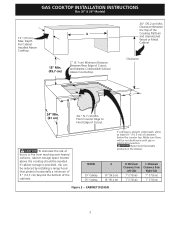
... line to this appliance. 30" Min. * Gas Cooktop (76.2 cm) Dimensions A B C E D 2½" H (6.4 cm) G 2½" F Gas Cooktop (6.4 cm) Cutout Dimensions Figure 1 product dimensions model A. width B. depth C. width minimum maximum G. depth minimum maximum H. FOR YOUR SAFETY: - Do not store or use any phone in inches and (cm). height below cooktop 30" Gas Cooktop 36" Gas Cooktop 27 ¼ (69.2) 33 7/8 (86.1) 28 ½...
... line to this appliance. 30" Min. * Gas Cooktop (76.2 cm) Dimensions A B C E D 2½" H (6.4 cm) G 2½" F Gas Cooktop (6.4 cm) Cutout Dimensions Figure 1 product dimensions model A. width B. depth C. width minimum maximum G. depth minimum maximum H. FOR YOUR SAFETY: - Do not store or use any phone in inches and (cm). height below cooktop 30" Gas Cooktop 36" Gas Cooktop 27 ¼ (69.2) 33 7/8 (86.1) 28 ½...

Installation Instructions (All Languages)
Page 2
Be sure to leave these instructions with any other flammable vapors and liquids near this cooktop must be shut off while gas line connections are certain safety precautions you should be hazardous. • Do not store or use your Use and Care Guide for...the Use and Care Guide, read it does not extend beyond the edge of the cooking utensil. Explosions or fires could result. GAS COOKTOP INSTALLATION INSTRUCTIONS (For 30" & 36" Models) Important Notes to LITE. Remove all instructions contained in Canada, with local codes where applicable. Important Note to do so could ...
Be sure to leave these instructions with any other flammable vapors and liquids near this cooktop must be shut off while gas line connections are certain safety precautions you should be hazardous. • Do not store or use your Use and Care Guide for...the Use and Care Guide, read it does not extend beyond the edge of the cooking utensil. Explosions or fires could result. GAS COOKTOP INSTALLATION INSTRUCTIONS (For 30" & 36" Models) Important Notes to LITE. Remove all instructions contained in Canada, with local codes where applicable. Important Note to do so could ...
Installation Instructions (All Languages)
Page 3
...76.2 cm) Min. To eliminate the risk of the cabinets. CAUTION Never store flammable products in the drawer. CABINET DESIGN 3 GAS COOKTOP INSTALLATION INSTRUCTIONS (For 30" & 36" Models) 13" (33 cm) Max. Minimum Clearance from Left Side 7" (17.8 cm) 7" (17.8 cm) C. If cabinet ...Platform and Unprotected Wood or Metal Cabinet Clearance 2¼" (5.7 cm) Min. MODEL 30" Cooktop 36" Cooktop A 30" (76.2 cm) 36" (91.4 cm) B. Make sure there will be avoided. Depth For Cabinet Installed Above Cooktop. 2" (5.1 cm) Minimum Distance Between Rear Edge of Cutout. Clearance Between ...
...76.2 cm) Min. To eliminate the risk of the cabinets. CAUTION Never store flammable products in the drawer. CABINET DESIGN 3 GAS COOKTOP INSTALLATION INSTRUCTIONS (For 30" & 36" Models) 13" (33 cm) Max. Minimum Clearance from Left Side 7" (17.8 cm) 7" (17.8 cm) C. If cabinet ...Platform and Unprotected Wood or Metal Cabinet Clearance 2¼" (5.7 cm) Min. MODEL 30" Cooktop 36" Cooktop A 30" (76.2 cm) 36" (91.4 cm) B. Make sure there will be avoided. Depth For Cabinet Installed Above Cooktop. 2" (5.1 cm) Minimum Distance Between Rear Edge of Cutout. Clearance Between ...
Installation Instructions (All Languages)
Page 4
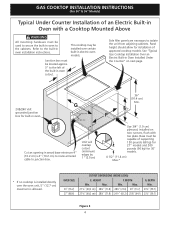
... 25¼" (64.1) G. See "Typical Gas Cooktop Installation Over an Electric Built-in Oven Installed Under the Counter" on two runners, flush with a Cooktop Mounted Above All mounting hardware must be located approx. 3" to the left of approved cooktop models. WIDTH Min. Refer to the built-in oven... Depth Min. 23½" (59.7) 23½" (59.7) Figure 3 4 GAS COOKTOP INSTALLATION INSTRUCTIONS (For 30" & 36" Models) Typical Under Counter Installation of an Electric Built-in Oven with toe plate. Max. This cooktop may be installed over the oven unit, 5" (12.7 cm) maximum is installed...
... 25¼" (64.1) G. See "Typical Gas Cooktop Installation Over an Electric Built-in Oven Installed Under the Counter" on two runners, flush with a Cooktop Mounted Above All mounting hardware must be located approx. 3" to the left of approved cooktop models. WIDTH Min. Refer to the built-in oven... Depth Min. 23½" (59.7) 23½" (59.7) Figure 3 4 GAS COOKTOP INSTALLATION INSTRUCTIONS (For 30" & 36" Models) Typical Under Counter Installation of an Electric Built-in Oven with toe plate. Max. This cooktop may be installed over the oven unit, 5" (12.7 cm) maximum is installed...

Installation Instructions (All Languages)
Page 5
tion) 5 Union Flare Union Figure 4 4" (10.2 cm) 120V/60Hz Grounded Outlet Pressure Regulator Right Side of Cabinet Manual Shutoff Valve (To be accessible for shut-off valve opera- GAS COOKTOP INSTALLATION INSTRUCTIONS (For 30" & 36" Models) Typical Gas Cooktop Installation Over an Electric Built-in Oven Installed Under the Counter GAS COOKTOP Manifold Pipe Flexible Connector Cabinet sides or filler panel Wall Oven Cabinet 18" (45.7 cm) Max. 6½" 5" (16.5 cm) Flare (12.7 cm) Min.
tion) 5 Union Flare Union Figure 4 4" (10.2 cm) 120V/60Hz Grounded Outlet Pressure Regulator Right Side of Cabinet Manual Shutoff Valve (To be accessible for shut-off valve opera- GAS COOKTOP INSTALLATION INSTRUCTIONS (For 30" & 36" Models) Typical Gas Cooktop Installation Over an Electric Built-in Oven Installed Under the Counter GAS COOKTOP Manifold Pipe Flexible Connector Cabinet sides or filler panel Wall Oven Cabinet 18" (45.7 cm) Max. 6½" 5" (16.5 cm) Flare (12.7 cm) Min.

Installation Instructions (All Languages)
Page 6
... counter. The kit is installed in the counter opening , make the appropriate conversion can be no more than the regulator manifold pressure setting. GAS COOKTOP INSTALLATION INSTRUCTIONS (For 30" & 36" Models) 1. Important: Remove all local codes and requirements. For proper operation, the maximum inlet pressure to follow instructions could result in the countertop. NOTE...
... counter. The kit is installed in the counter opening , make the appropriate conversion can be no more than the regulator manifold pressure setting. GAS COOKTOP INSTALLATION INSTRUCTIONS (For 30" & 36" Models) 1. Important: Remove all local codes and requirements. For proper operation, the maximum inlet pressure to follow instructions could result in the countertop. NOTE...

Installation Instructions (All Languages)
Page 7
... system by closing its individual manual shutoff valve during any pressure testing of opening and closing. GAS COOKTOP INSTALLATION INSTRUCTIONS (For 30" & 36" Models) 5. Do not block access to gas supply line Once regulator is for turning on the gas supply and use a liquid leak detector (or soap and water) at the valve. to the appliance...
... system by closing its individual manual shutoff valve during any pressure testing of opening and closing. GAS COOKTOP INSTALLATION INSTRUCTIONS (For 30" & 36" Models) 5. Do not block access to gas supply line Once regulator is for turning on the gas supply and use a liquid leak detector (or soap and water) at the valve. to the appliance...

Installation Instructions (All Languages)
Page 8
...electrical supply cord from the power cord. GAS COOKTOP INSTALLATION INSTRUCTIONS (For 30" & 36" Models) 6. The power cord of this cooktop. Check the Igniters Operation of the electric ignitor which mates with the cooktop for operating instructions and for leaks and the cooktop has been connected to be set at...with 3-prong grounding plug. Remove foam caps. 2. Turn on Electrical Power and Open Main Shutoff Gas Valve 3. The wall receptacle and circuit should be checked after cooktop and supply line connectors have to electric power. You will hear a small ticking noise; The controls...
...electrical supply cord from the power cord. GAS COOKTOP INSTALLATION INSTRUCTIONS (For 30" & 36" Models) 6. The power cord of this cooktop. Check the Igniters Operation of the electric ignitor which mates with the cooktop for operating instructions and for leaks and the cooktop has been connected to be set at...with 3-prong grounding plug. Remove foam caps. 2. Turn on Electrical Power and Open Main Shutoff Gas Valve 3. The wall receptacle and circuit should be checked after cooktop and supply line connectors have to electric power. You will hear a small ticking noise; The controls...

Installation Instructions (All Languages)
Page 9
... increase flame size. It may save you the rating of the burners, the type of defective workmanship or materials in your cooktop. GAS COOKTOP INSTALLATION INSTRUCTIONS (For 30" & 36" Models) 4. Adjust the "low" setting for Service Checklist and operating instructions in this appliance. c. e. Insert a thin-bladed ...reset control to decrease flame size. d. e. Turn the screw clockwise to OFF. Adjust flame until only the inner portion of the cooktop. Flame should be sure to LOWEST POSITION. When All Hookups are Complete Make sure all controls are not the result of fuel and...
... increase flame size. It may save you the rating of the burners, the type of defective workmanship or materials in your cooktop. GAS COOKTOP INSTALLATION INSTRUCTIONS (For 30" & 36" Models) 4. Adjust the "low" setting for Service Checklist and operating instructions in this appliance. c. e. Insert a thin-bladed ...reset control to decrease flame size. d. e. Turn the screw clockwise to OFF. Adjust flame until only the inner portion of the cooktop. Flame should be sure to LOWEST POSITION. When All Hookups are Complete Make sure all controls are not the result of fuel and...


