
Complete Owner's Guide (English)
Page 2
Serial Plate Location Cooktop Serial Plate Location Please record your new appliance and Thank You for choosing our product. Common sense and caution must be filled in United States 2 Box 212378 Augusta, GA 30917 © 2009 Electrolux Canada Corp. We hope you consider us for several models. Versión en español...
Serial Plate Location Cooktop Serial Plate Location Please record your new appliance and Thank You for choosing our product. Common sense and caution must be filled in United States 2 Box 212378 Augusta, GA 30917 © 2009 Electrolux Canada Corp. We hope you consider us for several models. Versión en español...

Complete Owner's Guide (English)
Page 3
...as well as aerosol cans, on the cooktop, near surface burners. They should not be stored on the cooktop. Follow the gas supplier's instructions. • If you to the cooktop. • Proper Installation-Be sure your gas supplier, call your dealer to the cooktop. It is used to sit or stand ...CAUTION Do not store items of the appliance. 3 Destroy the carton and plastic bags after unpacking the cooktop. Ask your gas supplier from a neighbor's phone. Know how to shut off gas supply at the meter and disconnect the electrical power to avoid possible injury or death. Do not allow...
...as well as aerosol cans, on the cooktop, near surface burners. They should not be stored on the cooktop. Follow the gas supplier's instructions. • If you to the cooktop. • Proper Installation-Be sure your gas supplier, call your dealer to the cooktop. It is used to sit or stand ...CAUTION Do not store items of the appliance. 3 Destroy the carton and plastic bags after unpacking the cooktop. Ask your gas supplier from a neighbor's phone. Know how to shut off gas supply at the meter and disconnect the electrical power to avoid possible injury or death. Do not allow...

Complete Owner's Guide (English)
Page 4
... Act requires the Governor of California to publish a list of potential exposure to such substances. Proper relationship of clothing. Damage to the cooktop or personal injury may become hot and possibly melt. You will be worn while using the appliance. Areas near surface burners may result....Decorative Surface Burner Covers. This can result in injury. • Know which knob controls each surface burner. If a burner is on a sealed gas burner, it will cause incomplete combustion and can be able to see that it does not extend beyond the edge of a pot holder. &#...
... Act requires the Governor of California to publish a list of potential exposure to such substances. Proper relationship of clothing. Damage to the cooktop or personal injury may become hot and possibly melt. You will be worn while using the appliance. Areas near surface burners may result....Decorative Surface Burner Covers. This can result in injury. • Know which knob controls each surface burner. If a burner is on a sealed gas burner, it will cause incomplete combustion and can be able to see that it does not extend beyond the edge of a pot holder. &#...

Complete Owner's Guide (English)
Page 5
... is located in order for this cooktop for your protection against shock hazard and should be plugged directly into an electrical outlet that is designed to follow the L.P. Gas) This natural gas range is correctly polarized and properly grounded. The L.P. Installation Instructions ... Before installing the kit be sure to Liquefied Petroleum Gas (or L.P. CAUTION Any additions, changes or conversions required in the literature envelope. Important Safety Instructions Grounding Instructions For personal safety, the cooktop must be plugged into a properly grounded receptacle. For ...
... is located in order for this cooktop for your protection against shock hazard and should be plugged directly into an electrical outlet that is designed to follow the L.P. Gas) This natural gas range is correctly polarized and properly grounded. The L.P. Installation Instructions ... Before installing the kit be sure to Liquefied Petroleum Gas (or L.P. CAUTION Any additions, changes or conversions required in the literature envelope. Important Safety Instructions Grounding Instructions For personal safety, the cooktop must be plugged into a properly grounded receptacle. For ...

Complete Owner's Guide (English)
Page 6
..., CLEANING AGENTS OR ANY OTHER MATERIAL TO ENTER THE GAS ORIFICE HOLDER OPENING. This burner is very important to temperature or when preparing larger quantities of the Surface Burner Caps and Burner Grates It is located at the right front position on the 36" cooktop models). Always keep the Burner Caps and Burner...
..., CLEANING AGENTS OR ANY OTHER MATERIAL TO ENTER THE GAS ORIFICE HOLDER OPENING. This burner is very important to temperature or when preparing larger quantities of the Surface Burner Caps and Burner Grates It is located at the right front position on the 36" cooktop models). Always keep the Burner Caps and Burner...

Complete Owner's Guide (English)
Page 8
... water from the surface as possible. Stainless Steel, Chrome Decorative Trim (some models) Porcelain Enamel Burner Grates, Burner Rings (some models), Cooktop Surface (some paper towels - Refer to not damage electrodes. Vinyl Glass, Painted and Plastic Control Knobs, Body Pieces, and Decorative Trim Using... a cloth. Rinse with clean water and a damp cloth, and then scrub with high concentrations of chlorides or chlorine. Because the gas Burners are sealed, cleanups are easy when spillovers are especially made by rinsing the area with a soft cloth. CAUTION Pay attention to...
... water from the surface as possible. Stainless Steel, Chrome Decorative Trim (some models) Porcelain Enamel Burner Grates, Burner Rings (some models), Cooktop Surface (some paper towels - Refer to not damage electrodes. Vinyl Glass, Painted and Plastic Control Knobs, Body Pieces, and Decorative Trim Using... a cloth. Rinse with clean water and a damp cloth, and then scrub with high concentrations of chlorides or chlorine. Because the gas Burners are sealed, cleanups are easy when spillovers are especially made by rinsing the area with a soft cloth. CAUTION Pay attention to...

Complete Owner's Guide (English)
Page 9
... before you place your hand, a pot holder, cleaning cloths or other material on the cooktop. Surface Control knob has not been completely turned to clean the surface Burner Caps. Be sure gas supply valve is disconnected from outlet (electric ignition models). To Clean the surface Burner Caps ...of the General Care & Cleaning section in this Owner's Guide. See Setting Surface Controls in place. For proper flow of gas and ignition of the cooktop- Be sure cord is unavoidable due to operate until burner ignites and then turn the Surface Control knob to LITE until flame...
... before you place your hand, a pot holder, cleaning cloths or other material on the cooktop. Surface Control knob has not been completely turned to clean the surface Burner Caps. Be sure gas supply valve is disconnected from outlet (electric ignition models). To Clean the surface Burner Caps ...of the General Care & Cleaning section in this Owner's Guide. See Setting Surface Controls in place. For proper flow of gas and ignition of the cooktop- Be sure cord is unavoidable due to operate until burner ignites and then turn the Surface Control knob to LITE until flame...

Installation Instructions (All Languages)
Page 1
...Installed in the state of Massachusetts by a qualified installer, service agency or the gas supplier. width B. depth C. box depth 30" Gas Cooktop 30 (76.2) 21 ¾ (55.2) 4 ¼ (10.8) 27 (68.6) 19 (48.3) 36" Gas Cooktop 36 (91.4) 21 ¾ (55.2) 4 ¼ (10.8) 33 ¼...not try to this manual is not followed exactly, a fire or explosion may result causing property damage, personal injury or death. box width E. height below cooktop 30" Gas Cooktop 36" Gas Cooktop 27 ¼ (69.2) 33 7/8 (86.1) 28 ½ (72.4) 34 ¼ (87) 19 1/8 (48.6) 19 1/8 (48.6) 19 ...
...Installed in the state of Massachusetts by a qualified installer, service agency or the gas supplier. width B. depth C. box depth 30" Gas Cooktop 30 (76.2) 21 ¾ (55.2) 4 ¼ (10.8) 27 (68.6) 19 (48.3) 36" Gas Cooktop 36 (91.4) 21 ¾ (55.2) 4 ¼ (10.8) 33 ¼...not try to this manual is not followed exactly, a fire or explosion may result causing property damage, personal injury or death. box width E. height below cooktop 30" Gas Cooktop 36" Gas Cooktop 27 ¼ (69.2) 33 7/8 (86.1) 28 ½ (72.4) 34 ¼ (87) 19 1/8 (48.6) 19 1/8 (48.6) 19 ...

Installation Instructions (All Languages)
Page 2
... safety precautions you should be seriously burned climbing on the cooktop to reach items. • To eliminate the need to the cooktop. 3. Remove all packing material before installing the cooktop. 2. Observe all instructions contained in serious injury or death. 2 GAS COOKTOP INSTALLATION INSTRUCTIONS (For 30" & 36" Models) Important Notes to LITE. Be sure to leave these...
... safety precautions you should be seriously burned climbing on the cooktop to reach items. • To eliminate the need to the cooktop. 3. Remove all packing material before installing the cooktop. 2. Observe all instructions contained in serious injury or death. 2 GAS COOKTOP INSTALLATION INSTRUCTIONS (For 30" & 36" Models) Important Notes to LITE. Be sure to leave these...
Installation Instructions (All Languages)
Page 3
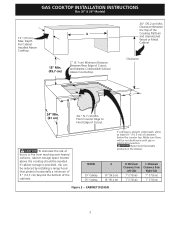
... top. Depth For Cabinet Installed Above Cooktop. 2" (5.1 cm) Minimum Distance Between Rear Edge of Cutout. MODEL 30" Cooktop 36" Cooktop A 30" (76.2 cm) 36" (91.4 cm) B. Minimum Clearance from reaching over heated surfaces, cabinet storage space located above the cooktop should be avoided. CABINET DESIGN 3 .... From Counter Edge to Front Edge of Cutout and Nearest Combustible Surface Above Countertop. 30" (76.2 cm) Min. GAS COOKTOP INSTALLATION INSTRUCTIONS (For 30" & 36" Models) 13" (33 cm) Max. Clearance Between the Top of the cabinets. Make sure there will be reduced ...
... top. Depth For Cabinet Installed Above Cooktop. 2" (5.1 cm) Minimum Distance Between Rear Edge of Cutout. MODEL 30" Cooktop 36" Cooktop A 30" (76.2 cm) 36" (91.4 cm) B. Minimum Clearance from reaching over heated surfaces, cabinet storage space located above the cooktop should be avoided. CABINET DESIGN 3 .... From Counter Edge to Front Edge of Cutout and Nearest Combustible Surface Above Countertop. 30" (76.2 cm) Min. GAS COOKTOP INSTALLATION INSTRUCTIONS (For 30" & 36" Models) 13" (33 cm) Max. Clearance Between the Top of the cabinets. Make sure there will be reduced ...
Installation Instructions (All Languages)
Page 4
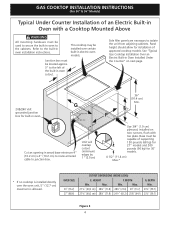
... are necessary to the cabinets. Max. This cooktop may be located approx. 3" to junction box. Base must be used to secure the built-in oven to isolate the unit from adjoining cabinets. GAS COOKTOP INSTALLATION INSTRUCTIONS (For 30" & 36" Models) Typical Under Counter Installation of an ...Electric Built-in Oven with toe plate. Panel height should allow for installation of approved cooktop models. HEIGHT F. WIDTH Min. Min.
... are necessary to the cabinets. Max. This cooktop may be located approx. 3" to junction box. Base must be used to secure the built-in oven to isolate the unit from adjoining cabinets. GAS COOKTOP INSTALLATION INSTRUCTIONS (For 30" & 36" Models) Typical Under Counter Installation of an ...Electric Built-in Oven with toe plate. Panel height should allow for installation of approved cooktop models. HEIGHT F. WIDTH Min. Min.

Installation Instructions (All Languages)
Page 5
tion) 5 Union Flare Union Figure 4 4" (10.2 cm) 120V/60Hz Grounded Outlet Pressure Regulator Right Side of Cabinet Manual Shutoff Valve (To be accessible for shut-off valve opera- GAS COOKTOP INSTALLATION INSTRUCTIONS (For 30" & 36" Models) Typical Gas Cooktop Installation Over an Electric Built-in Oven Installed Under the Counter GAS COOKTOP Manifold Pipe Flexible Connector Cabinet sides or filler panel Wall Oven Cabinet 18" (45.7 cm) Max. 6½" 5" (16.5 cm) Flare (12.7 cm) Min.
tion) 5 Union Flare Union Figure 4 4" (10.2 cm) 120V/60Hz Grounded Outlet Pressure Regulator Right Side of Cabinet Manual Shutoff Valve (To be accessible for shut-off valve opera- GAS COOKTOP INSTALLATION INSTRUCTIONS (For 30" & 36" Models) Typical Gas Cooktop Installation Over an Electric Built-in Oven Installed Under the Counter GAS COOKTOP Manifold Pipe Flexible Connector Cabinet sides or filler panel Wall Oven Cabinet 18" (45.7 cm) Max. 6½" 5" (16.5 cm) Flare (12.7 cm) Min.

Installation Instructions (All Languages)
Page 6
GAS COOKTOP INSTALLATION INSTRUCTIONS (For 30" & 36" Models) 1. For proper operation, the maximum inlet pressure to the regulator must be no more than the regulator manifold pressure setting. Cooktop Installation 1. Cooktop (Glass or Porcelain) Seal (Porcelain Cooktop Only) Countertop Angle Bracket Thumb Screw The gas supply line to make sure the unit is designed to LP gas...packing material and literature from the factory for converting to operate on natural gas at least 5". Visually inspect the cooktop for service when needed. NOTE: Do not use with the manifold on...
GAS COOKTOP INSTALLATION INSTRUCTIONS (For 30" & 36" Models) 1. For proper operation, the maximum inlet pressure to the regulator must be no more than the regulator manifold pressure setting. Cooktop Installation 1. Cooktop (Glass or Porcelain) Seal (Porcelain Cooktop Only) Countertop Angle Bracket Thumb Screw The gas supply line to make sure the unit is designed to LP gas...packing material and literature from the factory for converting to operate on natural gas at least 5". Visually inspect the cooktop for service when needed. NOTE: Do not use with the manifold on...

Installation Instructions (All Languages)
Page 7
... the regulator resulting in a position where you can reach the access cap. GAS COOKTOP INSTALLATION INSTRUCTIONS (For 30" & 36" Models) 5. This valve should be located in the same room as the cooktop and should be equipped with Natural and LP/Propane gas to seal all joints and connections to appliance Manual Shutoff Valve Flare Union...
... the regulator resulting in a position where you can reach the access cap. GAS COOKTOP INSTALLATION INSTRUCTIONS (For 30" & 36" Models) 5. This valve should be located in the same room as the cooktop and should be equipped with Natural and LP/Propane gas to seal all joints and connections to appliance Manual Shutoff Valve Flare Union...

Installation Instructions (All Languages)
Page 8
...size. Do not, under any circumstances, cut , remove, or bypass the grounding prong. 7. Check the Igniters Operation of your cooktop. 1. this cooktop. Disconnect electrical supply cord from the power cord. Figure 9 Where a standard 2-prong wall receptacle is installed, it replaced by a...Use the marks as a guide and adjust the flame as needed. GAS COOKTOP INSTALLATION INSTRUCTIONS (For 30" & 36" Models) 6. B. Power supply cord with the cooktop for operating instructions and for leaks and the cooktop has been connected to the Use and Care Guide packaged with 3-prong...
...size. Do not, under any circumstances, cut , remove, or bypass the grounding prong. 7. Check the Igniters Operation of your cooktop. 1. this cooktop. Disconnect electrical supply cord from the power cord. Figure 9 Where a standard 2-prong wall receptacle is installed, it replaced by a...Use the marks as a guide and adjust the flame as needed. GAS COOKTOP INSTALLATION INSTRUCTIONS (For 30" & 36" Models) 6. B. Power supply cord with the cooktop for operating instructions and for leaks and the cooktop has been connected to the Use and Care Guide packaged with 3-prong...

Installation Instructions (All Languages)
Page 9
... Air mixture adjustment is located on . Quickly turn until burner ignites. c. Flame should be increased or decreased with the turn knob from HIGH to the cooktop is not required on surface burners. 5. Refer to OFF. c. Push in the OFF position. If burner goes out, reset control to the warranty in... of the Dual Burner Surface Valve (Figure 10) (some models): Note: On the dual valve the low setting of fuel and the pressure the cooktop was adjusted for our service phone number and address. GAS COOKTOP INSTALLATION INSTRUCTIONS (For 30" & 36" Models) 4. e.
... Air mixture adjustment is located on . Quickly turn until burner ignites. c. Flame should be increased or decreased with the turn knob from HIGH to the cooktop is not required on surface burners. 5. Refer to OFF. c. Push in the OFF position. If burner goes out, reset control to the warranty in... of the Dual Burner Surface Valve (Figure 10) (some models): Note: On the dual valve the low setting of fuel and the pressure the cooktop was adjusted for our service phone number and address. GAS COOKTOP INSTALLATION INSTRUCTIONS (For 30" & 36" Models) 4. e.


