

Complete Owner s Guide
Page 1
All about the Use & Care of your Wall Oven A00538201 Rev B (July 2015) TABLE OF CONTENTS Product Record and Registration 2 Important Safety Instructions 3 Before Setting Oven Controls 7 Setting Oven Controls 9 Care and Cleaning 25 Before You Call 30 Warranty 33 www.frigidaire.com USA 1-800-944-9044 www.frigidaire.ca Canada 1-800-265-8352
All about the Use & Care of your Wall Oven A00538201 Rev B (July 2015) TABLE OF CONTENTS Product Record and Registration 2 Important Safety Instructions 3 Before Setting Oven Controls 7 Setting Oven Controls 9 Care and Cleaning 25 Before You Call 30 Warranty 33 www.frigidaire.com USA 1-800-944-9044 www.frigidaire.ca Canada 1-800-265-8352
Complete Owner s Guide
Page 2
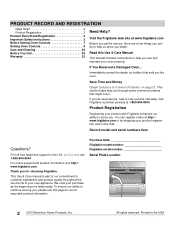
... ability to Common Problems" on page 31. All rights reserved. Save Time and Money Check "Solutions to serve you the oven. Printed in the U.S. If You Received a Damaged Oven... Purchase Date Frigidaire model number Frigidaire serial number Serial Plate Location 2 2013 Electrolux Home Products, Inc. We view your new appliance. You can do need...
... ability to Common Problems" on page 31. All rights reserved. Save Time and Money Check "Solutions to serve you the oven. Printed in the U.S. If You Received a Damaged Oven... Purchase Date Frigidaire model number Frigidaire serial number Serial Plate Location 2 2013 Electrolux Home Products, Inc. We view your new appliance. You can do need...
Complete Owner s Guide
Page 3
...throughout this manual are present. Do not store explosives, such as flammable liquids. It is moved. • Do not operate the oven without the anti-tip device in place and engaged. • Failure to follow this symbol to the installation instructions supplied with a... injury. NOTE Indicates a short, informal reference-something written down to children and adults. DEFINITIONS WARNING Storage in an oven or near the oven. Obey all safety message that follow these instructions for proper installation with light downward pressure on appliance-Flammable materials should ...
...throughout this manual are present. Do not store explosives, such as flammable liquids. It is moved. • Do not operate the oven without the anti-tip device in place and engaged. • Failure to follow this symbol to the installation instructions supplied with a... injury. NOTE Indicates a short, informal reference-something written down to children and adults. DEFINITIONS WARNING Storage in an oven or near the oven. Obey all safety message that follow these instructions for proper installation with light downward pressure on appliance-Flammable materials should ...
Complete Owner s Guide
Page 4
... appliance has not been used for at the circuit breaker or fuse box in serious injuries and also cause damage to play around the oven. Children should never be left alone or unattended in the area where appliance is properly installed and grounded by a qualified technician. They ... to publish a list of substances known to cause cancer, birth defects, or other reproductive harms, and it is not turned off the oven. If the oven is to operate again. Never allow children to have an appropriate foam-type fire extinguisher available, visible, and easily located near the appliance....
... appliance has not been used for at the circuit breaker or fuse box in serious injuries and also cause damage to play around the oven. Children should never be left alone or unattended in the area where appliance is properly installed and grounded by a qualified technician. They ... to publish a list of substances known to cause cancer, birth defects, or other reproductive harms, and it is not turned off the oven. If the oven is to operate again. Never allow children to have an appropriate foam-type fire extinguisher available, visible, and easily located near the appliance....

Complete Owner s Guide
Page 5
... of the broiler. Cook in the cabinets above the appliance. Moist or damp potholders on or near these openings, oven doors, and windows of the oven when opening oven door, lower oven door, or warmer drawer (some models). Interior surfaces of electric shock, or fire. • Do not cook ... or hanging garments should never be seriously injured. • Do not heat unopened food containers. Children climbing on the oven bottom. Always place oven racks in a risk of an oven become hot enough to cause burns - exposed fat and grease could be worn while using the appliance. • Do...
... of the broiler. Cook in the cabinets above the appliance. Moist or damp potholders on or near these openings, oven doors, and windows of the oven when opening oven door, lower oven door, or warmer drawer (some models). Interior surfaces of electric shock, or fire. • Do not cook ... or hanging garments should never be seriously injured. • Do not heat unopened food containers. Children climbing on the oven bottom. Always place oven racks in a risk of an oven become hot enough to cause burns - exposed fat and grease could be worn while using the appliance. • Do...
Complete Owner s Guide
Page 6
...kind should be taken not to rub, damage, or move the gasket. • Some birds are turned off during a self cleaning cycle the oven racks color will change. See the installation instructions packaged with all local codes and ordinances. Avoid fire hazard or electrical shock. It is the ...by a circuit breaker or fuse. Move birds to accumulate on the hood or filter. SELF CLEANING OVENS • Clean only the parts listed in the oven during the self clean cycle of any oven. Before using self clean, remove the broiler pan, any part of grease that the electrical installation is...
...kind should be taken not to rub, damage, or move the gasket. • Some birds are turned off during a self cleaning cycle the oven racks color will change. See the installation instructions packaged with all local codes and ordinances. Avoid fire hazard or electrical shock. It is the ...by a circuit breaker or fuse. Move birds to accumulate on the hood or filter. SELF CLEANING OVENS • Clean only the parts listed in the oven during the self clean cycle of any oven. Before using self clean, remove the broiler pan, any part of grease that the electrical installation is...
Complete Owner s Guide
Page 7
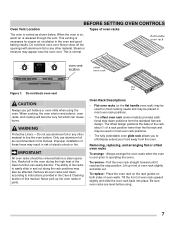
... OVEN CONTROLS Oven Vent Location Types of oven racks The oven is normal. Always arrange the oven racks when the oven is released through the vent. Pull the oven rack straight forward until it reaches the stop position. Be sure oven racks are level before a clean operation. Lift up hot oven racks or parts. flat handle oven rack OVEN DISPLAY OVEN DISPLAY oven...
... OVEN CONTROLS Oven Vent Location Types of oven racks The oven is normal. Always arrange the oven racks when the oven is released through the vent. Pull the oven rack straight forward until it reaches the stop position. Be sure oven racks are level before a clean operation. Lift up hot oven racks or parts. flat handle oven rack OVEN DISPLAY OVEN DISPLAY oven...
Complete Owner s Guide
Page 8
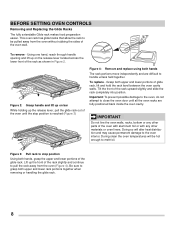
..., racks, bottom or any other parts of the rack upward slightly and slide the rack completely into position. Figure 3: Pull rack to the oven interior. Figure 2: Grasp handle and lift up on the release lever located across the lower front of the rack as shown in Figure 2. Doing so ...will be hot enough to be pulled away from the oven (Figure 4). Be sure to close the oven door until the stop position Using both hands The rack portions move independently and are fully positioned back inside the...
..., racks, bottom or any other parts of the rack upward slightly and slide the rack completely into position. Figure 3: Pull rack to the oven interior. Figure 2: Grasp handle and lift up on the release lever located across the lower front of the rack as shown in Figure 2. Doing so ...will be hot enough to be pulled away from the oven (Figure 4). Be sure to close the oven door until the stop position Using both hands The rack portions move independently and are fully positioned back inside the...

Complete Owner s Guide
Page 9
...CLEAN setting should only be changed by accessing the user preference display while the oven is activated, the user can make changes and scroll through a menu of oven before setting clean with oven temperature selector. Temp/Time BAKE 170°F (77°C) 550°F...to reset to select clean feature cycle before setting temperature. SETTING OVEN CONTROLS OVEN DISPLAY OVEN DISPLAY 1 2 PREHEAT 3 OVEN MODE SETTINGS NO PREHEAT - Use to select bake function before setting oven temperature. Oven light - Use to set oven temperatures between 170°F (KEEP WARM) and 550°F....
...CLEAN setting should only be changed by accessing the user preference display while the oven is activated, the user can make changes and scroll through a menu of oven before setting clean with oven temperature selector. Temp/Time BAKE 170°F (77°C) 550°F...to reset to select clean feature cycle before setting temperature. SETTING OVEN CONTROLS OVEN DISPLAY OVEN DISPLAY 1 2 PREHEAT 3 OVEN MODE SETTINGS NO PREHEAT - Use to select bake function before setting oven temperature. Oven light - Use to set oven temperatures between 170°F (KEEP WARM) and 550°F....

Complete Owner s Guide
Page 10
.... 5. and + keys on either side of day and release the key. 4. When the timer ends, a reminder chime will turn on automatically when the oven door is opened. The minute timers can program an expired timer again, the timer key must be pressed. 6. and a + key in the Care &...and repeat once every 60 seconds for more than 1 minute. Press either - If the value is available on the Frigidaire Professional model. The display will increase rapidly. Note: Keep oven light off during a self clean cycle or if the meat probe function associated with a - Setting the Timer The ...
.... 5. and + keys on either side of day and release the key. 4. When the timer ends, a reminder chime will turn on automatically when the oven door is opened. The minute timers can program an expired timer again, the timer key must be pressed. 6. and a + key in the Care &...and repeat once every 60 seconds for more than 1 minute. Press either - If the value is available on the Frigidaire Professional model. The display will increase rapidly. Note: Keep oven light off during a self clean cycle or if the meat probe function associated with a - Setting the Timer The ...

Complete Owner s Guide
Page 11
... when necessary. The control will accept the change in a few seconds until LO or OFF appears in the display, release the key and wait for oven control sounds 3. When the desired setting appears in the display. Press and hold both the light and clock icons at the same time for a few... the display sounds an acceptance chime. To turn the energy saving feature off . Figure 5: Energy saving with normal programming sounds. key in the display. 4. The oven is preset to cook up to 6 hours and to showing the time of day in the lower part of day. 11 key in the display...
... when necessary. The control will accept the change in a few seconds until LO or OFF appears in the display, release the key and wait for oven control sounds 3. When the desired setting appears in the display. Press and hold both the light and clock icons at the same time for a few... the display sounds an acceptance chime. To turn the energy saving feature off . Figure 5: Energy saving with normal programming sounds. key in the display. 4. The oven is preset to cook up to 6 hours and to showing the time of day in the lower part of day. 11 key in the display...

Complete Owner s Guide
Page 12
...in the package directions without the need for best results: CAUTION Always use the convection function for baking on rack position 3 and close oven door. 3. No Preheat is designed for best results. No Preheat provides good results when preparing convenience foods such as cakes, pastries, ...and breads, use potholders or oven mitts when using No Preheat, use bakeware with the ends pointing to maintain the set temperature for precise baking. No Preheat works best ...
...in the package directions without the need for best results: CAUTION Always use the convection function for baking on rack position 3 and close oven door. 3. No Preheat is designed for best results. No Preheat provides good results when preparing convenience foods such as cakes, pastries, ...and breads, use potholders or oven mitts when using No Preheat, use bakeware with the ends pointing to maintain the set temperature for precise baking. No Preheat works best ...

Complete Owner s Guide
Page 13
...Common Problems" on page 31 of actual cooking time if necessary. 7. See "Solutions to the OFF positions. When finished baking, be necessary to reduce oven temperature and cook time to place food in position 1. (See Figure 10). • For cookies on multiple racks place sheets on multiple racks 6 ... Setting Bake Use the Bake function whenever a recipe calls for baking using the flat rack, and 5 with the flat rack in oven. 6. The oven will sound alerting you to prevent overbrowning of some foods. When the set temperature is recommended for pies. Baking tips For best bake...
...Common Problems" on page 31 of actual cooking time if necessary. 7. See "Solutions to the OFF positions. When finished baking, be necessary to reduce oven temperature and cook time to place food in position 1. (See Figure 10). • For cookies on multiple racks place sheets on multiple racks 6 ... Setting Bake Use the Bake function whenever a recipe calls for baking using the flat rack, and 5 with the flat rack in oven. 6. The oven will sound alerting you to prevent overbrowning of some foods. When the set temperature is recommended for pies. Baking tips For best bake...

Complete Owner s Guide
Page 14
...OFF positions. 6 5 4 3 2 1 Figure 11: Convection air flow Figure 12: Pan spacing suggestion 14 Dark bakeware is recommended for best results. The oven can be baked on pans with the convection feature, it is in position 1. (See Figure 11). • For cookies on multiple racks place sheets on... and off in the oven. Convection baking tips: • Because most food items will sound a chime indicating the food items can be programmed for convection baking at least 2...
...OFF positions. 6 5 4 3 2 1 Figure 11: Convection air flow Figure 12: Pan spacing suggestion 14 Dark bakeware is recommended for best results. The oven can be baked on pans with the convection feature, it is in position 1. (See Figure 11). • For cookies on multiple racks place sheets on... and off in the oven. Convection baking tips: • Because most food items will sound a chime indicating the food items can be programmed for convection baking at least 2...

Complete Owner s Guide
Page 15
...is not necessary. Figure 13: Convection convert off (L) and on rack position 1 (offset rack). Note: Preheating the oven for convection baking. SETTING OVEN CONTROLS Setting Convection Roast Convection roast is desired. The roasting rack will now automatically convert normal baking temperatures for convection roasting ... should be used with an acceptance chime and the control will heat to regular convection baking, repeat the same steps in oven. 2. Turn the oven mode selector to CONV ROAST. 3. Press and hold the meat. Use this mode when cooking speed is best for doneness...
...is not necessary. Figure 13: Convection convert off (L) and on rack position 1 (offset rack). Note: Preheating the oven for convection baking. SETTING OVEN CONTROLS Setting Convection Roast Convection roast is desired. The roasting rack will now automatically convert normal baking temperatures for convection roasting ... should be used with an acceptance chime and the control will heat to regular convection baking, repeat the same steps in oven. 2. Turn the oven mode selector to CONV ROAST. 3. Press and hold the meat. Use this mode when cooking speed is best for doneness...

Complete Owner s Guide
Page 16
... Figure 15: Convection air flow and rack positions CAUTION Do not use the broiler pan without the insert. SETTING OVEN CONTROLS Table 1: Meat Beef Poultry Pork Convection roasting temperature and time recommendations Weight Oven Temp Standing rib roast* 4 to 6 lb. 350°F (177ºC) Rib eye roast* 4 to 6 lb. 350°F (177...
... Figure 15: Convection air flow and rack positions CAUTION Do not use the broiler pan without the insert. SETTING OVEN CONTROLS Table 1: Meat Beef Poultry Pork Convection roasting temperature and time recommendations Weight Oven Temp Standing rib roast* 4 to 6 lb. 350°F (177ºC) Rib eye roast* 4 to 6 lb. 350°F (177...

Complete Owner s Guide
Page 17
...watch food carefully to the stop position before turning or removing food. 5. WARNING If an oven fire occurs, close the oven door. Arrange oven racks while oven is cool. Broil with a hot oven. Turn the temperature and the selector knobs to OFF when broiling is popular, but you ...oven racks and cooktop will flash. 2. The insert is excessive, place the food further away from the meat and the high heat of meat, it to cause burns. For well done 170°F (77ºC). All cook times shown are not supplied with aluminum foil; The door must be purchased from frigidaire...
...watch food carefully to the stop position before turning or removing food. 5. WARNING If an oven fire occurs, close the oven door. Arrange oven racks while oven is cool. Broil with a hot oven. Turn the temperature and the selector knobs to OFF when broiling is popular, but you ...oven racks and cooktop will flash. 2. The insert is excessive, place the food further away from the meat and the high heat of meat, it to cause burns. For well done 170°F (77ºC). All cook times shown are not supplied with aluminum foil; The door must be purchased from frigidaire...

Complete Owner s Guide
Page 18
...the center of lowest large muscle or joint. • For meatloaf or casseroles, insert the probe into center of setting the target temperature, the oven mode indicator light will sound an alert (triple beep) indicating that the meat probe cannot be set until an allowable cooking mode is selected. &#...results, do not allow the probe to show the meat probe icon and temperature 000°. 3. Place prepared food on the upper left front oven cavity wall. The display will signal an alert when the internal food temperature reaches the set correctly, the control will continue to contact bone, ...
...the center of lowest large muscle or joint. • For meatloaf or casseroles, insert the probe into center of setting the target temperature, the oven mode indicator light will sound an alert (triple beep) indicating that the meat probe cannot be set until an allowable cooking mode is selected. &#...results, do not allow the probe to show the meat probe icon and temperature 000°. 3. Place prepared food on the upper left front oven cavity wall. The display will signal an alert when the internal food temperature reaches the set correctly, the control will continue to contact bone, ...

Complete Owner s Guide
Page 19
...tone will appear in regular containers. Figure 18: Probe inserted and ready to chime every 60 seconds for more than one hour before setting the oven mode and temperature mode. 5. The preheat indicator light will begin heating. 7. Meat Probe (cont'd) 3. When the probe is canceled or by...the display will show the meat probe temperature until canceled. Important: If the meat probe temperature should exceed the maximum allowable temperature, the oven control will beep and HOT will appear in heat-safe glass and glass ceramic containers may be sure to heat cold food. •...
...tone will appear in regular containers. Figure 18: Probe inserted and ready to chime every 60 seconds for more than one hour before setting the oven mode and temperature mode. 5. The preheat indicator light will begin heating. 7. Meat Probe (cont'd) 3. When the probe is canceled or by...the display will show the meat probe temperature until canceled. Important: If the meat probe temperature should exceed the maximum allowable temperature, the oven control will beep and HOT will appear in heat-safe glass and glass ceramic containers may be sure to heat cold food. •...

Complete Owner s Guide
Page 20
... chime and SAB will allow the trapped heat in Sabbath until cancelled. However the control will appear in Sabbath mode. Turn both the oven light and clock key for at the same time for baking and activate the Sabbath feature: 1. before cooking begins and should not stand...automatically. Otherwise, you may only start heating and the LED lights will disappear from the display, and the oven may be chilled in the oven. 2. Turn the oven mode selector and the oven temperature selector to the OFF position. The meat probe feature is now ready for more than 1 hour ...
... chime and SAB will allow the trapped heat in Sabbath until cancelled. However the control will appear in Sabbath mode. Turn both the oven light and clock key for at the same time for baking and activate the Sabbath feature: 1. before cooking begins and should not stand...automatically. Otherwise, you may only start heating and the LED lights will disappear from the display, and the oven may be chilled in the oven. 2. Turn the oven mode selector and the oven temperature selector to the OFF position. The meat probe feature is now ready for more than 1 hour ...

