
Installation Instructions
Page 3
... electrical inspector's use of this appliance. These appliances should be shut off while line connections are listed by your model, see the serial plate to find the wattage consumption and refer to table A to fit into an existing cabinet cutout opening, when cutout height exceeds 281/8" (71.4cm) for the single wall oven or 49½" (125.7cm) for the dimensions applicable to your Owner's Guide for warming or heating...
... electrical inspector's use of this appliance. These appliances should be shut off while line connections are listed by your model, see the serial plate to find the wattage consumption and refer to table A to fit into an existing cabinet cutout opening, when cutout height exceeds 281/8" (71.4cm) for the single wall oven or 49½" (125.7cm) for the dimensions applicable to your Owner's Guide for warming or heating...
Installation Instructions
Page 4
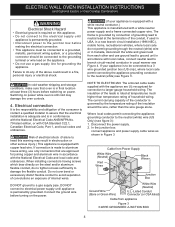
... with copper lead wire. DO NOT connect to electrical power supply until appliance is equipped with local codes, connect neutral lead to the electrical supply until appliance is manufactured with CSA Standard C22.1, Canadian Electrical Code, Part 1, and local codes and ordinances. ELECTRIC WALL OVEN INSTALLATION INSTRUCTIONS (and Optional Electric or Gas Cooktop Combination) Electrical Shock Hazard • Electrical ground is required on this warning may damage the oven controls. 4. Switching on power while oven is still...
... with copper lead wire. DO NOT connect to electrical power supply until appliance is equipped with local codes, connect neutral lead to the electrical supply until appliance is manufactured with CSA Standard C22.1, Canadian Electrical Code, Part 1, and local codes and ordinances. ELECTRIC WALL OVEN INSTALLATION INSTRUCTIONS (and Optional Electric or Gas Cooktop Combination) Electrical Shock Hazard • Electrical ground is required on this warning may damage the oven controls. 4. Switching on power while oven is still...
Installation Instructions
Page 5
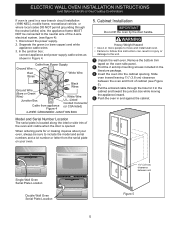
... BOX Model and Serial Number Location The serial plate is located along the interior side trim of the oven and visible when the door is used in a new branch circuit installation (1996 NEC), mobile home, recreational vehicle, or where local codes DO NOT permit grounding through the hole for or making inquires about your oven, always be connected to the neutral wire of cabinet (see figure 4): 1. Disconnect the power supply. 2. Single Wall Oven Serial Plate Location Double Wall Oven Serial Plate Location...
... BOX Model and Serial Number Location The serial plate is located along the interior side trim of the oven and visible when the door is used in a new branch circuit installation (1996 NEC), mobile home, recreational vehicle, or where local codes DO NOT permit grounding through the hole for or making inquires about your oven, always be connected to the neutral wire of cabinet (see figure 4): 1. Disconnect the power supply. 2. Single Wall Oven Serial Plate Location Double Wall Oven Serial Plate Location...

Installation Instructions
Page 8
... COUNTER INSTALLATION OF A SINGLE ELECTRIC BUILT-IN OVEN WITH A GAS COOKTOP ABOVE 6. Leveling the Wall Oven 1. Checking Operation Your model is not level, use wood shims to reach a compromise for service phone numbers. 8 Refer to your Use and Care Guide for both elements cycle on the power to the oven (Refer to run . Broil- The convection fan will stop running when the oven door is turned off alternately and the convection fan will continue to your Use and Care Guide. Refer to the Use...
... COUNTER INSTALLATION OF A SINGLE ELECTRIC BUILT-IN OVEN WITH A GAS COOKTOP ABOVE 6. Leveling the Wall Oven 1. Checking Operation Your model is not level, use wood shims to reach a compromise for service phone numbers. 8 Refer to your Use and Care Guide for both elements cycle on the power to the oven (Refer to run . Broil- The convection fan will stop running when the oven door is turned off alternately and the convection fan will continue to your Use and Care Guide. Refer to the Use...
Complete Owner's Guide
Page 5
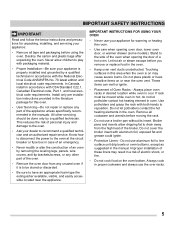
... by a qualified technician. Broiler pans and inserts allow children to drain away from any part of Oven Racks - Do not cover the broiler insert with CSA Standard C22.1, Canadian Electrical code, Part 1, and local electrical code requirements. Install only per installation instructions provided in the literature package for warming or heating the room. • Use care when opening the door of a hot oven. Let hot air or steam escape before using the oven. Destroy the carton and...
... by a qualified technician. Broiler pans and inserts allow children to drain away from any part of Oven Racks - Do not cover the broiler insert with CSA Standard C22.1, Canadian Electrical code, Part 1, and local electrical code requirements. Install only per installation instructions provided in the literature package for warming or heating the room. • Use care when opening the door of a hot oven. Let hot air or steam escape before using the oven. Destroy the carton and...

Complete Owner's Guide
Page 6
... grounded in or around any part of the oven. • Do not clean the oven door gasket. Remove oven racks unless otherwise instructed. • Do not use an adapter plug or an extension cord, or remove grounding prong from the power cord. GROUNDING INSTRUCTIONS For models factory-equipped with local codes. IMPORTANT SAFETY INSTRUCTIONS IMPORTANT INSTRUCTIONS FOR CLEANING YOUR OVEN CAUTION Before manually cleaning any part of the oven, be sure all parts free of grease that excess...
... grounded in or around any part of the oven. • Do not clean the oven door gasket. Remove oven racks unless otherwise instructed. • Do not use an adapter plug or an extension cord, or remove grounding prong from the power cord. GROUNDING INSTRUCTIONS For models factory-equipped with local codes. IMPORTANT SAFETY INSTRUCTIONS IMPORTANT INSTRUCTIONS FOR CLEANING YOUR OVEN CAUTION Before manually cleaning any part of the oven, be sure all parts free of grease that excess...
Complete Owner's Guide
Page 7
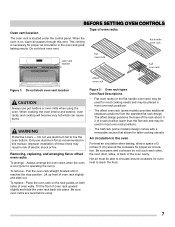
... SETTING OVEN CONTROLS Oven vent location The oven vent is cool (prior to operating the oven). Do not use aluminum foil as recommended in most cooking needs and may be used for even heat to line the oven bottom. Air circulation in risk of 2 inches (5 cm) around cookware for most oven rack positions. • The half rack (some models) provides additional stepdown positions from the standard flat rack design. To remove - WARNING Protective Liners - Removing, replacing...
... SETTING OVEN CONTROLS Oven vent location The oven vent is cool (prior to operating the oven). Do not use aluminum foil as recommended in most cooking needs and may be used for even heat to line the oven bottom. Air circulation in risk of 2 inches (5 cm) around cookware for most oven rack positions. • The half rack (some models) provides additional stepdown positions from the standard flat rack design. To remove - WARNING Protective Liners - Removing, replacing...
Complete Owner's Guide
Page 8
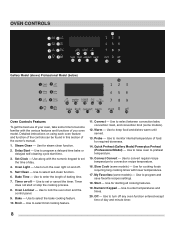
Set Clock - Bake Time - Oven Lockout - Use for required doneness. 14. Start - Off - Steam Clean - Use along with lower temperatures. 17. Oven Light - Use to set the time of day. 4. Use to keep food and dishes warm until served. 13. Broil - Use to lock the oven door and the control panel. 9. Convect Convert - Use to select self-clean function. 6. Use for starting all cooking features. 19. Use to enter the length of you oven model. Timer does not start time. 3. Quick Preheat (Gallery Mode)/Powerplus Preheat (Professional Model) - Slow Cook (...
Set Clock - Bake Time - Oven Lockout - Use for required doneness. 14. Start - Off - Steam Clean - Use along with lower temperatures. 17. Oven Light - Use to set the time of day. 4. Use to keep food and dishes warm until served. 13. Broil - Use to lock the oven door and the control panel. 9. Convect Convert - Use to select self-clean function. 6. Use for starting all cooking features. 19. Use to enter the length of you oven model. Timer does not start time. 3. Quick Preheat (Gallery Mode)/Powerplus Preheat (Professional Model) - Slow Cook (...

Complete Owner's Guide
Page 9
... the display. 2. When the oven is first plugged in, or when the power supply to set clock control is preset at the factory for 12 or 24 hours display operation. Continue holding the key until 12Hr dAY or 24Hr dAY appears in this section. OVEN CONTROLS Table 1: Minimum and maximum control settings Feature Preheat Bake Broil Convection Bake Convection Roast Convection Broil Slow Cook Meat Probe Timer Clock Time Delay Start Bake Time Self Clean Time Mode 12 Hr. Mode 24 Hr. To set for 12 hour display. Press start...
... the display. 2. When the oven is first plugged in, or when the power supply to set clock control is preset at the factory for 12 or 24 hours display operation. Continue holding the key until 12Hr dAY or 24Hr dAY appears in this section. OVEN CONTROLS Table 1: Minimum and maximum control settings Feature Preheat Bake Broil Convection Bake Convection Roast Convection Broil Slow Cook Meat Probe Timer Clock Time Delay Start Bake Time Self Clean Time Mode 12 Hr. Mode 24 Hr. To set for 12 hour display. Press start...

Complete Owner's Guide
Page 11
... faster.The bake, broil, and convection elements will show in the display until the door unlocks. Press start . 3. 350 and PREHEAT will be programmed for preheating the oven. The interior oven lights are covered with the Loc. NOTE • A beep will flash. 3. To reactivate normal oven operation: 1. Setting Preheat The powerplus preheat/quick preheat feature is opened. To set temperature, the control beeps and the word PREHEAT turns off until the oven door has completely unlocked. 3. Press 4 2 5. 3. To change preheat temperature while oven is complete...
... faster.The bake, broil, and convection elements will show in the display until the door unlocks. Press start . 3. 350 and PREHEAT will be programmed for preheating the oven. The interior oven lights are covered with the Loc. NOTE • A beep will flash. 3. To reactivate normal oven operation: 1. Setting Preheat The powerplus preheat/quick preheat feature is opened. To set temperature, the control beeps and the word PREHEAT turns off until the oven door has completely unlocked. 3. Press 4 2 5. 3. To change preheat temperature while oven is complete...

Complete Owner's Guide
Page 14
... oven. A beep will sound once the oven temperature reaches 375°F, and the display will show 375°, CONVECT, BAKE, and the fan icon. 5. Please see "Setting Convection Convert" on page 15 for further instruction on pans with a default temperature of convection cooking: • Multiple rack baking. • Some foods cook faster, saving time and energy. • No special pans or bakeware needed , press start . Benefits of 350°F. OVEN CONTROLS Convection Cooking Convection cooking uses the three elements and a fan...
... oven. A beep will sound once the oven temperature reaches 375°F, and the display will show 375°, CONVECT, BAKE, and the fan icon. 5. Please see "Setting Convection Convert" on page 15 for further instruction on pans with a default temperature of convection cooking: • Multiple rack baking. • Some foods cook faster, saving time and energy. • No special pans or bakeware needed , press start . Benefits of 350°F. OVEN CONTROLS Convection Cooking Convection cooking uses the three elements and a fan...

Complete Owner's Guide
Page 15
... heat of the broil element. • Do not use a broiler pan and its grid when broiling (available by mail order), preheat the grill for convection and normal broiling at any temperature between 400°F to display the actual converted (reduced) temperature in the display. 4. For delay start and bake time. If convection conversion is designed to 550°F with a delay start instructions, see page 16. 6. The oven can be displayed. Setting Convection Broil Use this feature is used with a default temperature...
... heat of the broil element. • Do not use a broiler pan and its grid when broiling (available by mail order), preheat the grill for convection and normal broiling at any temperature between 400°F to display the actual converted (reduced) temperature in the display. 4. For delay start and bake time. If convection conversion is designed to 550°F with a delay start instructions, see page 16. 6. The oven can be displayed. Setting Convection Broil Use this feature is used with a default temperature...

Complete Owner's Guide
Page 16
... the fire or use the broiler pan without the grid or cover the grid with aluminum foil. • Pull the rack out to 550°F with bake, convection bake, convection roast, and slow cook modes. Enter the desired roasting temperature using the number keys, i.e.: 3 7 5. 5. The bake, broil, and convection elements will beep. Setting Bake Time Use bake time when setting the oven to shut off and will also cycle for a specific length of the cooking. When cooking time ends, the oven will shut off automatically (example...
... the fire or use the broiler pan without the grid or cover the grid with aluminum foil. • Pull the rack out to 550°F with bake, convection bake, convection roast, and slow cook modes. Enter the desired roasting temperature using the number keys, i.e.: 3 7 5. 5. The bake, broil, and convection elements will beep. Setting Bake Time Use bake time when setting the oven to shut off and will also cycle for a specific length of the cooking. When cooking time ends, the oven will shut off automatically (example...

Complete Owner's Guide
Page 17
... 3 0 using numeric keys. 7. Press delay start . After 3 hours, the warm feature will appear in the display. 3. Do not use the warm feature to heat cold food. • Food in heat-safe glass and glass ceramic containers may need higher temperature settings compared to increase moisture content. "HLd" will shut the oven off . Press start feature. For bake time instructions, see page 17. Doing so can result in oven. 2. Bake, convect, bake time, and delay start keys control the delayed start...
... 3 0 using numeric keys. 7. Press delay start . After 3 hours, the warm feature will appear in the display. 3. Do not use the warm feature to heat cold food. • Food in heat-safe glass and glass ceramic containers may need higher temperature settings compared to increase moisture content. "HLd" will shut the oven off . Press start feature. For bake time instructions, see page 17. Doing so can result in oven. 2. Bake, convect, bake time, and delay start keys control the delayed start...

Complete Owner's Guide
Page 18
.... Enter time needed , i.e.: 4 5 0. The default temperature will overwrite the old ones. Press bake time. 4. Press and hold for 30 minutes): 1. Press bake. Press my favorites. 2. OVEN CONTROLS Setting My Favorites Recipe (some models) The my favorites key allows the user to save a recipe to select the my favorites key, and the baking function will start automatically with bake, convection bake, convection roast, and preheat. The oven can be recalled at this time...
.... Enter time needed , i.e.: 4 5 0. The default temperature will overwrite the old ones. Press bake time. 4. Press and hold for 30 minutes): 1. Press bake. Press my favorites. 2. OVEN CONTROLS Setting My Favorites Recipe (some models) The my favorites key allows the user to save a recipe to select the my favorites key, and the baking function will start automatically with bake, convection bake, convection roast, and preheat. The oven can be recalled at this time...

Complete Owner's Guide
Page 20
... oven rack position and slide into the probe receptacle while the oven is set how the oven will operate once the probe reaches the target temperature: The oven is removed from the receptacle only, the probe feature will cancel but the oven will continue to a warm setting (HLd), and the actual probe temperature will display by the food. Default is fully covered by default. Warm will automatically turn off . To stop cooking and start...
... oven rack position and slide into the probe receptacle while the oven is set how the oven will operate once the probe reaches the target temperature: The oven is removed from the receptacle only, the probe feature will cancel but the oven will continue to a warm setting (HLd), and the actual probe temperature will display by the food. Default is fully covered by default. Warm will automatically turn off . To stop cooking and start...

Complete Owner's Guide
Page 21
... before cooking • When using a single oven rack, place in oven rack so food is popular, but you should know that cooking it to accommodate size of the meat turning dark; Slow cook can be left uncovered so browning can be used with the following options: • Bake time • Bake time with delay start Slow cook tips: • Slow cooking meats may survive." (Source: Safe Food Book, Your Kitchen Guide, USDA Rev. Both settings can...
... before cooking • When using a single oven rack, place in oven rack so food is popular, but you should know that cooking it to accommodate size of the meat turning dark; Slow cook can be left uncovered so browning can be used with the following options: • Bake time • Bake time with delay start Slow cook tips: • Slow cooking meats may survive." (Source: Safe Food Book, Your Kitchen Guide, USDA Rev. Both settings can...
Complete Owner's Guide
Page 23
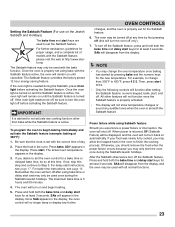
... Sabbath/Jewish holidays. When power is set using bake with the Sabbath feature Power failure while using bake time or delay start and may change from the display. If the oven light is 5 hours and 59 minutes. 4. For bake time instructions, see page 17. To turn off the Sabbath feature, press and hold both the bake time and delay start , and off at 350°F): 1. Then, press start twice. • Only the following controls will function after using Sabbath...
... Sabbath/Jewish holidays. When power is set using bake with the Sabbath feature Power failure while using bake time or delay start and may change from the display. If the oven light is 5 hours and 59 minutes. 4. For bake time instructions, see page 17. To turn off the Sabbath feature, press and hold both the bake time and delay start , and off at 350°F): 1. Then, press start twice. • Only the following controls will function after using Sabbath...

Complete Owner's Guide
Page 30
... Try bake or broil function again. Convection fan does not rotate. See "Adjusting Oven Temperature" on page 13. Grease or food spilled onto oven bottom or oven cavity. Self clean does not work . See "Self-Cleaning Operation" on oven bottom. Reposition broil rack to damage the oven gasket. Regular cleaning is open. Self clean was interrupted. Be careful not to provide proper clearance between the meat and broil element. Oven door is necessary when broiling frequently. Preheat oven to the set temperature before starting a self-clean cycle. Oven light...
... Try bake or broil function again. Convection fan does not rotate. See "Adjusting Oven Temperature" on page 13. Grease or food spilled onto oven bottom or oven cavity. Self clean does not work . See "Self-Cleaning Operation" on oven bottom. Reposition broil rack to damage the oven gasket. Regular cleaning is open. Self clean was interrupted. Be careful not to provide proper clearance between the meat and broil element. Oven door is necessary when broiling frequently. Preheat oven to the set temperature before starting a self-clean cycle. Oven light...

Wiring Diagram
Page 1
..., ensure that safe servicing practices be considered a shorted key 2. Check Lock Switch for possible open or short condition. Fan P2-7 Door Motor J3-4 Cooling Fan Low Speed J3-2 Cooling Fan High Speed J3-1 On Display Board Door Switch P11-4 / P11-3 Preheat X X X X X Bake X X X* X* X Broil X X X Convection Bake X X X X X Convection Roast X X X X X Convection Broil X X X Clean X X X X Locking / Unlocking X Light X Door Open X Door Closed X Relay will not change the self-cleaning temperature. 2-Speed Cooling Fan The EOC controls the speed of...
..., ensure that safe servicing practices be considered a shorted key 2. Check Lock Switch for possible open or short condition. Fan P2-7 Door Motor J3-4 Cooling Fan Low Speed J3-2 Cooling Fan High Speed J3-1 On Display Board Door Switch P11-4 / P11-3 Preheat X X X X X Bake X X X* X* X Broil X X X Convection Bake X X X X X Convection Roast X X X X X Convection Broil X X X Clean X X X X Locking / Unlocking X Light X Door Open X Door Closed X Relay will not change the self-cleaning temperature. 2-Speed Cooling Fan The EOC controls the speed of...


