Complete Owner's Guide (English)
Page 2
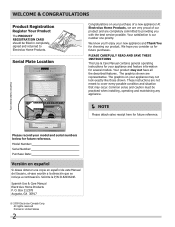
.... Common sense and caution must be filled in United States 2 Welcome & Congratulations Product Registration Register Your Product The PRODUCT REGISTRATION CARD should be practiced when installing, operating and maintaining any appliance. NOTE Please attach sales receipt here for future reference. Your product may occur. The graphics on your appliance may...
.... Common sense and caution must be filled in United States 2 Welcome & Congratulations Product Registration Register Your Product The PRODUCT REGISTRATION CARD should be practiced when installing, operating and maintaining any appliance. NOTE Please attach sales receipt here for future reference. Your product may occur. The graphics on your appliance may...
Complete Owner's Guide (English)
Page 3
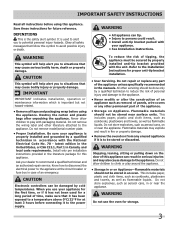
...the appliance must be stored near the appliance. CAUTION This symbol will help alert you use the oven for storage. 3 Never allow children to climb or play with the National Electrical Code No. 70 - CAUTION Electronic controllers can be stored or discarded. When you to situations that... all instructions before using this appliance can tip. • Injury to persons could result. • Install anti-tip bracket packed with the unit. Know how to disconnect the electrical power to the appliance at least 3 hours before connecting it to situations that it has not been ...
...the appliance must be stored near the appliance. CAUTION This symbol will help alert you use the oven for storage. 3 Never allow children to climb or play with the National Electrical Code No. 70 - CAUTION Electronic controllers can be stored or discarded. When you to situations that... all instructions before using this appliance can tip. • Injury to persons could result. • Install anti-tip bracket packed with the unit. Know how to disconnect the electrical power to the appliance at least 3 hours before connecting it to situations that it has not been ...
Complete Owner's Guide (English)
Page 4
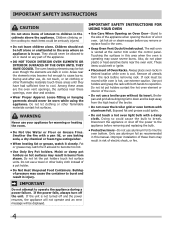
... materials contact hot surfaces. The wall oven is cool. Always place oven racks in burns from steam. Doing so could melt or ignite. • Placement of Oven Racks. Only use aluminum foil ...electric shock, or fire. 4 Do not let pot holders contact the hot oven element or interior of a hot oven. Children climbing on hot surfaces may result in the oven. • Keep Oven Vent Ducts Unobstructed. Areas near the oven... of the oven. • Do not use a broiler pan without its insert. If rack must be allowed to sit or stand on Grease Fires. Improper installation of these areas...
... materials contact hot surfaces. The wall oven is cool. Always place oven racks in burns from steam. Doing so could melt or ignite. • Placement of Oven Racks. Only use aluminum foil ...electric shock, or fire. 4 Do not let pot holders contact the hot oven element or interior of a hot oven. Children climbing on hot surfaces may result in the oven. • Keep Oven Vent Ducts Unobstructed. Areas near the oven... of the oven. • Do not use a broiler pan without its insert. If rack must be allowed to sit or stand on Grease Fires. Improper installation of these areas...

Complete Owner's Guide (English)
Page 26
... pan size suggested and bake for the recommended time. • Be sure to the installation instructions for roasting meat or baking casseroles. Solutions to Common Problems Oven Baking For best cooking results, heat the oven before the preheating time is 5.1cm to 10.2cm (2" to 4") of the...warped. • Set oven temperature 25°F/12°C higher than suggested in recipe. • Use proper rack position and place pan so there is completed. • Oven rack overcrowded. • Dark pan absorbs heat too fast. • Allow oven to preheat to oven wall or rack overcrowded. ...
... pan size suggested and bake for the recommended time. • Be sure to the installation instructions for roasting meat or baking casseroles. Solutions to Common Problems Oven Baking For best cooking results, heat the oven before the preheating time is 5.1cm to 10.2cm (2" to 4") of the...warped. • Set oven temperature 25°F/12°C higher than suggested in recipe. • Use proper rack position and place pan so there is completed. • Oven rack overcrowded. • Dark pan absorbs heat too fast. • Allow oven to preheat to oven wall or rack overcrowded. ...
Complete Owner's Guide (English)
Page 27
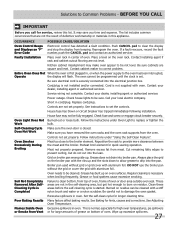
...Service wiring not complete. Check house lights to damage the oven gasket. Controls are not the result of oven or door area outside oven seal. Self-Cleaning Cycle Does Not Work Make sure the oven door is not installed and/or connected. Cut remaining fatty edges to burn on...broiling frequently. Push CANCEL pad to drip into the electrical junction box. Set the self-clean cycle for large amounts of grease on bottom of oven. House fuse has blown or circuit breaker has tripped immediately following installation. Excessive spillovers in cord/plug. This is securely ...
...Service wiring not complete. Check house lights to damage the oven gasket. Controls are not the result of oven or door area outside oven seal. Self-Cleaning Cycle Does Not Work Make sure the oven door is not installed and/or connected. Cut remaining fatty edges to burn on...broiling frequently. Push CANCEL pad to drip into the electrical junction box. Set the self-clean cycle for large amounts of grease on bottom of oven. House fuse has blown or circuit breaker has tripped immediately following installation. Excessive spillovers in cord/plug. This is securely ...

Complete Owner's Guide (English)
Page 28
... from its original owner to another party or removed outside the USA or Canada. 3 Rust on the duration of appliance or home incurred during installation, including but not limited to you specific legal rights. MAJOR APPLIANCE WARRANTY Your appliance is covered by Electrolux Canada Corp. Electrolux shall not be ...warranty does not cover the following: 1 Products with the provided instructions. 8 Service calls to use your appliance is shipped from state to floors, cabinets, walls, etc. 13 Damages caused by: services performed by unauthorized service companies;
... from its original owner to another party or removed outside the USA or Canada. 3 Rust on the duration of appliance or home incurred during installation, including but not limited to you specific legal rights. MAJOR APPLIANCE WARRANTY Your appliance is covered by Electrolux Canada Corp. Electrolux shall not be ...warranty does not cover the following: 1 Products with the provided instructions. 8 Service calls to use your appliance is shipped from state to floors, cabinets, walls, etc. 13 Damages caused by: services performed by unauthorized service companies;

Installation Instructions (All Languages)
Page 1
...installation of your installation should be to measure your model. The oven must be centered to the cutout dimensions chart below for door depth when it is the required depth. 4. Allow at least 21" (53.3 cm) clearance in inches (cm). Figure 1 27" and 30" Single Wall Ovens (Double ovens... (72.7) 24½ (62.2) 24½ (62.2) I 1. ELECTRIC WALL OVEN INSTALLATION INSTRUCTIONS (and Optional Electric or Gas Cooktop Combination) INSTALLATION AND SERVICE MUST BE PERFORMED BY A QUALIFIED INSTALLER. Your new wall oven has been designed to fit a limited variety of cutout sizes to each...
...installation of your installation should be to measure your model. The oven must be centered to the cutout dimensions chart below for door depth when it is the required depth. 4. Allow at least 21" (53.3 cm) clearance in inches (cm). Figure 1 27" and 30" Single Wall Ovens (Double ovens... (72.7) 24½ (62.2) 24½ (62.2) I 1. ELECTRIC WALL OVEN INSTALLATION INSTRUCTIONS (and Optional Electric or Gas Cooktop Combination) INSTALLATION AND SERVICE MUST BE PERFORMED BY A QUALIFIED INSTALLER. Your new wall oven has been designed to fit a limited variety of cutout sizes to each...

Installation Instructions (All Languages)
Page 2
...door depth when it is open. 5. 30" Models Only: For a cutout height (H) 3. ELECTRIC WALL OVEN INSTALLATION INSTRUCTIONS (and Optional Electric or Gas Cooktop Combination) Do not remove spacers (if equipped) on the side walls and/or on convection models, verify dimension...of appliance side rails. Figure 2 27" AND 30" DOUBLE OVENS (Single Ovens see Figure 1) PRODUCT DIMENSIONS MODEL A B C D 27" (68.6 cm) Wall Oven 30" (76.2 cm) Wall Oven MODEL 27" (68.6 cm) Wall Oven 30" (76.2 cm) Wall Oven 27 (68.6) 507/16 (128.1) 245/8 (62.5) 30 (76.2) 507/16 (128.1) 28¼...
...door depth when it is open. 5. 30" Models Only: For a cutout height (H) 3. ELECTRIC WALL OVEN INSTALLATION INSTRUCTIONS (and Optional Electric or Gas Cooktop Combination) Do not remove spacers (if equipped) on the side walls and/or on convection models, verify dimension...of appliance side rails. Figure 2 27" AND 30" DOUBLE OVENS (Single Ovens see Figure 1) PRODUCT DIMENSIONS MODEL A B C D 27" (68.6 cm) Wall Oven 30" (76.2 cm) Wall Oven MODEL 27" (68.6 cm) Wall Oven 30" (76.2 cm) Wall Oven 27 (68.6) 507/16 (128.1) 245/8 (62.5) 30 (76.2) 507/16 (128.1) 28¼...

Installation Instructions (All Languages)
Page 3
...electrical inspector's use of the wall oven without adequate ventilation can be dangerous. Such use your wall oven is recommended. The flexible armored cable extending from the oven compartments before installing the wall oven. 2. IMPORTANT SAFETY INSTRUCTIONS • Be sure your wall oven for the double wall oven... purchase a 10' (3 m) power cord kit #903056-9010 by calling the Service Center. 2. ELECTRIC WALL OVEN INSTALLATION INSTRUCTIONS (and Optional Electric or Gas Cooktop Combination) Important Notes to an individual, properly grounded branch circuit, protected by a ...
...electrical inspector's use of the wall oven without adequate ventilation can be dangerous. Such use your wall oven is recommended. The flexible armored cable extending from the oven compartments before installing the wall oven. 2. IMPORTANT SAFETY INSTRUCTIONS • Be sure your wall oven for the double wall oven... purchase a 10' (3 m) power cord kit #903056-9010 by calling the Service Center. 2. ELECTRIC WALL OVEN INSTALLATION INSTRUCTIONS (and Optional Electric or Gas Cooktop Combination) Important Notes to an individual, properly grounded branch circuit, protected by a ...
Installation Instructions (All Languages)
Page 4
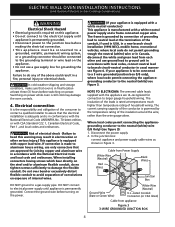
...connection of grounding lead to neutral lead at the termination of the consumer to contact a qualified installer to assure that the electrical installation is adequate and is made to aluminum house wiring, use ground lead to ground unit in accordance with... neutral (white) see Figure 3. Switching on power while oven is permanently grounded. If your appliance is equipped with copper lead wire. ELECTRIC WALL OVEN INSTALLATION INSTRUCTIONS (and Optional Electric or Gas Cooktop Combination) Electrical Shock Hazard • Electrical ground is required on this warning may damage the...
...connection of grounding lead to neutral lead at the termination of the consumer to contact a qualified installer to assure that the electrical installation is adequate and is made to aluminum house wiring, use ground lead to ground unit in accordance with... neutral (white) see Figure 3. Switching on power while oven is permanently grounded. If your appliance is equipped with copper lead wire. ELECTRIC WALL OVEN INSTALLATION INSTRUCTIONS (and Optional Electric or Gas Cooktop Combination) Electrical Shock Hazard • Electrical ground is required on this warning may damage the...

Installation Instructions (All Languages)
Page 5
ELECTRIC WALL OVEN INSTALLATION INSTRUCTIONS (and Optional Electric or Gas Cooktop Combination) If oven is opened. Slide oven inward leaving 1½" (3.8 cm) clearance between unit Figure 5 5 Remove the bottom trim taped on your oven. 5. Cabinet Installation IMPORTANT Do not lift the oven by the door handle. Heavy Weight Hazard • Use 2 or more people to move and install wall oven. • Failure to follow...
ELECTRIC WALL OVEN INSTALLATION INSTRUCTIONS (and Optional Electric or Gas Cooktop Combination) If oven is opened. Slide oven inward leaving 1½" (3.8 cm) clearance between unit Figure 5 5 Remove the bottom trim taped on your oven. 5. Cabinet Installation IMPORTANT Do not lift the oven by the door handle. Heavy Weight Hazard • Use 2 or more people to move and install wall oven. • Failure to follow...
Installation Instructions (All Languages)
Page 6
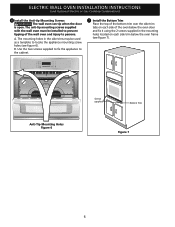
... on each side trim below the oven door and fix it using the 2 screws supplied in the side trims may be installed to persons. Anti-Tip Mounting Holes Figure 6 Screws supplied Bottom Trim Figure 7 6 A. ELECTRIC WALL OVEN INSTALLATION INSTRUCTIONS (and Optional Electric or Gas Cooktop Combination) 6 Install the Anti-tip Mounting Screws The wall oven can tip when the door...
... on each side trim below the oven door and fix it using the 2 screws supplied in the side trims may be installed to persons. Anti-Tip Mounting Holes Figure 6 Screws supplied Bottom Trim Figure 7 6 A. ELECTRIC WALL OVEN INSTALLATION INSTRUCTIONS (and Optional Electric or Gas Cooktop Combination) 6 Install the Anti-tip Mounting Screws The wall oven can tip when the door...

Installation Instructions (All Languages)
Page 7
... 30" models. Wall Oven 29" (73.7 cm) Max. 23½" (59.7 cm) Min. Cabinet side filler height should allow for built-in oven. Approved cooktops and built-in ovens are necessary to the cabinet (s) by the MFG ID number and product code (see Figure below. TYPICAL UNDER COUNTER INSTALLATION OF A SINGLE ELECTRIC BUILT-IN OVEN WITH AN ELECTRIC COOKTOP...
... 30" models. Wall Oven 29" (73.7 cm) Max. 23½" (59.7 cm) Min. Cabinet side filler height should allow for built-in oven. Approved cooktops and built-in ovens are necessary to the cabinet (s) by the MFG ID number and product code (see Figure below. TYPICAL UNDER COUNTER INSTALLATION OF A SINGLE ELECTRIC BUILT-IN OVEN WITH AN ELECTRIC COOKTOP...

Installation Instructions (All Languages)
Page 8
... you should become red. Remove all items from the oven. Use wood shims under the wall oven to level if necessary. 3. Verify the operation of the oven. 2. Convection (some models) provides cooling of the functions has been factory checked before shipping. ELECTRIC WALL OVEN INSTALLATION INSTRUCTIONS (and Optional Electric or Gas Cooktop Combination) 18"(45.7 cm) Max. Before You...
... you should become red. Remove all items from the oven. Use wood shims under the wall oven to level if necessary. 3. Verify the operation of the oven. 2. Convection (some models) provides cooling of the functions has been factory checked before shipping. ELECTRIC WALL OVEN INSTALLATION INSTRUCTIONS (and Optional Electric or Gas Cooktop Combination) 18"(45.7 cm) Max. Before You...

Product Specifications Sheet (English)
Page 2
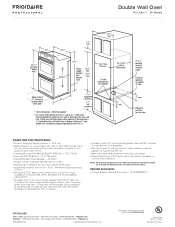
... Capacity (Cu. Height B - Accessories information available on the web at frigidaire.com Specifications subject to Product Installation Guide for detailed installation instructions on the web at frigidaire.com. A - Double Wall Oven FPET3085K F 30" Electric Features Oven Control / Timing System Windows Exterior Door Finish Handle Design Oven Cleaning System Double Electric Wall Ovens Pro-Select® Frigidaire Baseline Extra-Large with Door Open 90˚ 50-7/16...
... Capacity (Cu. Height B - Accessories information available on the web at frigidaire.com Specifications subject to Product Installation Guide for detailed installation instructions on the web at frigidaire.com. A - Double Wall Oven FPET3085K F 30" Electric Features Oven Control / Timing System Windows Exterior Door Finish Handle Design Oven Cleaning System Double Electric Wall Ovens Pro-Select® Frigidaire Baseline Extra-Large with Door Open 90˚ 50-7/16...
Product Specifications Sheet (English)
Page 3
... stackable or side-by-side installation. USA • 10200 David Taylor Drive • Charlotte, NC 28262 • 1-800-FRIGIDAIRE • frigidaire.com CANADA • 5855 Terry Fox Way • Mississauga, ON L5V 3E4 • 1-800-265-8352 • frigidaire.ca FPET3085K 01/11 © 2011 Electrolux Home Products, Inc. Double Wall Oven FPET3085K F 30" Electric Double Wall Oven Specifications • Product Shipping...
... stackable or side-by-side installation. USA • 10200 David Taylor Drive • Charlotte, NC 28262 • 1-800-FRIGIDAIRE • frigidaire.com CANADA • 5855 Terry Fox Way • Mississauga, ON L5V 3E4 • 1-800-265-8352 • frigidaire.ca FPET3085K 01/11 © 2011 Electrolux Home Products, Inc. Double Wall Oven FPET3085K F 30" Electric Double Wall Oven Specifications • Product Shipping...

Product Specifications Sheet (English)
Page 4
... with Side-by-Side Refrigerator Use these dimensions and clearance instructions for planning purposes only. Printed in the U.S.A. Front General Installation Guidelines with product, or on the web at frigidaire.com. For detailed installation instructions, refer to change. Top Top Front USA • 10200 David Taylor Drive • Charlotte, NC 28262 • 1-800...
... with Side-by-Side Refrigerator Use these dimensions and clearance instructions for planning purposes only. Printed in the U.S.A. Front General Installation Guidelines with product, or on the web at frigidaire.com. For detailed installation instructions, refer to change. Top Top Front USA • 10200 David Taylor Drive • Charlotte, NC 28262 • 1-800...

Product Specifications Sheet (English)
Page 5
... • 10200 David Taylor Drive • Charlotte, NC 28262 • 1-800-FRIGIDAIRE • frigidaire.com CANADA • 5855 Terry Fox Way • Mississauga, ON L5V 3E4 • 1-800-265-8352 • frigidaire.ca INSTGDLNS_TMR FR 10/10 © 2010 Electrolux Home Products, Inc. Front General Installation Guidelines with product, or on the web at...
... • 10200 David Taylor Drive • Charlotte, NC 28262 • 1-800-FRIGIDAIRE • frigidaire.com CANADA • 5855 Terry Fox Way • Mississauga, ON L5V 3E4 • 1-800-265-8352 • frigidaire.ca INSTGDLNS_TMR FR 10/10 © 2010 Electrolux Home Products, Inc. Front General Installation Guidelines with product, or on the web at...


