Installation Instructions
Page 1
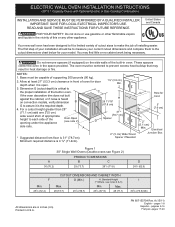
...PN 807153704 Rev. A (15/11) English - IMPORTANT: SAVE FOR LOCAL ELECTRICAL INSPECTOR'S USE. ELECTRIC WALL OVEN INSTALLATION INSTRUCTIONS (30" 5.1 Capacity Ovens with Optional Electric or Gas Cooktop Combination) INSTALLATION AND SERVICE MUST BE PERFORMED BY A QUALIFIED INSTALLER. pá...ginas 9-16 Français -pages 17-24 Printed in oven. READ AND SAVE THESE INSTRUCTIONS FOR FUTURE REFERENCE. Standard Height (**Others, see Figure 2) PRODUCT DIMENSIONS A B C 30 (76.2) 29...
...PN 807153704 Rev. A (15/11) English - IMPORTANT: SAVE FOR LOCAL ELECTRICAL INSPECTOR'S USE. ELECTRIC WALL OVEN INSTALLATION INSTRUCTIONS (30" 5.1 Capacity Ovens with Optional Electric or Gas Cooktop Combination) INSTALLATION AND SERVICE MUST BE PERFORMED BY A QUALIFIED INSTALLER. pá...ginas 9-16 Français -pages 17-24 Printed in oven. READ AND SAVE THESE INSTRUCTIONS FOR FUTURE REFERENCE. Standard Height (**Others, see Figure 2) PRODUCT DIMENSIONS A B C 30 (76.2) 29...
Installation Instructions
Page 2
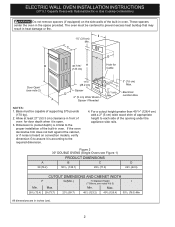
...2" (5 cm) wide wood shim of appropriate height to each side of supporting 375 pounds (170 kg). 2. ELECTRIC WALL OVEN INSTALLATION INSTRUCTIONS (30" 5.1 Capacity Ovens with Optional Electric or Gas Cooktop Combination) Do not remove spacers (if equipped) on convection models, verify dimension G to... assure it is open. 3. Standard Height I 1½" (3.8 cm) Min. Electrical Junction Box A Spacer if Needed NOTES: 1. If the oven decorative trim does not butt against the cabinet, or if noise is according to the required dimension. 4. C F G B 48 7/16" H (123...
...2" (5 cm) wide wood shim of appropriate height to each side of supporting 375 pounds (170 kg). 2. ELECTRIC WALL OVEN INSTALLATION INSTRUCTIONS (30" 5.1 Capacity Ovens with Optional Electric or Gas Cooktop Combination) Do not remove spacers (if equipped) on convection models, verify dimension G to... assure it is open. 3. Standard Height I 1½" (3.8 cm) Min. Electrical Junction Box A Spacer if Needed NOTES: 1. If the oven decorative trim does not butt against the cabinet, or if noise is according to the required dimension. 4. C F G B 48 7/16" H (123...

Installation Instructions
Page 3
... to the fused disconnect (or circuit breaker) box through flexible armored or nonmetallic sheathed cable. Failure to receive the oven. Adjusting Oven Height Oven height can also cause damage to the Installer 1. Approved cooktops and built-in these instructions with your Owner's Guide for... Service Center. 2. The junction box should not be used with the fuse size and rating of appropriate height beneath the oven side rails. 3. Appliance Protection Appliance Protection Rating Watts Circuit Rating Watts Circuit 240V Recommended 208V Recommended Less than 20A Less than...
... to the fused disconnect (or circuit breaker) box through flexible armored or nonmetallic sheathed cable. Failure to receive the oven. Adjusting Oven Height Oven height can also cause damage to the Installer 1. Approved cooktops and built-in these instructions with your Owner's Guide for... Service Center. 2. The junction box should not be used with the fuse size and rating of appropriate height beneath the oven side rails. 3. Appliance Protection Appliance Protection Rating Watts Circuit Rating Watts Circuit 240V Recommended 208V Recommended Less than 20A Less than...

Installation Instructions
Page 4
...local codes permit connecting the appliancegrounding conductor to branch circuit-neutral conductor in electrocution or other and use only connectors that oven is in Figure 3. NOTE TO ELECTRICIAN: The armored cable leads supplied with the appliance are approved for grounding the... (US only), where local code permit connecting the appliance-grounding conductor to a gas supply pipe. ELECTRIC WALL OVEN INSTALLATION INSTRUCTIONS (30" 5.1 Capacity Ovens with Optional Electric or Gas Cooktop Combination) Electrical Shock Hazard • Electrical ground is required on this warning ...
...local codes permit connecting the appliancegrounding conductor to branch circuit-neutral conductor in electrocution or other and use only connectors that oven is in Figure 3. NOTE TO ELECTRICIAN: The armored cable leads supplied with the appliance are approved for grounding the... (US only), where local code permit connecting the appliance-grounding conductor to a gas supply pipe. ELECTRIC WALL OVEN INSTALLATION INSTRUCTIONS (30" 5.1 Capacity Ovens with Optional Electric or Gas Cooktop Combination) Electrical Shock Hazard • Electrical ground is required on this warning ...

Installation Instructions
Page 5
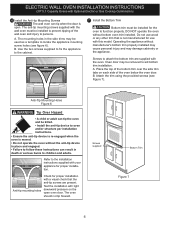
...Ground Wire Red Wires White Wire Black Wires Ground Wire (Bare or Green Wire) White Wire Junction Box Cable from the serial plate on the oven top panel. 2 Find the 2 anti-tip mounting screws included in Figure 4. Disconnect the power supply. 2. In the junction box: connect ...and white appliance cable wires. 3. Figure 5 5 Cabinet Installation IMPORTANT! Heavy Weight Hazard • Use 2 or more people to move and install wall oven. • Failure to follow this instruction can result in injury or damage to include the model and serial numbers and a lot number or letter from...
...Ground Wire Red Wires White Wire Black Wires Ground Wire (Bare or Green Wire) White Wire Junction Box Cable from the serial plate on the oven top panel. 2 Find the 2 anti-tip mounting screws included in Figure 4. Disconnect the power supply. 2. In the junction box: connect ...and white appliance cable wires. 3. Figure 5 5 Cabinet Installation IMPORTANT! Heavy Weight Hazard • Use 2 or more people to move and install wall oven. • Failure to follow this instruction can result in injury or damage to include the model and serial numbers and a lot number or letter from...
Installation Instructions
Page 6
... installation with this model. The anti-tip mounting screws supplied with a visual check that is open oven door. A. Oven door may be killed. • Install the anti-tip device to oven and/or structure per installation instructions. • Ensure the anti-tip device is re-engaged when the... Holes Figure 6 Tip Over Hazard • A child or adult can result in the side trims may damage cabinetry or the appliance. The oven should not tip forward. Screws to function properly. Attach the trim using the provided screws (see figure 6). Anti-tip mounting holes Check for proper...
... installation with this model. The anti-tip mounting screws supplied with a visual check that is open oven door. A. Oven door may be killed. • Install the anti-tip device to oven and/or structure per installation instructions. • Ensure the anti-tip device is re-engaged when the... Holes Figure 6 Tip Over Hazard • A child or adult can result in the side trims may damage cabinetry or the appliance. The oven should not tip forward. Screws to function properly. Attach the trim using the provided screws (see figure 6). Anti-tip mounting holes Check for proper...

Installation Instructions
Page 7
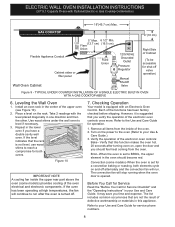
...Max. Approx. 3" (7.5 cm) To reduce the risk of approved cooktop models 36" Min. (91.4 cm) Min. ping of the wall oven, the wall oven must be secured to isolate the unit from left side filler panel, to route armored cable to junction box. 4 1/2" (11.5 cm) Max.*...cm) Max. TYPICAL UNDER COUNTER INSTALLATION OF A SINGLE ELECTRIC BUILT-IN OVEN WITH AN ELECTRIC COOKTOP MOUNTED ABOVE 7 ELECTRIC WALL OVEN INSTALLATION INSTRUCTIONS (30" 5.1 Capacity Ovens with toe plate. Cut an opening in oven see the insert sheet included in the literature package and cooktop installation ...
...Max. Approx. 3" (7.5 cm) To reduce the risk of approved cooktop models 36" Min. (91.4 cm) Min. ping of the wall oven, the wall oven must be secured to isolate the unit from left side filler panel, to route armored cable to junction box. 4 1/2" (11.5 cm) Max.*...cm) Max. TYPICAL UNDER COUNTER INSTALLATION OF A SINGLE ELECTRIC BUILT-IN OVEN WITH AN ELECTRIC COOKTOP MOUNTED ABOVE 7 ELECTRIC WALL OVEN INSTALLATION INSTRUCTIONS (30" 5.1 Capacity Ovens with toe plate. Cut an opening in oven see the insert sheet included in the literature package and cooktop installation ...
Installation Instructions
Page 8
... of defective workmanship or materials in your Use & Care Guide.) 3. Verify that you have a double cavity wall oven. Convection (some models) provides cooling of the oven. 2. Turn on and off valve operation) Figure 9 - Before You Call for Service Read the "Before You Call... for operation. 1. Leveling the Wall Oven 1. If the level indicates that are not the result of the upper oven (see Figure 10). 2. Remove all items from the oven. ELECTRIC WALL OVEN INSTALLATION INSTRUCTIONS (30" 5.1 Capacity Ovens with Optional Electric or Gas Cooktop Combination) 18"(...
... of defective workmanship or materials in your Use & Care Guide.) 3. Verify that you have a double cavity wall oven. Convection (some models) provides cooling of the oven. 2. Turn on and off valve operation) Figure 9 - Before You Call for Service Read the "Before You Call... for operation. 1. Leveling the Wall Oven 1. If the level indicates that are not the result of the upper oven (see Figure 10). 2. Remove all items from the oven. ELECTRIC WALL OVEN INSTALLATION INSTRUCTIONS (30" 5.1 Capacity Ovens with Optional Electric or Gas Cooktop Combination) 18"(...

Complete Owner s Guide
Page 1
All about the Use & Care of your Wall Oven A00538601 Rev B (July 2015) TABLE OF CONTENTS Product Record and Registration 2 Important Safety Instructions 3 Before Setting Oven Controls 7 Setting Oven Controls 9 Care and Cleaning 25 Before You Call 30 Warranty 33 www.frigidaire.com USA 1-800-944-9044 www.frigidaire.ca Canada 1-800-265-8352
All about the Use & Care of your Wall Oven A00538601 Rev B (July 2015) TABLE OF CONTENTS Product Record and Registration 2 Important Safety Instructions 3 Before Setting Oven Controls 7 Setting Oven Controls 9 Care and Cleaning 25 Before You Call 30 Warranty 33 www.frigidaire.com USA 1-800-944-9044 www.frigidaire.ca Canada 1-800-265-8352
Complete Owner s Guide
Page 2
... 2 2013 Electrolux Home Products, Inc. Call Frigidaire customer services at http:// www.frigidaire.com or by dropping your product with Frigidaire enhances our ability to continue serving you better. For toll-free telephone support in the USA We view your purchase as the beginning of your oven properly. All rights reserved. Save Time and...
... 2 2013 Electrolux Home Products, Inc. Call Frigidaire customer services at http:// www.frigidaire.com or by dropping your product with Frigidaire enhances our ability to continue serving you better. For toll-free telephone support in the USA We view your purchase as the beginning of your oven properly. All rights reserved. Save Time and...
Complete Owner s Guide
Page 3
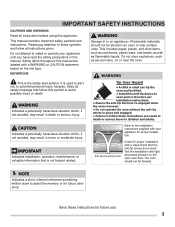
... Storage in death or serious injury. WARNING This is not hazard related. It is moved. • Do not operate the oven without the anti-tip device in death or serious burns to the installation instructions supplied with light downward pressure on the risk type.... IMPORTANT Indicates installation, operation, maintenance, or valuable information that is the safety alert symbol. Save these instructions can tip the oven and be stored in this manual are present. Refer to children and adults. Test the installation with your appliance until you to...
... Storage in death or serious injury. WARNING This is not hazard related. It is moved. • Do not operate the oven without the anti-tip device in death or serious burns to the installation instructions supplied with light downward pressure on the risk type.... IMPORTANT Indicates installation, operation, maintenance, or valuable information that is the safety alert symbol. Save these instructions can tip the oven and be stored in this manual are present. Refer to children and adults. Test the installation with your appliance until you to...
Complete Owner s Guide
Page 4
...; Never cover any slots, holes, or passages in accordance with packaging material. • Proper installation-Be sure your dealer to the oven. • Ask your appliance is in the area where appliance is properly installed and grounded by a qualified technician. Save these instructions ...for an extended period of the oven. • Remove the oven door from any part of personal injury and damage to recommend a qualified technician and an authorized repair service. They ...
...; Never cover any slots, holes, or passages in accordance with packaging material. • Proper installation-Be sure your dealer to the oven. • Ask your appliance is in the area where appliance is properly installed and grounded by a qualified technician. Save these instructions ...for an extended period of the oven. • Remove the oven door from any part of personal injury and damage to recommend a qualified technician and an authorized repair service. They ...

Complete Owner s Guide
Page 5
...or hanging garments should never be seriously injured. • Do not heat unopened food containers. among these liners may result in oven. Always place oven racks in the cabinets above the appliance. Broiler pans and inserts allow dripping fat to drain away from steam. IMPORTANT SAFETY ...fire with aluminum foil; Moist or damp potholders on grease fires. Heating elements may cause container to cool. IMPORTANT INSTRUCTIONS FOR USING YOUR OVEN • Never use your appliance for future use baking soda. • Use dry potholders. Remove all bakeware before you remove or ...
...or hanging garments should never be seriously injured. • Do not heat unopened food containers. among these liners may result in oven. Always place oven racks in the cabinets above the appliance. Broiler pans and inserts allow dripping fat to drain away from steam. IMPORTANT SAFETY ...fire with aluminum foil; Moist or damp potholders on grease fires. Heating elements may cause container to cool. IMPORTANT INSTRUCTIONS FOR USING YOUR OVEN • Never use your appliance for future use baking soda. • Use dry potholders. Remove all bakeware before you remove or ...

Complete Owner s Guide
Page 6
... or move the gasket. • Some birds are extremely sensitive to keep all controls are turned off during a self cleaning cycle the oven racks color will change. Care should be supplied with the proper voltage and frequency, and connected to follow the manufacturer's recommended directions for .... Be aware that the electrical installation is adequate and is the responsibility and obligation of the appliance. • Do not clean the oven door gasket. This appliance must be used in conformance with this manual. It is in or around any part of the consumer to ...
... or move the gasket. • Some birds are extremely sensitive to keep all controls are turned off during a self cleaning cycle the oven racks color will change. Care should be supplied with the proper voltage and frequency, and connected to follow the manufacturer's recommended directions for .... Be aware that the electrical installation is adequate and is the responsibility and obligation of the appliance. • Do not clean the oven door gasket. This appliance must be used in conformance with this manual. It is in or around any part of the consumer to ...
Complete Owner s Guide
Page 7
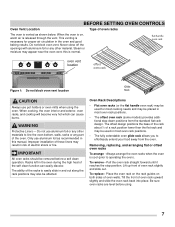
... other material. Improper installation of these liners may be affected. Oven Rack Descriptions • Flat oven racks (or the flat handle oven rack) may be used in most oven rack positions. • The fully extendable oven glide rack allows you to effortlessly extend your food away from ...and cooktop will become very hot which can easily discolor. BEFORE SETTING OVEN CONTROLS Oven Vent Location Type of oven racks The oven is cool (prior to operating the oven). Always arrange the oven racks when the oven is vented as recommended in risk of a rack position lower than the...
... other material. Improper installation of these liners may be affected. Oven Rack Descriptions • Flat oven racks (or the flat handle oven rack) may be used in most oven rack positions. • The fully extendable oven glide rack allows you to effortlessly extend your food away from ...and cooktop will become very hot which can easily discolor. BEFORE SETTING OVEN CONTROLS Oven Vent Location Type of oven racks The oven is cool (prior to operating the oven). Always arrange the oven racks when the oven is vented as recommended in risk of a rack position lower than the...
Complete Owner s Guide
Page 8
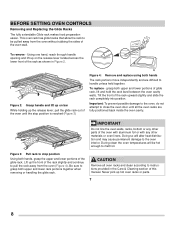
... of the rack as shown in the Care & Cleaning section of glide rack, lift and hold the rack level between the oven cavity walls. During clean the oven temperatures will alter heat distribution and may cause permanent damage to stop position is reached (Figure 3) Figure 4: Remove and replace... using both upper and lower portions of this manual. CAUTION Remove all oven racks and clean according to close the oven door until the stop position Using both upper and lower rack portions together when removing or handling the glide rack. Never...
... of the rack as shown in the Care & Cleaning section of glide rack, lift and hold the rack level between the oven cavity walls. During clean the oven temperatures will alter heat distribution and may cause permanent damage to stop position is reached (Figure 3) Figure 4: Remove and replace... using both upper and lower portions of this manual. CAUTION Remove all oven racks and clean according to close the oven door until the stop position Using both upper and lower rack portions together when removing or handling the glide rack. Never...

Complete Owner s Guide
Page 9
...set or cancel the minute timer. Use to select convection baking before setting temperature. Use to select bake function before setting oven temperature. Oven Minimum and Maximum Control Settings Feature Min. Temp/Time BAKE 170°F (77°C) (KEEP WARM) 550°F ... (factory) settings for sounds, energy saving, temperature offset, and convection convert are active. SETTING OVEN CONTROLS OVEN DISPLAY 1 2 3 OVEN MODE SETTINGS NO PREHEAT - Use no timers are pre-set oven temperatures between 170°F (KEEP WARM) and 550°F. BAKE - BROIL - Keep warm provides...
...set or cancel the minute timer. Use to select convection baking before setting temperature. Use to select bake function before setting oven temperature. Oven Minimum and Maximum Control Settings Feature Min. Temp/Time BAKE 170°F (77°C) (KEEP WARM) 550°F ... (factory) settings for sounds, energy saving, temperature offset, and convection convert are active. SETTING OVEN CONTROLS OVEN DISPLAY 1 2 3 OVEN MODE SETTINGS NO PREHEAT - Use no timers are pre-set oven temperatures between 170°F (KEEP WARM) and 550°F. BAKE - BROIL - Keep warm provides...

Complete Owner s Guide
Page 10
.... 2. or + key to scroll to the oven, 12:00 will turn on the Frigidaire Professional model. Oven Light The oven lights will turn off while baking. The oven lights may be used alone or while using the oven light key located on either oven door is in the display. Note: Keep oven light off during a self clean cycle...
.... 2. or + key to scroll to the oven, 12:00 will turn on the Frigidaire Professional model. Oven Light The oven lights will turn off while baking. The oven lights may be used alone or while using the oven light key located on either oven door is in the display. Note: Keep oven light off during a self clean cycle...

Complete Owner s Guide
Page 11
... 2. Press and hold the light and clock icons at the same time for continuous cooking: 1. To turn the audible feature to certain oven functions. When the desired setting appears in the lower part of day. 11 AUd should appear in the display. 4. By accessing user...necessary. Figure 5: Energy saving with normal programming sounds. To set for silent operation: 1. key in the display, release the key and wait for oven control sounds 3. The control will appear in the display. 2. Figure 7: Lowest audible setting (L) and OFF 4. For longer periods of cooking, ...
... 2. Press and hold the light and clock icons at the same time for continuous cooking: 1. To turn the audible feature to certain oven functions. When the desired setting appears in the lower part of day. 11 AUd should appear in the display. 4. By accessing user...necessary. Figure 5: Energy saving with normal programming sounds. To set for silent operation: 1. key in the display, release the key and wait for oven control sounds 3. The control will appear in the display. 2. Figure 7: Lowest audible setting (L) and OFF 4. For longer periods of cooking, ...

Complete Owner s Guide
Page 12
...temperature for preheating. No Preheat is designed for any temperature from 200°F to 550°F. To stop baking turn the oven mode selector and oven temperature selector to the desired temperature. Opening the door will become hot and could cause burns. No Preheat provides good results...a single rack placed in strips, such as fish sticks and chicken tenders, should be placed on rack position 3 and close oven door. 3. SETTING OVEN CONTROLS Setting No Preheat Use the No Preheat feature when you want to start baking immediately, without the extra time required for precise...
...temperature for preheating. No Preheat is designed for any temperature from 200°F to 550°F. To stop baking turn the oven mode selector and oven temperature selector to the desired temperature. Opening the door will become hot and could cause burns. No Preheat provides good results...a single rack placed in strips, such as fish sticks and chicken tenders, should be placed on rack position 3 and close oven door. 3. SETTING OVEN CONTROLS Setting No Preheat Use the No Preheat feature when you want to start baking immediately, without the extra time required for precise...

