
Complete Owner's Guide (English)
Page 2
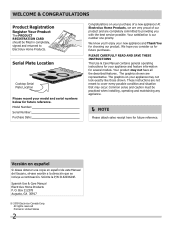
...Usuario, sírvase escribir a la dirección que se incluye a continuación. Model Number: Serial Number: Purchase Date: Congratulations on your appliance and feature information for several models. The graphics shown are very proud of a new appliance! Solicite la P/N 318203624E.... maintaining any appliance. NOTE Please attach sales receipt here for future reference. Serial Plate Location Cooktop Serial Plate Location Please record your model and serial numbers below for future purchases. At Electrolux Home Products, we are representative. Your satisfaction is...
...Usuario, sírvase escribir a la dirección que se incluye a continuación. Model Number: Serial Number: Purchase Date: Congratulations on your appliance and feature information for several models. The graphics shown are very proud of a new appliance! Solicite la P/N 318203624E.... maintaining any appliance. NOTE Please attach sales receipt here for future reference. Serial Plate Location Cooktop Serial Plate Location Please record your model and serial numbers below for future purchases. At Electrolux Home Products, we are representative. Your satisfaction is...
Complete Owner's Guide (English)
Page 5
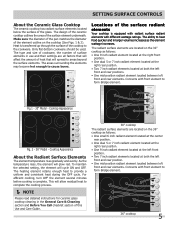
...glass. The areas surrounding the elements may become hot enough to form Bridge element. 36" cooktop 5 SETTING SURFACE CONTROLS About the Ceramic Glass Cooktop The ceramic cooktop has radiant surface elements located below the surface of the surface element underneath. The ... detailed instructions for ceramic glass cooktop cleaning in use and their settings are located on the 36" cooktop as the element wattage increases. Cooktop Appearance Fig. 2 - 36" Model - The heating element retains enough heat to form Bridge element. Cooktop Appearance About the Radiant Surface ...
...glass. The areas surrounding the elements may become hot enough to form Bridge element. 36" cooktop 5 SETTING SURFACE CONTROLS About the Ceramic Glass Cooktop The ceramic cooktop has radiant surface elements located below the surface of the surface element underneath. The ... detailed instructions for ceramic glass cooktop cleaning in use and their settings are located on the 36" cooktop as the element wattage increases. Cooktop Appearance Fig. 2 - 36" Model - The heating element retains enough heat to form Bridge element. Cooktop Appearance About the Radiant Surface ...
Complete Owner's Guide (English)
Page 7
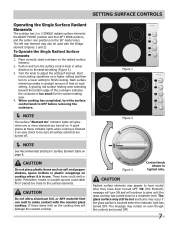
...surface elements are turned OFF. 7 CAUTION Do not place plastic items such as salt and pepper shakers, spoon holders or plastic wrappings on cooktop when it is touched before removing the cookware. NOTE The surface "Element On" indicator lights will glow when one or more ... to finish cooking. CAUTION Radiant surface elements may still be used with the ceramic glass cooktop. A glowing red surface heating area extending beyond the bottom edge of heat at these items melt on the 36" model only). Figure 1 Figure 2 Figure 3 Control knob shown is too small for Surface ...
...surface elements are turned OFF. 7 CAUTION Do not place plastic items such as salt and pepper shakers, spoon holders or plastic wrappings on cooktop when it is touched before removing the cookware. NOTE The surface "Element On" indicator lights will glow when one or more ... to finish cooking. CAUTION Radiant surface elements may still be used with the ceramic glass cooktop. A glowing red surface heating area extending beyond the bottom edge of heat at these items melt on the 36" model only). Figure 1 Figure 2 Figure 3 Control knob shown is too small for Surface ...
Complete Owner's Guide (English)
Page 12
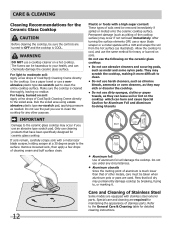
...After turning the surface elements OFF, use a nonabrasive plastic type no-scratch pad to the ceramic glass cooktop may occur if you use under any other metals, care must be taken when aluminum pots or pans...occur if not removed immediately. Remove loosened soils, then apply a few drops of Stainless Steel Some models are equipped with a mitt and scrape the soil from the hot surface (as metal and some ...nylon pads. Do not use the following on the ceramic glass cooktop: • Do not use the same method for heavy or burned on soil: Apply a few drops ...
...After turning the surface elements OFF, use a nonabrasive plastic type no-scratch pad to the ceramic glass cooktop may occur if you use under any other metals, care must be taken when aluminum pots or pans...occur if not removed immediately. Remove loosened soils, then apply a few drops of Stainless Steel Some models are equipped with a mitt and scrape the soil from the hot surface (as metal and some ...nylon pads. Do not use the following on the ceramic glass cooktop: • Do not use the same method for heavy or burned on soil: Apply a few drops ...

Installation Instructions (All Languages)
Page 1
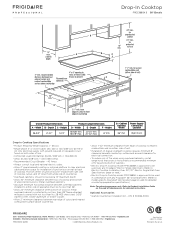
...; All electric cooktops run off a single phase, three-wire or four-wire cable, 240/208 volt, 60 hertz, AC only electrical supply with ground. • Please note minimum distances between cooktop and adjacent and overhead cabinetry is present G F * 30" (76.2 cm) min. BOX depth 19 ½ (49.5) 19½ (49.5) Model 30'' Ceramic Model 36'' Ceramic Model CUT...
...; All electric cooktops run off a single phase, three-wire or four-wire cable, 240/208 volt, 60 hertz, AC only electrical supply with ground. • Please note minimum distances between cooktop and adjacent and overhead cabinetry is present G F * 30" (76.2 cm) min. BOX depth 19 ½ (49.5) 19½ (49.5) Model 30'' Ceramic Model 36'' Ceramic Model CUT...

Installation Instructions (All Languages)
Page 2
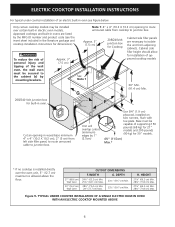
... Wall (Either Side of 13" (33 cm) 30" (76.2 cm) Min. The drawer must not interfere with the electrical installation of an Unprotected Wood or Metal Cabinet 24" (61 cm) Min. Clearance Between the Top of the Cooking Platform and...(0.6 mm) Aluminum or 0.020" (0.5 mm) Copper 18" (45.7 cm) G 24" (61 cm) L Min. ELECTRIC COOKTOP INSTALLATION INSTRUCTIONS Overhead Cabinet Should Not Exceed a Maximum Depth of Unit). 2 1/2" (6.4 cm) Min. when Bottom of the cabinets. Model 30'' Ceramic Glass 36'' Ceramic Glass J 7 ½'' (19.1 cm) 7 ½'' (19.1 cm) K 2'' (5.1 cm) 2'' (5.1 ...
... Wall (Either Side of 13" (33 cm) 30" (76.2 cm) Min. The drawer must not interfere with the electrical installation of an Unprotected Wood or Metal Cabinet 24" (61 cm) Min. Clearance Between the Top of the Cooking Platform and...(0.6 mm) Aluminum or 0.020" (0.5 mm) Copper 18" (45.7 cm) G 24" (61 cm) L Min. ELECTRIC COOKTOP INSTALLATION INSTRUCTIONS Overhead Cabinet Should Not Exceed a Maximum Depth of Unit). 2 1/2" (6.4 cm) Min. when Bottom of the cabinets. Model 30'' Ceramic Glass 36'' Ceramic Glass J 7 ½'' (19.1 cm) 7 ½'' (19.1 cm) K 2'' (5.1 cm) 2'' (5.1 ...

Installation Instructions (All Languages)
Page 3
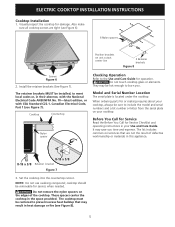
ELECTRIC COOKTOP INSTALLATION INSTRUCTIONS Important Notes to the cooktop must be shut off while line connections are being made. Read all instructions contained in the cable between the box and the appliance, so it can find it easily. WARNING The electrical power to the Installer 1. DO NOT fuse neutral....and run 120/240 or 120/208 Volt, AC wire from the serial plate on both sides of Electrical Connection. 2. See Cooktop Cleaning and Maintenance section in Canada. Model and Serial Number Location The serial plate is important that the ceramic-glass smoothtop be connected to the ...
ELECTRIC COOKTOP INSTALLATION INSTRUCTIONS Important Notes to the cooktop must be shut off while line connections are being made. Read all instructions contained in the cable between the box and the appliance, so it can find it easily. WARNING The electrical power to the Installer 1. DO NOT fuse neutral....and run 120/240 or 120/208 Volt, AC wire from the serial plate on both sides of Electrical Connection. 2. See Cooktop Cleaning and Maintenance section in Canada. Model and Serial Number Location The serial plate is important that the ceramic-glass smoothtop be connected to the ...
Installation Instructions (All Languages)
Page 5
...and a lot number or letter from the serial plate on your Use and Care Guide. Model and Serial Number Location The serial plate is located under the cooktop. NOTE: Do not use caulking compound; WARNING Do not remove the nylon spacers on ...Set the cooktop into the countertop cutout. ELECTRIC COOKTOP INSTALLATION INSTRUCTIONS Cooktop Installation 1. Visually inspect the cooktop for Service Checklist and operating instructions in this appliance. 8-18 x 5/8 8-18 x 3/8 Retainer bracket Figure 7 3. Also make sure all cooktop screws are not the result of the cooktop. They may...
...and a lot number or letter from the serial plate on your Use and Care Guide. Model and Serial Number Location The serial plate is located under the cooktop. NOTE: Do not use caulking compound; WARNING Do not remove the nylon spacers on ...Set the cooktop into the countertop cutout. ELECTRIC COOKTOP INSTALLATION INSTRUCTIONS Cooktop Installation 1. Visually inspect the cooktop for Service Checklist and operating instructions in this appliance. 8-18 x 5/8 8-18 x 3/8 Retainer bracket Figure 7 3. Also make sure all cooktop screws are not the result of the cooktop. They may...
Installation Instructions (All Languages)
Page 6
... should allow for installation of approved cooktop models See Note 1 36" Min. (91.4 cm) Min. 208/240 Volt junction box for built-in ovens are necessary to the cabinet (s) by mounting brackets. TYPICAL UNDER COUNTER INSTALLATION OF A SINGLE ELECTRIC BUILT-IN OVEN WITH AN ELECTRIC COOKTOP MOUNTED ABOVE 6 H. Only certain cooktop models may be capable of supporting 150...
... should allow for installation of approved cooktop models See Note 1 36" Min. (91.4 cm) Min. 208/240 Volt junction box for built-in ovens are necessary to the cabinet (s) by mounting brackets. TYPICAL UNDER COUNTER INSTALLATION OF A SINGLE ELECTRIC BUILT-IN OVEN WITH AN ELECTRIC COOKTOP MOUNTED ABOVE 6 H. Only certain cooktop models may be capable of supporting 150...
Product Specifications Sheet (English)
Page 2
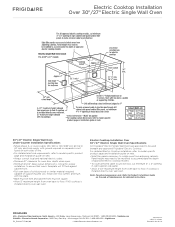
...-In Cooktop model FPEC3685K is approved to be used over any Frigidaire® Electric Single Wall Oven. (Refer to Electric Cooktop Installation Over 30" / 27" Electric Single Wall Oven Specifications page on either side of appliance must be no less than 36". • Allow 24" minimum clearance when bottom of wood or metal overhead cabinet is protected by not...
...-In Cooktop model FPEC3685K is approved to be used over any Frigidaire® Electric Single Wall Oven. (Refer to Electric Cooktop Installation Over 30" / 27" Electric Single Wall Oven Specifications page on either side of appliance must be no less than 36". • Allow 24" minimum clearance when bottom of wood or metal overhead cabinet is protected by not...
Product Specifications Sheet (English)
Page 3
...2009 Electrolux Home Products, Inc. For detailed Electric Cooktop installation, refer to model-specific product page and installation guide on the web at frigidaire.com for proper installation, to floor, if cooktop is installed directly over wall oven. Printed in...electrical requirements, refer to floor, if NO cooktop is critical for detailed instructions. Electric Cooktop Installation Over 30"/ 27" Electric Single Wall Oven Specifications All Frigidaire® Electric Single Wall Ovens are approved to be modified to accommodate the depth of approved electric cooktop models...
...2009 Electrolux Home Products, Inc. For detailed Electric Cooktop installation, refer to model-specific product page and installation guide on the web at frigidaire.com for proper installation, to floor, if cooktop is installed directly over wall oven. Printed in...electrical requirements, refer to floor, if NO cooktop is critical for detailed instructions. Electric Cooktop Installation Over 30"/ 27" Electric Single Wall Oven Specifications All Frigidaire® Electric Single Wall Ovens are approved to be modified to accommodate the depth of approved electric cooktop models...


