Complete Owner's Guide
Page 1
All about the Use &Care of your Coffee Maker 71133 (June 2011) TABLE OF CONTENTS Important Safeguards 2 Coffee Maker Safety Instructions 2 Brewing Tips 8 Cleaning the Coffee Maker 8 Parts and Features 3 Troubleshooting 8 Installing the Water Filter Holder and the Water Filter...6 Major Appliance Warranty 9 Brewing Your First Pot of Coffee 7 USA and Canada 1-888-845-7330
All about the Use &Care of your Coffee Maker 71133 (June 2011) TABLE OF CONTENTS Important Safeguards 2 Coffee Maker Safety Instructions 2 Brewing Tips 8 Cleaning the Coffee Maker 8 Parts and Features 3 Troubleshooting 8 Installing the Water Filter Holder and the Water Filter...6 Major Appliance Warranty 9 Brewing Your First Pot of Coffee 7 USA and Canada 1-888-845-7330
Complete Owner's Guide
Page 2
... use a cracked container (carafe) or a container having a loose or weakened handle. 17 Do not clean container with this appliance. It must never be used on a range top or in water or other ). save these instructions Consumer Safety Information THIS UNIT IS FOR HOUSEHOLD USE ONLY. Do not allow children to the nearest authorized service center for inspection, repair, or adjustment. 7 The use...
... use a cracked container (carafe) or a container having a loose or weakened handle. 17 Do not clean container with this appliance. It must never be used on a range top or in water or other ). save these instructions Consumer Safety Information THIS UNIT IS FOR HOUSEHOLD USE ONLY. Do not allow children to the nearest authorized service center for inspection, repair, or adjustment. 7 The use...
Complete Owner's Guide
Page 3
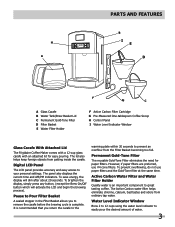
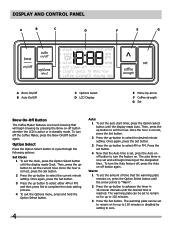
... the Filter Basket becoming too full. To brighten the display, simply press any button, (except the Brew On/Off button which will dim after about 20 seconds. H A PARTS AND FEATURES B I E D A Glass Carafe B Water Tank/Brew Basket Lid C Permanent Gold-Tone Filter D Filter Basket E Water Filter Holder F G C F Active Carbon Filter Cartridge G Pre-Measured One-tablespoon Coffee Scoop H Control Panel I Water Level Indicator Window Glass Carafe With Attached Lid The Frigidaire Coffee Maker comes with a 12-cup glass carafe with an attached lid for paper filters. The lid also helps keep...
... the Filter Basket becoming too full. To brighten the display, simply press any button, (except the Brew On/Off button which will dim after about 20 seconds. H A PARTS AND FEATURES B I E D A Glass Carafe B Water Tank/Brew Basket Lid C Permanent Gold-Tone Filter D Filter Basket E Water Filter Holder F G C F Active Carbon Filter Cartridge G Pre-Measured One-tablespoon Coffee Scoop H Control Panel I Water Level Indicator Window Glass Carafe With Attached Lid The Frigidaire Coffee Maker comes with a 12-cup glass carafe with an attached lid for paper filters. The lid also helps keep...
Complete Owner's Guide
Page 4
...: Set Clock: 1 To set the auto start timer, press the Option Select button until the display reads Clock. Once the hour is correct, press the Set button. 2 Press the up -button to select the current minute setting. Once the hour is correct, press the Set button. 2 Press the up -button to select the desired minute setting. To turn off the Coffee Maker, press the Brew On/Off button again. The warming plate can...
...: Set Clock: 1 To set the auto start timer, press the Option Select button until the display reads Clock. Once the hour is correct, press the Set button. 2 Press the up -button to select the current minute setting. Once the hour is correct, press the Set button. 2 Press the up -button to select the desired minute setting. To turn off the Coffee Maker, press the Brew On/Off button again. The warming plate can...
Complete Owner's Guide
Page 5
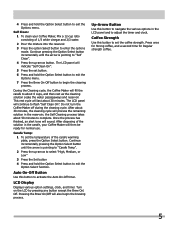
... for Strong coffee, and a second time for normal use. After disposing of the solution in the carafe, your Coffee Maker, Mix a 12-cup ratio consisting of the carafe warming plate, press the Option Select button. Continue incrementally pressing the Option Select button until the arrow is pointing to "Carafe Temp". 2 Press the up -arrow button. LCD Display Displays various option settings, clock, and timer. the Self Cleaning process takes...
... for Strong coffee, and a second time for normal use. After disposing of the solution in the carafe, your Coffee Maker, Mix a 12-cup ratio consisting of the carafe warming plate, press the Option Select button. Continue incrementally pressing the Option Select button until the arrow is pointing to "Carafe Temp". 2 Press the up -arrow button. LCD Display Displays various option settings, clock, and timer. the Self Cleaning process takes...
Complete Owner's Guide
Page 6
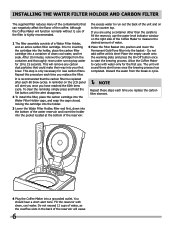
... 12 cups of water, as the overflow slots in cycle. NOTE Repeat these steps each time you have reached the 60th brew cycle. This will alert you once you replace the carbon filter element. 4 Plug the Coffee Maker into a container of the coffee. This step is only necessary for the first use of the filter is recommended that could make their way into the basket - A reminder...
... 12 cups of water, as the overflow slots in cycle. NOTE Repeat these steps each time you have reached the 60th brew cycle. This will alert you once you replace the carbon filter element. 4 Plug the Coffee Maker into a container of the coffee. This step is only necessary for the first use of the filter is recommended that could make their way into the basket - A reminder...
Complete Owner's Guide
Page 7
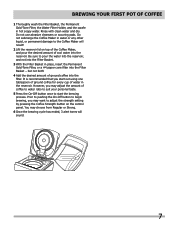
... button once to start out using one tablespoon of ground coffee for every cup of water in place, insert the Permanent Gold-Tone Filter, or a #4 paper cone filter into the reservoir. Brewing Your First Pot of Coffee 1 Thoroughly wash the Filter Basket, the Permanent Gold-Tone Filter, the Water Filter Holder, and the carafe in water or any other liquid, or permanent damage to the Coffee Maker will sound. 7 Do not submerge the Coffee Maker in hot soapy water...
... button once to start out using one tablespoon of ground coffee for every cup of water in place, insert the Permanent Gold-Tone Filter, or a #4 paper cone filter into the reservoir. Brewing Your First Pot of Coffee 1 Thoroughly wash the Filter Basket, the Permanent Gold-Tone Filter, the Water Filter Holder, and the carafe in water or any other liquid, or permanent damage to the Coffee Maker will sound. 7 Do not submerge the Coffee Maker in hot soapy water...
Complete Owner's Guide
Page 8
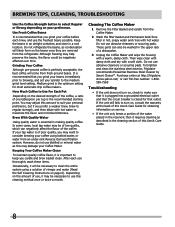
... use this Use & Care Guide. 8 Brewing tips, Cleaning, Troubleshooting Use the Coffee Strength button to consider brewing your coffee using a solution of vinegar and water (Read the Self Cleaning Instructions on page 6). Although freezing may be of the coffee. It is closed for most automatic drip coffee makers. You may adjust this may want to select Regular or Strong depending on , consult the warranty at http://frigidaire. In some cases, local tap water may help...
... use this Use & Care Guide. 8 Brewing tips, Cleaning, Troubleshooting Use the Coffee Strength button to consider brewing your coffee using a solution of vinegar and water (Read the Self Cleaning Instructions on page 6). Although freezing may be of the coffee. It is closed for most automatic drip coffee makers. You may adjust this may want to select Regular or Strong depending on , consult the warranty at http://frigidaire. In some cases, local tap water may help...
Complete Owner's Guide
Page 9
... removed, altered or cannot be readily determined. 2 Products that prove to products purchased in materials or workmanship when the appliance is warranted by improper use . 7 Labor or service visits under warranty is no person to change without notice. As a matter of God. abuse; If You Need Service: To obtain warranty service in a commercial setting or anything but single family household use , installation, or service; DISCLAIMER OF IMPLIED WARRANTIES...
... removed, altered or cannot be readily determined. 2 Products that prove to products purchased in materials or workmanship when the appliance is warranted by improper use . 7 Labor or service visits under warranty is no person to change without notice. As a matter of God. abuse; If You Need Service: To obtain warranty service in a commercial setting or anything but single family household use , installation, or service; DISCLAIMER OF IMPLIED WARRANTIES...
Product Specifications Sheet
Page 1
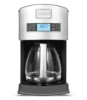
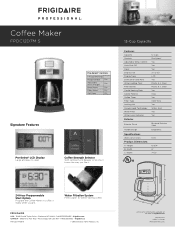
... Fox Way • Mississauga, ON L5V 3E4 • 1-800-265-8352 • frigidaire.ca FPDC12D7M 09/11 © 2011 Electrolux Home Products, Inc. A C B Accessories information available on the web at frigidaire.com Specifications subject to change. Height B - Control Auto Shut-Off Pro-Select® Yes Yes Clock Yes Pro-Select® Controls Display Size 2" x 2-1/2" 1-4 Cups Brewing Display Type LCD Coffee Maker Model FPDC12D7M Programmable Yes Adjustable Brew Strength Yes Dishwasher-Safe Parts Water Holding Tank Yes...
... Fox Way • Mississauga, ON L5V 3E4 • 1-800-265-8352 • frigidaire.ca FPDC12D7M 09/11 © 2011 Electrolux Home Products, Inc. A C B Accessories information available on the web at frigidaire.com Specifications subject to change. Height B - Control Auto Shut-Off Pro-Select® Yes Yes Clock Yes Pro-Select® Controls Display Size 2" x 2-1/2" 1-4 Cups Brewing Display Type LCD Coffee Maker Model FPDC12D7M Programmable Yes Adjustable Brew Strength Yes Dishwasher-Safe Parts Water Holding Tank Yes...
