Installation Instructions (All Languages)
Page 4
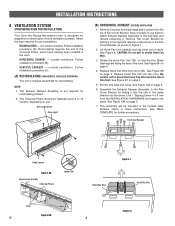
... the back of cavity. outside ventilation. The Charcoal Filters should be mounted to 12 months, depending on use of the arrow on page 5. 5. See Figure 8. Follow installation procedure (A). Remove Fan Cover Bracket by sliding it in the opposite direction of the Charcoal Filters, which... the Exhaust Damper Assembly to three types of Fan Cover Bracket. INSTALLATION INSTRUCTIONS 8 VENTILATION SYSTEM (PREPARING OVEN FOR INSTALLATION) This Over the Range Microwave Oven is designed for adaptation to the Fan Cover Bracket by sliding it into the slits in the same direction as...
... the back of cavity. outside ventilation. The Charcoal Filters should be mounted to 12 months, depending on use of the arrow on page 5. 5. See Figure 8. Follow installation procedure (A). Remove Fan Cover Bracket by sliding it in the opposite direction of the Charcoal Filters, which... the Exhaust Damper Assembly to three types of Fan Cover Bracket. INSTALLATION INSTRUCTIONS 8 VENTILATION SYSTEM (PREPARING OVEN FOR INSTALLATION) This Over the Range Microwave Oven is designed for adaptation to the Fan Cover Bracket by sliding it into the slits in the same direction as...
Installation Instructions (All Languages)
Page 5
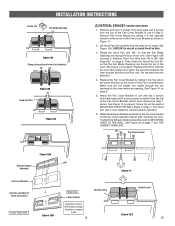
...Assembly Fan Cover Bracket Save the assembly for vertical exhaust operation. 6. Replace Hood Fan Unit into Wire Box. 4. To attach the Exhaust Damper Assembly, refer to use at MOUNTING OVEN THE WALL Step5 on page 7. Oven Rear Side Figure 10B Wall Side Rear Cushion Apply Rear Cushion after mounting the oven. ... of the oven. Then rotate the Hood Fan Unit 90° so that the Fan Blade Openings are facing the back of the Fan Cover Bracket to MOUNTING OVEN TO THE WALL, See Figure 20 on page 6. See Figure 14 on page 6. 5. See Figure 12A. Replace Hood Fan Wire from ...
...Assembly Fan Cover Bracket Save the assembly for vertical exhaust operation. 6. Replace Hood Fan Unit into Wire Box. 4. To attach the Exhaust Damper Assembly, refer to use at MOUNTING OVEN THE WALL Step5 on page 7. Oven Rear Side Figure 10B Wall Side Rear Cushion Apply Rear Cushion after mounting the oven. ... of the oven. Then rotate the Hood Fan Unit 90° so that the Fan Blade Openings are facing the back of the Fan Cover Bracket to MOUNTING OVEN TO THE WALL, See Figure 20 on page 6. See Figure 14 on page 6. 5. See Figure 12A. Replace Hood Fan Wire from ...
Installation Instructions (All Languages)
Page 7
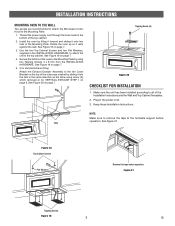
...5. (For Vertical Exhaust Only) Attach the Exhaust Damper Assembly to the fan Cover Bracket on the top of the outercase cabinet by sliding it into the slits in the bottom of the Mounting Plate. Tapping Screw (A) Figure 20 CHECKLIST FOR INSTALLATION 1. Plug in the INSTALLATION ...Installation Instructions. Tabs Figure 18 Top Cabinet Screws Flat Washers Remove this tape before operation. See Figure 18 on page 7. 4. INSTALLATION INSTRUCTIONS MOUNTING OVEN TO THE WALL Two people are recommended to attach the Microwave Oven/ Hood to remove the tape at (C) VERTICAL EXHAUST STEP 1 ...
...5. (For Vertical Exhaust Only) Attach the Exhaust Damper Assembly to the fan Cover Bracket on the top of the outercase cabinet by sliding it into the slits in the bottom of the Mounting Plate. Tapping Screw (A) Figure 20 CHECKLIST FOR INSTALLATION 1. Plug in the INSTALLATION ...Installation Instructions. Tabs Figure 18 Top Cabinet Screws Flat Washers Remove this tape before operation. See Figure 18 on page 7. 4. INSTALLATION INSTRUCTIONS MOUNTING OVEN TO THE WALL Two people are recommended to attach the Microwave Oven/ Hood to remove the tape at (C) VERTICAL EXHAUST STEP 1 ...


