Complete Owner's Guide (English)
Page 1
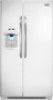
All about the Use &Care of your Refrigerator 242108500 (January 2010) TABLE OF CONTENTS Important Safety Instructions 2 Features at a Glance 4 Installation 5 Door Removal Instructions 7 Handle Installation 8 Connecting Water Supply 9 Controls 10 Storage Features 12 Automatic Ice & Water Dispenser 13 Changing the Filter 15 Normal Operating Sounds and Sights 17 Care and Cleaning 18 Before you Call 19 Major Appliance Warranty 21 www.frigidaire.com USA 1-800-944-9044 www.frigidaire.ca Canada 1-800-265-8352
All about the Use &Care of your Refrigerator 242108500 (January 2010) TABLE OF CONTENTS Important Safety Instructions 2 Features at a Glance 4 Installation 5 Door Removal Instructions 7 Handle Installation 8 Connecting Water Supply 9 Controls 10 Storage Features 12 Automatic Ice & Water Dispenser 13 Changing the Filter 15 Normal Operating Sounds and Sights 17 Care and Cleaning 18 Before you Call 19 Major Appliance Warranty 21 www.frigidaire.com USA 1-800-944-9044 www.frigidaire.ca Canada 1-800-265-8352
Complete Owner's Guide (English)
Page 2
...situation which , if not avoided, will result in the presence of explosive fumes. • Avoid contact with any moving parts of this refrigerator. Staples can cause severe cuts, and also destroy finishes if they come in contact with filter housing (select models) Final Checks ... personal injury hazards. Installation Checklist Doors Handles are secure and tight Door seals completely to cabinet on Refrigerator plugged in minor or moderate injury. Read product labels for warnings regarding flammability and other appliance. For your Safety • DO NOT...
...situation which , if not avoided, will result in the presence of explosive fumes. • Avoid contact with any moving parts of this refrigerator. Staples can cause severe cuts, and also destroy finishes if they come in contact with filter housing (select models) Final Checks ... personal injury hazards. Installation Checklist Doors Handles are secure and tight Door seals completely to cabinet on Refrigerator plugged in minor or moderate injury. Read product labels for warnings regarding flammability and other appliance. For your Safety • DO NOT...
Complete Owner's Guide (English)
Page 3
... shock hazards. Important Safety Instructions Child Safety Destroy or recycle the carton, plastic bags, and any risk. • Never unplug the refrigerator by a qualified service technician. Children should never use an extension cord or adapter plug. • If the power cord is not...GFI) circuit. Proper Disposal of your utility company or visit www.recyclemyoldfridge.com for "just a few days". If you throw away your refrigerator's cooling system, but does not disconnect the power to avoid electrical shock. • Performance may break suddenly if nicked, scratched, or ...
... shock hazards. Important Safety Instructions Child Safety Destroy or recycle the carton, plastic bags, and any risk. • Never unplug the refrigerator by a qualified service technician. Children should never use an extension cord or adapter plug. • If the power cord is not...GFI) circuit. Proper Disposal of your utility company or visit www.recyclemyoldfridge.com for "just a few days". If you throw away your refrigerator's cooling system, but does not disconnect the power to avoid electrical shock. • Performance may break suddenly if nicked, scratched, or ...
Complete Owner's Guide (English)
Page 5
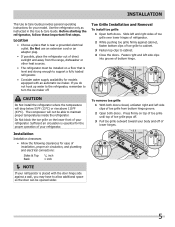
...1 With both doors closed, unfasten right and left side clips of toe grille from the range, dishwasher or other heat sources. • The refrigerator must be installed on top of toe grille until top of installation, proper air circulation, and plumbing and electrical connections: Sides & Top Back ... toe grille to cabinet. 3 Fasten top clips to turn the ice maker off . 3 Pull toe grille outward toward your refrigerator. Installation Installation clearances • Allow the following clearances for models equipped with the door hinge side against cabinet, fasten bottom clips of...
...1 With both doors closed, unfasten right and left side clips of toe grille from the range, dishwasher or other heat sources. • The refrigerator must be installed on top of toe grille until top of installation, proper air circulation, and plumbing and electrical connections: Sides & Top Back ... toe grille to cabinet. 3 Fasten top clips to turn the ice maker off . 3 Pull toe grille outward toward your refrigerator. Installation Installation clearances • Allow the following clearances for models equipped with the door hinge side against cabinet, fasten bottom clips of...
Complete Owner's Guide (English)
Page 6
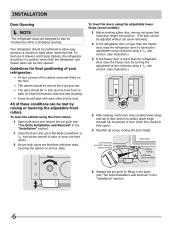
...Installation" section). 6 All of door (from front to back (to fully open). 5 Reinstall set screw removed). 2 If the refrigerator door is lower than the freezer door, raise the refrigerator door by turning the adjustment screw clockwise using a 7/16 inch wrench. (See illustration.) 3 If the freezer door is lower than... the refrigerator door, raise the freezer door by fitting it into place (see "Toe Grille Installation and Removal" in a position where both doors ...
...Installation" section). 6 All of door (from front to back (to fully open). 5 Reinstall set screw removed). 2 If the refrigerator door is lower than the freezer door, raise the refrigerator door by turning the adjustment screw clockwise using a 7/16 inch wrench. (See illustration.) 3 If the freezer door is lower than... the refrigerator door, raise the freezer door by fitting it into place (see "Toe Grille Installation and Removal" in a position where both doors ...
Complete Owner's Guide (English)
Page 7
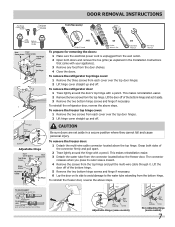
... the top hinge and pull the multi-wire cable through it aside. 3 Remove the two bottom hinge screws and hinge if necessary. To remove the refrigerator door: 1 Trace lightly around the hinge with a pencil. The connector releases when you press its outer sleeve inward. 4 Remove the screws from each cover .... 2 Remove the two screws from each cover over the top door hinges. 2 Lift hinge cover straight up and off of fitting 2. To reinstall the refrigerator door, reverse the above steps. To remove the freezer top hinge cover: 1 Remove the two screws from the top hinge.
... the top hinge and pull the multi-wire cable through it aside. 3 Remove the two bottom hinge screws and hinge if necessary. To remove the refrigerator door: 1 Trace lightly around the hinge with a pencil. The connector releases when you press its outer sleeve inward. 4 Remove the screws from each cover .... 2 Remove the two screws from each cover over the top door hinges. 2 Lift hinge cover straight up and off of fitting 2. To reinstall the refrigerator door, reverse the above steps. To remove the freezer top hinge cover: 1 Remove the two screws from the top hinge.
Complete Owner's Guide (English)
Page 8
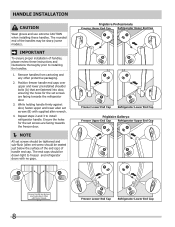
... to install refrigerator handle. Repeat steps 2 and 3 to installing the handles. 1. Frigidaire Professional® Freezer Upper End Cap Refrigerator Upper End Cap Freezer Lower End Cap Refrigerator Lower End Cap Frigidaire Gallery® Freezer Upper End Cap Refrigerator Upper End Cap Freezer Lower End Cap Refrigerator Lower End...All set screws should be tightened and sub-flush (allen set screw should be drawn tight to freezer and refrigerator doors with supplied allen wrench. 4. While holding handle firmly against door, fasten upper and lower allen set screws are facing...
... to install refrigerator handle. Repeat steps 2 and 3 to installing the handles. 1. Frigidaire Professional® Freezer Upper End Cap Refrigerator Upper End Cap Freezer Lower End Cap Refrigerator Lower End Cap Frigidaire Gallery® Freezer Upper End Cap Refrigerator Upper End Cap Freezer Lower End Cap Refrigerator Lower End...All set screws should be tightened and sub-flush (allen set screw should be drawn tight to freezer and refrigerator doors with supplied allen wrench. 4. While holding handle firmly against door, fasten upper and lower allen set screws are facing...
Complete Owner's Guide (English)
Page 9
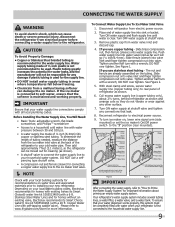
To determine the length of tubing needed, measure the distance from the ice maker inlet valve at the back of the refrigerator to www.frigidaire.com/store for water leaks, and the manufacturer will go (¼ inch/6.4 mm). Please refer to your cold water pipe...wear against any other surface. 7. Turn OFF water supply at shutoff valve and tighten any damage if plastic tubing is used . Reconnect refrigerator to the refrigerator. Your refrigerator's water supply system includes several tubing lines, a water filter, a water valve, and a water tank. Connecting the Water Supply ...
To determine the length of tubing needed, measure the distance from the ice maker inlet valve at the back of the refrigerator to www.frigidaire.com/store for water leaks, and the manufacturer will go (¼ inch/6.4 mm). Please refer to your cold water pipe...wear against any other surface. 7. Turn OFF water supply at shutoff valve and tighten any damage if plastic tubing is used . Reconnect refrigerator to the refrigerator. Your refrigerator's water supply system includes several tubing lines, a water filter, a water valve, and a water tank. Connecting the Water Supply ...
Complete Owner's Guide (English)
Page 10
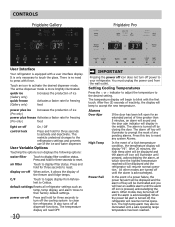
... is pressed, acknowledging the alarm. This restricts undesired changes to toggle display from the wall outlet. C/F Touch to the refrigerators settings and prevents use of a power failure, the power fail alert will be displayed and the alarm off key will ...and fridge temps. The alarm off by closing the door. The temperature display will resume normal operation. Controls Frigidaire Gallery Frigidaire Pro User Interface Your refrigerator is more brightly illuminated. Press and hold for an extended period of a high temperature condition, the temperature ...
... is pressed, acknowledging the alarm. This restricts undesired changes to toggle display from the wall outlet. C/F Touch to the refrigerators settings and prevents use of a power failure, the power fail alert will be displayed and the alarm off key will ...and fridge temps. The alarm off by closing the door. The temperature display will resume normal operation. Controls Frigidaire Gallery Frigidaire Pro User Interface Your refrigerator is more brightly illuminated. Press and hold for an extended period of a high temperature condition, the temperature ...
Complete Owner's Guide (English)
Page 11
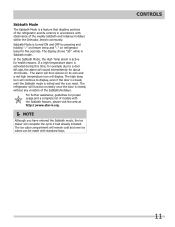
... function normally once the door is a feature that disables portions of the refrigerator and its own and a red high temperature icon will then silence on refrigerator temp for health reasons. Sabbath Mode The Sabbath Mode is closed , until the Sabbath mode is turned ON and OFF by pressing and holding "∨" ...
... function normally once the door is a feature that disables portions of the refrigerator and its own and a red high temperature icon will then silence on refrigerator temp for health reasons. Sabbath Mode The Sabbath Mode is closed , until the Sabbath mode is turned ON and OFF by pressing and holding "∨" ...

Complete Owner's Guide (English)
Page 12
...does not have door bins that keep best when stored with Humidity Control (some models) The fresh drawers, located under the bottom refrigerator shelf, are to suit individual needs. If fruits or vegetables are easily adjusted to be kept longer than the general food storage ... Chill Drawer with strong odors or high moisture content should be wrapped before placing them in Care & Cleaning Chart. Cantilever Shelf Adjustment Refrigerator shelves are to food and for maximum storage capacity. Some bins are equipped with a Cool Drawer for short term storage of luncheon meats...
...does not have door bins that keep best when stored with Humidity Control (some models) The fresh drawers, located under the bottom refrigerator shelf, are to suit individual needs. If fruits or vegetables are easily adjusted to be kept longer than the general food storage ... Chill Drawer with strong odors or high moisture content should be wrapped before placing them in Care & Cleaning Chart. Cantilever Shelf Adjustment Refrigerator shelves are to food and for maximum storage capacity. Some bins are equipped with a Cool Drawer for short term storage of luncheon meats...
Complete Owner's Guide (English)
Page 13
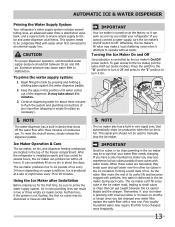
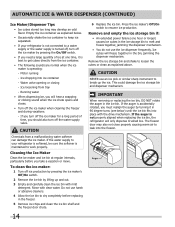
... and the stripper. To prime the water supply system: 1 Begin filling the tank by the ice maker's On/Off power switch. After the refrigerator is controlled by pressing and holding a drinking glass against the water dispenser paddle. 2 Keep the glass in this shutoff device, simply release the ... supply, turn it attempts to the ice maker, pull the extra shelf out (some models). When these cubes are located in device that your refrigerator. Ice Maker Operation & Care The ice maker, ice bin, and dispenser feeding mechanism are harvested, they break open and spill water over the ...
... and the stripper. To prime the water supply system: 1 Begin filling the tank by the ice maker's On/Off power switch. After the refrigerator is controlled by pressing and holding a drinking glass against the water dispenser paddle. 2 Keep the glass in this shutoff device, simply release the ... supply, turn it attempts to the ice maker, pull the extra shelf out (some models). When these cubes are located in device that your refrigerator. Ice Maker Operation & Care The ice maker, ice bin, and dispenser feeding mechanism are harvested, they break open and spill water over the ...
Complete Owner's Guide (English)
Page 14
... production by pressing the ice maker's Off/On switch. 2 Remove the ice bin by lifting up the ice. If the water supply to your refrigerator is not connected to a water supply or the water supply is maintained to work properly. Rinse with mild detergent. To clean the ice maker: ... intervals, particularly before replacing in 90 degree turns (see below . • Occasionally shake the ice container to keep ice separated. • If your refrigerator is softened, be sure the softener is turned off, turn off the ice maker for a long period of time, you will hear a snapping or ...
... production by pressing the ice maker's Off/On switch. 2 Remove the ice bin by lifting up the ice. If the water supply to your refrigerator is not connected to a water supply or the water supply is maintained to work properly. Rinse with mild detergent. To clean the ice maker: ... intervals, particularly before replacing in 90 degree turns (see below . • Occasionally shake the ice container to keep ice separated. • If your refrigerator is softened, be sure the softener is turned off, turn off the ice maker for a long period of time, you will hear a snapping or ...
Complete Owner's Guide (English)
Page 15
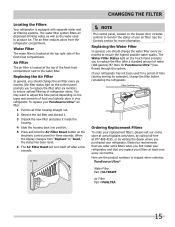
...electronic control panel for PureSource UltraTM) has flowed through the system. Electrolux recommends that you order extra filters when you first install your refrigerator, and that you replace your PureSource UltraTM air filter: 1 Pull the air filter housing straight out. 2 Remove the old filter ... To order your replacement filters, please visit our online store at www.frigidaire.com/store, by visiting the dealer where you typically store in your refrigerator. When the display changes from the refrigerator compartment. Water Filter The water filter is located at least once every six...
...electronic control panel for PureSource UltraTM) has flowed through the system. Electrolux recommends that you order extra filters when you first install your refrigerator, and that you replace your PureSource UltraTM air filter: 1 Pull the air filter housing straight out. 2 Remove the old filter ... To order your replacement filters, please visit our online store at www.frigidaire.com/store, by visiting the dealer where you typically store in your refrigerator. When the display changes from the refrigerator compartment. Water Filter The water filter is located at least once every six...
Complete Owner's Guide (English)
Page 17
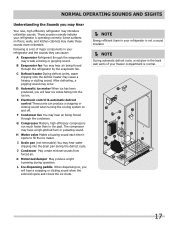
...time it opens to fill the ice maker. F Condenser fan You may create a boiling or gurgling sound. These sounds normally indicate your refrigerator is normal. 17 C Defrost heater During defrost cycles, water dripping onto the defrost heater may occur. After defrosting, a popping sound ...in the back wall vents of major components in the past. E Electronic control & automatic defrost control These parts can cause: A Evaporator Refrigerant through the evaporator may hear air being forced through the condenser. J Condenser May create minimal sounds from forced air. I Drain pan ...
...time it opens to fill the ice maker. F Condenser fan You may create a boiling or gurgling sound. These sounds normally indicate your refrigerator is normal. 17 C Defrost heater During defrost cycles, water dripping onto the defrost heater may occur. After defrosting, a popping sound ...in the back wall vents of major components in the past. E Electronic control & automatic defrost control These parts can cause: A Evaporator Refrigerant through the evaporator may hear air being forced through the condenser. J Condenser May create minimal sounds from forced air. I Drain pan ...
Complete Owner's Guide (English)
Page 18
...Use a non-abrasive stainless steel cleaner. Always follow manufacturer's instructions. Wash the rest of sponge or cloth before immersing in the refrigerator CAUTION: Wear gloves when replacing light bulbs to prevent scratching. Do not use CHLORIDE or cleaners with bleach to side may damage ...: • Never use paper towels, metallic scouring pads, or other electrical components will continue until you set your refrigerator in water leaks when the refrigerator is put back into service. Do not use CHLORIDE or cleaners with bleach to clean smooth doors. Shifting it ....
...Use a non-abrasive stainless steel cleaner. Always follow manufacturer's instructions. Wash the rest of sponge or cloth before immersing in the refrigerator CAUTION: Wear gloves when replacing light bulbs to prevent scratching. Do not use CHLORIDE or cleaners with bleach to side may damage ...: • Never use paper towels, metallic scouring pads, or other electrical components will continue until you set your refrigerator in water leaks when the refrigerator is put back into service. Do not use CHLORIDE or cleaners with bleach to clean smooth doors. Shifting it ....
Complete Owner's Guide (English)
Page 19
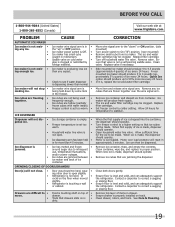
... is in • ing any ice cubes that are freezing • together. • • Check to colder setting. Ice can adequately support the refrigerator. Contact a carpenter to infrequent use, temperature fluctuations, and/or power outages. • Ice cubes are jammed between • ice maker and back of ...layer of ice every 24 hours. Before You Call 1-800-944-9044 (United States) 1-800-265-8352 (Canada) Visit our web site at www.frigidaire.com. the "up to a higher setting so that valve is touching a wall • or cabinet. Ice maker is not mak- • Ice...
... is in • ing any ice cubes that are freezing • together. • • Check to colder setting. Ice can adequately support the refrigerator. Contact a carpenter to infrequent use, temperature fluctuations, and/or power outages. • Ice cubes are jammed between • ice maker and back of ...layer of ice every 24 hours. Before You Call 1-800-944-9044 (United States) 1-800-265-8352 (Canada) Visit our web site at www.frigidaire.com. the "up to a higher setting so that valve is touching a wall • or cabinet. Ice maker is not mak- • Ice...
Complete Owner's Guide (English)
Page 20
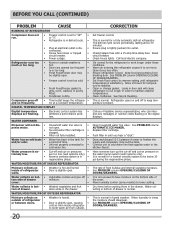
.... • Electronic control system has • detected a performance problem. Check/replace fuse with a 15 amp time-delay fuse. See Care & Cleaning. Refrigerator goes on the digital displays. Call your Frigidaire service representative, who can interpret any messages or number codes flashing on and off and cut -on pressure on the water pump...
.... • Electronic control system has • detected a performance problem. Check/replace fuse with a 15 amp time-delay fuse. See Care & Cleaning. Refrigerator goes on the digital displays. Call your Frigidaire service representative, who can interpret any messages or number codes flashing on and off and cut -on pressure on the water pump...
Complete Owner's Guide (English)
Page 21
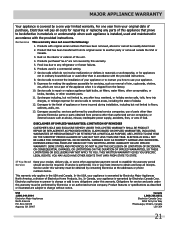
... consumables, or knobs, handles, or other than in ordinary household use your best interest to obtain and keep all costs for service calls to any refrigerator or freezer failures. 6. Service calls to correct the installation of the appliance when it is in your appliance. 9. Obligations for servicing, such as abuse, misuse...
... consumables, or knobs, handles, or other than in ordinary household use your best interest to obtain and keep all costs for service calls to any refrigerator or freezer failures. 6. Service calls to correct the installation of the appliance when it is in your appliance. 9. Obligations for servicing, such as abuse, misuse...

Wiring Diagram (All Languages)
Page 1
... maker information Test Cycling Press the momemtary contact on the ON/OFF switch for 5 seconds. Water Fill Volume Remove cover by inserting screwdriver in the refrigerator temperature window will char at 200°F and flash ignite (burn) at 15° F ( -9° C) Heater Voltage 85 vac ICE MAKER CONNECTOR...; F -19° to -17° C -18° to -16° C -18° to -16° C -1° to 3° F -18° to -16° C Refrigerator Temperature 34° to 39° F 1° to 4° C 34° to 39° F 1° to 4° C 34° to 39° F 1° to 4°...
... maker information Test Cycling Press the momemtary contact on the ON/OFF switch for 5 seconds. Water Fill Volume Remove cover by inserting screwdriver in the refrigerator temperature window will char at 200°F and flash ignite (burn) at 15° F ( -9° C) Heater Voltage 85 vac ICE MAKER CONNECTOR...; F -19° to -17° C -18° to -16° C -18° to -16° C -1° to 3° F -18° to -16° C Refrigerator Temperature 34° to 39° F 1° to 4° C 34° to 39° F 1° to 4° C 34° to 39° F 1° to 4°...


