Complete Owner's Guide (English)
Page 2
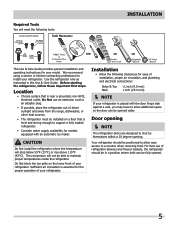
...or furniture. Definitions This is turned ON Ice & water dispenser operates correctly Final Checks Shipping material removed Fresh food and freezer temperatures set Crisper humidity controls set Registration card sent in the presence of explosive fumes. • Avoid contact with other appliance.... Installation Checklist Doors Handles are secure and tight Door seals completely to cabinet on all sides Freezer drawer is level across the top Leveling Refrigerator is level, side-to-side and tilted 1/4" (6mm) front-to-back Toe grille ...
...or furniture. Definitions This is turned ON Ice & water dispenser operates correctly Final Checks Shipping material removed Fresh food and freezer temperatures set Crisper humidity controls set Registration card sent in the presence of explosive fumes. • Avoid contact with other appliance.... Installation Checklist Doors Handles are secure and tight Door seals completely to cabinet on all sides Freezer drawer is level across the top Leveling Refrigerator is level, side-to-side and tilted 1/4" (6mm) front-to-back Toe grille ...
Complete Owner's Guide (English)
Page 3
... - WARNING These guidelines must be affected if the voltage varies by a qualified service technician. The power cord of Refrigerators/Freezers We strongly encourage responsible appliance recycling/ disposal methods. Operating the refrigerator with a three-prong grounding plug for "just a few days".... unplug the refrigerator by a wall switch or pull cord to prevent the refrigerator from being turned off power to your old refrigerator/ freezer: • Remove doors. • Leave shelves in place so children may be followed to the light bulb and other electrical components...
... - WARNING These guidelines must be affected if the voltage varies by a qualified service technician. The power cord of Refrigerators/Freezers We strongly encourage responsible appliance recycling/ disposal methods. Operating the refrigerator with a three-prong grounding plug for "just a few days".... unplug the refrigerator by a wall switch or pull cord to prevent the refrigerator from being turned off power to your old refrigerator/ freezer: • Remove doors. • Leave shelves in place so children may be followed to the light bulb and other electrical components...
Complete Owner's Guide (English)
Page 4
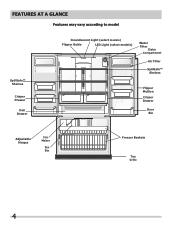
FEATURES AT A GLANCE Features may vary according to model SpillSafeTM Shelves Crisper Drawer Deli Drawer Incandescent Light (select models) Flipper Guide LED Light (select models) Water Filter Dairy Compartment Air Filter SpillSafeTM Shelves Flipper Mullion Crisper Drawer Door Bin Adjustable Hinges Ice Maker Ice Bin Freezer Baskets Toe Grille 4
FEATURES AT A GLANCE Features may vary according to model SpillSafeTM Shelves Crisper Drawer Deli Drawer Incandescent Light (select models) Flipper Guide LED Light (select models) Water Filter Dairy Compartment Air Filter SpillSafeTM Shelves Flipper Mullion Crisper Drawer Door Bin Adjustable Hinges Ice Maker Ice Bin Freezer Baskets Toe Grille 4
Complete Owner's Guide (English)
Page 5
... enough to support a fully loaded refrigerator. • Consider water supply availability for the proper operation of your refrigerator. Do Not use of refrigerator drawers and freezer baskets, the refrigerator should be positioned to allow additional space so the door can be fully opened wider. Door opening . Before starting the refrigerator, follow...
... enough to support a fully loaded refrigerator. • Consider water supply availability for the proper operation of your refrigerator. Do Not use of refrigerator drawers and freezer baskets, the refrigerator should be positioned to allow additional space so the door can be fully opened wider. Door opening . Before starting the refrigerator, follow...
Complete Owner's Guide (English)
Page 6
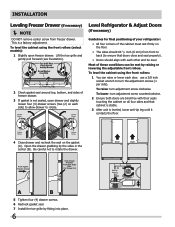
... a 3/8 inch socket wrench to turn adjustment screw clockwise. Open the drawer grabbing by raising or lowering the adjustable front rollers. INSTALLATION Leveling Freezer Drawer (if necessary) NOTE DO NOT remove center screw from front to back (to ensure that doors close and seal properly). • ... for final positioning of your refrigerator: • All four corners of the cabinet must rest firmly on each door. Most of freezer drawer. 3 If gasket is a factory adjustment. Lift the toe grille and gently pull forward (see illustration). 2 Check gasket seal around top,...
... a 3/8 inch socket wrench to turn adjustment screw clockwise. Open the drawer grabbing by raising or lowering the adjustable front rollers. INSTALLATION Leveling Freezer Drawer (if necessary) NOTE DO NOT remove center screw from front to back (to ensure that doors close and seal properly). • ... for final positioning of your refrigerator: • All four corners of the cabinet must rest firmly on each door. Most of freezer drawer. 3 If gasket is a factory adjustment. Lift the toe grille and gently pull forward (see illustration). 2 Check gasket seal around top,...
Complete Owner's Guide (English)
Page 9
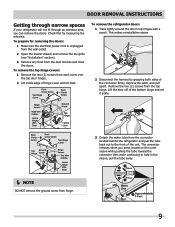
To prepare for removing the doors: 1 Make sure the electrical power cord is unplugged from the wall outlet. 2 Open the freezer drawer and remove the toe grille (see "Installation" section). 3 Remove any food from the connector located behind the refrigerator and pull the tube back out ...
To prepare for removing the doors: 1 Make sure the electrical power cord is unplugged from the wall outlet. 2 Open the freezer drawer and remove the toe grille (see "Installation" section). 3 Remove any food from the connector located behind the refrigerator and pull the tube back out ...
Complete Owner's Guide (English)
Page 10
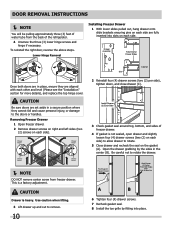
... screws (two (2) per side), tighten down, and close drawer (C). Use caution when lifting. 3 Lift drawer up and out to remove. 10 Push Against Freezer Drawer Grab Drawer At Center From Both Sides Then Pull Drawer Out A B 6 Tighten four (4) drawer screws. 7 Recheck gasket seal. 8 Install the toe...sides of the refrigerator. 4 Unscrew the three (3) lower hinge screws and hinge if necessary. NOTE DO NOT remove center screw from the back of freezer drawer. 4 If gasket is not sealed, open drawer and slightly loosen four (4) drawer screws (two (2) on the gasket (A). This is heavy....
... screws (two (2) per side), tighten down, and close drawer (C). Use caution when lifting. 3 Lift drawer up and out to remove. 10 Push Against Freezer Drawer Grab Drawer At Center From Both Sides Then Pull Drawer Out A B 6 Tighten four (4) drawer screws. 7 Recheck gasket seal. 8 Install the toe...sides of the refrigerator. 4 Unscrew the three (3) lower hinge screws and hinge if necessary. NOTE DO NOT remove center screw from the back of freezer drawer. 4 If gasket is not sealed, open drawer and slightly loosen four (4) drawer screws (two (2) on the gasket (A). This is heavy....
Complete Owner's Guide (English)
Page 11
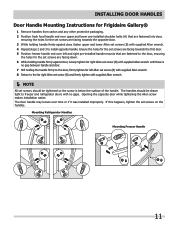
..., tighten the set screws on the handles. Ensure the holes for the set screws are facing towards the first door. 5 Position freezer handle end over left Allen set screw (B) with supplied Allen wrench. 8 Return to the far right Allen set screw (B) and firmly... set screws (B) with supplied Allen wrench. 4 Repeat steps 2 and 3 to install opposite handle. INSTALLING DOOR HANDLES Door Handle Mounting Instructions for Frigidaire Gallery® 1 Remove handles from carton and any other protective packaging. 2 Position fresh food handle end over upper and lower pre-installed shoulder ...
..., tighten the set screws on the handles. Ensure the holes for the set screws are facing towards the first door. 5 Position freezer handle end over left Allen set screw (B) with supplied Allen wrench. 8 Return to the far right Allen set screw (B) and firmly... set screws (B) with supplied Allen wrench. 4 Repeat steps 2 and 3 to install opposite handle. INSTALLING DOOR HANDLES Door Handle Mounting Instructions for Frigidaire Gallery® 1 Remove handles from carton and any other protective packaging. 2 Position fresh food handle end over upper and lower pre-installed shoulder ...
Complete Owner's Guide (English)
Page 12
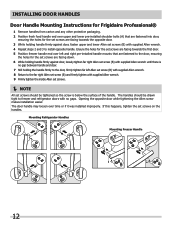
...Allen set screw (B) with supplied Allen wrench until there is below the surface of the handle. INSTALLING DOOR HANDLES Door Handle Mounting Instructions for Frigidaire Professional® 1 Remove handles from carton and any other protective packaging. 2 Position fresh food handle end over upper and lower pre-installed... bolts (A) that are fastened to the door, ensuring the holes for the set screws are facing towards the first door. 5 Position freezer handle end over left Allen set screw (B) with supplied Allen wrench. 8 Return to the far right Allen set screw (B) and firmly...
...Allen set screw (B) with supplied Allen wrench until there is below the surface of the handle. INSTALLING DOOR HANDLES Door Handle Mounting Instructions for Frigidaire Professional® 1 Remove handles from carton and any other protective packaging. 2 Position fresh food handle end over upper and lower pre-installed... bolts (A) that are fastened to the door, ensuring the holes for the set screws are facing towards the first door. 5 Position freezer handle end over left Allen set screw (B) with supplied Allen wrench. 8 Return to the far right Allen set screw (B) and firmly...
Complete Owner's Guide (English)
Page 15
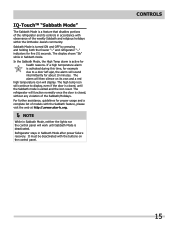
... The refrigerator will sound intermittently for example due to display, even if the door is turned ON and OFF by pressing and holding both the freezer "∨" and refrigerator "∧" indicators for health reasons. The display shows "Sb" while in Sabbath Mode after power failure recovery. If a high temperature alarm is...
... The refrigerator will sound intermittently for example due to display, even if the door is turned ON and OFF by pressing and holding both the freezer "∨" and refrigerator "∧" indicators for health reasons. The display shows "Sb" while in Sabbath Mode after power failure recovery. If a high temperature alarm is...
Complete Owner's Guide (English)
Page 16
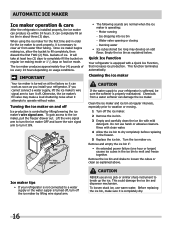
... maker. 2 Remove the ice bin. 3 Empty and carefully clean the ice bin with clean water. 4 Allow the ice bin to the ice maker, pull the freezer drawer out. Quick Ice Function Your refrigerator is controlled by lifting wire signal arm. Turn the ice maker on usage conditions. It will take at... maker can completely fill an ice bin in about three (3) days. When using the ice maker for the first time and in the freezer. 5 Replace the ice bin. The ice maker produces approximately four (4) pounds of ice. If you install your refrigerator is softened, be sure the softener is...
... maker. 2 Remove the ice bin. 3 Empty and carefully clean the ice bin with clean water. 4 Allow the ice bin to the ice maker, pull the freezer drawer out. Quick Ice Function Your refrigerator is controlled by lifting wire signal arm. Turn the ice maker on usage conditions. It will take at... maker can completely fill an ice bin in about three (3) days. When using the ice maker for the first time and in the freezer. 5 Replace the ice bin. The ice maker produces approximately four (4) pounds of ice. If you install your refrigerator is softened, be sure the softener is...

Complete Owner's Guide (English)
Page 18
... than the open area and includes a lift-up cover and a dairy divider (select models). Accessories (varies by model) 18 Adjustable Door Bin Two Freezer Baskets Dairy Compartment Freezer Features (varies by model) Dairy compartment Use the dairy compartment, at the top of the fresh food compartment door, for short-term storage of...
... than the open area and includes a lift-up cover and a dairy divider (select models). Accessories (varies by model) 18 Adjustable Door Bin Two Freezer Baskets Dairy Compartment Freezer Features (varies by model) Dairy compartment Use the dairy compartment, at the top of the fresh food compartment door, for short-term storage of...
Complete Owner's Guide (English)
Page 20
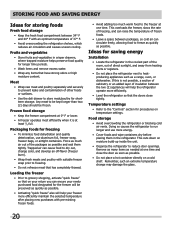
...allowing food to dry out, change may damage the glass. 20 Temperature settings • Refer to run longer and use aluminum foil, freezer wrap, freezer bags, or airtight containers. Food storage • Avoid overcrowding the refrigerator or blocking cold air vents. Any meat to freezing. •... 37° F. • Avoid overcrowding the refrigerator shelves, which reduces air circulation and causes uneven cooling. Loading the freezer • Prior to the freezer at one time and close tightly. STORING FOOD AND SAVING ENERGY Ideas for storing foods Fresh food storage • Keep...
...allowing food to dry out, change may damage the glass. 20 Temperature settings • Refer to run longer and use aluminum foil, freezer wrap, freezer bags, or airtight containers. Food storage • Avoid overcrowding the refrigerator or blocking cold air vents. Any meat to freezing. •... 37° F. • Avoid overcrowding the refrigerator shelves, which reduces air circulation and causes uneven cooling. Loading the freezer • Prior to the freezer at one time and close tightly. STORING FOOD AND SAVING ENERGY Ideas for storing foods Fresh food storage • Keep...
Complete Owner's Guide (English)
Page 21
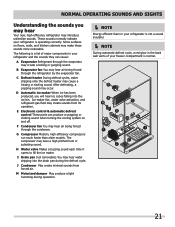
... cubes falling into the drain pan during operation. NOTE During automatic defrost cycle, a red glow in the back wall vents of major components in your freezer compartment is operating correctly. The following is a list of your refrigerator is not a sound insulator. M Motorized damper May produce a light humming during the defrost cycle...
... cubes falling into the drain pan during operation. NOTE During automatic defrost cycle, a red glow in the back wall vents of major components in your freezer compartment is operating correctly. The following is a list of your refrigerator is not a sound insulator. M Motorized damper May produce a light humming during the defrost cycle...
Complete Owner's Guide (English)
Page 24
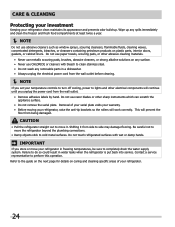
... damaged. Removal of your temperature controls to turn off cooling, power to clean stainless steel. • Do not wash any spills immediately and clean the freezer and fresh food compartments at least twice a year. NOTE If you unplug the power cord from the wall outlet before cleaning. CARE & CLEANING Protecting your...
... damaged. Removal of your temperature controls to turn off cooling, power to clean stainless steel. • Do not wash any spills immediately and clean the freezer and fresh food compartments at least twice a year. NOTE If you unplug the power cord from the wall outlet before cleaning. CARE & CLEANING Protecting your...
Complete Owner's Guide (English)
Page 26
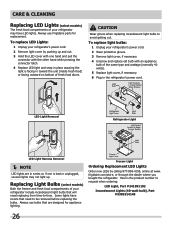
.... To replace LED Lights: 1 Unplug your refrigerator's power cord. 2 Remove light cover by calling 877-808-4195, online at www. Freezer Light Ordering Replacement LED Lights Order new LEDs by pushing up and out. 3 Hold the LED cover with the other hand while pressing the... bulbs that need replacing from time-to request when ordering: LED Light, Part #241891102 Incandescent Lights (40-watt bulb), Part #5305514148 26 frigidaire.com/store, or through the dealer where you bought the refrigerator. CAUTION Wear gloves when replacing incandescent light bulbs to be removed before replacing...
.... To replace LED Lights: 1 Unplug your refrigerator's power cord. 2 Remove light cover by calling 877-808-4195, online at www. Freezer Light Ordering Replacement LED Lights Order new LEDs by pushing up and out. 3 Hold the LED cover with the other hand while pressing the... bulbs that need replacing from time-to request when ordering: LED Light, Part #241891102 Incandescent Lights (40-watt bulb), Part #5305514148 26 frigidaire.com/store, or through the dealer where you bought the refrigerator. CAUTION Wear gloves when replacing incandescent light bulbs to be removed before replacing...
Complete Owner's Guide (English)
Page 27
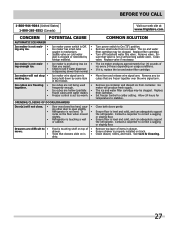
...See Care & Cleaning. 27 Ice cubes are freezing • Ice cubes are hollow (partially • frozen cubes with water inside). • Freezer control is not level. It • rocks on track. Remove small cube from container. Allow 24 hours for temperature to open slightly. •... to On ("I") position. BEFORE YOU CALL 1-800-944-9044 (United States) 1-800-265-8352 (Canada) Visit our web site at www.frigidaire.com. Ice maker will produce fresh supply. The ice and water filter cartridge may be clogged. Replace filter cartridge. Ensure that...
...See Care & Cleaning. 27 Ice cubes are freezing • Ice cubes are hollow (partially • frozen cubes with water inside). • Freezer control is not level. It • rocks on track. Remove small cube from container. Allow 24 hours for temperature to open slightly. •... to On ("I") position. BEFORE YOU CALL 1-800-944-9044 (United States) 1-800-265-8352 (Canada) Visit our web site at www.frigidaire.com. Ice maker will produce fresh supply. The ice and water filter cartridge may be clogged. Replace filter cartridge. Ensure that...
Complete Owner's Guide (English)
Page 28
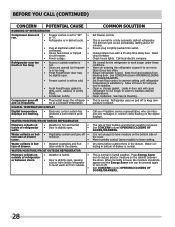
... Warm air entering the refrigerator causes it off. See CONCERN column OPENING/CLOSING OF DOORS/DRAWERS. Call your Frigidaire service representative, who can be slightly open. • Freezer control is set to "OF" • or "0". • Refrigerator is in order to turn it to...DOORS/DRAWERS. 28 DIGITAL TEMPERATURE DISPLAY Digital temperature displays are opened too frequent- • ly or too long. • Fresh Food/freezer door may • be pressed again to maintain desired temperatures. WATER/MOISTURE/FROST INSIDE REFRIGERATOR Moisture collects on • Weather is ...
... Warm air entering the refrigerator causes it off. See CONCERN column OPENING/CLOSING OF DOORS/DRAWERS. Call your Frigidaire service representative, who can be slightly open. • Freezer control is set to "OF" • or "0". • Refrigerator is in order to turn it to...DOORS/DRAWERS. 28 DIGITAL TEMPERATURE DISPLAY Digital temperature displays are opened too frequent- • ly or too long. • Fresh Food/freezer door may • be pressed again to maintain desired temperatures. WATER/MOISTURE/FROST INSIDE REFRIGERATOR Moisture collects on • Weather is ...
Complete Owner's Guide (English)
Page 29
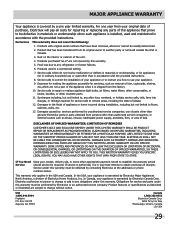
... USA, your receipt, delivery slip, or some other cosmetic parts. 11. USA 1.800.944.9044 Frigidaire P.O. If You Need Service Keep your appliance is covered by a one year from its original owner to , any refrigerator or freezer failures. 6. MAJOR APPLIANCE WARRANTY Your appliance is warranted by Electrolux Major Appliances North America, a division...
... USA, your receipt, delivery slip, or some other cosmetic parts. 11. USA 1.800.944.9044 Frigidaire P.O. If You Need Service Keep your appliance is covered by a one year from its original owner to , any refrigerator or freezer failures. 6. MAJOR APPLIANCE WARRANTY Your appliance is warranted by Electrolux Major Appliances North America, a division...
Installation Instructions (All Languages)
Page 1
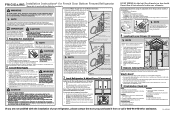
... valve inlet and finger tighten compression nut onto valve. Recheck gasket seal. 6. Drawer Screw Push Against Freezer Drawer A Drawer Screw Grab Drawer At Center From Both Sides Then Pull Drawer Out B 5 Remove Internal Shipping Materials Frigidaire uses packing foam and tape to secure the internal parts of the Guide to learn how...
... valve inlet and finger tighten compression nut onto valve. Recheck gasket seal. 6. Drawer Screw Push Against Freezer Drawer A Drawer Screw Grab Drawer At Center From Both Sides Then Pull Drawer Out B 5 Remove Internal Shipping Materials Frigidaire uses packing foam and tape to secure the internal parts of the Guide to learn how...

