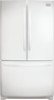
Complete Owner's Guide (English)
Page 2
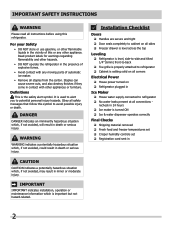
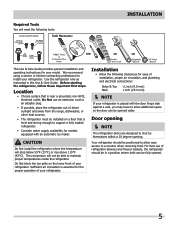
... potential personal injury hazards. WARNING WARNING indicates a potentially hazardous situation which is setting solid on all corners Electrical Power House power turned on Refrigerator plugged in Ice Maker House water supply connected to refrigerator No water leaks present at all staples from the carton. Installation Checklist Doors Handles are secure and tight Door seals completely to cabinet on all sides Freezer drawer is level across the top Leveling Refrigerator is level, side-to-side and tilted...
... potential personal injury hazards. WARNING WARNING indicates a potentially hazardous situation which is setting solid on all corners Electrical Power House power turned on Refrigerator plugged in Ice Maker House water supply connected to refrigerator No water leaks present at all staples from the carton. Installation Checklist Doors Handles are secure and tight Door seals completely to cabinet on all sides Freezer drawer is level across the top Leveling Refrigerator is level, side-to-side and tilted...
Complete Owner's Guide (English)
Page 3
... personal injury or property damage, handle tempered glass shelves carefully. Before you throw away your old refrigerator/ freezer: • Remove doors. • Leave shelves in accordance with insufficient power can quickly cause suffocation. It must unplug the power cord from the receptacle to prevent damaging the power cord. • Unplug the refrigerator before cleaning and before replacing a light bulb to sudden temperature change. 3 The receptacle must be...
... personal injury or property damage, handle tempered glass shelves carefully. Before you throw away your old refrigerator/ freezer: • Remove doors. • Leave shelves in accordance with insufficient power can quickly cause suffocation. It must unplug the power cord from the receptacle to prevent damaging the power cord. • Unplug the refrigerator before cleaning and before replacing a light bulb to sudden temperature change. 3 The receptacle must be...
Complete Owner's Guide (English)
Page 4
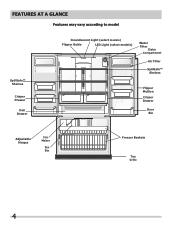
FEATURES AT A GLANCE Features may vary according to model SpillSafeTM Shelves Crisper Drawer Deli Drawer Incandescent Light (select models) Flipper Guide LED Light (select models) Water Filter Dairy Compartment Air Filter SpillSafeTM Shelves Flipper Mullion Crisper Drawer Door Bin Adjustable Hinges Ice Maker Ice Bin Freezer Baskets Toe Grille 4
FEATURES AT A GLANCE Features may vary according to model SpillSafeTM Shelves Crisper Drawer Deli Drawer Incandescent Light (select models) Flipper Guide LED Light (select models) Water Filter Dairy Compartment Air Filter SpillSafeTM Shelves Flipper Mullion Crisper Drawer Door Bin Adjustable Hinges Ice Maker Ice Bin Freezer Baskets Toe Grille 4
Complete Owner's Guide (English)
Page 5
... degree opening NOTE The refrigerator doors are designed to support a fully loaded refrigerator. • Consider water supply availability for ease of installation, proper air circulation, and plumbing and electrical connections: Sides & Top Back 3/8 inch (9.5 mm) 1 inch (25.4 mm) NOTE If your refrigerator is placed with an automatic ice maker. Installation • Allow the following tools: INSTALLATION This Use & Care Guide provides general installation and operating instructions for the proper operation of refrigerator drawers and freezer baskets, the refrigerator...
... degree opening NOTE The refrigerator doors are designed to support a fully loaded refrigerator. • Consider water supply availability for ease of installation, proper air circulation, and plumbing and electrical connections: Sides & Top Back 3/8 inch (9.5 mm) 1 inch (25.4 mm) NOTE If your refrigerator is placed with an automatic ice maker. Installation • Allow the following tools: INSTALLATION This Use & Care Guide provides general installation and operating instructions for the proper operation of refrigerator drawers and freezer baskets, the refrigerator...
Complete Owner's Guide (English)
Page 10
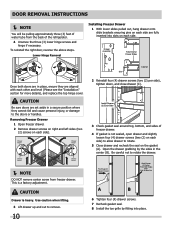
... the gasket (A). CAUTION Drawer is a factory adjustment. Removing Freezer Drawer 1 Open freezer drawer. 2 Remove drawer screws on right and left sides (two (2) screws on each other and level (Please see the "Installation" section for more details), and replace the top hinge cover. CAUTION Be sure doors are aligned with each side). 2 Reinstall four (4) drawer screws (two (2) per side), tighten down, and close drawer (C). Be careful not to remove. 10 Push Against Freezer Drawer Grab Drawer...
... the gasket (A). CAUTION Drawer is a factory adjustment. Removing Freezer Drawer 1 Open freezer drawer. 2 Remove drawer screws on right and left sides (two (2) screws on each other and level (Please see the "Installation" section for more details), and replace the top hinge cover. CAUTION Be sure doors are aligned with each side). 2 Reinstall four (4) drawer screws (two (2) per side), tighten down, and close drawer (C). Be careful not to remove. 10 Push Against Freezer Drawer Grab Drawer...
Complete Owner's Guide (English)
Page 13
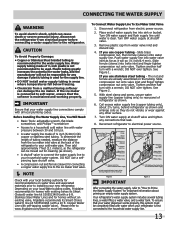
... water supply line to www.frigidaire.com/store for the supply line. • DO NOT install water supply tubing in areas where temperatures fall below freezing. • Chemicals from electrical power before connecting a water supply line to rear panel of ¼ inch (6.4mm) OD, copper or stainless steel tubing. NOTE Check with a wrench; Depending on the tubing. Copper Water Line with a 6 ft. To Connect Water Supply Line To Ice Maker Inlet Valve 1. Disconnect refrigerator from water valve inlet and discard cap. 4. Remove plastic cap from electric power...
... water supply line to www.frigidaire.com/store for the supply line. • DO NOT install water supply tubing in areas where temperatures fall below freezing. • Chemicals from electrical power before connecting a water supply line to rear panel of ¼ inch (6.4mm) OD, copper or stainless steel tubing. NOTE Check with a wrench; Depending on the tubing. Copper Water Line with a 6 ft. To Connect Water Supply Line To Ice Maker Inlet Valve 1. Disconnect refrigerator from water valve inlet and discard cap. 4. Remove plastic cap from electric power...
Complete Owner's Guide (English)
Page 14
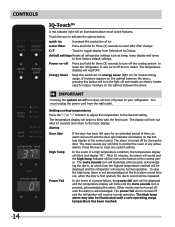
... ice maker. CONTROLS IQ-TouchTM A red indicator light will display on the bottom display of the control panel. Touch the icon to blink with the first touch. Power on ) for an extended period of a high temperature condition, the temperature display will be displayed and the temperature display will resume normal operation. It also turns off by closing the door. Energy Saver Keep this switch set on energy saver (light on -off the cooling system to reset...
... ice maker. CONTROLS IQ-TouchTM A red indicator light will display on the bottom display of the control panel. Touch the icon to blink with the first touch. Power on ) for an extended period of a high temperature condition, the temperature display will be displayed and the temperature display will resume normal operation. It also turns off by closing the door. Energy Saver Keep this switch set on energy saver (light on -off the cooling system to reset...
Complete Owner's Guide (English)
Page 16
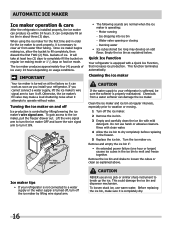
... Motor running - Quick Ice Function Your refrigerator is controlled by lifting wire signal arm. This could damage the ice bin and dispenser mechanism. Before replacing the ice bin, make a loud chattering noise when it attempts to turn off . When using the ice maker for the first time and in the freezer. 5 Replace the ice bin. Once ice maker begins making mode or 1 1/2 days on usage conditions. Empty the ice bin as explained above. Cleaning the ice maker CAUTION If the water supply...
... Motor running - Quick Ice Function Your refrigerator is controlled by lifting wire signal arm. This could damage the ice bin and dispenser mechanism. Before replacing the ice bin, make a loud chattering noise when it attempts to turn off . When using the ice maker for the first time and in the freezer. 5 Replace the ice bin. Once ice maker begins making mode or 1 1/2 days on usage conditions. Empty the ice bin as explained above. Cleaning the ice maker CAUTION If the water supply...
Complete Owner's Guide (English)
Page 17
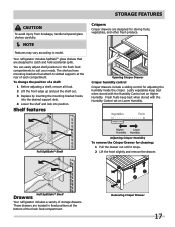
... the shelf out. 3 Replace by inserting the mounting bracket hooks into the desired support slots. 4 Lower the shelf and lock into position. Opening Crisper Drawer Crisper humidity control Crisper drawers include a sliding control for cleaning: 1 Pull the drawer out until it stops. 2 Lift the front slightly and remove the drawer. Full SpillSafeTM Shelf Adjusting Crisper Humidity To remove the Crisper Drawer for adjusting the humidity inside the crisper. Removing Crisper Drawer 17 Your refrigerator includes SpillSafeTM glass shelves that attach to model. To change the...
... the shelf out. 3 Replace by inserting the mounting bracket hooks into the desired support slots. 4 Lower the shelf and lock into position. Opening Crisper Drawer Crisper humidity control Crisper drawers include a sliding control for cleaning: 1 Pull the drawer out until it stops. 2 Lift the front slightly and remove the drawer. Full SpillSafeTM Shelf Adjusting Crisper Humidity To remove the Crisper Drawer for adjusting the humidity inside the crisper. Removing Crisper Drawer 17 Your refrigerator includes SpillSafeTM glass shelves that attach to model. To change the...
Complete Owner's Guide (English)
Page 20
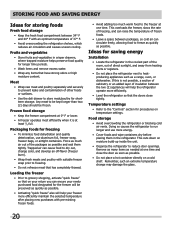
... help the refrigerator operate more efficiently. • Level the refrigerator so that has completely thawed. Any meat to store meat/poultry for shortterm storage. Packaging foods for longer time periods. • Wash items and remove excess water. • Wrap any items that on a cold shelf. Doing so causes the refrigerator to run longer and use aluminum foil, freezer wrap, freezer bags...
... help the refrigerator operate more efficiently. • Level the refrigerator so that has completely thawed. Any meat to store meat/poultry for shortterm storage. Packaging foods for longer time periods. • Wash items and remove excess water. • Wrap any items that on a cold shelf. Doing so causes the refrigerator to run longer and use aluminum foil, freezer wrap, freezer bags...
Complete Owner's Guide (English)
Page 22
... tested or certified by lowering the wire signal arm. 7 Press and hold the Water Filter button on the performance data sheet. The water filter system filters all dispensed drinking water, as well as the cartridge engages the snap-in order for three seconds. The Water Filter Status light on this model is located at the top right side of ice. Once ice maker begins making mode...
... tested or certified by lowering the wire signal arm. 7 Press and hold the Water Filter button on the performance data sheet. The water filter system filters all dispensed drinking water, as well as the cartridge engages the snap-in order for three seconds. The Water Filter Status light on this model is located at the top right side of ice. Once ice maker begins making mode...
Complete Owner's Guide (English)
Page 23
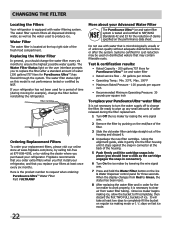
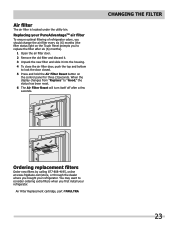
... refrigerator. Air Filter Replacement cartridge, part #PAULTRA 23 Replacing your PureAdvantageTM air filter To ensure optimal filtering of refrigerator odors, you should change the air filter every six (6) months (the filter status light on the control panel for three (3)seconds. Air filter The air filter is located under the utility bin. You may want to lock the door closed. 5 Press and hold the Air Filter Reset button...
... refrigerator. Air Filter Replacement cartridge, part #PAULTRA 23 Replacing your PureAdvantageTM air filter To ensure optimal filtering of refrigerator odors, you should change the air filter every six (6) months (the filter status light on the control panel for three (3)seconds. Air filter The air filter is located under the utility bin. You may want to lock the door closed. 5 Press and hold the Air Filter Reset button...
Complete Owner's Guide (English)
Page 24
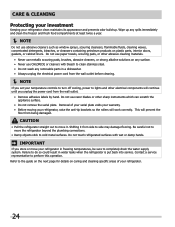
... you set your temperature controls to turn off cooling, power to lights and other electrical components will continue until you store or move your refrigerator in freezing temperatures, be sure to the guide on the next page for details on plastic parts, interior doors, gaskets, or cabinet liners. Refer to completely drain the water supply system. Removal of your refrigerator. 24 CAUTION • Pull the refrigerator straight out to move the refrigerator beyond...
... you set your temperature controls to turn off cooling, power to lights and other electrical components will continue until you store or move your refrigerator in freezing temperatures, be sure to the guide on the next page for details on plastic parts, interior doors, gaskets, or cabinet liners. Refer to completely drain the water supply system. Removal of your refrigerator. 24 CAUTION • Pull the refrigerator straight out to move the refrigerator beyond...
Complete Owner's Guide (English)
Page 25
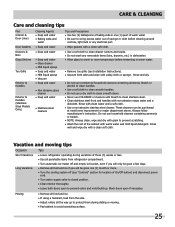
... immersing in warm water. • Remove toe grille (see "Controls" section for location of On/Off button) and disconnect power cord. • Turn water supply valve to closed position. • Clean interior thoroughly. • Leave both sides and wipe with sudsy cloth or sponge. Moving • Remove all food and ice. • If using a handcart, load from refrigerator compartment. • Turn automatic ice maker off (see Installation Instructions). • Vacuum both doors open if...
... immersing in warm water. • Remove toe grille (see "Controls" section for location of On/Off button) and disconnect power cord. • Turn water supply valve to closed position. • Clean interior thoroughly. • Leave both sides and wipe with sudsy cloth or sponge. Moving • Remove all food and ice. • If using a handcart, load from refrigerator compartment. • Turn automatic ice maker off (see Installation Instructions). • Vacuum both doors open if...
Complete Owner's Guide (English)
Page 27
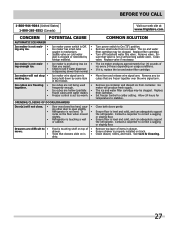
... cold water • pipe is set too warm. • OPENING/CLOSING OF DOORS/DRAWERS Door(s) will produce fresh supply. Replace filter cartridge. See Care & Cleaning. 27 Replace valve if necessary. Move item and release wire signal arm. Close both doors gently. Ensure floor is , replace the ice and water filter cartridge. Remove top layer of ice every 24 hours depending on the floor when moved slightly. • Refrigerator is • making ice. Replace...
... cold water • pipe is set too warm. • OPENING/CLOSING OF DOORS/DRAWERS Door(s) will produce fresh supply. Replace filter cartridge. See Care & Cleaning. 27 Replace valve if necessary. Move item and release wire signal arm. Close both doors gently. Ensure floor is , replace the ice and water filter cartridge. Remove top layer of ice every 24 hours depending on the floor when moved slightly. • Refrigerator is • making ice. Replace...
Complete Owner's Guide (English)
Page 28
... desired temperatures. Clean or change gasket. This is satisfactory. Move humidity control (some models) to stabilize. Check house lights. Refrigerator goes on • Weather is humid. • outside . • COMMON SOLUTION Set freezer control. When humidity is normal. Water collecting in humid weather. See CONCERN column OPENING/CLOSING OF DOORS/DRAWERS. 28 WATER/MOISTURE/FROST OUTSIDE REFRIGERATOR Moisture collects on and off . drain while in defrost cycle. • Refrigerator runs too...
... desired temperatures. Clean or change gasket. This is satisfactory. Move humidity control (some models) to stabilize. Check house lights. Refrigerator goes on • Weather is humid. • outside . • COMMON SOLUTION Set freezer control. When humidity is normal. Water collecting in humid weather. See CONCERN column OPENING/CLOSING OF DOORS/DRAWERS. 28 WATER/MOISTURE/FROST OUTSIDE REFRIGERATOR Moisture collects on and off . drain while in defrost cycle. • Refrigerator runs too...
Complete Owner's Guide (English)
Page 29
... is in accordance with the provided instructions. YOU MAY ALSO HAVE OTHER RIGHTS THAT VARY FROM STATE TO STATE. MAJOR APPLIANCE WARRANTY Your appliance is covered by a one year from its original owner to repair or replace appliance light bulbs, air filters, water filters, other consumables, or knobs, handles, or other cosmetic parts. 11. Products used and maintained in your receipt...
... is in accordance with the provided instructions. YOU MAY ALSO HAVE OTHER RIGHTS THAT VARY FROM STATE TO STATE. MAJOR APPLIANCE WARRANTY Your appliance is covered by a one year from its original owner to repair or replace appliance light bulbs, air filters, water filters, other consumables, or knobs, handles, or other cosmetic parts. 11. Products used and maintained in your receipt...
Installation Instructions (All Languages)
Page 1
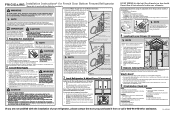
... water supply at all corners Electrical Power □ House power turned on your local/state building codes, Frigidaire recommends for cleaning.) Figure 1 7. Check gasket seal around top, bottom, and sides of your refrigerator, please contact the store you use a self-piercing type shutoff valve. • A compression nut and ferrule (sleeve) for more details). Installation Instructions* for French Door Bottom Freezer/Refrigerator ® *Please refer to your Use & Care Guide for connecting a copper water supply line to the ice maker...
... water supply at all corners Electrical Power □ House power turned on your local/state building codes, Frigidaire recommends for cleaning.) Figure 1 7. Check gasket seal around top, bottom, and sides of your refrigerator, please contact the store you use a self-piercing type shutoff valve. • A compression nut and ferrule (sleeve) for more details). Installation Instructions* for French Door Bottom Freezer/Refrigerator ® *Please refer to your Use & Care Guide for connecting a copper water supply line to the ice maker...
Wiring Diagram (All Languages)
Page 1
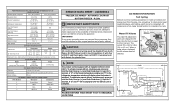
....). BLU YEL NEUTRAL P-4 P-2 WATER VALVE CONDENSER FAN MOTOR Watts RPM Amps 3.1 (Energy Star, some models) 1100 CW Opposite Shaft 0.03 Running ICE MAKER SPECIFICATIONS Electrical 115 vac (127 vac max) Thermostat Opens at 48° F (9° C), Closes at 15° F (-9° C) Heater Voltage 85 vac ICE MAKER CONNECTOR PLUG CONNECTIONS Wire Number Wire Color Connects to .9 Base Voltage 115 vac (127 vac max) DEFROST SPECIFICATIONS Cabinet Size Thermostat Cut-in Cut-out Heater Watts Ohms 26' & 28' SD...
....). BLU YEL NEUTRAL P-4 P-2 WATER VALVE CONDENSER FAN MOTOR Watts RPM Amps 3.1 (Energy Star, some models) 1100 CW Opposite Shaft 0.03 Running ICE MAKER SPECIFICATIONS Electrical 115 vac (127 vac max) Thermostat Opens at 48° F (9° C), Closes at 15° F (-9° C) Heater Voltage 85 vac ICE MAKER CONNECTOR PLUG CONNECTIONS Wire Number Wire Color Connects to .9 Base Voltage 115 vac (127 vac max) DEFROST SPECIFICATIONS Cabinet Size Thermostat Cut-in Cut-out Heater Watts Ohms 26' & 28' SD...
Product Specifications Sheet (English)
Page 2
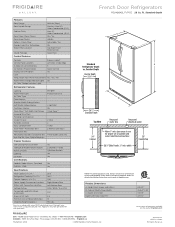
... Panel Location Left Door, Inside Edge Number of Control Buttons 5 Ice Option / Freeze Option Quick Ice / No Display On / Off Option Yes Lock Temp / Door Ajar / Power Failure Alerts Yes / Yes / Yes Water Filter Change Indicator Light Yes Air Filter Change Indicator Light Refrigerator Features Lighting Water Filter Type Air Filter Type Fixed Shelves Quarter-Width Sliding Shelves Half-Width Sliding Shelves Cantilever Shelves Store-More™ Full-Width Deli Drawer Hanging Wine Rack Hanging Can Dispenser Crisper Drawer Humidity Controls Dairy Compartment Store-More™ Fixed Door...
... Panel Location Left Door, Inside Edge Number of Control Buttons 5 Ice Option / Freeze Option Quick Ice / No Display On / Off Option Yes Lock Temp / Door Ajar / Power Failure Alerts Yes / Yes / Yes Water Filter Change Indicator Light Yes Air Filter Change Indicator Light Refrigerator Features Lighting Water Filter Type Air Filter Type Fixed Shelves Quarter-Width Sliding Shelves Half-Width Sliding Shelves Cantilever Shelves Store-More™ Full-Width Deli Drawer Hanging Wine Rack Hanging Can Dispenser Crisper Drawer Humidity Controls Dairy Compartment Store-More™ Fixed Door...


