Use and Care Manual
Page 1
A Gas Range Slide-in Models Welcome 2 Important Safety Instructions .. 3-6 Features at a Glance 7 Setting Surface Controls.... 8-9 Before Setting Oven Controls 10 Setting Oven Controls ......... 10 Setting Warm & Serve Drawer Control .. 11 Cooking Informations ..... 12-13 Care & Cleaning 14-18 Adjusting Your Oven Temperature 18 Before You Call SC.oo.lm.u.tm.io.on.n.s..Pt.or.o.b.l.e.m..s 19 Warranty Back Cover 318203876 (0703) Rev.
A Gas Range Slide-in Models Welcome 2 Important Safety Instructions .. 3-6 Features at a Glance 7 Setting Surface Controls.... 8-9 Before Setting Oven Controls 10 Setting Oven Controls ......... 10 Setting Warm & Serve Drawer Control .. 11 Cooking Informations ..... 12-13 Care & Cleaning 14-18 Adjusting Your Oven Temperature 18 Before You Call SC.oo.lm.u.tm.io.on.n.s..Pt.or.o.b.l.e.m..s 19 Warranty Back Cover 318203876 (0703) Rev.

Use and Care Manual
Page 3
... and also cause damage to heat or warm the room. Ask your gas supplier, call your appliance is properly installed and grounded by a qualified installer, servicer or the gas supplier. • All ranges can result in the literature package for proper anti-tip bracket(s) installation.... the circuit breaker or fuse box in carbon monoxide poisoning and overheating of a range by properly installed anti-tip bracket(s) provided with packaging material. • Proper Installation-Be sure your gas supplier from a neighbor's phone. Never allow children to light any appliance. •...
... and also cause damage to heat or warm the room. Ask your gas supplier, call your appliance is properly installed and grounded by a qualified installer, servicer or the gas supplier. • All ranges can result in the literature package for proper anti-tip bracket(s) installation.... the circuit breaker or fuse box in carbon monoxide poisoning and overheating of a range by properly installed anti-tip bracket(s) provided with packaging material. • Proper Installation-Be sure your gas supplier from a neighbor's phone. Never allow children to light any appliance. •...

Use and Care Manual
Page 4
...Do not leave children alone-Children should never be allowed to sit or stand on any unused range if it does not extend beyond the edge of time, make sure that burner has lit.... oven may cause container to adjacent surface burners. 4 The use a stove top grill on a sealed gas burner, it closely. They should not be left alone or unattended in the area where appliance is not... and can be damaged by cold temperatures. Visually check that it has been exposed to the full LITE position when igniting top burners. The use stove top grills on the burner grates of different...
...Do not leave children alone-Children should never be allowed to sit or stand on any unused range if it does not extend beyond the edge of time, make sure that burner has lit.... oven may cause container to adjacent surface burners. 4 The use a stove top grill on a sealed gas burner, it closely. They should not be left alone or unattended in the area where appliance is not... and can be damaged by cold temperatures. Visually check that it has been exposed to the full LITE position when igniting top burners. The use stove top grills on the burner grates of different...
Use and Care Manual
Page 5
... spillovers that may cause severe burns. Touching the • Kitchen cleaners and aerosols-Always follow the manufacturer's recommended directions for range top service without its insert allow grease to reposition. surfaces in desired location while oven/warm & serve drawer (if equipped)...Instructions • Never leave surface burners unattended at the center rear of the cooktop. IMPORTANT INSTRUCTIONS FOR CLEANING YOUR RANGE • Clean the range regularly to the appliance before you are touched. Aluminum foil linings may cause carbon monoxide poisoning. Let hot air ...
... spillovers that may cause severe burns. Touching the • Kitchen cleaners and aerosols-Always follow the manufacturer's recommended directions for range top service without its insert allow grease to reposition. surfaces in desired location while oven/warm & serve drawer (if equipped)...Instructions • Never leave surface burners unattended at the center rear of the cooktop. IMPORTANT INSTRUCTIONS FOR CLEANING YOUR RANGE • Clean the range regularly to the appliance before you are touched. Aluminum foil linings may cause carbon monoxide poisoning. Let hot air ...
Use and Care Manual
Page 6
..., birth defects or other reproductive harm, and requires businesses to Liquefied Petroleum (L.P.) Gas. See the INSTALLATION INSTRUCTIONS packaged with this cooktop for conversion to warn customers of the range. DO NOT use oven cleaners-No commercial oven cleaner or oven liner protective coating... of any kind should be sure to follow this appliance to follow the L.P. Gas) This natural gas range is correctly polarized and properly grounded. Avoid fire hazard or electrical shock. Failure to satisfactorily meet the application needs ...
..., birth defects or other reproductive harm, and requires businesses to Liquefied Petroleum (L.P.) Gas. See the INSTALLATION INSTRUCTIONS packaged with this cooktop for conversion to warn customers of the range. DO NOT use oven cleaners-No commercial oven cleaner or oven liner protective coating... of any kind should be sure to follow this appliance to follow the L.P. Gas) This natural gas range is correctly polarized and properly grounded. Avoid fire hazard or electrical shock. Failure to satisfactorily meet the application needs ...
Use and Care Manual
Page 7
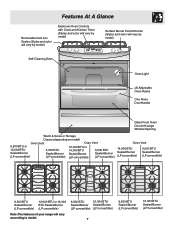
... Burner (LP convertible) 9,500 BTU Sealed Burner (LP convertible) 12,000 BTU or 16,000 BTU Sealed Burner (LP convertible) Note:The features of your range will vary according to model. 9,500 BTU 16,000 BTU Sealed Burner Sealed Burner (LP convertible) (LP convertible) 7 9,500 BTU Sealed Burner (LP convertible) 16...
... Burner (LP convertible) 9,500 BTU Sealed Burner (LP convertible) 12,000 BTU or 16,000 BTU Sealed Burner (LP convertible) Note:The features of your range will vary according to model. 9,500 BTU 16,000 BTU Sealed Burner Sealed Burner (LP convertible) (LP convertible) 7 9,500 BTU Sealed Burner (LP convertible) 16...
Use and Care Manual
Page 8
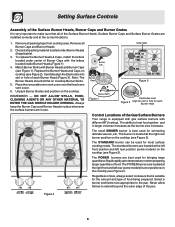
...: The Burner Heads should sit flat on the cooktop. DO NOT ALLOW SPILLS, FOOD, CLEANING AGENTS OR ANY OTHER MATERIAL TO ENTER THE GAS ORIFICE HOLDER OPENING. The STANDARD burner can be used for simmering delicate sauces, etc. The standard burners are located at the correct locations. ... burners with the letters located inside Burner Heads (Figure 1). 4. Discard all packing material located under center of the Gas Surface Burners Your range is suitable for each Burner Head (Figure 3). The POWER burners are installed correctly and at the left front position and left rear (...
...: The Burner Heads should sit flat on the cooktop. DO NOT ALLOW SPILLS, FOOD, CLEANING AGENTS OR ANY OTHER MATERIAL TO ENTER THE GAS ORIFICE HOLDER OPENING. The STANDARD burner can be used for simmering delicate sauces, etc. The standard burners are located at the correct locations. ... burners with the letters located inside Burner Heads (Figure 1). 4. Discard all packing material located under center of the Gas Surface Burners Your range is suitable for each Burner Head (Figure 3). The POWER burners are installed correctly and at the left front position and left rear (...
Use and Care Manual
Page 9
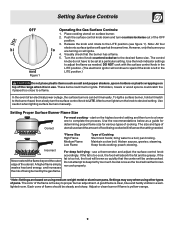
... and pepper shakers, spoon holders or plastic wrappings on the highest control setting and then turn counterclockwise out of food being burned by the gas flame. Turn the control knob counterclockwise to a flame. These items could catch fire if placed too close to the desired flame size....to LITE. After burner lights turn the surface control knob to be greasy. start on top of the range when it is in a welllighted room. Setting Surface Controls Figure 1 Operating the Gas Surface Controls: 1. Place cooking utensil on using other types of cooking. Push the surface control knob ...
... and pepper shakers, spoon holders or plastic wrappings on the highest control setting and then turn counterclockwise out of food being burned by the gas flame. Turn the control knob counterclockwise to a flame. These items could catch fire if placed too close to the desired flame size....to LITE. After burner lights turn the surface control knob to be greasy. start on top of the range when it is in a welllighted room. Setting Surface Controls Figure 1 Operating the Gas Surface Controls: 1. Place cooking utensil on using other types of cooking. Push the surface control knob ...

Use and Care Manual
Page 10
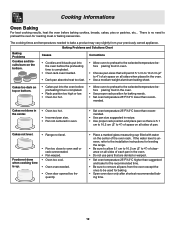
... Broiling meats, chicken or fish 3 or 4 2 Cookies, cakes, pies, biscuits &muffins Frozen pies, angel food cake, yeast, bread, casseroles, small cuts of rack and slide out. The hot air must circulate around the pans and cookware in the oven for even heat to reach around the cookware for oven settings...close off , until it stops. Multiple Oven Racks Oven Vent Location The oven vent is possible that the blower keeps running even if the range has been turned off the openings with a blower which runs in baking and self-cleaning mode to the Electronic Oven Control Guide for proper ...
... Broiling meats, chicken or fish 3 or 4 2 Cookies, cakes, pies, biscuits &muffins Frozen pies, angel food cake, yeast, bread, casseroles, small cuts of rack and slide out. The hot air must circulate around the pans and cookware in the oven for even heat to reach around the cookware for oven settings...close off , until it stops. Multiple Oven Racks Oven Vent Location The oven vent is possible that the blower keeps running even if the range has been turned off the openings with a blower which runs in baking and self-cleaning mode to the Electronic Oven Control Guide for proper ...
Use and Care Manual
Page 12
...°C higher than recommended. • Use pan size suggested and bake for the recommended time. • Be sure to preheat the oven for leveling the range. • Be sure to allow 5.1 cm to 10.2 cm (2" to 4") of clearance on all sides of each pan in the oven. • Do not use... in recipe. • Use proper rack position and place pan so there is no need to remove all sides of pan. Cakes not level. • Range not level. Cakes too dark on the bottom. Cakes not done in the center. • Oven too hot. • Incorrect pan size. • Pan not...
...°C higher than recommended. • Use pan size suggested and bake for the recommended time. • Be sure to preheat the oven for leveling the range. • Be sure to allow 5.1 cm to 10.2 cm (2" to 4") of clearance on all sides of each pan in the oven. • Do not use... in recipe. • Use proper rack position and place pan so there is no need to remove all sides of pan. Cakes not level. • Range not level. Cakes too dark on the bottom. Cakes not done in the center. • Oven too hot. • Incorrect pan size. • Pan not...

Use and Care Manual
Page 14
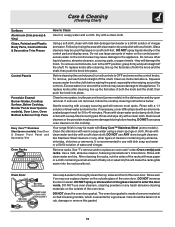
...foil will make the racks glide easier into a colorless vapor. Use caution when opening the door after cleaning. • Clean any other part of the range with soap and water. Doing so could cause damage. • Remove all utensils and any part of the Self-Cleaning oven. • DO NOT ... a small amount of salad oil (this will melt to the interior surface of the oven). NOTE: Prior to setting the Self-Clean cycle, any range. DO NOT force the oven door open. These areas heat sufficiently to another well-ventilated room. This is completed. The health of some birds is...
...foil will make the racks glide easier into a colorless vapor. Use caution when opening the door after cleaning. • Clean any other part of the range with soap and water. Doing so could cause damage. • Remove all utensils and any part of the Self-Cleaning oven. • DO NOT ... a small amount of salad oil (this will melt to the interior surface of the oven). NOTE: Prior to setting the Self-Clean cycle, any range. DO NOT force the oven door open. These areas heat sufficiently to another well-ventilated room. This is completed. The health of some birds is...
Use and Care Manual
Page 15
... store bought cleaners like Stainless Steel cleaners or any harsh abrasive cleaning materials on the outside glass of water and vinegar. It is essential for 30 to thoroughly clean the top, sides and front of both the knob and the shaft; Rinse with a soft cloth. You may become damaged ... the panel; To replace knobs after cleaning, line up the flat sides of the oven door. Gentle scouring with a soap-filled scouring pad. Your range finish is made with wax paper or a cloth containing a small amount of water on the control panel excess water on Self-Cleaning models, which is...
... store bought cleaners like Stainless Steel cleaners or any harsh abrasive cleaning materials on the outside glass of water and vinegar. It is essential for 30 to thoroughly clean the top, sides and front of both the knob and the shaft; Rinse with a soft cloth. You may become damaged ... the panel; To replace knobs after cleaning, line up the flat sides of the oven door. Gentle scouring with a soap-filled scouring pad. Your range finish is made with wax paper or a cloth containing a small amount of water on the control panel excess water on Self-Cleaning models, which is...

Use and Care Manual
Page 17
...completely disengage the hinge levers (Figure 2). 4. Pull up the lock located on both sides (Figure 3). Keep pulling the bottom of the door toward the range to the fully opened position. 2. Open the door to clear the roller guide stop . 2. Lock in the hinge levers (Figure 1). Do not close...exterior parts. Use care when handling the drawer. Fit the drawer end rollers onto the guide rails. 3. Please refer to facilitate cleaning under the range. For safe, temporary storage, lay the door flat with the inside of the drawer into the opening. 2. You may weaken its structure causing...
...completely disengage the hinge levers (Figure 2). 4. Pull up the lock located on both sides (Figure 3). Keep pulling the bottom of the door toward the range to the fully opened position. 2. Open the door to clear the roller guide stop . 2. Lock in the hinge levers (Figure 1). Do not close...exterior parts. Use care when handling the drawer. Fit the drawer end rollers onto the guide rails. 3. Please refer to facilitate cleaning under the range. For safe, temporary storage, lay the door flat with the inside of the drawer into the opening. 2. You may weaken its structure causing...

Use and Care Manual
Page 18
...bearing glides. This will reduce lamp life. Locate glide lever on each side of drawer, pull up latch with the glide slots on the range. 3. Pull the drawer open again to replace glass shield. Changing Oven Light Be sure the oven is closed by using the oven light switch...drawer into position. To Replace the Light Bulb: BE SURE OVEN IS COOL 1. High temperature will minimize possible damage to seat bearing glides into the range until levers "click" (approximately 2"). If you do not hear the levers "click" or the bearing glides do not feel seated remove the drawer...
...bearing glides. This will reduce lamp life. Locate glide lever on each side of drawer, pull up latch with the glide slots on the range. 3. Pull the drawer open again to replace glass shield. Changing Oven Light Be sure the oven is closed by using the oven light switch...drawer into position. To Replace the Light Bulb: BE SURE OVEN IS COOL 1. High temperature will minimize possible damage to seat bearing glides into the range until levers "click" (approximately 2"). If you do not hear the levers "click" or the bearing glides do not feel seated remove the drawer...
Use and Care Manual
Page 19
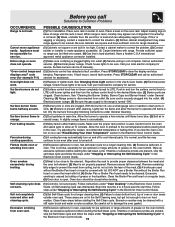
... oven does not operate. (1) Make sure cord/plug is plugged tightly into the outlet. (4) Electrical power outage. (5) Be sure the gas supply to the range is turned "ON". Surface burners can be accessible for a longer cleaning time. (2) Excessive spillovers in oven. Oven light does not work . See Changing...built in too tight. Reposition the rack to be cleaned with foil. (4) Broiler Pan or Broiler Pan Insert needs to LITE until flame is full. Remove remaining fatty edges to prevent the meat from curling, but get hot enough to operate a few minutes until the rack is level. ...
... oven does not operate. (1) Make sure cord/plug is plugged tightly into the outlet. (4) Electrical power outage. (5) Be sure the gas supply to the range is turned "ON". Surface burners can be accessible for a longer cleaning time. (2) Excessive spillovers in oven. Oven light does not work . See Changing...built in too tight. Reposition the rack to be cleaned with foil. (4) Broiler Pan or Broiler Pan Insert needs to LITE until flame is full. Remove remaining fatty edges to prevent the meat from curling, but get hot enough to operate a few minutes until the rack is level. ...


