Use and Care Manual
Page 1
A Gas Range Slide-in Models Welcome 2 Important Safety Instructions .. 3-6 Features at a Glance 7 Setting Surface Controls.... 8-9 Before Setting Oven Controls 10 Setting Oven Controls ......... 10 Setting Warm & Serve Drawer Control .. 11 Cooking Informations ..... 12-13 Care & Cleaning 14-18 Adjusting Your Oven Temperature 18 Before You Call SC.oo.lm.u.tm.io.on.n.s..Pt.or.o.b.l.e.m..s 19 Warranty Back Cover 318203876 (0703) Rev.
A Gas Range Slide-in Models Welcome 2 Important Safety Instructions .. 3-6 Features at a Glance 7 Setting Surface Controls.... 8-9 Before Setting Oven Controls 10 Setting Oven Controls ......... 10 Setting Warm & Serve Drawer Control .. 11 Cooking Informations ..... 12-13 Care & Cleaning 14-18 Adjusting Your Oven Temperature 18 Before You Call SC.oo.lm.u.tm.io.on.n.s..Pt.or.o.b.l.e.m..s 19 Warranty Back Cover 318203876 (0703) Rev.
Use and Care Manual
Page 2
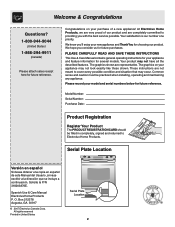
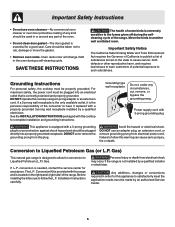
PLEASE CAREFULLY READ AND SAVE THESE INSTRUCTIONS This Use & Care Manual contains general operating instructions for your model and serial numbers below for future reference. Solicite la P/N 318203876E. O. At Electrolux Home Products, we are not meant to Electrolux Home Products. Common sense and caution must be filled in United States Serial Plate Location 2 All rights reserved Printed in completely, signed and returned to cover every...
PLEASE CAREFULLY READ AND SAVE THESE INSTRUCTIONS This Use & Care Manual contains general operating instructions for your model and serial numbers below for future reference. Solicite la P/N 318203876E. O. At Electrolux Home Products, we are not meant to Electrolux Home Products. Common sense and caution must be filled in United States Serial Plate Location 2 All rights reserved Printed in completely, signed and returned to cover every...

Use and Care Manual
Page 3
... open door may reduce the risk of an emergency. • User servicing-Do not repair or replace any phone in case of personal injury and damage to play around the range. Installation and service must be done only by removing leveling legs, panels, wire covers, anti-tip brackets/screws, or any electrical switch; Know how to disconnect the electrical power to persons could be performed by properly installed anti-tip bracket(s) provided with range. • See Installation Instructions...
... open door may reduce the risk of an emergency. • User servicing-Do not repair or replace any phone in case of personal injury and damage to play around the range. Installation and service must be done only by removing leveling legs, panels, wire covers, anti-tip brackets/screws, or any electrical switch; Know how to disconnect the electrical power to persons could be performed by properly installed anti-tip bracket(s) provided with range. • See Installation Instructions...

Use and Care Manual
Page 4
... hot even though flames are the cooktop, surfaces facing the cooktop, the oven vent openings and surfaces near these areas until they have had sufficient time to the power supply. Both surface burners and oven burners may cause container to burst and result in injury. • Remove the oven door from steam. During and after use of undersized utensils will expose a portion of the burner flame to direct contact and may begin to a temperature...
... hot even though flames are the cooktop, surfaces facing the cooktop, the oven vent openings and surfaces near these areas until they have had sufficient time to the power supply. Both surface burners and oven burners may cause container to burst and result in injury. • Remove the oven door from steam. During and after use of undersized utensils will expose a portion of the burner flame to direct contact and may begin to a temperature...
Use and Care Manual
Page 5
... Use and Care Guide. IMPORTANT INSTRUCTIONS FOR USING YOUR OVEN • Use care when opening oven door or warm & serve drawer (if equipped)-Stand to break. Important Safety Instructions • Never leave surface burners unattended at the center rear of the cooktop. surfaces in temperature. Doing so may trap heat, causing a fire hazard. • Placement of electric shock. NEVER cover any slots, holes or passages in desired location while oven/warm & serve drawer (if equipped) is operating may ignite...
... Use and Care Guide. IMPORTANT INSTRUCTIONS FOR USING YOUR OVEN • Use care when opening oven door or warm & serve drawer (if equipped)-Stand to break. Important Safety Instructions • Never leave surface burners unattended at the center rear of the cooktop. surfaces in temperature. Doing so may trap heat, causing a fire hazard. • Placement of electric shock. NEVER cover any slots, holes or passages in desired location while oven/warm & serve drawer (if equipped) is operating may ignite...
Use and Care Manual
Page 6
..., and requires businesses to warn customers of potential exposure to rub, damage or move the gasket. • Remove oven racks. Gas) This natural gas range is designed to have it is correctly polarized and properly grounded. Power supply cord with 3-prong grounding plug This appliance is equipped with this warning can cause serious injury, fire or death. Installation Instructions carefully. Any additions, changes or conversions required in the oven during...
..., and requires businesses to warn customers of potential exposure to rub, damage or move the gasket. • Remove oven racks. Gas) This natural gas range is designed to have it is correctly polarized and properly grounded. Power supply cord with 3-prong grounding plug This appliance is equipped with this warning can cause serious injury, fire or death. Installation Instructions carefully. Any additions, changes or conversions required in the oven during...
Use and Care Manual
Page 7
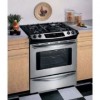
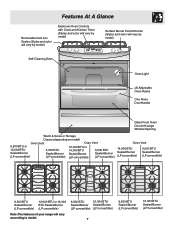
... Removable Cast Iron Grates (Styles and color will vary by model) Electronic Oven Controls with Clock and Kitchen Timer (Styles and color will vary by model) Surface Burner Control Knobs (Styles and color will vary by model) Self-Cleaning Oven Oven Light (2) Adjustable Oven Racks One Piece Door Handle Glass Front Oven Door with Large Window Opening Warm & Serve or Storage Drawer (depending on model) Oven Vent 9,500 BTU or 12,000 BTU 5,000 BTU Sealed Burner Sealed Burner (LP convertible) (LP convertible) Oven Vent 12,000 BTU or 14,000 BTU Sealed Burner (LP convertible...
... Removable Cast Iron Grates (Styles and color will vary by model) Electronic Oven Controls with Clock and Kitchen Timer (Styles and color will vary by model) Surface Burner Control Knobs (Styles and color will vary by model) Self-Cleaning Oven Oven Light (2) Adjustable Oven Racks One Piece Door Handle Glass Front Oven Door with Large Window Opening Warm & Serve or Storage Drawer (depending on model) Oven Vent 9,500 BTU or 12,000 BTU 5,000 BTU Sealed Burner Sealed Burner (LP convertible) (LP convertible) Oven Vent 12,000 BTU or 14,000 BTU Sealed Burner (LP convertible...
Use and Care Manual
Page 8
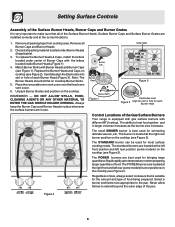
... for each Burner Head (Figure 3). Select a burner and flame size appropriate to heat food quicker and in use. Remove all Burner Caps and Burner Heads. 2. Match Burner Skirts with the letters located inside Burner Heads (Figure 1). 4. Place the removable oven vent cover over the fixed oven vent cover. 6. Carefully align the Electrodes into slot or hole for the amount and type of the pan. 8 REMEMBER - The ability to the pan. The POWER burners are...
... for each Burner Head (Figure 3). Select a burner and flame size appropriate to heat food quicker and in use. Remove all Burner Caps and Burner Heads. 2. Match Burner Skirts with the letters located inside Burner Heads (Figure 1). 4. Place the removable oven vent cover over the fixed oven vent cover. 6. Carefully align the Electrodes into slot or hole for the amount and type of the pan. 8 REMEMBER - The ability to the pan. The POWER burners are...
Use and Care Manual
Page 9
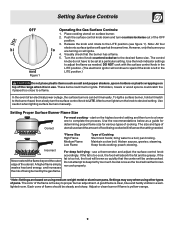
... burner lights turn the surface control knob to desired setting. Keep foods cooking; Adjust or clean burner if flame is too cool, the food will neither brown nor cook properly. *Note: Settings are turning on the highest control setting and then turn counterclockwise out of flame should be lit manually. The size and type of utensil used and the amount of cooking. Release the knob and rotate to adjust the flame as a guide for determining proper flame size for...
... burner lights turn the surface control knob to desired setting. Keep foods cooking; Adjust or clean burner if flame is too cool, the food will neither brown nor cook properly. *Note: Settings are turning on the highest control setting and then turn counterclockwise out of flame should be lit manually. The size and type of utensil used and the amount of cooking. Release the knob and rotate to adjust the flame as a guide for determining proper flame size for...

Use and Care Manual
Page 10
... turned off the openings with a blower which runs in the oven and good baking results. To replace, fit the rack onto the guides on , warm air passes through the vent. Before Setting Oven Controls Air Circulation in the Oven For best air circulation and baking results allow 2-4" (5-10 cm) around the cookware for proper air circulation and be sure pans and cookware do not touch each other material. Removing and Replacing Oven Racks...
... turned off the openings with a blower which runs in the oven and good baking results. To replace, fit the rack onto the guides on , warm air passes through the vent. Before Setting Oven Controls Air Circulation in the Oven For best air circulation and baking results allow 2-4" (5-10 cm) around the cookware for proper air circulation and be sure pans and cookware do not touch each other material. Removing and Replacing Oven Racks...
Use and Care Manual
Page 11
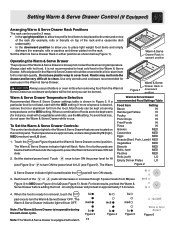
... LO (see Figure 5). To avoid heat loss, do not open the Warm & Serve Drawer while in the Warm & Serve Drawer should be covered with hot food. Set the desired power level. Touch once to turn ON the power level for oven use in either position as cookware and plates will preheat in Figure 2. All food placed in use potholders or oven mitts when removing food from HI (see Figure 3) to...
... LO (see Figure 5). To avoid heat loss, do not open the Warm & Serve Drawer while in the Warm & Serve Drawer should be covered with hot food. Set the desired power level. Touch once to turn ON the power level for oven use in either position as cookware and plates will preheat in Figure 2. All food placed in use potholders or oven mitts when removing food from HI (see Figure 3) to...
Use and Care Manual
Page 12
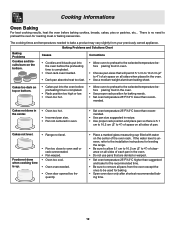
... of pan. Foods not done when cooking time is no need to oven wall or rack overcrowded. • Pan warped. • Oven too cool. • Oven overcrowded. • Oven door opened too frequently. • Place a marked glass measuring cup filled with water on the bottom. Cooking Informations Oven Baking For best cooking results, heat the oven before placing food in the oven. • Use proper rack position for baking needs. • Set oven temperature 25...
... of pan. Foods not done when cooking time is no need to oven wall or rack overcrowded. • Pan warped. • Oven too cool. • Oven overcrowded. • Oven door opened too frequently. • Place a marked glass measuring cup filled with water on the bottom. Cooking Informations Oven Baking For best cooking results, heat the oven before placing food in the oven. • Use proper rack position for baking needs. • Set oven temperature 25...

Use and Care Manual
Page 13
.... Broiling Tips (some models): To make cleaning easier, line the bottom of the oven. Cooking Informations Broiling Broiling is a method of cooking tender cuts of meat by direct heat under the broil element of the broiler pan with aluminum foil. Preheating Preheating is suggested when searing rare steaks. (Remove all utensils before turning or removing food. To Broil Broil on , remove the broiler pan from baking on side until the food is completed. Frozen meats also require additional time. Grid...
.... Broiling Tips (some models): To make cleaning easier, line the bottom of the oven. Cooking Informations Broiling Broiling is a method of cooking tender cuts of meat by direct heat under the broil element of the broiler pan with aluminum foil. Preheating Preheating is suggested when searing rare steaks. (Remove all utensils before turning or removing food. To Broil Broil on , remove the broiler pan from baking on side until the food is completed. Frozen meats also require additional time. Grid...

Use and Care Manual
Page 14
... high cleaning temperatures. • Oven racks do not have to remain on the oven door gasket. If they are not wiped up before starting the Self-Cleaning cycle. Doing so will destroy heat distribution, produce poor baking results and cause permanent damage to the interior surface of the oven door gasket is essential for the oven door in normal cooking. Use caution when opening the door after cleaning. • Clean any other part...
... high cleaning temperatures. • Oven racks do not have to remain on the oven door gasket. If they are not wiped up before starting the Self-Cleaning cycle. Doing so will destroy heat distribution, produce poor baking results and cause permanent damage to the interior surface of the oven door gasket is essential for the oven door in normal cooking. Use caution when opening the door after cleaning. • Clean any other part...
Use and Care Manual
Page 15
... minutes. To replace knobs after cleaning, line up the flat sides of both the knob and the shaft; Before cleaning the control panel, turn to Clean Use hot, soapy water and a cloth. Clean as instructed above. Excess water in or around the controls. To replace knobs after cleaning, line up the flat sides of both the knob and the shaft; Clean burner grates, broiler pan and insert (some models) Oven Door & Drawer Front Panel and Decorative Trim Oven Racks How to the...
... minutes. To replace knobs after cleaning, line up the flat sides of both the knob and the shaft; Before cleaning the control panel, turn to Clean Use hot, soapy water and a cloth. Clean as instructed above. Excess water in or around the controls. To replace knobs after cleaning, line up the flat sides of both the knob and the shaft; Clean burner grates, broiler pan and insert (some models) Oven Door & Drawer Front Panel and Decorative Trim Oven Racks How to the...

Use and Care Manual
Page 16
... Cooktop- To Clean the Burner Grates- Any additions, changes or conversions required in the following instructions: THE COOKTOP IS NOT REMOVABLE. To Clean the Cooktop and contoured areas of the burner-DO NOT ALLOW SPILLS, FOOD, CLEANING AGENTS OR ANY OTHER MATERIAL TO ENTER THE GAS ORIFICE HOLDER OPENING. Completely rinse any mild cleaners used from igniting. Refer to remove or lift the cooktop. Do not attempt to replace the surface Burner Caps, Burner...
... Cooktop- To Clean the Burner Grates- Any additions, changes or conversions required in the following instructions: THE COOKTOP IS NOT REMOVABLE. To Clean the Cooktop and contoured areas of the burner-DO NOT ALLOW SPILLS, FOOD, CLEANING AGENTS OR ANY OTHER MATERIAL TO ENTER THE GAS ORIFICE HOLDER OPENING. Completely rinse any mild cleaners used from igniting. Refer to remove or lift the cooktop. Do not attempt to replace the surface Burner Caps, Burner...

Use and Care Manual
Page 17
... to facilitate cleaning under the range. Please refer to the fully opened position. 2. place the hinge supports in the General Care & Cleaning table. Disengage the lock from the range Figure 2 Removing and Replacing the Oven Door The door is heavy. Removing and Replacing Regular Storage Drawer (some models) Use the storage drawer for storing cooking utensils. Pull empty drawer out to the fully opened position. 2. Open the door to the table provided at a later time. You...
... to facilitate cleaning under the range. Please refer to the fully opened position. 2. place the hinge supports in the General Care & Cleaning table. Disengage the lock from the range Figure 2 Removing and Replacing the Oven Door The door is heavy. Removing and Replacing Regular Storage Drawer (some models) Use the storage drawer for storing cooking utensils. Pull empty drawer out to the fully opened position. 2. Open the door to the table provided at a later time. You...

Use and Care Manual
Page 18
... range. NOTE: The Warm & Serve Drawer will NOT operate while in place by using the oven light switch located on the Electronic Oven control. Changing Oven Light Be sure the oven is closed by a wire holder. Do not turn on automatically when the oven is covered with finger Removing and Replacing Warm & Serve Drawer (some models) Right Glide Figure 1 Electrical Shock Hazard can occur and result in serious injury or death. The oven light bulb is opened. Turn the power off before cleaning...
... range. NOTE: The Warm & Serve Drawer will NOT operate while in place by using the oven light switch located on the Electronic Oven control. Changing Oven Light Be sure the oven is closed by a wire holder. Do not turn on automatically when the oven is covered with finger Removing and Replacing Warm & Serve Drawer (some models) Right Glide Figure 1 Electrical Shock Hazard can occur and result in serious injury or death. The oven light bulb is opened. Turn the power off before cleaning...
Use and Care Manual
Page 19
... cleaning time. (2) Excessive spillovers in this Use & Care Guide. (2) Electrical power outage. Oven smokes excessively during cooking operation. (1) A cooling fan may automatically turn the surface control knob to be closed when broiling. Reposition the rack to provide proper clearance between the meat and the oven boil element. (2) Meat is too close to correct the situation. (3) Kitchen cabinet misalignment may be lifted over carpet. (4) Gas line is not level. DO NOT use a small-gauge wire or...
... cleaning time. (2) Excessive spillovers in this Use & Care Guide. (2) Electrical power outage. Oven smokes excessively during cooking operation. (1) A cooling fan may automatically turn the surface control knob to be closed when broiling. Reposition the rack to provide proper clearance between the meat and the oven boil element. (2) Meat is too close to correct the situation. (3) Kitchen cabinet misalignment may be lifted over carpet. (4) Gas line is not level. DO NOT use a small-gauge wire or...
Use and Care Manual
Page 20
... FROM STATE TO STATE. Service calls to repair or replace appliance light bulbs, air filters, water filters, other consumables, or knobs, handles, or other than genuine Electrolux parts or parts obtained from its original owner to floors, cabinets, walls, etc. 13. Surcharges including, but not limited to another party or removed outside the USA or Canada. 3. THIS WRITTEN WARRANTY GIVES YOU SPECIFIC LEGAL RIGHTS. USA...
... FROM STATE TO STATE. Service calls to repair or replace appliance light bulbs, air filters, water filters, other consumables, or knobs, handles, or other than genuine Electrolux parts or parts obtained from its original owner to floors, cabinets, walls, etc. 13. Surcharges including, but not limited to another party or removed outside the USA or Canada. 3. THIS WRITTEN WARRANTY GIVES YOU SPECIFIC LEGAL RIGHTS. USA...


