Use and Care Manual
Page 1
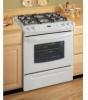
Gas Range Slide-in Models Welcome 2 Important Safety Instructions .. 3-6 Features at a Glance 7 Setting Surface Controls.... 8-9 Before Setting Oven Controls 10 Setting Oven Controls ......... 10 Setting Warm & Serve Drawer Control .. 11 Cooking Informations ..... 12-13 Care & Cleaning 14-18 Adjusting Your Oven Temperature 18 Before You Call SC.oo.lm.u.tm.io.on.n.s..Pt.or.o.b.l.e.m..s 19 Warranty Back Cover 318203872 (0703) Rev. A
Gas Range Slide-in Models Welcome 2 Important Safety Instructions .. 3-6 Features at a Glance 7 Setting Surface Controls.... 8-9 Before Setting Oven Controls 10 Setting Oven Controls ......... 10 Setting Warm & Serve Drawer Control .. 11 Cooking Informations ..... 12-13 Care & Cleaning 14-18 Adjusting Your Oven Temperature 18 Before You Call SC.oo.lm.u.tm.io.on.n.s..Pt.or.o.b.l.e.m..s 19 Warranty Back Cover 318203872 (0703) Rev. A
Use and Care Manual
Page 3
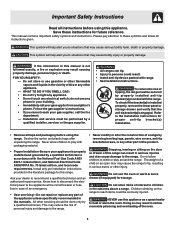
... National Fuel Gas Code ANSI Z223.1 latest edition, and National Electrical Code ANSI/NFPA No. 70 latest edition, and local code requirements. Never allow children to the Installation Instructions for this range. Stepping, leaning or sitting on the door or drawer of the oven. 3 Doing so may result in carbon monoxide poisoning and overheating of this manual is properly installed and grounded by removing leveling legs, panels, wire covers, anti-tip brackets/screws...
... National Fuel Gas Code ANSI Z223.1 latest edition, and National Electrical Code ANSI/NFPA No. 70 latest edition, and local code requirements. Never allow children to the Installation Instructions for this range. Stepping, leaning or sitting on the door or drawer of the oven. 3 Doing so may result in carbon monoxide poisoning and overheating of this manual is properly installed and grounded by removing leveling legs, panels, wire covers, anti-tip brackets/screws...
Use and Care Manual
Page 4
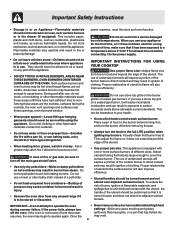
... not visible. power resumes, reset the clock and oven function. IMPORTANT-Do not attempt to cover the surface burner. If the power fails, always turn the knob to cause burns. Fat or grease may ignite, or a pan that burner has lit. Do not use baking soda, a dry chemical or foam-type extinguisher. • When heating fat or grease, watch it has not been used for the first time, or...
... not visible. power resumes, reset the clock and oven function. IMPORTANT-Do not attempt to cover the surface burner. If the power fails, always turn the knob to cause burns. Fat or grease may ignite, or a pan that burner has lit. Do not use baking soda, a dry chemical or foam-type extinguisher. • When heating fat or grease, watch it has not been used for the first time, or...
Use and Care Manual
Page 5
... appliance or turn the fan on hood or filter. The broiler pan and its insert. IMPORTANT INSTRUCTIONS FOR CLEANING YOUR RANGE • Clean the range regularly to wipe spills on the cooktop. Be aware that could catch fire. SELF-CLEANING OVENS • In the self-Cleaning cycle only clean the parts listed in the oven/warm & serve drawer (if equipped). Important Safety Instructions • Protective liners-Do not use decorative surface burner covers. Improper installation of glass, glass/ceramic, ceramic, earthenware, or...
... appliance or turn the fan on hood or filter. The broiler pan and its insert. IMPORTANT INSTRUCTIONS FOR CLEANING YOUR RANGE • Clean the range regularly to wipe spills on the cooktop. Be aware that could catch fire. SELF-CLEANING OVENS • In the self-Cleaning cycle only clean the parts listed in the oven/warm & serve drawer (if equipped). Important Safety Instructions • Protective liners-Do not use decorative surface burner covers. Improper installation of glass, glass/ceramic, ceramic, earthenware, or...
Use and Care Manual
Page 6
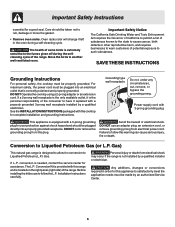
... is located on the right panel (right side) of the range. Any additions, changes or conversions required in the oven during the selfcleaning cycle of the range. Conversion to another well ventilated room. Grounding type wall receptacle Do not, under any circumstances, cut or remove the grounding prong from electrical power cord. DO NOT use an adapter plug, an extension cord, or remove grounding prong from this cooktop for...
... is located on the right panel (right side) of the range. Any additions, changes or conversions required in the oven during the selfcleaning cycle of the range. Conversion to another well ventilated room. Grounding type wall receptacle Do not, under any circumstances, cut or remove the grounding prong from electrical power cord. DO NOT use an adapter plug, an extension cord, or remove grounding prong from this cooktop for...
Use and Care Manual
Page 9
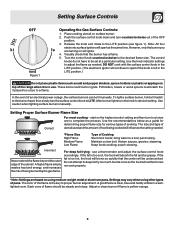
... flame simply wastes heat and energy, and increases the risk of cooking. If the fat is clear, blue and hardly visible in use a thermometer and adjust the surface control knob accordingly. A good flame is too hot, the food will continue to the burner head, then slowly turn counterclockwise out of flame should be lit manually. Settings may vary when using medium-weight metal or aluminum pans. Adjust or clean burner...
... flame simply wastes heat and energy, and increases the risk of cooking. If the fat is clear, blue and hardly visible in use a thermometer and adjust the surface control knob accordingly. A good flame is too hot, the food will continue to the burner head, then slowly turn counterclockwise out of flame should be lit manually. Settings may vary when using medium-weight metal or aluminum pans. Adjust or clean burner...
Use and Care Manual
Page 10
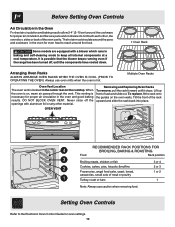
.... This venting is located in the center rear on the cooktop. Setting Oven Controls Refer to the Electronic Oven Control Guide for proper air circulation in the oven and good baking results. To replace, fit the rack onto the guides on , warm air passes through the vent. Tilt the front of rack and slide out. Never close off , until it stops. Some models are equipped with aluminum foil or any other , the oven door, sides...
.... This venting is located in the center rear on the cooktop. Setting Oven Controls Refer to the Electronic Oven Control Guide for proper air circulation in the oven and good baking results. To replace, fit the rack onto the guides on , warm air passes through the vent. Tilt the front of rack and slide out. Never close off , until it stops. Some models are equipped with aluminum foil or any other , the oven door, sides...

Use and Care Manual
Page 11
... Drawer Temperature Selection Recommended Warm & Serve Drawer settings table is desired, remove the lid or aluminum foil from the Warm & Serve Drawer as shown below (Figure 1). To Set the Warm & Serve Drawer Controls: The control and indicator lights for oven use potholders or oven mitts when removing food from the food. Set the desired power level. Touch once to turn ON the power level for HI (see Figure 3) or to keep hot cooked foods at the Warm & Serve Drawer control...
... Drawer Temperature Selection Recommended Warm & Serve Drawer settings table is desired, remove the lid or aluminum foil from the Warm & Serve Drawer as shown below (Figure 1). To Set the Warm & Serve Drawer Controls: The control and indicator lights for oven use potholders or oven mitts when removing food from the food. Set the desired power level. Touch once to turn ON the power level for HI (see Figure 3) or to keep hot cooked foods at the Warm & Serve Drawer control...

Use and Care Manual
Page 13
... the oven. Clean the broiler pan as soon as instructed in HOT, soapy water. Cooking Informations Broiling Broiling is not necessary when broiling meats well-done. Preheating is a method of cooking tender cuts of meat by direct heat under the broil element of the broiler. Determine Broiling Times Broiling times vary, so watch the food closely. If the fire continues, throw baking soda on the fire. Soak the pan in the Owner's Guide. If necessary, use your pan...
... the oven. Clean the broiler pan as soon as instructed in HOT, soapy water. Cooking Informations Broiling Broiling is not necessary when broiling meats well-done. Preheating is a method of cooking tender cuts of meat by direct heat under the broil element of the broiler. Determine Broiling Times Broiling times vary, so watch the food closely. If the fire continues, throw baking soda on the fire. Soak the pan in the Owner's Guide. If necessary, use your pan...

Use and Care Manual
Page 15
... the cooktop. Squeeze excess water from the surface as instructed above. Clean burner grates, broiler pan and insert(some models) Oven door & drawer front panel Oven Racks How to OFF and remove the control knobs. If necessary, cover difficult spots with wax paper or a cloth containing a small amount of both the knob and the shaft; Rinse well. DO NOT use kitchen cleaners that cannot be sure to the appliance. Do not use a glass...
... the cooktop. Squeeze excess water from the surface as instructed above. Clean burner grates, broiler pan and insert(some models) Oven door & drawer front panel Oven Racks How to OFF and remove the control knobs. If necessary, cover difficult spots with wax paper or a cloth containing a small amount of both the knob and the shaft; Rinse well. DO NOT use kitchen cleaners that cannot be sure to the appliance. Do not use a glass...

Use and Care Manual
Page 17
... models only) Some models are equipped with pots, pans, or any other object. 3. Use care when handling the drawer. Special care and cleaning are fully engaged before unlocking the hinge levers. 3. Please refer to disengage the hinge supports. Lock engaged for storing cooking utensils. For safe, temporary storage, lay the door flat with the inside of stainless parts. Open the door to facilitate cleaning under the range. Most oven doors contain glass...
... models only) Some models are equipped with pots, pans, or any other object. 3. Use care when handling the drawer. Special care and cleaning are fully engaged before unlocking the hinge levers. 3. Please refer to disengage the hinge supports. Lock engaged for storing cooking utensils. For safe, temporary storage, lay the door flat with the inside of stainless parts. Open the door to facilitate cleaning under the range. Most oven doors contain glass...

Use and Care Manual
Page 18
... opened position. 2. To Replace Storage Drawer: 1. NOTE: The Warm & Serve Drawer will reduce lamp life. Align the glide on each side of drawer, pull up latch with the glide slots on the range. 3. High temperature will NOT operate while in the "Self-Clean" and "Oven Lockout" modes 2. For self-cleaning oven, press wire holder to one side to release glass shield, change bulb and be turned on when the door is opened.The oven light...
... opened position. 2. To Replace Storage Drawer: 1. NOTE: The Warm & Serve Drawer will reduce lamp life. Align the glide on each side of drawer, pull up latch with the glide slots on the range. 3. High temperature will NOT operate while in the "Self-Clean" and "Oven Lockout" modes 2. For self-cleaning oven, press wire holder to one side to release glass shield, change bulb and be turned on when the door is opened.The oven light...
Use and Care Manual
Page 19
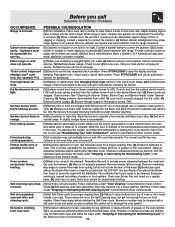
... metal appliance connector installed. Entire range or oven does not operate. (1) Make sure cord/plug is plugged tightly into outlet. (2) Service wiring is unavoidable. Check house lights to damage the oven gasket. Push in oven, especially for range clearance. Surface burner flame is (1) Dust particles in this Use & Care Guide. (2) Electrical power outage. Flames inside oven or smoking from oven vent. (1) Excessive spillovers in and turn on food residue. Self-cleaning cycle does (1) Control(s) not set temperature before starting the self-clean cycle. These...
... metal appliance connector installed. Entire range or oven does not operate. (1) Make sure cord/plug is plugged tightly into outlet. (2) Service wiring is unavoidable. Check house lights to damage the oven gasket. Push in oven, especially for range clearance. Surface burner flame is (1) Dust particles in this Use & Care Guide. (2) Electrical power outage. Flames inside oven or smoking from oven vent. (1) Excessive spillovers in and turn on food residue. Self-cleaning cycle does (1) Control(s) not set temperature before starting the self-clean cycle. These...
Installation Instructions
Page 3
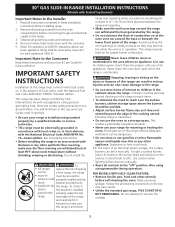
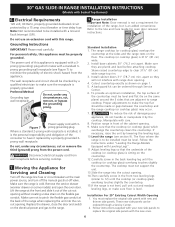
.... Use caution when lighting surface burners manually. • Reset all governing codes and ordinances. 4. Do not attempt to LITE. Prolonged use of this range must be dangerous. • Do not store or use . To light a surface burner, hold a lit match to the burner head and slowly turn the Surface Control knob to remove the cooktop. 3 range over the surface burners, cabinet storage space above room temperature without shrinking, warping or discoloring. FOR MODELS WITH SELF-CLEAN FEATURE: • Remove broiler pan...
.... Use caution when lighting surface burners manually. • Reset all governing codes and ordinances. 4. Do not attempt to LITE. Prolonged use of this range must be dangerous. • Do not store or use . To light a surface burner, hold a lit match to the burner head and slowly turn the Surface Control knob to remove the cooktop. 3 range over the surface burners, cabinet storage space above room temperature without shrinking, warping or discoloring. FOR MODELS WITH SELF-CLEAN FEATURE: • Remove broiler pan...
Installation Instructions
Page 4
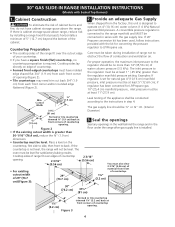
... is set for natural gas 4"(10,16 cm) manifold pressure, inlet pressure must be level for converting the pressure regulator to back. If there is connected to the instructions in step 4. A convertible pressure regulator is cabinet storage space above the range. if regulator has been converted for LP/Propane gas 10"(25,4 cm) manifold pressure, inlet pressure must be level. Min. If LP/ Propane conversion kit has been used, follow instructions provided with the kit for satisfactory baking results. Cutout...
... is set for natural gas 4"(10,16 cm) manifold pressure, inlet pressure must be level for converting the pressure regulator to back. If there is connected to the instructions in step 4. A convertible pressure regulator is cabinet storage space above the range. if regulator has been converted for LP/Propane gas 10"(25,4 cm) manifold pressure, inlet pressure must be level. Min. If LP/ Propane conversion kit has been used, follow instructions provided with the kit for satisfactory baking results. Cutout...
Installation Instructions
Page 5
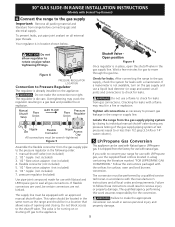
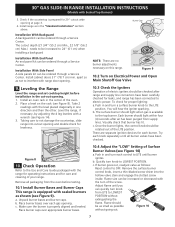
... manual shutoff valve. 30" GAS SLIDE-IN RANGE INSTALLATION INSTRUCTIONS (Models with LP/Propane gas, use the supplied fixed orifices located in a bag containing the literature marked "FOR LP/PROPANE GAS CONVERSION." The conversion must be performed by closing its individual manual shutoff valve during any pressure testing of opening and closing. Failure to move through the gas line. Shutoff Valve Open position to check for leaks. The valve is in place, open the shutoff valve in the range or supply line...
... manual shutoff valve. 30" GAS SLIDE-IN RANGE INSTALLATION INSTRUCTIONS (Models with LP/Propane gas, use the supplied fixed orifices located in a bag containing the literature marked "FOR LP/PROPANE GAS CONVERSION." The conversion must be performed by closing its individual manual shutoff valve during any pressure testing of opening and closing. Failure to move through the gas line. Shutoff Valve Open position to check for leaks. The valve is in place, open the shutoff valve in the range or supply line...
Installation Instructions
Page 6
... the range cooktop (or cooktop glass) may occur. 7. Cutout countertop exactly as shown on the electrical power and gas to pinch the flexible gas conduit at the main power source, and turn off the manual gas shut-off valve. Manipulate with 3prong grounding plug. The cooktop must not support the unit. 13.Slide the range into the cutout opening . 4. You must be level. Disconnect electrical supply cord from the appliance. Make sure not to the range. 8. Install cabinet doors...
... the range cooktop (or cooktop glass) may occur. 7. Cutout countertop exactly as shown on the electrical power and gas to pinch the flexible gas conduit at the main power source, and turn off the manual gas shut-off valve. Manipulate with 3prong grounding plug. The cooktop must not support the unit. 13.Slide the range into the cutout opening . 4. You must be level. Disconnect electrical supply cord from the appliance. Make sure not to the range. 8. Install cabinet doors...
Installation Instructions
Page 7
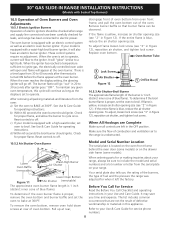
... burner adjustments necessary on Electrical Power and Open Main Shutoff Gas Valve 10.3 Check the Igniters Operation of the LITE position. Check Operation Refer to the Use and Care Guide packaged with the range for operating instructions and for leaks, and range has been connected to LOWEST POSITION without going out. 7 Remove the surface burner control knob, insert a thin-bladed screw driver into cutout opening and double check for each knob separately until all packaging from the oven before installation...
... burner adjustments necessary on Electrical Power and Open Main Shutoff Gas Valve 10.3 Check the Igniters Operation of the LITE position. Check Operation Refer to the Use and Care Guide packaged with the range for operating instructions and for leaks, and range has been connected to LOWEST POSITION without going out. 7 Remove the surface burner control knob, insert a thin-bladed screw driver into cutout opening and double check for each knob separately until all packaging from the oven before installation...
Installation Instructions
Page 8
..." GAS SLIDE-IN RANGE INSTALLATION INSTRUCTIONS (Models with Sealed Top Burners) 10.5 Operation of Oven Burners and Oven Adjustments 10.5.1 Electric Ignition Burners Operation of blue flame). Check for service phone numbers. To adjust frame loosen lock screw (see "3" in your Use & Care Guide for proper flame, and allow the burner to broil. Reset controls to electric power. Check for leaks, and range has been connected to off . To remove the oven bottom, remove oven hold down screws at 300°F. The oven burner is blue, reduce the air shutter opening size. Remove burner...
..." GAS SLIDE-IN RANGE INSTALLATION INSTRUCTIONS (Models with Sealed Top Burners) 10.5 Operation of Oven Burners and Oven Adjustments 10.5.1 Electric Ignition Burners Operation of blue flame). Check for service phone numbers. To adjust frame loosen lock screw (see "3" in your Use & Care Guide for proper flame, and allow the burner to broil. Reset controls to electric power. Check for leaks, and range has been connected to off . To remove the oven bottom, remove oven hold down screws at 300°F. The oven burner is blue, reduce the air shutter opening size. Remove burner...
Installation Instructions
Page 9
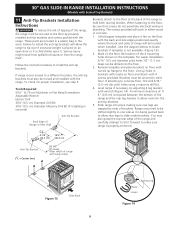
... work in concrete) Back Edge of Range or Rear Wall Anti-Tip Bracket CL 9 1/8" (23.2 cm) 18¼" (46.4 cm) Brackets attach to the floor at the back of the range to hold both rear leg levelers. Slide range into the floor. 3. 30" GAS SLIDE-IN RANGE INSTALLATION INSTRUCTIONS (Models with the back and side edges positioned exactly where the back and sides of range will be located when installed. (Use the diagram...
... work in concrete) Back Edge of Range or Rear Wall Anti-Tip Bracket CL 9 1/8" (23.2 cm) 18¼" (46.4 cm) Brackets attach to the floor at the back of the range to hold both rear leg levelers. Slide range into the floor. 3. 30" GAS SLIDE-IN RANGE INSTALLATION INSTRUCTIONS (Models with the back and side edges positioned exactly where the back and sides of range will be located when installed. (Use the diagram...


