
Use and Care Manual
Page 1
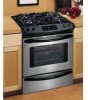
A Gas Range Slide-in Models Welcome 2 Important Safety Instructions .. 3-6 Features at a Glance 7 Setting Surface Controls.... 8-9 Before Setting Oven Controls 10 Setting Oven Controls ......... 10 Setting Warm & Serve Drawer Control .. 11 Cooking Informations ..... 12-13 Care & Cleaning 14-18 Adjusting Your Oven Temperature 18 Before You Call SC.oo.lm.u.tm.io.on.n.s..Pt.or.o.b.l.e.m..s 19 Warranty Back Cover 318203872 (0703) Rev.
A Gas Range Slide-in Models Welcome 2 Important Safety Instructions .. 3-6 Features at a Glance 7 Setting Surface Controls.... 8-9 Before Setting Oven Controls 10 Setting Oven Controls ......... 10 Setting Warm & Serve Drawer Control .. 11 Cooking Informations ..... 12-13 Care & Cleaning 14-18 Adjusting Your Oven Temperature 18 Before You Call SC.oo.lm.u.tm.io.on.n.s..Pt.or.o.b.l.e.m..s 19 Warranty Back Cover 318203872 (0703) Rev.
Use and Care Manual
Page 2
... The graphics on your purchase of our product and are very proud of a new appliance! Solicite la P/N 318203872E. Box 212378 Augusta, GA 30917 © 2007 Electrolux Canada Corp. Spanish Use & Care Manual Electrolux Home Products P. PLEASE CAREFULLY READ AND SAVE THESE INSTRUCTIONS This ... for future reference. Please record your appliance may not look exactly like those shown. O. Congratulations on your model and serial numbers below for several models. At Electrolux Home Products, we are completely committed to cover every possible condition and situation that may not ...
... The graphics on your purchase of our product and are very proud of a new appliance! Solicite la P/N 318203872E. Box 212378 Augusta, GA 30917 © 2007 Electrolux Canada Corp. Spanish Use & Care Manual Electrolux Home Products P. PLEASE CAREFULLY READ AND SAVE THESE INSTRUCTIONS This ... for future reference. Please record your appliance may not look exactly like those shown. O. Congratulations on your model and serial numbers below for several models. At Electrolux Home Products, we are completely committed to cover every possible condition and situation that may not ...
Use and Care Manual
Page 7
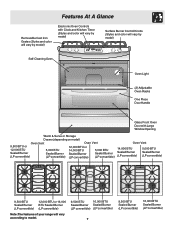
...Oven Light (2) Adjustable Oven Racks One Piece Door Handle Glass Front Oven Door with Large Window Opening Warm & Serve or Storage Drawer (depending on model) Oven Vent 9,500 BTU or 12,000 BTU 5,000 BTU Sealed Burner Sealed Burner (LP convertible) (LP convertible) Oven Vent 12,000 ...) 9,500 BTU Sealed Burner (LP convertible) 12,000 BTU or 16,000 BTU Sealed Burner (LP convertible) Note:The features of your range will vary according to model. 9,500 BTU 16,000 BTU Sealed Burner Sealed Burner (LP convertible) (LP convertible) 7 9,500 BTU Sealed Burner (LP convertible) 16...
...Oven Light (2) Adjustable Oven Racks One Piece Door Handle Glass Front Oven Door with Large Window Opening Warm & Serve or Storage Drawer (depending on model) Oven Vent 9,500 BTU or 12,000 BTU 5,000 BTU Sealed Burner Sealed Burner (LP convertible) (LP convertible) Oven Vent 12,000 ...) 9,500 BTU Sealed Burner (LP convertible) 12,000 BTU or 16,000 BTU Sealed Burner (LP convertible) Note:The features of your range will vary according to model. 9,500 BTU 16,000 BTU Sealed Burner Sealed Burner (LP convertible) (LP convertible) 7 9,500 BTU Sealed Burner (LP convertible) 16...

Use and Care Manual
Page 8
...Caps and Burner Grates It is very important to make sure that is suitable for the amount and type of the Gas Surface Burners Your range is equipped with gas surface burners with different BTU ratings. Remove all packing tape from cooktop area. Note: The Burner Heads should sit flat... Electrodes must Figure 3 align into slot or hole of the pan. 8 This burner is located at the right front and left rear position (some models) burner positions on the cooktop (see Figure 2). The POWER burners are best used for simmering delicate sauces, etc. Regardless of size, always select cookware...
...Caps and Burner Grates It is very important to make sure that is suitable for the amount and type of the Gas Surface Burners Your range is equipped with gas surface burners with different BTU ratings. Remove all packing tape from cooktop area. Note: The Burner Heads should sit flat... Electrodes must Figure 3 align into slot or hole of the pan. 8 This burner is located at the right front and left rear position (some models) burner positions on the cooktop (see Figure 2). The POWER burners are best used for simmering delicate sauces, etc. Regardless of size, always select cookware...

Use and Care Manual
Page 10
... around the cookware for proper air circulation and be sure pans and cookware do not touch each other material. DO NOT BLOCK OVEN VENT. Some models are equipped with aluminum foil or any other , the oven door, sides or back of meat or poultry 1 Turkey, roast or ham 2 or 3 1 or 2 1 Note... THE OVEN IS COOL (PRIOR TO OPERATING THE OVEN). Tilt the front of rack and slide out. It is necessary for oven settings. 10 This venting is possible that the blower keeps running even if the range has been turned off the openings with a blower which runs in the oven and good...
... around the cookware for proper air circulation and be sure pans and cookware do not touch each other material. DO NOT BLOCK OVEN VENT. Some models are equipped with aluminum foil or any other , the oven door, sides or back of meat or poultry 1 Turkey, roast or ham 2 or 3 1 or 2 1 Note... THE OVEN IS COOL (PRIOR TO OPERATING THE OVEN). Tilt the front of rack and slide out. It is necessary for oven settings. 10 This venting is possible that the blower keeps running even if the range has been turned off the openings with a blower which runs in the oven and good...

Use and Care Manual
Page 13
.... DO Broiler Pan NOT cover the broiler grid with foil. Soak the pan in the Owner's Guide. turn off grease. Broiling Tips (some models): To make cleaning easier, line the bottom of meat, fat content and doneness preferred. Pour off the oven. Should an oven fire occur, ... the fire continues, throw baking soda on the fire. Preheating Preheating is not necessary when broiling meats well-done. Broiler Clean-Up Tips (some models) The broiler pan and it grid allow dripping grease to BROIL as possible after each use soap-filled steel wool pads. If necessary, use ...
.... DO Broiler Pan NOT cover the broiler grid with foil. Soak the pan in the Owner's Guide. turn off grease. Broiling Tips (some models): To make cleaning easier, line the bottom of meat, fat content and doneness preferred. Pour off the oven. Should an oven fire occur, ... the fire continues, throw baking soda on the fire. Preheating Preheating is not necessary when broiling meats well-done. Broiler Clean-Up Tips (some models) The broiler pan and it grid allow dripping grease to BROIL as possible after each use soap-filled steel wool pads. If necessary, use ...
Use and Care Manual
Page 15
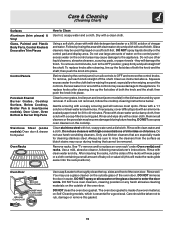
... glass of both the knob and the shaft; Dry with a soft cloth. Using a soft cloth, clean with an ammoniasoaked paper towel for 30 to enter the door vents. DO NOT use oven cleaners, cleaning powders or any harsh abrasive cleaning materials on the cooktop. The oven door ...gasket is essential for cleaning stainless steel. Gentle scouring with wax paper or a cloth containing a small amount of a woven material, on Self-Cleaning models, which is made for a good seal. Remove racks. After cleaning the racks, rub the sides of the racks with a soapy scouring pad will ...
... glass of both the knob and the shaft; Dry with a soft cloth. Using a soft cloth, clean with an ammoniasoaked paper towel for 30 to enter the door vents. DO NOT use oven cleaners, cleaning powders or any harsh abrasive cleaning materials on the cooktop. The oven door ...gasket is essential for cleaning stainless steel. Gentle scouring with wax paper or a cloth containing a small amount of a woven material, on Self-Cleaning models, which is made for a good seal. Remove racks. After cleaning the racks, rub the sides of the racks with a soapy scouring pad will ...

Use and Care Manual
Page 17
... position Figure 3 Roller Roller Guide Storage Drawer Front Frame Figure 4 Special Door Care Instructions - Please refer to facilitate cleaning under the range. The drawer can break. Use care when handling the drawer. Open the door to the fully opened position. 2. Do not hit ...To replace the drawer: 1. Removing and Replacing Regular Storage Drawer (some models) Use the storage drawer for storing cooking utensils. Care & Cleaning Care and Cleaning of Stainless Steel (Stainless Steel models only) Some models are required for door removal Figure 1 HINGE SLOT Door removed from the ...
... position Figure 3 Roller Roller Guide Storage Drawer Front Frame Figure 4 Special Door Care Instructions - Please refer to facilitate cleaning under the range. The drawer can break. Use care when handling the drawer. Open the door to the fully opened position. 2. Do not hit ...To replace the drawer: 1. Removing and Replacing Regular Storage Drawer (some models) Use the storage drawer for storing cooking utensils. Care & Cleaning Care and Cleaning of Stainless Steel (Stainless Steel models only) Some models are required for door removal Figure 1 HINGE SLOT Door removed from the ...
Use and Care Manual
Page 18
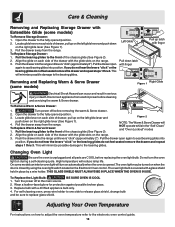
...steps 1 thru 3. Do not turn on automatically when the oven is opened.The oven light may be sure to seat bearing glides into the range until levers "click" (approximately 2"). Turn the power off before replacing the oven light bulb. Pull the drawer away from electric power before ...cleaning and servicing the warm & Serve drawer. This will minimize possible damage to seat bearing glides into position. On some models an interior oven light will minimize possible damage to the electronic oven control guide. 18 Adjusting Your Oven Temperature For instructions on the...
...steps 1 thru 3. Do not turn on automatically when the oven is opened.The oven light may be sure to seat bearing glides into the range until levers "click" (approximately 2"). Turn the power off before replacing the oven light bulb. Pull the drawer away from electric power before ...cleaning and servicing the warm & Serve drawer. This will minimize possible damage to seat bearing glides into position. On some models an interior oven light will minimize possible damage to the electronic oven control guide. 18 Adjusting Your Oven Temperature For instructions on the...


