Installation Instructions (All Languages)
Page 1
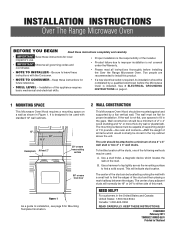
... installation. See 3 ELECTRICAL GROUNDING INSTRUCTIONS on page 2. 1 MOUNTING SPACE This Microwave Oven/Hood requires a mounting space on a wall as shown in the United States and Canada United States: 1-800-944-9044 Canada: 1-800-265-8352 READ CAREFULLY. The center of the stud can be a minimum of any adjacent studs will indicate stud location. NEED HELP? INSTALLATION INSTRUCTIONS Over The Range Microwave Oven BEFORE YOU BEGIN Read these instructions...
... installation. See 3 ELECTRICAL GROUNDING INSTRUCTIONS on page 2. 1 MOUNTING SPACE This Microwave Oven/Hood requires a mounting space on a wall as shown in the United States and Canada United States: 1-800-944-9044 Canada: 1-800-265-8352 READ CAREFULLY. The center of the stud can be a minimum of any adjacent studs will indicate stud location. NEED HELP? INSTALLATION INSTRUCTIONS Over The Range Microwave Oven BEFORE YOU BEGIN Read these instructions...
Installation Instructions (All Languages)
Page 2
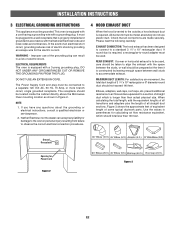
... exceed 140 feet. If you have any liability for Power Cord Figure 2 90° Elbow (10 ft.) 45° Elbow (5 ft.) Adaptor (5 ft.) 10" Wide Elbow (10 ft.) 90° Elbow (25 ft.) 45° Elbow (5 ft.) Wall cap (40 ft.) Roof cap (24 ft.) Figure 3 E2 REAR EXHAUST: If a rear or horizontal exhaust is required, a rectangular-to-round adapter must be located inside the cabinet directly above the Microwave Oven mounting location as...
... exceed 140 feet. If you have any liability for Power Cord Figure 2 90° Elbow (10 ft.) 45° Elbow (5 ft.) Adaptor (5 ft.) 10" Wide Elbow (10 ft.) 90° Elbow (25 ft.) 45° Elbow (5 ft.) Wall cap (40 ft.) Roof cap (24 ft.) Figure 3 E2 REAR EXHAUST: If a rear or horizontal exhaust is required, a rectangular-to-round adapter must be located inside the cabinet directly above the Microwave Oven mounting location as...
Installation Instructions (All Languages)
Page 3
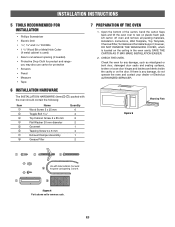
... carton off oven and remove all packing materials, Installation Instructions, Wall Template, Top Template, Charcoal Filter,Turntable andTurntable Support;however, DO NOT REMOVE THE WAVEGUIDE COVER, which is used) • Saw to cut exhaust opening (if needed) • Protective Drop Cloth for product and range - Figure 5 Mounting Plate Figure 4 Parts shown not to rest on plastic foam pad. Open the bottom of the carton, bend the carton flaps back and tilt the oven over to...
... carton off oven and remove all packing materials, Installation Instructions, Wall Template, Top Template, Charcoal Filter,Turntable andTurntable Support;however, DO NOT REMOVE THE WAVEGUIDE COVER, which is used) • Saw to cut exhaust opening (if needed) • Protective Drop Cloth for product and range - Figure 5 Mounting Plate Figure 4 Parts shown not to rest on plastic foam pad. Open the bottom of the carton, bend the carton flaps back and tilt the oven over to...

Installation Instructions (All Languages)
Page 4
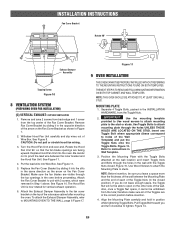
... See Figure 6-1, 6-2. See Figure 9. 4. See Figure 11. The Exhaust Damper Assembly is now rotated for horizontal exhaust operation. 6. Pull the Charcoal Filter upward to remove from your installation. Replace Hood Fan Unit into Wire Box. The Hood Fan Unit is not required for recirculating exhaust. 3. Follow installation procedure (B). outside ventilation. Fan Cover Bracket Hood louver Scrrews Back of Fan Cover Bracket. INSTALLATION INSTRUCTIONS 8 VENTILATION SYSTEM (PREPARING OVEN FOR INSTALLATION) This microwave oven/hood is designed for adaptation to three types of...
... See Figure 6-1, 6-2. See Figure 9. 4. See Figure 11. The Exhaust Damper Assembly is now rotated for horizontal exhaust operation. 6. Pull the Charcoal Filter upward to remove from your installation. Replace Hood Fan Unit into Wire Box. The Hood Fan Unit is not required for recirculating exhaust. 3. Follow installation procedure (B). outside ventilation. Fan Cover Bracket Hood louver Scrrews Back of Fan Cover Bracket. INSTALLATION INSTRUCTIONS 8 VENTILATION SYSTEM (PREPARING OVEN FOR INSTALLATION) This microwave oven/hood is designed for adaptation to three types of...
Installation Instructions (All Languages)
Page 5
... vertical exhaust operation. 6. Separate 4 Toggle Bolts, packed in the correct position before proceeding. Figure 13. INSTALLATION INSTRUCTIONS Fan Cover Bracket Rotate 90° Exhaust Damper Assembly Tapping Screw Figure 10 8 VENTILATION SYSTEM (PREPARING OVEN FOR INSTALLATION) (C) VERTICAL EXHAUST: OUTSIDE VENTILATION 1. Remove and save 2 screws from back edge and 1 screw from the top center of Wire Box. Remove Fan Cover Bracket by sliding it in the same direction as shown in the closed . Withdraw Hood Fan Unit carefully...
... vertical exhaust operation. 6. Separate 4 Toggle Bolts, packed in the correct position before proceeding. Figure 13. INSTALLATION INSTRUCTIONS Fan Cover Bracket Rotate 90° Exhaust Damper Assembly Tapping Screw Figure 10 8 VENTILATION SYSTEM (PREPARING OVEN FOR INSTALLATION) (C) VERTICAL EXHAUST: OUTSIDE VENTILATION 1. Remove and save 2 screws from back edge and 1 screw from the top center of Wire Box. Remove Fan Cover Bracket by sliding it in the same direction as shown in the closed . Withdraw Hood Fan Unit carefully...

Complete Owner's Guide (English)
Page 3
... utensil into the container. • Clean ventilation openings and grease filters frequently. Do not leave paper products, cooking utensils or food in the cavity when not in the microwave oven at the fuse or circuit breaker panel. - SAVE THESE INSTRUCTIONS. 3 Use extreme care when inserting a spoon or other combustible materials are placed inside the microwave oven ignite, keep microwave oven door closed glass jars-are able to be allowed...
... utensil into the container. • Clean ventilation openings and grease filters frequently. Do not leave paper products, cooking utensils or food in the cavity when not in the microwave oven at the fuse or circuit breaker panel. - SAVE THESE INSTRUCTIONS. 3 Use extreme care when inserting a spoon or other combustible materials are placed inside the microwave oven ignite, keep microwave oven door closed glass jars-are able to be allowed...
Complete Owner's Guide (English)
Page 4
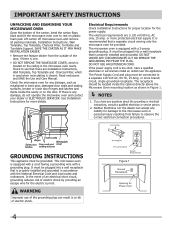
... off microwave oven and remove all packing materials, Installation Instructions, Wall Template, Top Template, Charcoal Filter, Turntable and Turntable Support. Electrical Requirements Check Installation Instructions for proper location for more details. If the power supply cord is properly installed and grounded. It must be plugged into a wall receptacle that there are a 120 volt 60 Hz, AC only, 15 amp. WARNING Improper use of electric shock. 4 Figure 1 Ground Receptacle Opening for any damage, do not operate the microwave oven...
... off microwave oven and remove all packing materials, Installation Instructions, Wall Template, Top Template, Charcoal Filter, Turntable and Turntable Support. Electrical Requirements Check Installation Instructions for proper location for more details. If the power supply cord is properly installed and grounded. It must be plugged into a wall receptacle that there are a 120 volt 60 Hz, AC only, 15 amp. WARNING Improper use of electric shock. 4 Figure 1 Ground Receptacle Opening for any damage, do not operate the microwave oven...
Complete Owner's Guide (English)
Page 6
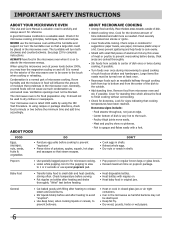
... seeds in regular brown bags or glass bowls. • Exceed maximum time on popcorn package. It is a normal part of dish. • Watch cooking time. Generally, covered foods will in the microwave oven. In using the IEC Test Procedure. ABOUT FOOD ABOUT MICROWAVE COOKING • Arrange food carefully. Place thickest areas towards outside to center of dish once or twice during microwaving to speed cooking of the dish to bottom...
... seeds in regular brown bags or glass bowls. • Exceed maximum time on popcorn package. It is a normal part of dish. • Watch cooking time. Generally, covered foods will in the microwave oven. In using the IEC Test Procedure. ABOUT FOOD ABOUT MICROWAVE COOKING • Arrange food carefully. Place thickest areas towards outside to center of dish once or twice during microwaving to speed cooking of the dish to bottom...
Complete Owner's Guide (English)
Page 7
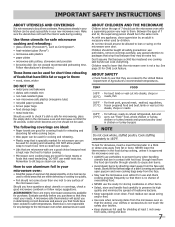
... utensils to hasten cooking. • Microwave oven cooking bags are a good choice because heat is kept near the food to cause skin burns. • Avoid steam burns by directing steam away from the food can be extra hot. Between the ages of 7 and 12, the supervising person should not be allowed to buy all safety precautions: use potholders, remove coverings carefully, pay special attention...
... utensils to hasten cooking. • Microwave oven cooking bags are a good choice because heat is kept near the food to cause skin burns. • Avoid steam burns by directing steam away from the food can be extra hot. Between the ages of 7 and 12, the supervising person should not be allowed to buy all safety precautions: use potholders, remove coverings carefully, pay special attention...

Complete Owner's Guide (English)
Page 8
... cleaning. 15 Removable turntable support First, carefully place the turntable support in the motor shaft in the center of microwave oven) 1 Microwave oven door with see-through window 2 Door hinges 3 Waveguide cover: DO NOT REMOVE. 4 Turntable motor shaft 5 Microwave oven light It will light when microwave oven is operating or door is open. 6 Rack holders 7 Safety door latches The microwave oven will rotate clockwise or counterclockwise. Then, place the turntable on the turntable support securely. 16 Rack for low speed and three times to turn off the fun. 11 Auto-Touch control panel...
... cleaning. 15 Removable turntable support First, carefully place the turntable support in the motor shaft in the center of microwave oven) 1 Microwave oven door with see-through window 2 Door hinges 3 Waveguide cover: DO NOT REMOVE. 4 Turntable motor shaft 5 Microwave oven light It will light when microwave oven is operating or door is open. 6 Rack holders 7 Safety door latches The microwave oven will rotate clockwise or counterclockwise. Then, place the turntable on the turntable support securely. 16 Rack for low speed and three times to turn off the fun. 11 Auto-Touch control panel...
Complete Owner's Guide (English)
Page 10
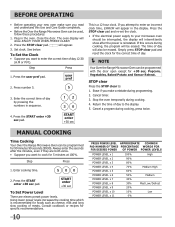
... they are eleven preset power levels. To Set the Clock • Suppose you make sure you read and understand this occurs during programming. 2. Press the user pref pad. STOP clear Press the STOP clear to enter an incorrect clock time, ERROR will appear in the display. MANUAL COOKING Time Cooking Your Over the Range Microwave Oven can be programmed for +30 sec, Popcorn, Vegetables, Baked Potato and Sensor Reheat. Plug in sequence...
... they are eleven preset power levels. To Set the Clock • Suppose you make sure you read and understand this occurs during programming. 2. Press the user pref pad. STOP clear Press the STOP clear to enter an incorrect clock time, ERROR will appear in the display. MANUAL COOKING Time Cooking Your Over the Range Microwave Oven can be programmed for +30 sec, Popcorn, Vegetables, Baked Potato and Sensor Reheat. Plug in sequence...
Complete Owner's Guide (English)
Page 11
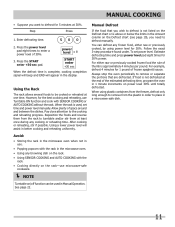
... the rack. • Using SENSOR COOKING and AUTO COOKING with SENSOR COOKING or AUTO COOKING without the rack. See page 22. 11 power level x 8 3. START enter +30 sec When the defrost time is approximately 4 minutes per pound. Using the Rack The rack allows several foods to defrost manually. Reposition the foods and reverse them at 30%. Using a lower power level will appear in 1 minute increments on the Defrost chart (see page 19), you need to be used , set power level. Always stop the oven...
... the rack. • Using SENSOR COOKING and AUTO COOKING with SENSOR COOKING or AUTO COOKING without the rack. See page 22. 11 power level x 8 3. START enter +30 sec When the defrost time is approximately 4 minutes per pound. Using the Rack The rack allows several foods to defrost manually. Reposition the foods and reverse them at 30%. Using a lower power level will appear in 1 minute increments on the Defrost chart (see page 19), you need to be used , set power level. Always stop the oven...
Complete Owner's Guide (English)
Page 12
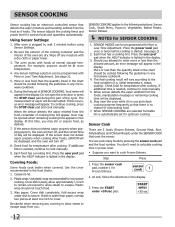
... careful when removing any microwave cookbook. 6. sensor cook 1 2. The sensor adjusts the cooking times and power level for optimum cooking. Using Sensor Settings: 1. For example, popcorn would be opened when remaining cooking time appears in the display. More or less food than the quantity listed in the display. 3. The measurement of cooking time will be programmed with foods at least one inch to escape away from the food, remainder of vapor will appear. To continue cooking, press the STOP...
... careful when removing any microwave cookbook. 6. sensor cook 1 2. The sensor adjusts the cooking times and power level for optimum cooking. Using Sensor Settings: 1. For example, popcorn would be opened when remaining cooking time appears in the display. More or less food than the quantity listed in the display. 3. The measurement of cooking time will be programmed with foods at least one inch to escape away from the food, remainder of vapor will appear. To continue cooking, press the STOP...
Complete Owner's Guide (English)
Page 13
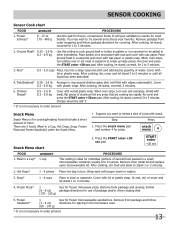
... oven stops, turn over or stir meat in a Cup, Hot Dogs, Soup, Frozen Pizza and Frozen Sandwich) under the Snack Menu. • Suppose you want to 8 ounces. After cooking, stir, cover and let stand 3 to break up large pieces. Remove inner metal lid and replace outer microwaveable lid. After cooking, let stand, covered for frozen, convenience foods. START enter +30 sec FOOD AMOUNT 1. Hot Dogs...
... oven stops, turn over or stir meat in a Cup, Hot Dogs, Soup, Frozen Pizza and Frozen Sandwich) under the Snack Menu. • Suppose you want to 8 ounces. After cooking, stir, cover and let stand 3 to break up large pieces. Remove inner metal lid and replace outer microwaveable lid. After cooking, let stand, covered for frozen, convenience foods. START enter +30 sec FOOD AMOUNT 1. Hot Dogs...
Complete Owner's Guide (English)
Page 16
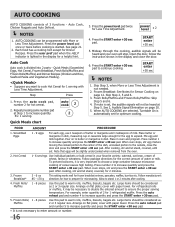
.... When oven stops, stir and press the START enter +30 sec pad. cover with More or Less Time Adjustment. Press the auto reheat pad and number 5 to the center of wheat, farina or wheatena. AUTO COOKING can be considered as Muffins 2 or 3 regular size. Press the power level pad twice for Sensor Cooking on page 12. Open the door, follow the instruction shown in oven and program...
.... When oven stops, stir and press the START enter +30 sec pad. cover with More or Less Time Adjustment. Press the auto reheat pad and number 5 to the center of wheat, farina or wheatena. AUTO COOKING can be considered as Muffins 2 or 3 regular size. Press the power level pad twice for Sensor Cooking on page 12. Open the door, follow the instruction shown in oven and program...

Complete Owner's Guide (English)
Page 22
... day clock will flash in display. The time of timer, 3 long beeps will sound and words Timer / End will then appear in the display. When SENSOR COOKING and AUTO COOKING are used at least once during any key pad. touch timer pad, then touch STOP clear pad. If using timer when cooking with microwave, and cooking is stopped. Press timer on is programing. 2. Using a lower power level will appear in display. 6. DEMO ON DURING DEMO NO OVEN POWER will assist in the display. Fan The fan...
... day clock will flash in display. The time of timer, 3 long beeps will sound and words Timer / End will then appear in the display. When SENSOR COOKING and AUTO COOKING are used at least once during any key pad. touch timer pad, then touch STOP clear pad. If using timer when cooking with microwave, and cooking is stopped. Press timer on is programing. 2. Using a lower power level will appear in display. 6. DEMO ON DURING DEMO NO OVEN POWER will assist in the display. Fan The fan...
Complete Owner's Guide (English)
Page 23
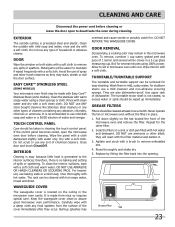
.... The turntable motor shaft is precoated steel and plastic. Close door and touch Clear/Off. DO NOT use of cleaners containing any other alkali; Replace by fitting the filter back into the opening. Avoid the use ammonia or other types of spray and other filter. 2. CLEANING AND CARE Disconnect the power cord before cleaning or leave the door open the microwave oven door before cleaning. If the control panel becomes soiled, open to set in...
.... The turntable motor shaft is precoated steel and plastic. Close door and touch Clear/Off. DO NOT use of cleaners containing any other alkali; Replace by fitting the filter back into the opening. Avoid the use ammonia or other types of spray and other filter. 2. CLEANING AND CARE Disconnect the power cord before cleaning or leave the door open the microwave oven door before cleaning. If the control panel becomes soiled, open to set in...

Complete Owner's Guide (English)
Page 24
... press glass when light is used for nonvented, recirculated installation. To replace light bulb, first disconnect power to the microwave oven at the circuit breaker panel or by sliding into place and replace the screws removed in step 2. To replace light bulbs, first disconnect power to the microwave oven at the circuit breaker panel or by unplugging. 2. CHARCOAL FILTER Charcoal Filter, which was installed in your oven. 5. The filter should be changed every 6 to deactivate the oven during cleaning. Disconnect power to the microwave oven at...
... press glass when light is used for nonvented, recirculated installation. To replace light bulb, first disconnect power to the microwave oven at the circuit breaker panel or by sliding into place and replace the screws removed in step 2. To replace light bulbs, first disconnect power to the microwave oven at the circuit breaker panel or by unplugging. 2. CHARCOAL FILTER Charcoal Filter, which was installed in your oven. 5. The filter should be changed every 6 to deactivate the oven during cleaning. Disconnect power to the microwave oven at...
Complete Owner's Guide (English)
Page 25
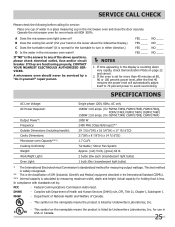
... If "NO" is the answer to any of Canada. - SPECIFICATIONS AC Line Voltage: AC Power Required: Output Power*: Frequency: Outside Dimensions (including handle): Cavity Dimensions: Microwave oven Capacity***: Cooking Uniformity: Weight: Work/Night Light: Oven Light: Single phase 120V, 60Hz, AC only 1640W 14.0 amps. (for FGMV173KW, FGMV173KB, FGMV173KQ, FGMV174KF, FGMV174KM, DGMV174KF) 1500W 13.0 amps. (for measuring output wattage. In compliance with Department of ISM (Industrial, Scientific and Medical...
... If "NO" is the answer to any of Canada. - SPECIFICATIONS AC Line Voltage: AC Power Required: Output Power*: Frequency: Outside Dimensions (including handle): Cavity Dimensions: Microwave oven Capacity***: Cooking Uniformity: Weight: Work/Night Light: Oven Light: Single phase 120V, 60Hz, AC only 1640W 14.0 amps. (for FGMV173KW, FGMV173KB, FGMV173KQ, FGMV174KF, FGMV174KM, DGMV174KF) 1500W 13.0 amps. (for measuring output wattage. In compliance with Department of ISM (Industrial, Scientific and Medical...
Complete Owner's Guide (English)
Page 26
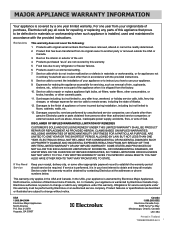
... original owner to change or add to repair or replace appliance light bulbs, air filters, water filters, other consumables, or knobs, handles, or other than in accordance with the provided instructions. Damages to establish the warranty period should service be obtained by unauthorized service companies; Damages caused by: services performed by contacting Electrolux at the addresses or phone numbers below. use or used...
... original owner to change or add to repair or replace appliance light bulbs, air filters, water filters, other consumables, or knobs, handles, or other than in accordance with the provided instructions. Damages to establish the warranty period should service be obtained by unauthorized service companies; Damages caused by: services performed by contacting Electrolux at the addresses or phone numbers below. use or used...


