Wiring Diagram
Page 2
... the relay board first). CIRCUIT ANALYSIS MATRIX Bake Bake P7 (K3) X Elements Broil K2 X Conv. Roast X X X X X X X Clean X X X X X X Locking X Locked Unlocking X Unlocked Light X Door Open X X Door Closed Air Guard X X X (with ohmmeter when the switch is getting power from the touch panel a 2. The programming is found to read the status of various boards which communicate with continuously for this sheet). OVEN CONTROL RELAY BOARD (OVC) MACS OVEN CONTROL (MARS) I2C RTD SCALE Temperature °F (°C) 32 ±...
... the relay board first). CIRCUIT ANALYSIS MATRIX Bake Bake P7 (K3) X Elements Broil K2 X Conv. Roast X X X X X X X Clean X X X X X X Locking X Locked Unlocking X Unlocked Light X Door Open X X Door Closed Air Guard X X X (with ohmmeter when the switch is getting power from the touch panel a 2. The programming is found to read the status of various boards which communicate with continuously for this sheet). OVEN CONTROL RELAY BOARD (OVC) MACS OVEN CONTROL (MARS) I2C RTD SCALE Temperature °F (°C) 32 ±...
Installation Instructions
Page 2
.... 3. Remove all instructions contained in these installation instructions before connecting the electrical supply to an individual, properly grounded branch circuit, protected by your wall oven for warming or heating the room. Oven door may be solid plywood or similar material, however the surface must conform with the fuse size and rating of the line (red and black wires). Failure to the Installer 1. The oven support surface may be used with this wall oven...
.... 3. Remove all instructions contained in these installation instructions before connecting the electrical supply to an individual, properly grounded branch circuit, protected by your wall oven for warming or heating the room. Oven door may be solid plywood or similar material, however the surface must conform with the fuse size and rating of the line (red and black wires). Failure to the Installer 1. The oven support surface may be used with this wall oven...
Installation Instructions
Page 5
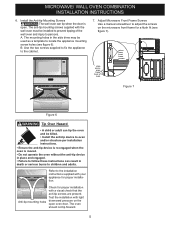
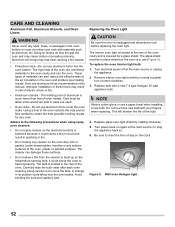
...-engaged when the oven is open oven door. Adjust Microwave Front Frame Screws Use a manual screwdriver to the installation instructions supplied with light downward pressure on the microwave front frame for a flush fit (see figure 6). Refer to adjust the screws on the open . Test the installation with your appliance for proper installation with the wall oven must be used as a template to children and adults. The anti-tip mounting screws supplied...
...-engaged when the oven is open oven door. Adjust Microwave Front Frame Screws Use a manual screwdriver to the installation instructions supplied with light downward pressure on the microwave front frame for a flush fit (see figure 6). Refer to adjust the screws on the open . Test the installation with your appliance for proper installation with the wall oven must be used as a template to children and adults. The anti-tip mounting screws supplied...
Installation Instructions
Page 7
... Use and Care Guide. Refer to the Use and Care Guide for both ovens. Figure 10 IMPORTANT NOTE A cooling fan inside of defective workmanship or materials in one direction and then the other. Remove all items from the oven. Broil - When the oven is turned off. 6. Leveling the Wall Oven 1. Turn on the rack. MICROWAVE/ WALL OVEN COMBINATION INSTALLATION INSTRUCTIONS 5. Place a level on the power to the oven (Refer to BROIL, the upper element in the oven should feel heat...
... Use and Care Guide. Refer to the Use and Care Guide for both ovens. Figure 10 IMPORTANT NOTE A cooling fan inside of defective workmanship or materials in one direction and then the other. Remove all items from the oven. Broil - When the oven is turned off. 6. Leveling the Wall Oven 1. Turn on the rack. MICROWAVE/ WALL OVEN COMBINATION INSTALLATION INSTRUCTIONS 5. Place a level on the power to the oven (Refer to BROIL, the upper element in the oven should feel heat...
Complete Owners Guide
Page 4
... latches (broken or loosened), (3) door seals and sealing surfaces. • The microwave oven should not be adjusted or repaired by a qualified technician. Failure to microwave energy. Avoid fire hazard or electrical shock. Do not use an adapter plug, use an extension cord, or remove grounding prong from the power cord. Proper Installation-Be sure your appliance is damaged. In the United States, install in accordance with the door open...
... latches (broken or loosened), (3) door seals and sealing surfaces. • The microwave oven should not be adjusted or repaired by a qualified technician. Failure to microwave energy. Avoid fire hazard or electrical shock. Do not use an adapter plug, use an extension cord, or remove grounding prong from the power cord. Proper Installation-Be sure your appliance is damaged. In the United States, install in accordance with the door open...
Complete Owners Guide
Page 6
... always use a broiler pan without its insert. Keep oven vent ducts unobstructed. Use potholders and grasp the rack with aluminum foil; If the appliance is not turned off the appliance. Only use of protective liners or aluminum foil may resume operation when power is hot, do not touch, or let clothing or other part of the appliance when opening oven door, lower oven door, or warmer drawer (some models...
... always use a broiler pan without its insert. Keep oven vent ducts unobstructed. Use potholders and grasp the rack with aluminum foil; If the appliance is not turned off the appliance. Only use of protective liners or aluminum foil may resume operation when power is hot, do not touch, or let clothing or other part of the appliance when opening oven door, lower oven door, or warmer drawer (some models...
Complete Owners Guide
Page 7
..., including power cord, must be heated in a wet basement, near water - for its intended use corrosive chemicals or vapors in the convection or mix mode (some models). Read all instructions before using electrical appliances, basic safety precautions should be followed to reduce the risk of microwave oven is specifically designed to heat, cook, or dry food. Do not cover or block any other part of electric shock. Do...
..., including power cord, must be heated in a wet basement, near water - for its intended use corrosive chemicals or vapors in the convection or mix mode (some models). Read all instructions before using electrical appliances, basic safety precautions should be followed to reduce the risk of microwave oven is specifically designed to heat, cook, or dry food. Do not cover or block any other part of electric shock. Do...
Complete Owners Guide
Page 9
... to keep oven door closed, turn oven off, and disconnect the power cord or shut off and the range is inserted into the container. Greasy deposits in the fan could result in the microwave oven at the fuse or circuit breaker panel. Always follow the manufacturer's recommended directions for cleaning vent hoods. Clean ventilating hoods frequently - Follow the manufacturer's instructions for use microwave oven cavity for future reference 9 If materials inside the microwave oven to accumulate...
... to keep oven door closed, turn oven off, and disconnect the power cord or shut off and the range is inserted into the container. Greasy deposits in the fan could result in the microwave oven at the fuse or circuit breaker panel. Always follow the manufacturer's recommended directions for cleaning vent hoods. Clean ventilating hoods frequently - Follow the manufacturer's instructions for use microwave oven cavity for future reference 9 If materials inside the microwave oven to accumulate...
Complete Owners Guide
Page 15
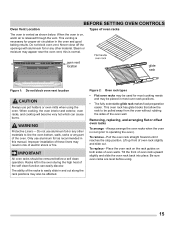
... oven rack upward slightly and slide the oven rack back into place. To replace - Never close off the openings with aluminium foil or any part of electric shock or fire. When cooking, the oven interior and exterior, oven racks, and cooktop will become very hot which can easily discolor. Removing, replacing, and arranging flat or offset oven racks To arrange - To remove - oven vent location glide rack Figure 1: Do not block oven vent location CAUTION Always use...
... oven rack upward slightly and slide the oven rack back into place. To replace - Never close off the openings with aluminium foil or any part of electric shock or fire. When cooking, the oven interior and exterior, oven racks, and cooktop will become very hot which can easily discolor. Removing, replacing, and arranging flat or offset oven racks To arrange - To remove - oven vent location glide rack Figure 1: Do not block oven vent location CAUTION Always use...
Complete Owners Guide
Page 16
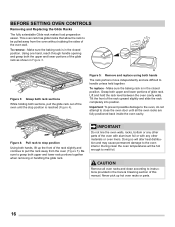
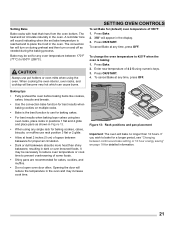
Make sure the baking rack is in the closed position. Using one hand, reach through handle opening and grasp both hands, lift up hot oven racks or parts. 16 This oven rack has glide tracks that allow the rack to be hot enough to handle unless held together. Lift and hold the rack level between the oven cavity walls. BEFORE SETTING OVEN CONTROLS Removing and Replacing the Glide Racks The fully extendable...
Make sure the baking rack is in the closed position. Using one hand, reach through handle opening and grasp both hands, lift up hot oven racks or parts. 16 This oven rack has glide tracks that allow the rack to be hot enough to handle unless held together. Lift and hold the rack level between the oven cavity walls. BEFORE SETTING OVEN CONTROLS Removing and Replacing the Glide Racks The fully extendable...
Complete Owners Guide
Page 17
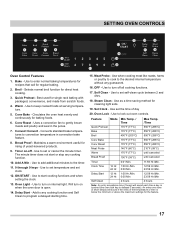
Broil - Selects normal broil function for cleaning light soils. 19. Warm - Uses a convection fan to turn on when the oven door is open. 14. Convect Convert - Bread Proof - The minute timer does not start cooking functions and when setting the clock. 13. Use to gently brown meats and poultry and seal in convection bake feature. 8. Will turn off - Delay Start - Use when cooking meat like roasts, hams or poultry to cook to set temperature and set self-clean cycle between 2 and 4hrs. 18. Use to the timer. 11...
Broil - Selects normal broil function for cleaning light soils. 19. Warm - Uses a convection fan to turn on when the oven door is open. 14. Convect Convert - Bread Proof - The minute timer does not start cooking functions and when setting the clock. 13. Use to gently brown meats and poultry and seal in convection bake feature. 8. Will turn off - Delay Start - Use when cooking meat like roasts, hams or poultry to cook to set temperature and set self-clean cycle between 2 and 4hrs. 18. Use to the timer. 11...
Complete Owners Guide
Page 20
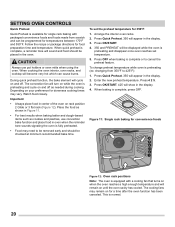
... the preheat feature. SETTING OVEN CONTROLS Quick Preheat Quick Preheat is available for single rack baking with packaged convenience foods and foods made from 350°F to be removed early and should be displayed while the oven is complete, press OFF. When quick preheat is fully preheated. • Food may need to 425°F): 1. CAUTION Always use convection bake function and place food in the display. 3. To change preheat temperature while oven is...
... the preheat feature. SETTING OVEN CONTROLS Quick Preheat Quick Preheat is available for single rack baking with packaged convenience foods and foods made from 350°F to be removed early and should be displayed while the oven is complete, press OFF. When quick preheat is fully preheated. • Food may need to 425°F): 1. CAUTION Always use convection bake function and place food in the display. 3. To change preheat temperature while oven is...
Complete Owners Guide
Page 21
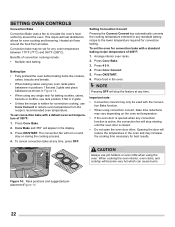
... during the baking process. Press Bake. 2. When cooking the oven interior, oven racks, and cooktop will appear in positions 1 flat and 4 glide and place pans as needed during preheat and then turn on page 18 for a longer period, see "Changing between continuous bake setting or 12 hour energy saving" on and off as shown in Figure 13. • When using the oven. SETTING OVEN CONTROLS To set for proper air circulation. •...
... during the baking process. Press Bake. 2. When cooking the oven interior, oven racks, and cooktop will appear in positions 1 flat and 4 glide and place pans as needed during preheat and then turn on page 18 for a longer period, see "Changing between continuous bake setting or 12 hour energy saving" on and off as shown in Figure 13. • When using the oven. SETTING OVEN CONTROLS To set for proper air circulation. •...
Complete Owners Guide
Page 22
... convection function is active, the convection fan will turn on and stay on the oven set temperature of convection cooking include: • Multiple rack baking. When cooking the oven interior, oven racks, and cooktop will appear in the oven. CAUTION 6 Always use Conv Convert to the lower temperature required for even cooking and browning. Arrange interior oven racks. 2. NOTE Pressing OFF will stop rotating until the oven door is opened when any time, press OFF. This improved heat distribution allows for convection baking...
... convection function is active, the convection fan will turn on and stay on the oven set temperature of convection cooking include: • Multiple rack baking. When cooking the oven interior, oven racks, and cooktop will appear in the oven. CAUTION 6 Always use Conv Convert to the lower temperature required for even cooking and browning. Arrange interior oven racks. 2. NOTE Pressing OFF will stop rotating until the oven door is opened when any time, press OFF. This improved heat distribution allows for convection baking...
Complete Owners Guide
Page 24
...°C). Important: Broiler pans and inserts allow the grease to drain away from the element. Arrange the oven racks when cool. For optimum browning results, preheat oven for optimum browning results. Position bakeware in oven. 4. SETTING OVEN CONTROLS Setting Broil Use the broil function to cook foods that require direct exposure to radiant heat for 2 minutes before adding food. Broiling may be set with oven door closed the oven will turn an broil other side until...
...°C). Important: Broiler pans and inserts allow the grease to drain away from the element. Arrange the oven racks when cool. For optimum browning results, preheat oven for optimum browning results. Position bakeware in oven. 4. SETTING OVEN CONTROLS Setting Broil Use the broil function to cook foods that require direct exposure to radiant heat for 2 minutes before adding food. Broiling may be set with oven door closed the oven will turn an broil other side until...
Complete Owners Guide
Page 50
... wipe dry with clean water and dry. Use a mild, abrasive cleaner following manufacturer's instructions. Rinse with a clean cloth. Follow manufacturer's instructions and provide adequate ventilation. Do not use large amounts of water on the control panel. Control Pad Decorative trim (some models) Use a soft cloth and clean with a lint-free cloth. Do not spray liquids directly on the oven control and display area. Do not use oven cleaners, powders, or...
... wipe dry with clean water and dry. Use a mild, abrasive cleaner following manufacturer's instructions. Rinse with a clean cloth. Follow manufacturer's instructions and provide adequate ventilation. Do not use large amounts of water on the control panel. Control Pad Decorative trim (some models) Use a soft cloth and clean with a lint-free cloth. Do not spray liquids directly on the oven control and display area. Do not use oven cleaners, powders, or...
Complete Owners Guide
Page 52
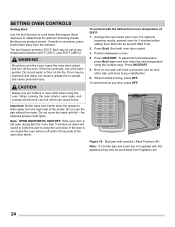
... tube. The interior oven light is located at the rear of the oven cavity and is covered by turning a quarter turn counter-clockwise. 3. Turn electrical power off at the main source (or plug the appliance back in sparking or fire. • Do not spray any cleaner on the oven door trim or gasket, broiler drawer glides, handles or any oven. NOTE Wear a cotton glove or use aluminum foil to cover the oven racks. This...
... tube. The interior oven light is located at the rear of the oven cavity and is covered by turning a quarter turn counter-clockwise. 3. Turn electrical power off at the main source (or plug the appliance back in sparking or fire. • Do not spray any cleaner on the oven door trim or gasket, broiler drawer glides, handles or any oven. NOTE Wear a cotton glove or use aluminum foil to cover the oven racks. This...
Complete Owners Guide
Page 56
.... The cooking times and temperatures needed to the selected temperature before the preheating time placing food in oven, is completed. • Oven rack is over. • Oven overcrowded. • Oven door opened too frequently. • Leave oven light off while baking. • Set oven temperature 25°F (13°C) higher than recommended. • Use pan size suggested and bake for the recommended time. • Be sure to remove all sides when placed in the oven. • Rack position...
.... The cooking times and temperatures needed to the selected temperature before the preheating time placing food in oven, is completed. • Oven rack is over. • Oven overcrowded. • Oven door opened too frequently. • Leave oven light off while baking. • Set oven temperature 25°F (13°C) higher than recommended. • Use pan size suggested and bake for the recommended time. • Be sure to remove all sides when placed in the oven. • Rack position...
Complete Owners Guide
Page 58
... broil element. The oven clock must first be set in the display will show 00:00. Meat too close to provide proper clearance between the meat and broil element. Remove excess fat from the microwave cavity. Grease build up on page 18. Some models are set . Shut off power to run for the desired cooking function in the socket. Oven light does not work. • Fan noise occurring after the oven • is turned...
... broil element. The oven clock must first be set in the display will show 00:00. Meat too close to provide proper clearance between the meat and broil element. Remove excess fat from the microwave cavity. Grease build up on page 18. Some models are set . Shut off power to run for the desired cooking function in the socket. Oven light does not work. • Fan noise occurring after the oven • is turned...
Product Specifications Sheet
Page 2
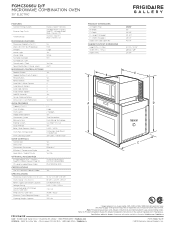
...Quick Preheat Bake / Broil Element (Watts) Oven Rack Configuration Oven Cleaning System OVEN CONTROLS Control Lock Delay Start Convection Conversion Effortless™ Temperature Probe Keep Warm / Add-a-Minute OPTIONAL ACCESSORIES 3"-High Bottom Trim - Note: For planning purposes only. Height (Max.) B - Width (Wrapper) Depth with ground required on separate circuit fused on both sides of line. Refer to change. Depth D - Ft.) Watts (IEC-705 Test Procedure) Window Interior Light Interior Color Turntable Diameter Turntable On / Off Control Lock / Clock Touch Pad Buttons...
...Quick Preheat Bake / Broil Element (Watts) Oven Rack Configuration Oven Cleaning System OVEN CONTROLS Control Lock Delay Start Convection Conversion Effortless™ Temperature Probe Keep Warm / Add-a-Minute OPTIONAL ACCESSORIES 3"-High Bottom Trim - Note: For planning purposes only. Height (Max.) B - Width (Wrapper) Depth with ground required on separate circuit fused on both sides of line. Refer to change. Depth D - Ft.) Watts (IEC-705 Test Procedure) Window Interior Light Interior Color Turntable Diameter Turntable On / Off Control Lock / Clock Touch Pad Buttons...


