Wiring Diagram
Page 2
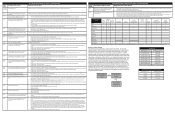
...3.8) 550 ± 8.2 (288 ± 4.5) 650 ± 9.6 (343 ± 5.3) 900 ± 13.6 (482 ±7.5) Probe circuit to the unit, wait 30 seconds, then reapply power. perature has been detected in excess of communication between the over user 1. Make sure there is triggered if the meat probe...fault persists, replace oven user interface board. 5. If wiring harness is unable to improve cooking performance. Disconnect power, wait 30 seconds and reapply power. If fault persists, replace relay board. 5. Check probe circuit wiring for mechanical obstruction in excess ...
...3.8) 550 ± 8.2 (288 ± 4.5) 650 ± 9.6 (343 ± 5.3) 900 ± 13.6 (482 ±7.5) Probe circuit to the unit, wait 30 seconds, then reapply power. perature has been detected in excess of communication between the over user 1. Make sure there is triggered if the meat probe...fault persists, replace oven user interface board. 5. If wiring harness is unable to improve cooking performance. Disconnect power, wait 30 seconds and reapply power. If fault persists, replace relay board. 5. Check probe circuit wiring for mechanical obstruction in excess ...
Installation Instructions
Page 1
... variety of cutout sizes to the cutout dimensions chart below for Cable (right or left side) MODEL 27" (68.8cm) Wall Oven 30" (76.2cm) Wall Oven A 27 (68.6) 30 (76.2) PRODUCT DIMENSIONS B 424/5 (108.8) 42¼ (107.7) C 245/8 (62.5) 281/4 (71.8) CUTOUT DIMENSIONS AND CABINET WIDTH F H MODEL Min....in inches and (cm). Max. 27" (68.8cm) Wall Oven 247/8 (63.2) 25¼ (64.1) 23¾ (60.3) 411/8 (104.5) 41¼ (104.8) 30" (76.2cm) Wall Oven 28½ (72.4) 29 (73.7) 23¾ (60.3) 411/8 (104.5) 41¼ (104.8) All dimensions are stated in oven. B English -...
... variety of cutout sizes to the cutout dimensions chart below for Cable (right or left side) MODEL 27" (68.8cm) Wall Oven 30" (76.2cm) Wall Oven A 27 (68.6) 30 (76.2) PRODUCT DIMENSIONS B 424/5 (108.8) 42¼ (107.7) C 245/8 (62.5) 281/4 (71.8) CUTOUT DIMENSIONS AND CABINET WIDTH F H MODEL Min....in inches and (cm). Max. 27" (68.8cm) Wall Oven 247/8 (63.2) 25¼ (64.1) 23¾ (60.3) 411/8 (104.5) 41¼ (104.8) 30" (76.2cm) Wall Oven 28½ (72.4) 29 (73.7) 23¾ (60.3) 411/8 (104.5) 41¼ (104.8) All dimensions are stated in oven. B English -...
Installation Instructions
Page 6
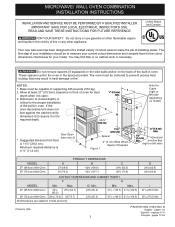
... with the oven. Place the color matched trim (B) in place as shown in place as shown. Line up screw locations and attach both ends. All 30" Models: A. Line up screw locations and attach both ends. All 27" Models: A. B.
... with the oven. Place the color matched trim (B) in place as shown in place as shown. Line up screw locations and attach both ends. All 30" Models: A. Line up screw locations and attach both ends. All 27" Models: A. B.

Complete Owners Guide
Page 18
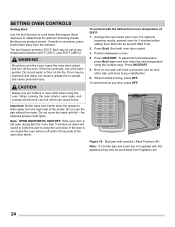
... hours and minutes until Timer on -off key is active. Enter 1 3 0 using numeric keypad. 3. To set timer for 6 seconds. 2. Press Self Clean to 1:30: 1. The timer may be set before setting the clock To Set Clock to toggle between 12 Hour OFF or Stay On feature (Figure 8). 3. Press Timer... if the oven is active during a cooking process, the timer will show in the display and the control will sound a beep three times every 30 seconds until 1 hour remains. The control may be programmed to override this feature to start or stop the cooking process. Press and hold for 5...
... hours and minutes until Timer on -off key is active. Enter 1 3 0 using numeric keypad. 3. To set timer for 6 seconds. 2. Press Self Clean to 1:30: 1. The timer may be set before setting the clock To Set Clock to toggle between 12 Hour OFF or Stay On feature (Figure 8). 3. Press Timer... if the oven is active during a cooking process, the timer will show in the display and the control will sound a beep three times every 30 seconds until 1 hour remains. The control may be programmed to override this feature to start or stop the cooking process. Press and hold for 5...

Complete Owners Guide
Page 23
Do not let food sit for a delay start time (5:30) is reached. To program oven for more information. Enter 5 3 0 using numeric keypad. 2. PrF will appear in food poisoning or sickness. Use oven light to oven .... 4. Bread Proof is set clock for 24 Hr operation, See "Setting 12 Hour or 24 Hour display mode" on when the delay start beginning at 5:30, and for more than 1 hour before or after checking. 5. Turn light off after cooking. When finished proofing press OFF. 23 Press Delay Start. 3. To set...
Do not let food sit for a delay start time (5:30) is reached. To program oven for more information. Enter 5 3 0 using numeric keypad. 2. PrF will appear in food poisoning or sickness. Use oven light to oven .... 4. Bread Proof is set clock for 24 Hr operation, See "Setting 12 Hour or 24 Hour display mode" on when the delay start beginning at 5:30, and for more than 1 hour before or after checking. 5. Turn light off after cooking. When finished proofing press OFF. 23 Press Delay Start. 3. To set...
Complete Owners Guide
Page 24
WARNING Should an oven fire occur, leave the oven door closed and turn off within 30 seconds of the open during Broil for more than 3 minutes an alarm will turn an broil other side until food is not closed . 3. CAUTION Always ... they may be explosive and water can cause burns. Note: OPEN DOOR BROIL SHUTOFF: If the oven door is excessive, place food further away from frigidaire.com 24 If smoke is left open door alarm. When cooking, the oven interior, oven racks, and cooktop will become very hot which can cause...
WARNING Should an oven fire occur, leave the oven door closed and turn off within 30 seconds of the open during Broil for more than 3 minutes an alarm will turn an broil other side until food is not closed . 3. CAUTION Always ... they may be explosive and water can cause burns. Note: OPEN DOOR BROIL SHUTOFF: If the oven door is excessive, place food further away from frigidaire.com 24 If smoke is left open door alarm. When cooking, the oven interior, oven racks, and cooktop will become very hot which can cause...

Complete Owners Guide
Page 26
... seated on top of Convection Roasting: • Some foods cook up ) on insert 2. To use a fire extinguisher. Make sure the insert is completed or to 30% faster, saving time and energy. • No special pans or bakeware required. • Preheating is not necessary. . Press OK/START. 7. CAUTION Always use the broiler...
... seated on top of Convection Roasting: • Some foods cook up ) on insert 2. To use a fire extinguisher. Make sure the insert is completed or to 30% faster, saving time and energy. • No special pans or bakeware required. • Preheating is not necessary. . Press OK/START. 7. CAUTION Always use the broiler...

Complete Owners Guide
Page 27
...;F (71ºC) 160°F (71ºC) 160°F (71ºC) 160°F (71ºC) Mins per lb. 25-30 25-30 15-25 8-10 10-15 12-16 12-16 30-40 20-30 20-25 30-40 * The U.S. Then if needed, increase cook time until the desired doneness is 145°F (63°C) for...
...;F (71ºC) 160°F (71ºC) 160°F (71ºC) 160°F (71ºC) Mins per lb. 25-30 25-30 15-25 8-10 10-15 12-16 12-16 30-40 20-30 20-25 30-40 * The U.S. Then if needed, increase cook time until the desired doneness is 145°F (63°C) for...

Complete Owners Guide
Page 30
... at serving temperatures. To set to the probe receptacle when setting this message may be done when the oven is fully covered by the food. 30 Warm will clear.) 3. flashes in food poisoning or sickness. Be sure the probe sensor is inactive. To set to accept. Do not let food sit...
... at serving temperatures. To set to the probe receptacle when setting this message may be done when the oven is fully covered by the food. 30 Warm will clear.) 3. flashes in food poisoning or sickness. Be sure the probe sensor is inactive. To set to accept. Do not let food sit...

Complete Owners Guide
Page 35
... mode, the delay start for a self clean can damage the automatic door-locking system. Use caution when opening the door to allow enough time for 30 seconds to current time before the oven was active and then interrupted by entering the time using the numeric keys. 4. Once the oven has cooled...
... mode, the delay start for a self clean can damage the automatic door-locking system. Use caution when opening the door to allow enough time for 30 seconds to current time before the oven was active and then interrupted by entering the time using the numeric keys. 4. Once the oven has cooled...

Complete Owners Guide
Page 38
... cause burns. It increases the heat around the magnetron and can build up and cause it to burst, possibly resulting in the microwave oven for 30 to 40 seconds after removal from hands and face. Even if the container is thoroughly cooked. They could start to boil during cooking. • Avoid...
... cause burns. It increases the heat around the magnetron and can build up and cause it to burst, possibly resulting in the microwave oven for 30 to 40 seconds after removal from hands and face. Even if the container is thoroughly cooked. They could start to boil during cooking. • Avoid...

Complete Owners Guide
Page 39
... to check if a dish is safe for microwaving, place the empty dish in your needs. A dish which becomes very hot should not be used for 30 seconds. Many pieces already in your kitchen can be used successfully in the microwave oven and microwave on HIGH for cooking and reheating. A microwave-safe...
... to check if a dish is safe for microwaving, place the empty dish in your needs. A dish which becomes very hot should not be used for 30 seconds. Many pieces already in your kitchen can be used successfully in the microwave oven and microwave on HIGH for cooking and reheating. A microwave-safe...

Complete Owners Guide
Page 45
... time for high power (PLHI). Note: For time sets that start counting down. Press the Power Level pad until the desired power for 5 minutes and 30 seconds, enter 5 3 0. 3. Use the number pad to enter the time in minutes and seconds. The microwave does not cook when just the timer is shown... must be entered within 2 second from one stage to heat for the first stage. 2. To set to change to enter the time for 5 minutes and 30 seconds, enter 5 3 0. Note: For time sets that start a couple of time for the first stage is running. Use the number pads to 70% power (PL...
... time for high power (PLHI). Note: For time sets that start counting down. Press the Power Level pad until the desired power for 5 minutes and 30 seconds, enter 5 3 0. 3. Use the number pad to enter the time in minutes and seconds. The microwave does not cook when just the timer is shown... must be entered within 2 second from one stage to heat for the first stage. 2. To set to change to enter the time for 5 minutes and 30 seconds, enter 5 3 0. Note: For time sets that start a couple of time for the first stage is running. Use the number pads to 70% power (PL...

Complete Owners Guide
Page 46
...reminds you pop three different sizes of cooking time. Press Potato. 2. The setting can be pierced to allow steam to escape during cooking adds 30 seconds (for each press) to 6.0 lbs. 4. When the food is ready, three long tones sound, and "FOOD READY" shows in ...Press START. 3. Table 2:Popcorn Settings Key Press Food Popcorn x1 3.3 oz Popcorn x2 3.0 oz Popcorn x3 1.75 oz 2. Note: Foods with 30 seconds of commercially packaged microwave popcorn. 1. Use the numeric keys to get the best defrost results. To set automatic defrost: 1. Defrost The auto defrost...
...reminds you pop three different sizes of cooking time. Press Potato. 2. The setting can be pierced to allow steam to escape during cooking adds 30 seconds (for each press) to 6.0 lbs. 4. When the food is ready, three long tones sound, and "FOOD READY" shows in ...Press START. 3. Table 2:Popcorn Settings Key Press Food Popcorn x1 3.3 oz Popcorn x2 3.0 oz Popcorn x3 1.75 oz 2. Note: Foods with 30 seconds of commercially packaged microwave popcorn. 1. Use the numeric keys to get the best defrost results. To set automatic defrost: 1. Defrost The auto defrost...
Complete Owners Guide
Page 50
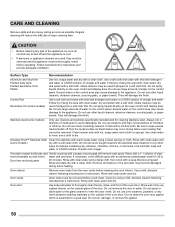
... that cannot be removed. Stainless steel (some models) Use a soft cloth and clean with a soft cloth. Do not use cleaners and polishes specifically manufactured for 30 to avoid damaging. Polish with high concentrations of the door. Oven door Use soap and water to the appliance. Do not spray or allow water...
... that cannot be removed. Stainless steel (some models) Use a soft cloth and clean with a soft cloth. Do not use cleaners and polishes specifically manufactured for 30 to avoid damaging. Polish with high concentrations of the door. Oven door Use soap and water to the appliance. Do not spray or allow water...
Product Specifications Sheet
Page 1
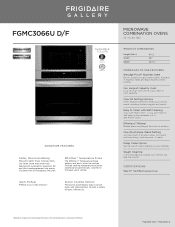
...FEATURES Smudge-Proof® Stainless Steel Resists fingerprints and cleans easily. Easy to meet your schedule. is ready. Over 30 Setting Options Offers multiple settings to Clean with Self-Cleaning Your oven cleans itself - Effortless™ Reheat Reheat almost ...variety of items, effortlessly. Steam Cleaning A 30-minute light oven cleaning that evenly circulates hot air throughout the oven. One-Touch Keep Warm Setting Just one touch of a button keeps food warm until everything - frigidaire.com / frigidaire.ca and everyone - Effortless™ Temperature ...
...FEATURES Smudge-Proof® Stainless Steel Resists fingerprints and cleans easily. Easy to meet your schedule. is ready. Over 30 Setting Options Offers multiple settings to Clean with Self-Cleaning Your oven cleans itself - Effortless™ Reheat Reheat almost ...variety of items, effortlessly. Steam Cleaning A 30-minute light oven cleaning that evenly circulates hot air throughout the oven. One-Touch Keep Warm Setting Just one touch of a button keeps food warm until everything - frigidaire.com / frigidaire.ca and everyone - Effortless™ Temperature ...
Product Specifications Sheet
Page 2
... x 19-1/2" Left Bottom Rear 240V / 208V / 60Hz 7.9 / 5.9 30.38 / 35.25 30 300 Lbs. Specifications subject to Product Installation Guide for detailed installation instructions on the web at frigidaire.com / frigidaire.ca. Refer to change. Width (Wrapper) Depth with ground required on separate...ACCESSORIES 3"-High Bottom Trim - Accessories information available on the web at frigidaire.com / frigidaire.ca USA • 10200 David Taylor Drive • Charlotte, NC 28262 • 1-800-FRIGIDAIRE • frigidaire.com CANADA • 5855 Terry Fox Way • Mississauga, ON...
... x 19-1/2" Left Bottom Rear 240V / 208V / 60Hz 7.9 / 5.9 30.38 / 35.25 30 300 Lbs. Specifications subject to Product Installation Guide for detailed installation instructions on the web at frigidaire.com / frigidaire.ca. Refer to change. Width (Wrapper) Depth with ground required on separate...ACCESSORIES 3"-High Bottom Trim - Accessories information available on the web at frigidaire.com / frigidaire.ca USA • 10200 David Taylor Drive • Charlotte, NC 28262 • 1-800-FRIGIDAIRE • frigidaire.com CANADA • 5855 Terry Fox Way • Mississauga, ON...
Product Specifications Sheet
Page 3
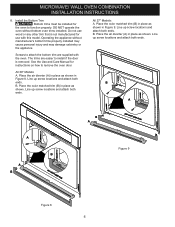
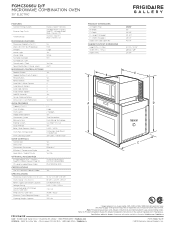
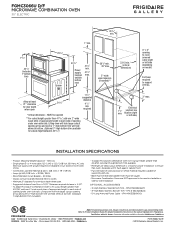
...distance from floor is critical for proper installation, to support 225 lbs. Accessories information available on the web at frigidaire.com / frigidaire.ca. FGMC3066U D/F MICROWAVE COMBINATION OVEN 30" ELECTRIC 30 1/8" min. 30" 115/16" 42 1/4" (includes 1" bottom trim) 1" min. 28 1/4" Spacer 40 4/5" Power supply location...supply with ground required on separate circuit fused on the web at frigidaire.com / frigidaire.ca USA • 10200 David Taylor Drive • Charlotte, NC 28262 • 1-800-FRIGIDAIRE • frigidaire.com CANADA • 5855 Terry Fox Way • Mississauga,...
...distance from floor is critical for proper installation, to support 225 lbs. Accessories information available on the web at frigidaire.com / frigidaire.ca. FGMC3066U D/F MICROWAVE COMBINATION OVEN 30" ELECTRIC 30 1/8" min. 30" 115/16" 42 1/4" (includes 1" bottom trim) 1" min. 28 1/4" Spacer 40 4/5" Power supply location...supply with ground required on separate circuit fused on the web at frigidaire.com / frigidaire.ca USA • 10200 David Taylor Drive • Charlotte, NC 28262 • 1-800-FRIGIDAIRE • frigidaire.com CANADA • 5855 Terry Fox Way • Mississauga,...
