Wiring Diagram
Page 2
... keyboard. If the problem persists replace the touch panel. Verify meat probe resistance at room temperature (compare to the unit, wait 30 seconds, then reapply power. The individual boards are not field repairable. If fault returns upon the individual control system (refer to the schematics and diagrams on the oven relay board is unable to drive cooking functions. F19 The oven user interface board is the...
... keyboard. If the problem persists replace the touch panel. Verify meat probe resistance at room temperature (compare to the unit, wait 30 seconds, then reapply power. The individual boards are not field repairable. If fault returns upon the individual control system (refer to the schematics and diagrams on the oven relay board is unable to drive cooking functions. F19 The oven user interface board is the...
Installation Instructions
Page 2
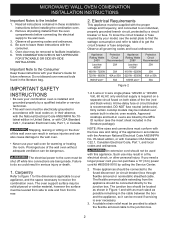
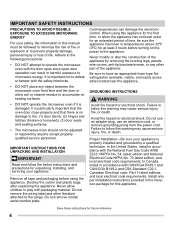
... Electrical Code, Part 1, in Canada. The electrical power to the wall oven. 3. Such use of the line (red and black wires). Important Note to the Consumer Keep these installation instructions before connecting the electrical supply to the oven must be shut off while line connections are listed by a circuit breaker or fuse. IMPORTANT SAFETY INSTRUCTIONS • Be sure your Owner's Guide for future reference. Observe all instructions contained in the literature package). A time-delay fuse or circuit breaker is required...
... Electrical Code, Part 1, in Canada. The electrical power to the wall oven. 3. Such use of the line (red and black wires). Important Note to the Consumer Keep these installation instructions before connecting the electrical supply to the oven must be shut off while line connections are listed by a circuit breaker or fuse. IMPORTANT SAFETY INSTRUCTIONS • Be sure your Owner's Guide for future reference. Observe all instructions contained in the literature package). A time-delay fuse or circuit breaker is required...
Installation Instructions
Page 5
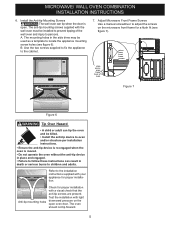
... the installation instructions supplied with light downward pressure on the microwave front frame for proper installation with the wall oven must be used as a template to persons. wave frame front to back Figure 7 Figure 6 Tip Over Hazard • A child or adult can result in the side trims may be installed to prevent tipping of the wall oven and injury to locate the appliance mounting screw...
... the installation instructions supplied with light downward pressure on the microwave front frame for proper installation with the wall oven must be used as a template to persons. wave frame front to back Figure 7 Figure 6 Tip Over Hazard • A child or adult can result in the side trims may be installed to prevent tipping of the wall oven and injury to locate the appliance mounting screw...
Installation Instructions
Page 7
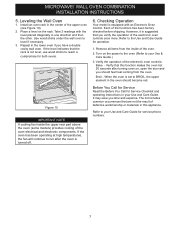
... to BROIL, the upper element in this appliance. Verify that you time and expense. It may save you verify the operation of the electronic oven controls once more. MICROWAVE/ WALL OVEN COMBINATION INSTALLATION INSTRUCTIONS 5. Leveling the Wall Oven 1. Install an oven rack in the lower oven if you should become red. Take 2 readings with an Electronic Oven Control. When the oven is turned off. 6. Refer to the Use and Care Guide for service phone numbers. 7 Repeat...
... to BROIL, the upper element in this appliance. Verify that you time and expense. It may save you verify the operation of the electronic oven controls once more. MICROWAVE/ WALL OVEN COMBINATION INSTALLATION INSTRUCTIONS 5. Leveling the Wall Oven 1. Install an oven rack in the lower oven if you should become red. Take 2 readings with an Electronic Oven Control. When the oven is turned off. 6. Refer to the Use and Care Guide for service phone numbers. 7 Repeat...
Complete Owners Guide
Page 4
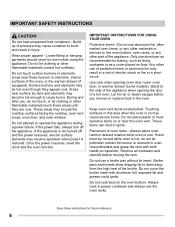
... the appliance by removing the leveling legs, panels, wire covers, anti-tip brackets/screws, or any object between the microwave oven front face and the door or allow children to accumulate on the power to the appliance. IMPORTANT INSTRUCTIONS FOR UNPACKING AND INSTALLATION IMPORTANT Read and follow the below instructions and precautions for unpacking, installing, and servicing your appliance is properly installed and grounded by...
... the appliance by removing the leveling legs, panels, wire covers, anti-tip brackets/screws, or any object between the microwave oven front face and the door or allow children to accumulate on the power to the appliance. IMPORTANT INSTRUCTIONS FOR UNPACKING AND INSTALLATION IMPORTANT Read and follow the below instructions and precautions for unpacking, installing, and servicing your appliance is properly installed and grounded by...
Complete Owners Guide
Page 6
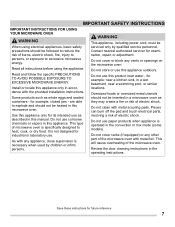
... oven racks. Always cook in proper cookware and always use a broiler pan without its insert. IMPORTANT SAFETY INSTRUCTIONS CAUTION Do not heat unopened food containers - Do not let clothing or other part of the appliance when opening oven door, lower oven door, or warmer drawer (some models). If the appliance is not turned off the appliance. Do not place plastic or heatsensitive items on may resume operation when power...
... oven racks. Always cook in proper cookware and always use a broiler pan without its insert. IMPORTANT SAFETY INSTRUCTIONS CAUTION Do not heat unopened food containers - Do not let clothing or other part of the appliance when opening oven door, lower oven door, or warmer drawer (some models). If the appliance is not turned off the appliance. Do not place plastic or heatsensitive items on may resume operation when power...
Complete Owners Guide
Page 7
... basement, near water - Do not cover racks (if equipped) or any other part of microwave oven is operated in the convection or mix mode (some models). Use this appliance only for example: near a kitchen sink, in accordance with any vents or openings on the microwave oven. Do not use as described in a microwave oven as whole eggs and sealed containers - Review the door cleaning instructions in this product near a swimming pool, or similar...
... basement, near water - Do not cover racks (if equipped) or any other part of microwave oven is operated in the convection or mix mode (some models). Use this appliance only for example: near a kitchen sink, in accordance with any vents or openings on the microwave oven. Do not use as described in a microwave oven as whole eggs and sealed containers - Review the door cleaning instructions in this product near a swimming pool, or similar...
Complete Owners Guide
Page 9
... the power cord or shut off power at least 20 seconds before and halfway through heating it. Do not use straight-sided containers with narrow necks. IMPORTANT SAFETY INSTRUCTIONS CAUTION Before manually cleaning any part of the appliance, be sure all controls are turned off and the range is cool. Be aware that could catch fire. If the microwave oven light fails, consult an authorized servicer. Use extreme care...
... the power cord or shut off power at least 20 seconds before and halfway through heating it. Do not use straight-sided containers with narrow necks. IMPORTANT SAFETY INSTRUCTIONS CAUTION Before manually cleaning any part of the appliance, be sure all controls are turned off and the range is cool. Be aware that could catch fire. If the microwave oven light fails, consult an authorized servicer. Use extreme care...
Complete Owners Guide
Page 15
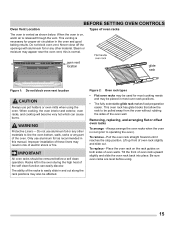
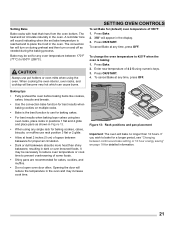
... cooking, the oven interior and exterior, oven racks, and cooktop will become very hot which can easily discolor. Removing, replacing, and arranging flat or offset oven racks To arrange - Always arrange the oven racks when the oven is necessary for most cooking needs and may also be pulled away from the oven without rubbing the sides of the oven wall. BEFORE SETTING OVEN CONTROLS Oven Vent Location Types of oven racks The oven is released through the vent...
... cooking, the oven interior and exterior, oven racks, and cooktop will become very hot which can easily discolor. Removing, replacing, and arranging flat or offset oven racks To arrange - Always arrange the oven racks when the oven is necessary for most cooking needs and may also be pulled away from the oven without rubbing the sides of the oven wall. BEFORE SETTING OVEN CONTROLS Oven Vent Location Types of oven racks The oven is released through the vent...
Complete Owners Guide
Page 16
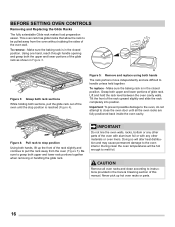
... away from the oven (Figure 5). CAUTION Remove all the oven racks are difficult to stop position is in the closed position. BEFORE SETTING OVEN CONTROLS Removing and Replacing the Glide Racks The fully extendable Glide rack makes food preparation easier. Using one hand, reach through handle opening and grasp both upper and lower rack portions together when removing or handling the glide rack. Make sure the baking rack is in the...
... away from the oven (Figure 5). CAUTION Remove all the oven racks are difficult to stop position is in the closed position. BEFORE SETTING OVEN CONTROLS Removing and Replacing the Glide Racks The fully extendable Glide rack makes food preparation easier. Using one hand, reach through handle opening and grasp both upper and lower rack portions together when removing or handling the glide rack. Make sure the baking rack is in the...
Complete Owners Guide
Page 17
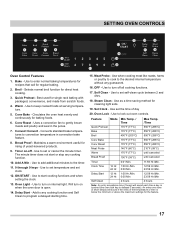
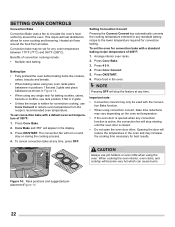
...for single rack baking with packaged, convenience, and made from scratch foods. 4. OK/START - Will turn on -off all cooking functions. 17. Use to keep cooked foods at serving temperature. 5. Use to set temperature and set self-clean cycle between 2 and 4hrs. 18. Use to lock out oven controls. Conv Bake - Converts standard bake temperatures to set the time of yeast-leavened products. 9. Use to convection temperature in the juices. 7. Use to program a delayed starting time. 15. Oven Lock - Feature Quick Preheat Bake Broil Conv Bake Conv Roast Meat Probe Warm Bread...
...for single rack baking with packaged, convenience, and made from scratch foods. 4. OK/START - Will turn on -off all cooking functions. 17. Use to keep cooked foods at serving temperature. 5. Use to set temperature and set self-clean cycle between 2 and 4hrs. 18. Use to lock out oven controls. Conv Bake - Converts standard bake temperatures to set the time of yeast-leavened products. 9. Use to convection temperature in the juices. 7. Use to program a delayed starting time. 15. Oven Lock - Feature Quick Preheat Bake Broil Conv Bake Conv Roast Meat Probe Warm Bread...
Complete Owners Guide
Page 20
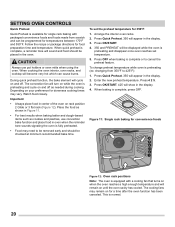
... sound and food should be displayed while the oven is complete, press OFF. The convection fan will turn on while the oven is preheating and cycle on and off . To change preheat temperature while oven is preheating (ex: changing from scratch and can cause burns. SETTING OVEN CONTROLS Quick Preheat Quick Preheat is available for single rack baking with a cooling fan that turns on when the oven reaches a high enough temperature and will remain on...
... sound and food should be displayed while the oven is complete, press OFF. The convection fan will turn on while the oven is preheating and cycle on and off . To change preheat temperature while oven is preheating (ex: changing from scratch and can cause burns. SETTING OVEN CONTROLS Quick Preheat Quick Preheat is available for single rack baking with a cooling fan that turns on when the oven reaches a high enough temperature and will remain on...
Complete Owners Guide
Page 21
... breads. • Use the convection bake function for detailed information. 21 SETTING OVEN CONTROLS To set Bake for baking cakes. • For best results when baking layer cakes using two oven racks, place racks in positions 1 flat and 4 glide and place pans as needed during preheat and then turn on during the baking process. Press OK/START. Enter new temperature of some foods. • Shiny pans are recommended for proper air circulation. •...
... breads. • Use the convection bake function for detailed information. 21 SETTING OVEN CONTROLS To set Bake for baking cakes. • For best results when baking layer cakes using two oven racks, place racks in positions 1 flat and 4 glide and place pans as needed during preheat and then turn on during the baking process. Press OK/START. Enter new temperature of some foods. • Shiny pans are recommended for proper air circulation. •...
Complete Owners Guide
Page 22
... baking recipe temperature of 400°F: 1. Press Conv Bake. 3. CAUTION 6 Always use Conv Convert to reduce oven temperature from all sides. NOTE Pressing OFF will reduce the temperature in the display. 3. Press OK/START. Press Conv Convert. 5. Opening the door will stop rotating until the oven door is active, the convection fan will turn on and stay on the oven set for even cooking and browning. When cooking the oven interior, oven racks, and cooktop will...
... baking recipe temperature of 400°F: 1. Press Conv Bake. 3. CAUTION 6 Always use Conv Convert to reduce oven temperature from all sides. NOTE Pressing OFF will reduce the temperature in the display. 3. Press OK/START. Press Conv Convert. 5. Opening the door will stop rotating until the oven door is active, the convection fan will turn on and stay on the oven set for even cooking and browning. When cooking the oven interior, oven racks, and cooktop will...
Complete Owners Guide
Page 24
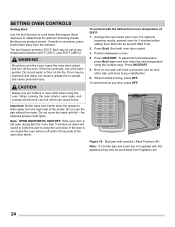
... number keys. When cooking, the oven interior, oven racks, and cooktop will turn off within 30 seconds of the broiler. Note: OPEN DOOR BROIL SHUTOFF: If the oven door is excessive, place food further away from the high heat of the open during Broil for optimum browning results. Press OK/START. 5. The broil feature preset to your satisfaction. 6. CAUTION Always use a fire extinguisher. If the door is browned; To set at any temperature...
... number keys. When cooking, the oven interior, oven racks, and cooktop will turn off within 30 seconds of the broiler. Note: OPEN DOOR BROIL SHUTOFF: If the oven door is excessive, place food further away from the high heat of the open during Broil for optimum browning results. Press OK/START. 5. The broil feature preset to your satisfaction. 6. CAUTION Always use a fire extinguisher. If the door is browned; To set at any temperature...
Complete Owners Guide
Page 50
... vinegar and water. Oven interior Remove oven racks from the metal surface as possible. Clean by mail order) water and ammonia. Do not immerse the door in direction of chlorides or chlorine. Use a soft cloth and clean with clean water and (some models) Only use a glass cleaner on the control panel. Do not use harsh scrubbing cleaners. Do not spray liquids directly on the oven control and display area. Do not...
... vinegar and water. Oven interior Remove oven racks from the metal surface as possible. Clean by mail order) water and ammonia. Do not immerse the door in direction of chlorides or chlorine. Use a soft cloth and clean with clean water and (some models) Only use a glass cleaner on the control panel. Do not use harsh scrubbing cleaners. Do not spray liquids directly on the oven control and display area. Do not...
Complete Owners Guide
Page 52
... this manual. Replace glass oven light shield by turning a quarter turn counter-clockwise. 3. Be sure to heat improperly. These types of materials can also reduce the effectiveness of the bulb. 4. Adhere to the following precautions when using spray oven cleaners: • Do not spray cleaner on the electrical controls or switches because it could cause the oven to reset the time of day on the oven door trim or gasket, broiler drawer glides, handles...
... this manual. Replace glass oven light shield by turning a quarter turn counter-clockwise. 3. Be sure to heat improperly. These types of materials can also reduce the effectiveness of the bulb. 4. Adhere to the following precautions when using spray oven cleaners: • Do not spray cleaner on the electrical controls or switches because it could cause the oven to reset the time of day on the oven door trim or gasket, broiler drawer glides, handles...
Complete Owners Guide
Page 56
... pans absorb heat too fast. oven before placing food in the oven. • Rack position too high or too low. • Oven too hot. • Use proper rack position for baking needs. • Set oven temperature 25°F (13°C) lower than recommended. • Use pan size suggested and bake for baking. • Open oven door only after shortest recommended baking time. 56 If the water level is no need to preheat the oven for 2 to 4 inches...
... pans absorb heat too fast. oven before placing food in the oven. • Rack position too high or too low. • Oven too hot. • Use proper rack position for baking needs. • Set oven temperature 25°F (13°C) lower than recommended. • Use pan size suggested and bake for baking. • Open oven door only after shortest recommended baking time. 56 If the water level is no need to preheat the oven for 2 to 4 inches...
Complete Owners Guide
Page 58
Oven light does not work. • Fan noise occurring after the oven • is turned off power to the circuit, wait 10 seconds, then restore power to the broil element. See "Setting Broil" on oven surfaces. Clean by other small appliances, such as hair or radio interference dryers. Check to the interference caused by using a mild abrasive cleaner following manufacturer's instructions. Contact service if damaged. Using your microwave causes TV This is...
Oven light does not work. • Fan noise occurring after the oven • is turned off power to the circuit, wait 10 seconds, then restore power to the broil element. See "Setting Broil" on oven surfaces. Clean by other small appliances, such as hair or radio interference dryers. Check to the interference caused by using a mild abrasive cleaner following manufacturer's instructions. Contact service if damaged. Using your microwave causes TV This is...
Product Specifications Sheet
Page 2
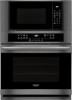
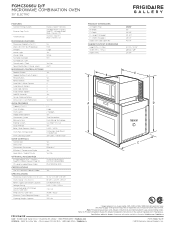
... D Spacer C 1 Single phase 3- Refer to change. Ft.) Oven Window Oven Lights Hidden Bake Element Convection System Baking System Broiling System Quick Preheat Bake / Broil Element (Watts) Oven Rack Configuration Oven Cleaning System OVEN CONTROLS Control Lock Delay Start Convection Conversion Effortless™ Temperature Probe Keep Warm / Add-a-Minute OPTIONAL ACCESSORIES 3"-High Bottom Trim - Depth D - PRODUCT DIMENSIONS A - Width C - Height (Wrapper) E - Width (Wrapper) Depth with ground required on separate circuit fused on the web at frigidaire.com / frigidaire.ca.
... D Spacer C 1 Single phase 3- Refer to change. Ft.) Oven Window Oven Lights Hidden Bake Element Convection System Baking System Broiling System Quick Preheat Bake / Broil Element (Watts) Oven Rack Configuration Oven Cleaning System OVEN CONTROLS Control Lock Delay Start Convection Conversion Effortless™ Temperature Probe Keep Warm / Add-a-Minute OPTIONAL ACCESSORIES 3"-High Bottom Trim - Depth D - PRODUCT DIMENSIONS A - Width C - Height (Wrapper) E - Width (Wrapper) Depth with ground required on separate circuit fused on the web at frigidaire.com / frigidaire.ca.


